WEB460 Advanced Web Application Development with Lab
Need Help in WEB 460 C# Labs and Course Project?
We can help you if you are having difficulty with your WEB460 Course. Just email your assignments at support@assignmentcache.com.
We provide help for students all over the world.
7 Item(s)
Grid List
-
WEB460 Lab 1 of 7: Basic ASP Page and Cross-Page Posting
Regular Price: $12.00
Special Price $10.00
WEB460 Lab 1 of 7: Basic ASP Page and Cross-Page Posting
Scenario/Summary
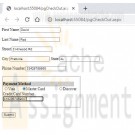
In this week's lab assignment, we'll be developing credit card information checkout pages of an online book store. Such pages are necessary in any developed e-commerce application. In these pages, users are required to enter information related to their payment and shipping options.
We will develop two pages. On the first page, the user provides personal, payment, and shipping information for the order submitted. The second page summarizes the user's input and requires the user to confirm.Learning Objectives
Create an ASP.NET web project in Visual Studio 2010 or Visual Studio 2012.
Create and design ASP.Net web forms.
Cross-page posting in ASP.NET
How to use ASP.NET web server controls (DropDownList, TextBox, RadioButtonList, Label, and Button)
Exception handlingDeliverables
A zip archive of the ASP.NET Application implementing cross-page posting consisting of the following files:
– pgCheckOut.aspx web form with all server controls defined in requirements
– pgCheckOut.aspx.cs with code for cross-page posting
– pgConfirm.aspx web form with all server controls defined in requirements
– pgConfirm.aspx.cs with code for cross-page posting and exception handlingLab Steps
STEP A: Create a New Web Site Project
1. Go to the File menu and select New. From the New sub-menu, select Web Site to create a new Web Site project.
2. In the New Web Site dialog box, select the language you want to use in developing your web application; for our applications choose Visual C#.
3. Select ASP.NET Empty Web Site to create a project with only a web.config file.
4. Then specify the location of your project or website. Note that in ASP.NET, you have the option of creating your website in different locations, whether in any folder on your local file system, on the local IIS server you have on your computer, or on a remote HTTP or FTP server. ASP.NET has an integrated IIS server with the Visual Studio .Net IDE.
I recommend using the default Web Sites folder in the Visual Studio project folder. This allows the development of web applications without the hassle of setting up an IIS server on your computer. If you don't have IIS server installed on your computer, this is the best option to select for your lab.STEP B: Create and Design a New Web Form, pgCheckOut.aspx
1. Add the first web form to the web application by right-clicking on the project name and selecting Add New Item. Name the web form pgCheckOut.aspx.
2. Add the controls in the table below to the form. If desired, you can visually layout the form using HTML and CSS after adding the controls.
The first column in the table shows the data the control represents or their label, the second column is the type of control, and the last column is the ID or name of the actual control. If the Visual Studio web form Toolbox Pane is not displayed, you can show it by going to the View menu and selecting Toolbox. All of these controls can be found in the Toolbox Pane.
Data or Label Control Type Control ID or Name
First Name TextBox txtFirstName
Last Name TextBox txtLastName
Street TextBox txtStreet
City TextBox txtCity
State TextBox txtState
Payment Method RadioButtonList rblCCType
Credit Card Number TextBox txtCCNumber
Submit Button btnSubmit
Phone Number TextBox txtPhone3. When the user clicks on the submit button, pgConfirm.aspx should be displayed. This is done with cross-page posting. To implement this, set the PostBackUrl property of the Submit button to ~/pgConfirm.aspx. This will cause the pgCheckOut.aspx to post user requests to the web page pgConfirm.aspx, which we will create shortly.
STEP C: Add Code to the pgCheckOut.aspx Form (to Read User Input and Implement Cross-page Posting)
Implement public methods in the pgCheckOut.aspx.cs code file to expose the form's control values to other pages. The code below is an example of how to retrieve the value of the txtFirstName and txtLastName.
Sample Method to Get Control Values
public TextBox FirstName
{ get { return txtFirstName; } }
public TextBox LastName
{ get { return txtLastName; } }STEP D: Create and Design Another Web Form, pgConfirm.aspx
1. Add the second web form to your web application. Name the form pgConfirm.aspx.
2. Add label controls to display the user input values for the name, address, credit card type, and credit card number.
This allows the user to review and confirm order information before final submission. Add the controls in the table below to the form. The application will fill in the text displayed by the labels, so you don't need to. You should provide additional labels that describe these values for the user.
Control Type Control ID or Name Control Purpose
Label lblName Holds the concatenation string of first name and last name entered in pgChekout.aspx
Label lblAddress Holds the concatenation of all address-related fields user input in pgCheckOut.aspx
Label lblCCType Displays the credit card type the user selected in pgCheckOut.aspx
Label lblCCNumber Displays the credit card number the user entered in pgCheckOut.aspx
Label lblStatus Displays the message of any run time exception that might happen during run time
Button btnSubmit When the user clicks on the submit order button, this displays a note to the user that his or her order was submitted successfully. You should use the status label to display the message.STEP E: Add Code to the pgConfirm.aspx Form (to Allow User to Verify Order Input and Submit for Final Processing)
1. In the pgConfirm.aspx page, add the following code to the PreviousPageType directive to the pgConfirm.aspx file, and set it to the pgCheckOut.aspx.
<%@ Page Language="C#" AutoEventWireup=“true" CodeFile="pgConfirm.aspx.cs" Inherits="pgConfirm" %>
<%@ PreviousPageType VirtualPath="~/pgCheckOut.aspx" %>
2. Next, in the Page_Load() event of the pgConfirm.aspx.cs code page, check whether there is any cross-page posting by checking whether there is a cross-page postback, and set the values of the label controls with the corresponding user input values from the previous page as shown below. Be sure to implement for all controls on the form.
3. Enclose your code in a try/catch block to handle any run time exception thrown by the application for any reason, as shown below.
4. Add code to have lblStatus display the message of any thrown exception. Don't forget to add comments explaining what each line of code does.
pgConfirm Page_Load method
protected void Page_Load(object sender, EventArgs e)
{
try
{
if (PreviousPage.IsCrossPagePostBack)
{
lblName.Text = PreviousPage.FirstName.Text + " " + PreviousPage.LastName.Text;
// Your code to set other form labels goes here
}
}
catch (Exception error )
{
lblStatus.Text = error.Message;
}
}STEP F: Compile, Test, Save, and Submit Your Project
Learn More
1. Save your work!
2. Test it! Make changes as appropriate until it works.
3. Remember to add comments for each step being performed.
4. Please zip and submit the entire web project folder. -
WEB460 Lab 2 of 7: Creating and Using Master Pages
Regular Price: $12.00
Special Price $10.00
WEB460 Lab 2 of 7: Creating and Using Master Pages
Scenario/Summary
In this Lab, you create a master page for our bookstore website and then modify the checkout and order confirm pages from last week's lab to use the master page.Deliverables
The deliverables for this week's lab are the following:
pgCheckOut.aspx
pgCheckOut.aspx.cs
pgConfirm.aspx
pgConfirm.aspx.cs
Web460Store.master
Web460Store.master.cs
web.config
Please zip and submit the entire web project folder.Lab Steps
STEP A: Create a New Web Site Project
In this step, we set up a new project and copy the files from the Week 1 Lab into it. This allows us to begin our lab this week where we left off last week and to add common elements to both pages.
1. To start this week's project, create a new Empty Web Application project.
2. Copy the four files from last week's Lab into the folder for this new project. Be careful not to move the files. We want to work on a copy of last week's lab and leave the original untouched. The website folder should have the following files:
pgCheckOut.aspx
pgCheckOut.aspx.cs
pgConfirm.aspx
pgConfirm.aspx.cs
web.config
web.Debug.config ( optional: it depends on the version of Visual Studio you are using)
3. Set pgCheckOut.aspx as the start page and test your application. It should perform just as it did last week.STEP B: Create a Master Page
In this step, we add a master page to our project.
1. Right-click on the name of your project and select Add => Add New Item ...
2. Select Master Page as the type of item to add. Be sure that Place code in separate file. is checked.
3. Name the master page Web460Store.master and click OK to create the maser page for our site.STEP C: Design Your Master Page
Our master page contains elements that we want common to all pages on our website, such as the header, the footer, and two side-by-side content areas. We mark areas that content pages can fill with the ContentPlaceHolder tag.
We also want a Label control that our content pages can modify to display messages directed to the user. Making the Label accessible to content pages requires editing the C# code for the master page, which we do in the next step.
1. View the source for Web460Store.master. We first set the title and a content area in the head of the master page. Make any changes necessary to the <head> tag so that it matches the code below:
<head runat="server">
<title>WEB460 Book Store</title>
<asp:ContentPlaceHolder id="HeadPlaceHolder" runat="server">
</asp:ContentPlaceHolder>
</head>
2. Next we create the page template in the <body> of the master page. We use a table to assist with the layout. The first row of the table is the header for our page, displaying the company name and motto. It also contains the Label we will use to send messages to the user. The second table row has two content areas side by side for the website pages to place content and additional controls. The last row of the table is the page footer.
Edit the <body> of your master page so that it looks like the following block of code:
<body>
<form id="form1" runat="server">
<table style="padding: 10px; border: 1px solid black;">
<tr style="background-color:lightcyan; text-align: center;">
<td colspan="2">
<!-- page header -->
<h1>WEB 460 Book Store</h1>
<h2>Providing you 100% more than 360 degrees</h2>
<!-- Label for content pages to display user message -->
<strong><span style="color:red;">
<asp:Label ID="lblUserFeedBack" Runat="server">Welcome Traveler!</asp:Label>
</span></strong>
</td>
</tr>
<tr style="vertical-align: top;">
<td>
<!-- Left content area -->
<asp:ContentPlaceHolder ID="ContentPlaceHolder1" Runat="server">
</asp:ContentPlaceHolder>
</td>
<td>
<!-- right content area -->
<asp:ContentPlaceHolder ID="ContentPlaceHolder2" Runat="server">
</asp:ContentPlaceHolder>
</td>
</tr>
<tr style="background-color:lightgrey; text-align: center;">
<td colspan="2">
<!-- page footer -->
Copyright DeVry University<br />
<strong>User's GUID:
<asp:Label ID="lblGUID" Runat="server" /></strong>
</td>
</tr>
</table>
</form>
</body>STEP D: Expose the Label Control to Content Pages
In this step, we modify the C# code file for our master page, Web460Store.master.cs, to modify text displayed on the Label controls.
1. We need to establish set properties for the Label lblUserFeedback so that our content pages can change the message displayed to the user. Add the following method to the class Web460Store:
public Label UserFeedBack
{
get { return lblUserFeedBack; }
set { lblUserFeedBack = value; }
}
2. To provide a tool we can use for security in the future, we want to display the user GUID (globally unique identifier) for this page call. We only want to generate the GUID the first time the page is loaded (not on postback). We can accomplish this by adding the following code to the master page's Page_Load method:
if (!Page.IsPostBack)
{
lblGUID.Text = System.Guid.NewGuid().ToString();
}STEP E: Modify pgCheckOut to Use Our Master Page
In this step, we modify pgCheckOut.aspx to use the master page we created earlier. Since the master page contains <head>, <body>, and <form> tags, we do not need those in our content page, so we will be removing them as part of this step. We also must map the content on this page to the ContentPlaceHolder controls on the master page.
1. We begin by adding MasterPageFile="~/Web460Store.master" to the page directive to indicate that this page references our master page:
<%@ Page Language="C#" AutoEventWireup="true" MasterPageFile="~/Web460Store.master" CodeFile="pgCheckOut.aspx.cs" Inherits="pgCheckOut" %>
2. So we have access controls the master page has exposed to us, such as the Label for user feedback. We need to add the following directive next:
<%@ MasterType VirtualPath ="~/Web460Store.master" %>
3. We can then remove the <!DOCTYPE>, <html>, and <head> tags because we will be using the ones defined in the master page. Also remove the <body> and <form> tags, but leave the content.
4. Next we map the body content to the two ContentPlaceHolder controls on the master page. The customer name, address, and phone number should be in the left content area (ContentPlaceHolder1) and the credit card information in the right content area ( ContentPlaceholder2 ). We bracket the content for each with an ASP.NET Content control.
5. Before the Label control for the customer's first name, place the line:
<asp:Content ID="ContentArea1" ContentPlaceHolderID="ContentPlaceHolder1" Runat="Server">
6. Just after the line for the phone number TextBox control, close the first content area with the line:
</asp:Content>
7. On the next line, we begin the second content area the same way as the first begins:
<asp:Content ID="ContentArea2" ContentPlaceHolderID="ContentPlaceHolder2" Runat="Server">
8. We close the second content area at the end of the file, after the submit button:
</asp:Content>
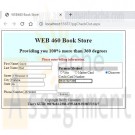
At this point, the pgCheckOut.aspx design view should look similar to the following:STEP F: Update the Master Page User Feedback Label
On pgCheckOut.aspx we want the user to enter billing information. We can modify the master page Label lblUserFeedback by updating the master page's UserFeedBack property we setup earlier. So this happens when the page is loaded, making the Page_Load method in pgCheckOut.aspx.cs look like this:
protected void Page_Load(object sender, EventArgs e)
{
Master.UserFeedBack.Text = "Please enter billing information.";
}STEP G: Modify pgConfirm to Use the Site Master Page
In this step, we transform the confirmation page pgConfirm to use the website master page in a similar way to how we modified pgCheckOut.
First, modify pgConfirm.aspx:
1. Remove unneeded HTML tags and modify the page directives as necessary.
2. The left content area should contain the customer's name and address.
3. The right content area should contain the customer credit card information and the Submit Order button.
4. Remove the status label lblStatus because we will use the master page's user feedback Label.
Then, because we removed lblStatus, we need to modify pgConfirm.aspx.cs:
5. When the page first loads, it should display the user feedback message:
Please confirm your billing information.
6. After the user presses the Submit Order button, the user feedback should be:
Your order has been submitted for processing.
7. If there is an exception thrown by PreviousPage.IsCrossPagePostBack, it should display the message:
Sorry, there was an error processing your request.
When the application is rTuonpning, pgConfirm should appear similar to the following:STEP H: Finalize Your Lab
Learn More
1. Save your work!
2. Test it!
3. Make changes as appropriate until it works.
4. Remember to add comments for each step being performed. -

WEB460 Lab 3 of 7: Adding Data Layer Functionality
Regular Price: $12.00
Special Price $10.00
WEB460 Lab 3 of 7: Adding Data Layer Functionality
Scenario/Summary
For our Lab this week, you will connect to a Microsoft Access database to store, update, and retrieve customer information. Here is an overview of the lab:
Step A: Create a New Web Site Project
Copy files from last week's Lab.
Step B: Add the ClearForm Functionality to pgCheckOut
Add a button and code to clear form fields.
Step C: Create a DataSet and Link It to an Access Database
This step also creates a TableAdapter that can be used in our code.
Step D: Create the clsDataLayer Class to Represent Our Application's Data Layer
Add a data field for the connection and modify the constructor.
Step E: Implement the FindCustomer Functionailty
This and the following two steps require editing three different files and then testing your changes.
Be careful to add the lab code to the correct file each time.
Generally, the parts of these steps are as follows:
– Add a method to the clsDataLayer class.
– Add a click method to pgCheckOut.aspx.cs that calls the method in clsDataLayer.
– Add a button to pgCheckOut.aspx that calls the click method.
Step F: Implement the UpdateCustomer Functionailty
Step G: Implement the InsertCustomer Functionality
Step H: Test and Finalize the Lab
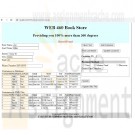
When you have completed and tested the lab, the web form pgCheckOut should look similar to this image:Deliverables
A zip archive of the ASP.NET Web Application directory. It should contain the following files in
addition to your database and dataset files:
– pgCheckOut.aspx **
– pgCheckOut.aspx.cs **
– pgConfirm.aspx
– pgConfirm.aspx.cs
– Web460Store.master
– Web460Store.master.cs
– clsDataLayer.cs **
The files with ** are the ones that should have been modified for this lab.Lab Steps
STEP A: Create a New Web Site Project
1. Create a new Empty Web Site project.
2. Copy the six files from last week's Lab into the folder for this new project. Be careful not to move the files. We want to work on a copy of last week's lab and leave the original untouched. The website folder should have the following files:
pgCheckOut.aspx
pgCheckOut.aspx.cs
pgConfirm.aspx
pgConfirm.aspx.cs
Web460Store.master
Web460Store.master.cs
web.config
web.Debug.config ( optional: depends on the version of Visual Studio you are using)
3. Set pgCheckOut.aspx as the start page and test your application. It should perform just as it did last week.STEP B: Add the ClearForm Functionality to pgCheckOut
Because we will be adding, retrieving, and updating customer information, we should give the user the ability to easily clear the form fields so that information from one customer is not mixed with that of another.
1. Add a private method to pgCheckOut.aspx.cs that examines each control on the page. If the control is a Textbox, DropDown list, or RadioButton, the control is cleared. If it is a panel or other container, the method calls itself recursively, passing the controls on that container so that they may be cleared.
ClearInputs Method in pgCheckOut.aspx.cs
private void ClearInputs(ControlCollection ctrls)
{
foreach (Control ctrl in ctrls)
{
if (ctrl is TextBox)
((TextBox)ctrl).Text = string.Empty;
else if (ctrl is DropDownList)
((DropDownList)ctrl).ClearSelection();
else if (ctrl is RadioButton)
((RadioButton)ctrl).Checked = false;
else if (ctrl is RadioButtonList)
((RadioButtonList)ctrl).ClearSelection();
else
ClearInputs(ctrl.Controls);
}
}
2. Next, we add a click method that will be called by a form button. The form button cannot call the recursive method directly because click methods require a different set of parameters. Because of this, we need the private helper method ClearInputs.
btnClearForm_Click in pgCheckOut.aspx.cs
public void btnClearForm_Click(object sender, EventArgs e)
{
ClearInputs(Page.Controls);
}
3. Add a button to pgCheckOut.aspx that calls the Clear Form click handler above. The button should have the name and ID btnClearForm and the text "Clear Form". You can use the image in the Lab Summary section above for guidance on placing the button.
4. Test your work. You should be able to enter data in the form fields on the left and when the Clear Form button is clicked, all form fields should be cleared.STEP C: Create a DataSet and Link it to Microsoft Access Database
These steps create and add a DataSet called dsAccounts to your project. Carefully read through these instructions as you step through the creation of the DataSet. If you cannot connect to the database when these steps are complete, delete the DataSet and recreate it from scratch to make sure all parts are initialized properly.
1. Download and copy the Microsoft Access database, Acounts.mdb, found in the Files section of the Course Menu to your website folder. Note that you can have the database at any location on your computer, but your code should be adjusted accordingly. It is best to have it in the top level of your website or in the App_Data folder. In Steps E, F, and G below, you will need to adjust your code to accurately reflect the path to where your database is stored.
If you are using the DeVry FTP site websol, you must place the database into the FPDB folder in your account top-level directory. It is recommended to use your local computer instead of the websol FTP server.
2. From the Solution Explorer pane, right click on the App_Code folder and select the Add New Item menu option. In the Add New Item dialog box, select DataSet and type the dsAccounts as the name of the DataSet. When prompted, allow Visual Studio to store the DataSet in the App_Code folder.
3. After creating dsAccounts, double-click TableAdapter in the Dataset Toolbox to configure the connection to the database using the TableAdapter Configuration wizard. The Dataset Toolbox panel is displayed by selecting dsAccounts.xsd in the Solution Explorer panel and then clicking the Toolbox link in the main window. You may also select Toolbox from the View menu.
4. On the first window, click the New Connection button.
5. In the Choose Data Source window, select the file Microsoft Access Database and click Continue.
6. In the Add Connection window, click the Browse button and select the Microsoft Access database that you downloaded from the Files section of the Course Menu named Accounts.mdb.
7. Click Test Connection to ensure that Visual Studio can access and connect to the database.
8. Click OK, and then click Next on the TableAdapter Wizard. If you expand the connection string + symbol, you can view the connection string used to access the database. This should closely match what we will use in our application.
9. Click Next again to save the connection string to a file.
10. On the Wizard's Choose a Command Type screen, select SQL Statements and then click Next.
11. We now enter the default SQL query for this DataSet connection. In the textbox on this screen, enter the following SQL SELECT statement whose result will be used to populate the DataSet:
SELECT * FROM tblCustomers
12. Click Finish to exit the TableAdapter wizard.STEP D: Create the clsDataLayer Class to Represent Our Application's Data Layer
1. Right-click on the project name in the Solution Explorer pane and select Add. From the submenu, select New Item. From the Add Dialog Box, add a Class called clsDataLayer.
The code file (clsDataLayer.cs) will automatically be placed in the App_Code folder in your website directory.
2. Add a data field to our class that represents the database connection and adjust the constructor to initialize it.
clsDataLayer Data Field and Constructor
OleDbConnection dbConnection;
Be sure to place this code in the correct location in the class file. Verify that your code does not have any syntax errors before continuing.
public clsDataLayer(string Path)
{
dbConnection = new OleDbConnection("PROVIDER=Microsoft.Jet.OLEDB.4.0;Data Source=" + Path);
}STEP E: Implement the FindCustomer Functionality Editing Multiple Files
This step, Step F, and Step G require you to add code to three different files. Carefully follow the directions to ensure that you add code to the correct files. Test your code after each step before moving to the next. You may want to make a copy of the following files before starting this step so that if you make a significant error, you can return to this point:
clsDataLayer.cs
pgCheckOut.aspx.cs
pgCheckOut.aspx
1. In the clsDataLayer class, create a method, called FindCustomer, that accepts LastName as a parameter. This method finds the all occurrences of customers with LastName in the database and places the results in the DataSet object mystoreDataSet, which is an instance of our dsAccounts DataSet.
You can add the following code to the class clsDataLayer. Be sure to replace the lines in the code below that read "Add your comments here with your own comments
explaining what the code does.
FindCustomer Method in clsDataLayer.cs
// Add your comments here
public dsAccounts FindCustomer(string LastName)
{
//Add your comments here
string sqlStmt = "select * from tblCustomers where LastName like '" + LastName + "'";
OleDbDataAdapter sqlDataAdapter = new OleDbDataAdapter(sqlStmt, dbConnection);
//Add your comments here
dsAccounts myStoreDataSet = new dsAccounts();
sqlDataAdapter.Fill(myStoreDataSet.tblCustomers);
// Add your comments here
return myStoreDataSet;
}
When adding this database code to clsDataLayer, do not forget to add the two Using directives in C# that must be placed at the start of your code that ensure that the compiler has the definition of the Data and OleDataAdapter objects necessary for the data layer. (Your challenge is to research and discover what they are.)
2. In pgCheckOut.aspx.cs, create the click method that calls the Data Layer method FindCustomer. This click method is invoked when the user clicks the Find Last Name button we add next. The following method calls FindCustomer and then fills the form fields with results from the Data Set. Be sure that the tempPath variable accurately reflects the path to where you have saved the Access database Accounts.mdb.
btnFindLastName_Click Method in pgCheckOut.aspx.cs
// Add your comments here
protected void btnFindLastName_Click(object sender, EventArgs e)
{
// Add your comments here
dsAccounts dsFindLastName;
// Add your comments here
// Depending on where you placed your Access database,
// one of the following lines may work better:
// tempPath = Server.MapPath("Accounts.mdb")
// tempPath = Server.MapPath("~/FPDB/Accounts.mdb")
string tempPath = Server.MapPath("~/App_Data/Accounts.mdb");
clsDataLayer dataLayerObj = new clsDataLayer(tempPath);
try
{
// Add your comments here
dsFindLastName = dataLayerObj.FindCustomer(txtLastName.Text);
// Add your comments here
if (dsFindLastName.tblCustomers.Rows.Count > 0)
{
// Add your comments here
txtFirstName.Text = dsFindLastName.tblCustomers[0].FirstName;
txtLastName.Text = dsFindLastName.tblCustomers[0].LastName;
txtStreet.Text = dsFindLastName.tblCustomers[0].Street;
txtCity.Text = dsFindLastName.tblCustomers[0].City;
txtState.Text = dsFindLastName.tblCustomers[0].State;
txtPhone.Text = dsFindLastName.tblCustomers[0].PhoneNumber;
customerID.Text = dsFindLastName.tblCustomers[0].CustomerID.ToString();
Master.UserFeedBack.Text = "Record Found";
}
else
{
// Add your comments here
Master.UserFeedBack.Text = "No records were found!";
}
}
catch (Exception error)
{
// Add your comments here
string message = "Something went wrong - ";
Master.UserFeedBack.Text = message + error.Message;
}
}
3. Add a button to pgCheckOut.aspx that calls btnFindLastName_Click for its click event. The button should have the name and ID btnFindLastName and the text Find Last Name. You can use the image in the Lab Summary section above for guidance on placing the button.
4. In Step F, when we update customer information, we must ensure that we update the correct customer. To do this, we use a field that uniquely identifies each row or customer in the table: the CustomerID field. We need to add this to pgCheckOut.aspx.
Add two labels to pgCheckOut.aspx with the names and IDs, lblCustID and customerID.
The text for lblCustID should be "Customer ID:".
The text for the label customerID can be left blank as the application will fill in that text.
5. Test your work. You should be able to enter a name in the Last Name field on the form and when the Find Last Name button is clicked, other form fields should be filled in with data on that customer. If the customer is not found, the appropriate message should be displayed to the user. The Access database comes with data already entered on four customers for testing: Smith, Doe, Rice, and Sue.STEP F: Implement UpdateCustomer Functionality
1. In the clsDataLayer class, create a method called UpdateCustomer that accepts the customer's name and address as parameters. This method finds the customer whose CustomerID field matches the parameter customerID and updates the field values to match the arguments sent when it was called.
You can add the following code to the class clsDataLayer. Be sure to replace the lines in the code below that read "Add your comments here with your own comments explaining what the code does.
UpdateCustomer Method in clsDataLayer.cs
// Add your comments here
public void UpdateCustomer(string firstName, string lastName,
string street, string city,
string state, string phoneNumber, int customerID)
{
// Add your comments here
dbConnection.Open();
// Add your comments here
string sqlStmt = "UPDATE tblCustomers SET FirstName = @first, " +
"LastName = @last, " +
"Street = @street, " +
"City = @city, " +
"State = @state, " +
"PhoneNumber = @phone " +
"WHERE (tblCustomers.CustomerID = @id)";
// Add your comments here
OleDbCommand dbCommand = new OleDbCommand(sqlStmt, dbConnection);
// Add your comments here
OleDbParameter param = new OleDbParameter("@first", firstName);
dbCommand.Parameters.Add(param);
dbCommand.Parameters.Add(new OleDbParameter("@last", lastName));
dbCommand.Parameters.Add(new OleDbParameter("@street", street));
dbCommand.Parameters.Add(new OleDbParameter("@city", city));
dbCommand.Parameters.Add(new OleDbParameter("@state", state));
dbCommand.Parameters.Add(new OleDbParameter("@phone", phoneNumber));
dbCommand.Parameters.Add(new OleDbParameter("@id", customerID));
//Add your comments here
dbCommand.ExecuteNonQuery();
//Add your comments here
dbConnection.Close();
}
2. In pgCheckOut.aspx.cs, create the click method that calls the Data Layer method UpdateCustomer. This click method is invoked when the user clicks the Update
Customer button we add next. The following method calls UpdateCustomer, passing the form field values as arguments.
Be sure that the tempPath variable accurately reflects the path to where you have saved the Access database Accounts.mdb.
btnUpdate_Click Method in pgCheckOut.aspx.cs
protected void btnUpdate_Click(object sender, EventArgs e)
{
// Add your comments here
bool customerUpdateError = false;
// Add your comments here
// Depending on where you placed your Access database,
// one of the following lines may work better:
// tempPath = Server.MapPath("Accounts.mdb")
// tempPath = Server.MapPath("~/FPDB/Accounts.mdb")
string tempPath = Server.MapPath("~/App_Data/Accounts.mdb");
clsDataLayer myDataLayer = new clsDataLayer(tempPath);
// Add your comments here
try
{
myDataLayer.UpdateCustomer(txtFirstName.Text, txtLastName.Text,
txtStreet.Text, txtCity.Text,
txtState.Text, txtPhone.Text, Convert.ToInt32(customerID.Text));
}
catch (Exception error)
{
customerUpdateError = true;
string message = "Error updating customer, please check form data. ";
Master.UserFeedBack.Text = message + error.Message;
}
if (!customerUpdateError)
{
ClearInputs(Page.Controls);
Master.UserFeedBack.Text = "Customer Updated Successfully.";
}
}
3. Add a button to pgCheckOut.aspx that calls btnUpdateCustomer_Click for its click event. The button should have the name and ID btnUpdateCustomer and the text
Update Customer. You can use the image in the Lab Summary section above for guidance on placing the button.
4. Test your work. You should be able to enter a name in the Last Name field on the form and when the Find Last Name button is clicked, other form fields should be filled in with data on that customer. If the customer is not found, the appropriate message should be displayed to the user.
Once a customer has been retrieved (found) in the database, you can update the customer's information and click the Update Customer button. If the application is working correctly, the updated information on the customer will be retrieved from the database the next time you find the customer.STEP G: Implement InsertCustomer Functionality
1. In the clsDataLayer class, create a method called InsertCustomer that accepts the customer's name and address as parameters. This method creates a new customer in the database with the data passed as arguments to the method.
You can add the following code to the class clsDataLayer. Be sure to replace the lines in the code below that read Add your comments here with your own comments explaining what the code does.
InsertCustomer Method in clsDataLayer.cs
// Add your comments here
public void InsertCustomer(string firstName, string lastName,
string street, string city,
string state, string phoneNumber)
{
// Add your comments here
dbConnection.Open();
// Add your comments here
string sqlStmt = "INSERT INTO tblCustomers (FirstName, LastName, Street, City,
State, PhoneNumber) ";
sqlStmt += "VALUES (@first, @last, @street, @city, @state, @phone)";
// Add your comments here
OleDbCommand dbCommand = new OleDbCommand(sqlStmt, dbConnection);
// Add your comments here
OleDbParameter param = new OleDbParameter("@first", firstName);
dbCommand.Parameters.Add(param);
dbCommand.Parameters.Add(new OleDbParameter("@last", lastName));
dbCommand.Parameters.Add(new OleDbParameter("@street", street));
dbCommand.Parameters.Add(new OleDbParameter("@city", city));
dbCommand.Parameters.Add(new OleDbParameter("@state", state));
dbCommand.Parameters.Add(new OleDbParameter("@phone", phoneNumber));
//Add your comments here
dbCommand.ExecuteNonQuery();
//Add your comments here
dbConnection.Close();
}
2. In pgCheckOut.aspx.cs, create the click method that calls the Data Layer method InsertCustomer. This click method is invoked when the user clicks the Add Customer button we add next. The following method calls AddCustomer, passing the form field values as arguments, and then clears the form to await information the user enters on the next customer. Be sure that the tempPath variable accurately reflects the path to where you have saved the Access database Accounts.mdb.
btnAdd_Click Method in pgCheckOut.aspx.cs
// Add your comments here
protected void btnAdd_Click(object sender, EventArgs e)
{
// Add your comments here
bool customerAddError = false;
// Add your comments here
// Depending on where you placed your Access database,
// one of the following lines may work better:
// tempPath = Server.MapPath("Accounts.mdb")
// tempPath = Server.MapPath("~/FPDB/Accounts.mdb")
string tempPath = Server.MapPath("~/App_Data/Accounts.mdb");
clsDataLayer myDataLayer = new clsDataLayer(tempPath);
// Add your comments here
try
{
// Add your comments here
myDataLayer.InsertCustomer(txtFirstName.Text, txtLastName.Text,
txtStreet.Text, txtCity.Text,
txtState.Text, txtPhone.Text);
}
catch (Exception error)
{
// Add your comments here
customerAddError = true;
string message = "Error adding customer, please check form data. ";
Master.UserFeedBack.Text = message + error.Message;
}
// Add your comments here
if (!customerAddError)
{
ClearInputs(Page.Controls);
Master.UserFeedBack.Text = "Customer Added Successfully.";
}
}
3. Add a button to pgCheckOut.aspx that calls btnAddCustomer_Click for its click event. The button should have the name and ID btnAddCustomer and the text Add Customer. You can use the image in the Lab Summary section above for guidance on placing the button.
4. Test your work You should be able to enter a customer's name and address in the appropriate fields on the form and when the Add Customer button is clicked, a record should be added to the database for the customer.
You should be able to view the record directly in the database or by finding the customer using the Find Last Name functionality of the application.STEP H: Test and Finalize the Lab
Learn More
1. Save your work!
2. Test it! Check the Clear, Find, Update, and Add capabilities. Until you add more of your own, the last names in the database that you can search for in this lab are Smith, Doe, Rice, and Sue.
3. Make changes as appropriate until it works.
4. Remember to add comments for each step being performed.
5. Please zip and submit the entire web project folder. -
WEB460 Lab 4 of 7: Create a Business Layer Class and Use an XML File
Regular Price: $15.00
Special Price $12.00
WEB460 Lab 4 of 7: Create a Business Layer Class and Use an XML File
Scenario/Summary
This week, we add the business layer to our application. This layer handles business rules and data validation based on those rules. It also handles communication with external websites and applications, so this layer is where we implement creating, reading, and writing an XML file for data transfer.
If you haven't noticed, pgCheckOut.aspx.cs has become fairly large, making it difficult to maintain. The reason for this is that we have the pgCheckOut class doing much of the work that belongs in the business layer and data layer. Next week, we deal with this situation and refactor our code to better distribute the workload among the classes in our application.
Refactoring does not change the external functionality of software, but it changes the internal structure by reorganizing it. After refactoring our application, it should look the same to users but execute more efficiently and be easier to maintain. More on this next week. For now, let's add some GridView controls and XML interaction.Here is an overview of the steps in this lab:
Step A: Set up a new website with a copy of the Week 3 Lab.
Step B: In the data layer, fill a DataSet with data on all the customers. We'll later bind this DataSet to a GridView.
Step C: Add control to pgCheckOUt.aspx. We will add two GridViews and two labels for the GridViews and a Button to update an XML file.
Step D: Bind one of the GridViews to the DataSet listing all customers in the database. We have it automatically update when the page is loaded and when customers are updated or added.
Step F: We build our business layer and have it read from and write to the XML file.
Step G: We bind the second GridView in pgCheckOut.aspx to the parsed data in the XML file and connect the Click event of btnUpdateXML to a method that updates the XML file.
This diagram shows the major components we will be working with in this lab and how they interact.
We have a lot to accomplish, so let's get started!Lab Steps
STEP A: Set Up a New Web Site
1. Create a new Empty Web Site project.
2. Copy all the files from last week's Lab into the website folder for this week.
3. Test that your application functions and runs the same as it did last week.STEP B: In the Data Layer, Fill a DataSet With all Customers
In our previous lab, we filled a DataSet with data on a single customer from the database. In this lab, we want to show the user a list of all customers, so we need to add a method to our data layer that fetches all the customers and fills a DataSet with this list.
In clsDataLayer.cs, add the following code for the GetAllCustomers method:
GetAllCustomers Method in clsDataLayer.cs
public dsAccounts GetAllCustomers()
{
//Add your comments here
OleDbDataAdapter sqlDataAdapter = new OleDbDataAdapter ( "select * from tblCustomers;", dbConnection );
//Add your comments here
dsAccounts myStoreDataSet = new dsAccounts();
sqlDataAdapter.Fill(myStoreDataSet.blCustomers);
// Add your comments here
return myStoreDataSet;
}STEP C: Add Controls to pgCheckOut.aspx
In this step, we add two Labels, two GridViews, and a Button to pgCheckOut.aspx. One GridView will be bound to the database and the other to an XML file. The labels will label the GridView so that the user knows which each is. The Button is used to update the XML file after changes have been made to the database.
We do not bind the GridViews to a data source at this time! This will be done later in our C# code.
The first GridView, gvCustomerList, will be bound to a DataSet with records from the database.
The second GridView, gvXML, will be bound to a DataSet comprised of record from an XMLfile that we can use to transmit customer information to another application.
1. Add the two Label and GridView controls by adding the following statements after the lines for the Phone Number textbox on the left column of the web page:
<asp:Label ID="lblGVDataBase" runat="server" Text="Customers in Database:"></asp:Label><br/>
<asp:GridView ID="gvCustomerList" runat="server" Font-Size="9"></asp:GridView><br/>
<asp:Label ID="lblGVXML" runat="server" Text="Customers in XML File:"></asp:Label><br/>
<asp:GridView ID="gvXML" runat="server" Font-Size="9"></asp:GridView>
2. On the right column of the web page, add the following line to place a Button for updating the XML file below the Submit Order button:
<br/><br/>
<asp:Button ID="btnUpdateXML" runat="server" Text="Update XML File"/>
3.When you have completed this step, the design view of pgCheckOut.aspx should be similar to this image:STEP D: Bind the First GridView inpgCheckOut.aspx.cs
Now that we have a method in our data layer that returns all the customers in a DataSetobject, we can bind that DataSet to our GridView control.
1. The private method BindCustomerGridView calls the data layer to fetch a list of all customers and then binds that to the GridView. Additionally, it stores the DataSet in the cache. Later, we'll use the cache to update the XML file.
Add the following to pgCheckOut.aspx.cs:
BindCustomerGridView Method for pgCheckOut.aspx.cs
private dsAccounts BindCustomerGridView()
{
// Add your comments here
// Depending on where you placed your Access database,
// one of the following lines may work better:
// tempPath = Server.MapPath("Accounts.mdb")
// tempPath = Server.MapPath("~/FPDB/Accounts.mdb")
string tempPath = Server.MapPath("~/App_Data/Accounts.mdb");
clsDataLayer myDataLayer=new clsDataLayer(tempPath);
// Add your comments here
dsAccounts customerListing=myDataLayer.GetAllCustomers();
// Add your comments here
gvCustomerList.DataSource=customerListing.tblCustomers;
// Add your comments here
gvCustomerList.DataBind();
Cache.Insert("CustomerDataSet",customerListing);
return customerListing;
}
2. We must now call this method so the GridView, gvCustomerList, is updated to reflect the customers in the database. There are three times we must call this method if we want the GridView to update without user interaction:
In the method Page_Load: When the page first loads, we perform the initial binding of the GridView.
In the method btnAdd_Click: After creating a new customer record, we ensure that it shows up in the GridView.
In the method btnUpdate_Click: After updating customer information, we ensure that the new information shows up in the GridView.
Add the following statements to the end of the Page_Load, btnUpdate_Click and btnAdd_Click methods in pgCheckOut.aspx.cs.
// Add your comments here
BindCustomerGridView();
3. Test your to code to ensure the gvCustomerList is properly bound and updated.STEP E: Implementing the Business Layer
The business layer is implemented in C# class clsBusinessLayer. For this lab, there are three methods and two data fields that we need to create in clsBusinessLayer. In our next lab, we will refactor our application and add more functionality to this class.
The business layer functionality we need in this lab is the ability to read and write the XML file customers.xml. This is handled in the business layer because it does not directly involve the database and is part of the communication our application does with other applications. The XML file we create can be read from the disk by another application on our server or transmitted to a remote application.
1. Add a new class to your application, name it clsBusinessLayer.cs, and add the statement:
using System.Data;
2. Add two data fields to your class.
dataPath is the path on the server to the App_Data directory or whichever directory the user wants the XML file stored. This will be passed as an argument to the clsBusinessLayer constructor and initialized there.
The data field myDataLayer represents an instance of the data layer. We use this for our database interaction. Like all data fields, it is initialized in the constructor.
Data Fields for the Class clsBusinessLayer
// Add your comments here
string dataPath;
// Add your comments here
clsDataLayer myDataLayer;
3. Our clsBusinessClass constructor serves to initialize all our data fields (a programming best practice).
Constructor for clsBusinessLayer
public clsBusinessLayer(string serverMappedPath)
{
// Add your comments here
dataPath = serverMappedPath;
myDataLayer = new clsDataLayer(dataPath + "Accounts.mdb");
}
4. The next functionality to add to our business layer is the ability to read (or get) the XML file with customer data ( customers.xml). This method creates a DataSet to hold the customer records parsed from the XML file. It then attempts to read the XML file. If the file is not found, we catch the exception and fix the situation by creating a fresh XML file. We can read the new file and place it in the DataSet object.
Add this code to clsBusinessLayer.cs:
GetCustomerXMLFile Method in clsBusinessLayer.cs
public DataSet GetCustomerXMLFile()
{
// Add your comments here
DataSet xmlDataSet = new DataSet();
try
{
// Add your comments here
xmlDataSet.ReadXml(dataPath+"customers.xml");
}catch(System.IO.FileNotFoundException error)
{
// Add your comments here
dsAccounts customerListing = myDataLayer.GetAllCustomers();
customerListing.tblCustomers.WriteXml(dataPath+"customers.xml");
xmlDataSet.ReadXml(dataPath+"customers.xml");
}
// Add your comments here
return xmlDataSet;
}
5. Our last task with clsBusinessLayer.cs is to add a function that writes the XML data file, customers.xml. To do this, we will read the current list of customers from the Cache object. If you remember, previously, we saved the updated list of customer to the cache as a way to save returning to the database to read customer data. We can read from the cache, which is a much quicker operation.
Add this code to clsBusinessLayer.cs:
WriteCustomerXMLFile Method in clsBusinessLayer.cs
public DataSet WriteCustomerXMLFile(System.Web.Caching.Cache appCache)
{
// Add your comments here
DataSet xmlDataSet = (DataSet) appCache["CustomerDataSet"];
// Add your comments here
xmlDataSet.WriteXml(dataPath+"customers.xml");
// Add your comments here
return xmlDataSet;
}
We'll be able to test this code after we complete the next step.STEP F: Calling the Business Layer and Binding aGridView
The last task we have is to bind the GridView, gvXML, to the data parsed from the XML file and update the XML file based on data stored in the Cache object.
1. Because our presentation layer class, pgCheckOut, will need to access the business layer frequently, let's create a data field of type clsBusinessLayer and initialize it in our Page_Load method. This activity is similar to how we handled the clsDataLayer object in our business layer class. Add the following data field to pgCheckOut.aspx.cs:
clsBusinessLayer myBusinessLayer;
Then in the Page_Load, add the following to initialize the data field:
//Add your comments here
// Ensure the argument to MapPath reflects the path
// To where the database is stored. This is also where the
// XML file will be saved. Don't forget the closing '/'
// If you are using Citrix, the directory should be ~/FPDB/
myBusinessLayer = new clsBusinessLayer(Server.MapPath("~/App_Data/"));
2.We can easily bind the GridView to the data in the XML file by asking the business layer to process the file and handle any errors. We can expect back a DataSet that webind to the GridView. Add the following code to pgCheckOut.aspx.cs:
BindXMLGridView Method in pgCheckOut.aspx.cs
public void BindXMLGridView()
{
// Add your comments here
gvXML.DataSource = myBusinessLayer.GetCustomerXMLFile();
gvXML.DataBind();
}
3. This method needs to be called when the page first loads so that gvXML displays data. Add the following statement to the end of the Page_Load method:
BindXMLGridView();
4. For this lab, we want to update gvXML manually (as opposed to automatically as we do with gvCustomerList). The following click method will be called from the Button btnUpdateXML. It updates the XML from the Cache object and then binds gvXML.
btnUpdateXML_Click Method in pgCheckOut.aspx.cs
public void btnUpdateXML_Click(object sender, EventArgs e)
{
// Add your comments here
gvXML.DataSource = myBusinessLayer.WriteCustomerXMLFile(Cache);
gvXML.DataBind();
}
5. Finally, we need to set the Click event for btnUpdateXML. In the ASP file pgCheckOut.aspx , add the following to the definition for btnUpdateXML :
OnClick="btnUpdateXML_Click"
6. At this point, you should be able to test the entire application's functionality.STEP G: Finalize the Lab.
Learn More
1. Save your work!
2. Test it! Make changes as appropriate until it works. Try updating or adding new records to the database.
3. Remember to add comments for each step being performed.
4. Please zip and submit the entire web project folder. -
WEB460 Lab 5 of 7: Refactoring and Security
Regular Price: $15.00
Special Price $12.00
WEB460 Lab 5 of 7: Refactoring and Security
Scenario/Summary
In this week's Lab, we refactor our web application and add a secure login feature.Part I: Refactoring
As applications grow and change with added features and fixed bugs, they can become unwieldy and very difficult to maintain. When an application is difficult to maintain, even a small change to the app can result in hard-to-find bugs. The original design of the application may no longer support the features and functionality present in the current application version.
The solution to this situation is refactoring the application code to better distribute the workload among the classes in the application. Refactoring does not change the external functionality of software; it changes the internal structure by reorganizing it. After refactoring our application, it should look the same to users but execute more efficiently and be easier to maintain.
pgCheckOut.aspx.cs has become fairly large, making it difficult to maintain. The reason for this is that we have the pgCheckOut class doing much of the work that belongs in the business layer and data layer. For this week, the goals of our refactoring are as follows.
1. Correctly distributing application functionality
The presentation layer (pgCheckOut) manages user interaction through the ASP form. It makes requests of the business layer for data to populate form fields, responds to button
presses, and sends form data to the business layer for processing.
The business layer (clsBusinessLayer) validates data, catches exceptions, and corrects them if possible. This layer handles communication between our application and others (through an XML file) and retrieves data from the data layer.
The data layer (clsDataLayer) interacts with database and responds to requests formthe business layer. When we are finished with our refactoring, pgCheckOut.aspx.cs should not need any knowledge or interaction with the data layer (clsDataLayer.cs)2.Replace repeated or duplicate code with methods to improve maintainability We want to replace code that is duplicated in several places with either a method when it is a sequence of statements, or a data field when it is a reused piece of data, such as the data directory's Server.MapPath. We already reduce duplication on our forms by using master pages. This step allows us to reduce duplication in our code.
Part II: Secure Login
Because our application manages customer information, we should provide a secure login so that only authorized users can view and manipulate customer information. Our secure login page accepts a username and password. If the same user fails to correctly enter his or her password three times, that user's account is locked and the person must contact the system admin to unlock it. If there is a total of six failed login attempts during the session, no matter the user, the application locks by hiding the login/submit button.Here is an outline of this lab:
PART 0: Prepare Your Project
Start your project as a copy of the Week 4 LabPART I: STEP A: Move the GetAllCustomers Functionality to the Business Layer
Add a method to clsBusinessLayer.cs and modify a method in pgCheckOut.aspx.cs.PART I: STEP B: Move Update and Insert Customer Functionality to the Business Layer
Add two methods to clsBusinessLayer.cs, add a new method to pgCheckOut.aspx.cs, and modify two other methods in pgCheckOut.aspx.cs.PART I: STEP C: Move Retrieving a Single Customer's Data to the Business Layer
Add a method to clsBusinessLayer.cs and modify a method in pgCheckOut.aspx.cs.PART II: STEP D: Data Layer Functionality: Validating and Locking Users
Add two methods to clsDataLayer.cs.Lab Steps
PART II: STEP E: Implement the Business Layer Functionality to Verify User Credentials
Add one method to clsBusinessLayer.cs.PART II: STEP F: Create the Login Form
Create a form, user the site master page and add controls.PART II: STEP G: Implement Login Functionality
Validate user credentials and redirect to pgCheckOut.aspx.PART II: STEP H: Harden Your Application (Optional)
Optionally add features to obscure passwords and prevent SQL injection.PART II: STEP I: Finalize the Lab
Deliverables
Please zip and submit the entire web project folder.PART 0: Prepare Your Project
To begin this week's lab, create an Empty Web Site and copy the files from the Week 4 Lab into your website folder.
Test your application. It should function the same as it did at the end of the Week 4 Lab.PART I: STEP A: Move the GetAllCustomersFunctionality to the Business Layer
We begin with an easy change. In pgCheckOut, the method BindCustomerGridView calls the clsDataLayer method GetAllCustomers. Calling this method should be done in the businesslayer (clsBusinessLayer) because the presentation layer (pgCheckOut) should not interact with the data layer. To fix this, we need to take two actions:
Create a method SelectAllCustomers in clsBusinessLayer that calls the clsDataLayer method GetAllCustomers.
Modify BindCustomerGridView to call SelectAllCustomers in clsBusinessLayer.1. In clsBusinessLayer, add the SelectAllCustomers method:
SelectAllCustomer Method in clsBusinessLayer.cs
public dsAccounts SelectAllCustomers(){
return myDataLayer.GetAllCustomers();
}2. In the BindCustomerGridView method in pgCheckOut.aspx.cs, change the line where GetAllCustomers is called to be:
dsAccounts customerListing = myBusinessLayer.SelectAllCustomers();3. Test your application. It should function as it did at the end of the Week 4 Lab.
PART I: STEP B: Move Update and Insert CustomerFunctionality to the Business Layer
The btnAdd_Click and btnUpdate_Click methods in pgCheckOut have very similar functionality. They pass data from the form to the data layer and then handle any exceptions and errors that may occur. After that, both methods clear the form, display a message to the user, and bind the GridView. There are several optimizations we can make with these:
- Move the calls to the data layer and all exception handling into the business layer(clsBusinessLayer) where they belong. The business layer should also handle any exceptions or errors that could arise, relieving the presentation layer of this responsibility.
- Have the business layer methods return a string that indicates success or failure and can be displayed to the user.
- Place the duplicate code that clears the form, binds the GridView, and sets the feedback message in a private method that can be called from the btnAdd_Click and btnUpdate_Click methods. This should make maintaining the application easier.1.Create the method UpdateCustomer in clsBusinessLayer.cs:
UpdateCustomer Method in clsBusinessLayer.cs
public string UpdateCustomer ( string firstName, string lastName, string street, string city, string state, string phoneNumber, int customerID)
{
// Add your comments here
string resultMessage = "Customer Updated Successfully.";
// Add your comments here
try
{
myDataLayer.UpdateCustomer(firstName,lastName,street,city,state,phoneNumber,customerID);
}
catch(Exception error)
{
resultMessage = "Error updating customer, please check form data. ";
resultMessage = resultMessage+error.Message;
}
return resultMessage;
}2. Create the method InsertCustomer in clsBusinessLayer.cs:
InsertCustomer Method in clsBusinessLayer.cs
public string InsertCustomer ( string firstName, string lastName, string street, string city, string state, string phoneNumber)
{
// Add your comments here
string resultMessage = "Customer Added Successfully.";
// Add your comments here
try
{
// Add your comments here
myDataLayer.InsertCustomer(firstName,lastName,street,city,state,phoneNumber);
}
catch(Exception error)
{
// Add your comments here
resultMessage = "Error adding customer, please check form data.";
resultMessage = resultMessage + error.Message;
}
return resultMessage;
}3. Create the private method updateForm in pgCheckOut.aspx.cs that clears the form, displays the message sent as a parameter, and binds the GridView:
updateForm Method in pgCheckOut.aspx.cs
private void updateForm(string results)
{
// Add your comments here
ClearInputs(Page.Controls);
// Add your comments here
Master.UserFeedBack.Text = results;
// Add your comments here
BindCustomerGridView();
}4. Modify btnUpdate_Click in pgCheckOut.aspx.cs so that it calls UpdateCustomer in clsBusinessLayer and updateForm. The final version of the method should appear as below:
Revised btnUpdate_Click Method in pgCheckOut.aspx.cs
protected void btnUpdate_Click( object sender, EventArgs e)
{
// Add your comments here
string results = myBusinessLayer.UpdateCustomer(txtFirstName.Text,txtLastName.Text,txtStreet.Text,txtCity.Text,txtState.Text,txtPhone.Text,Convert.ToInt32(customerID.Text));
// Add your comments here
updateForm(results);
}5. Modify btnAdd_Click in pgCheckOut.aspx.cs so that it calls InsertCustomer in clsBusinessLayer and updateForm. The final version of the method should appear as below:
Revised btnAdd_Click Method in pgCheckOut.aspx.cs
protected void btnAdd_Click (object sender,EventArgs e)
{
// Add your comments here
string results = myBusinessLayer.InsertCustomer(txtFirstName.Text,txtLastName.Text,txtStreet.Text,txtCity.Text,txtState.Text,txtPhone.Text);
// Add your comments here
updateForm(results);
}6. Test your application. It should function the same is it did at the end of the Week 4 Lab.
PART I: STEP C: Move Retrieving a Single Customer's Data to the Business Layer
In this step, we move the functionality that accesses the data layer and performs exception handling from pgCheckOut to clsBusinessLayer as in the previous steps. Generally, fetching records from the database is safer than updating and inserting. If there is a problem, a DataSet object is still created but it contains no records. Our presentation layer can test for that and display a message to the user that "No records were found", just as our current method does.
If a record is returned from the database, empty fields in the record may contain the value DBNull, which represents a NULL value in the database. Because of this, an exception may occur when a field's value is retrieved so it can be placed in a TextBox on the form. We want to prevent any exceptions from occurring in the presentation layer, so our business layer must find a way to fix fields that have a value of DBNull before the DataSet is passed to the presentation layer for display on the form.1. Here is the code for the FindCustomer method in clsBusinessLayer. Notice that before returning the DataSet to the presentation layer, it checks each field for DBNull. If a field has that value, it is set to the empty string, which is safe for a form to display.
FindCustomer Method in clsBusinessLayer.cs
public dsAccounts FindCustomer (string LastName)
{
// Add your comments here
dsAccounts dsFoundCustomer = myDataLayer.FindCustomer(LastName);
// Add your comments here
if(dsFoundCustomer.tblCustomers.Rows.Count>0)
{
// Add your comments here
System.Data.DataRow customerRecord = dsFoundCustomer.tblCustomers.Rows[0];
if( customerRecord["FirstName"]==DBNull.Value)
customerRecord["FirstName"]=string.Empty;
if(customerRecord["LastName"]==DBNull.Value)
customerRecord["LastName"]=string.Empty;
if(customerRecord["Street"]==DBNull.Value)
customerRecord["Street"]=string.Empty;
if(customerRecord["City"]==DBNull.Value)
customerRecord["City"]=string.Empty;
if(customerRecord["State"]==DBNull.Value)
customerRecord["State"]=string.Empty;
if(customerRecord["PhoneNumber"]==DBNull.Value)
customerRecord["PhoneNumber"]=string.Empty;
}
return dsFoundCustomer;
}2. Because the business layer handles all the problems, our presentation layer can simply take the work of the business layer and display it for the user. Here is the final version of the modified btnFindLastName_Click method in pgCheckOut.aspx.cs:
Revised btnFindLastName_Click Method in pgCheckOut.aspx.cs
protected void btnFindLastName_Click (object sender, EventArgs e)
{
// Add your comments here
dsAccounts dsFindLastName = myBusinessLayer.FindCustomer(txtLastName.Text);
// Add your comments here
if(dsFindLastName.tblCustomers.Rows.Count>0)
{
// Add your comments here
txtFirstName.Text=dsFindLastName.tblCustomers[0].FirstName;
txtLastName.Text=dsFindLastName.tblCustomers[0].LastName;
txtStreet.Text=dsFindLastName.tblCustomers[0].Street;
txtCity.Text=dsFindLastName.tblCustomers[0].City;
txtState.Text=dsFindLastName.tblCustomers[0].State;
txtPhone.Text=dsFindLastName.tblCustomers[0].PhoneNumber;
customerID.Text=dsFindLastName.tblCustomers[0].CustomerID.ToString();
Master.UserFeedBack.Text="Record Found";
}
else
{
// Add your comments here
Master.UserFeedBack.Text="No records were found!";
}
}3. Test your application. It should function the same is it did at the end of the Week 4 Lab. You should also scan through your code to see if there are any other optimizers or clean-ups you can make, such as removing statement setting tempPath because we no longer need it.
Refactored Code
At this point, even though your application has no new features compared to the Week 4 Lab, it is much easier to maintain and modify.
As you scroll through pgCheckOut.aspx.cs, you'll see the class has been greatly simplified and the code performs two main tasks in keeping with the rules of the presentation layer:
Passing data from the form to the business layer for processing
Receiving data from the business layer to display on the form
The data layer code in clsDataLayer.cs is only for interacting with the database. It doesn't validate or display data.
The business layer, clsBusinessLayer.cs ,is the workhorse layer. It communicates data requests from the presentation layer to the data layer, handles errors, and passes clean data back to the presentation layer. It also handles communication with outside applications through XML files. In the next part of the lab, we'll see how we can apply business rules
in the business layer also.PART II: STEP D: Data Layer Functionality: Validating and Locking Users
As we implement our secure login, we'll begin at the lowest tier and work our way up. The Microsoft Access database Accounts.mdb has two tables. tblCustomers, which we have been working with so far, contains the site customers. The second table, tblUsers, has user account information, such as login credentials. Our site users are company employees and are not customers.1. To validate a user's login credentials, we need to match the username and password to a username and password in the database. We can do that with a simple select that returns a record if the username and password match someone in the database. We then return a bool to indicate whether the credentials were valid.
ValidateUser Method in clsDataLayer.cls
public bool ValidateUser (string username, string passwd)
{
// Add your comments here
dbConnection.Open();
// Add your comments here
string sqlStmt = "SELECT * FROM tblUsers WHERE UserID = @id AND Pwd = @passwd AND Locked = FALSE";
// Add your comments here
OleDbCommand dbCommand = new OleDbCommand(sqlStmt,dbConnection);
// Add your comments here
dbCommand.Parameters.Add(new OleDbParameter("@id",username));
dbCommand.Parameters.Add(new OleDbParameter("@passwd",passwd));
// Add your comments here
OleDbDataReader dr = dbCommand.ExecuteReader();
//Add your comments here
Boolean isValidAccount = dr.Read();
//Add your comments here
dbConnection.Close();
returnis ValidAccount;
}2. If the business layer has decided a user needs to be locked out of the application, the data layer can oblige this request by setting the LOCKED field for the user to TRUE. Because the SELECT in the previous method would only return a record if the LOCKED field was FALSE, setting LOCKED to TRUE prevents the user's record from ever being found, effectively locking them out.
LockUserAccount Method in clsDataLayer
public void LockUserAccount(string username)
{
// Add your comments here
dbConnection.Open();
// Add your comments here
string sqlStmt = "UPDATE tblUsers SET Locked = True WHERE UserID = @id";
// Add your comments here
OleDbCommand dbCommand=new OleDbCommand(sqlStmt,dbConnection);
// Add your comments here
dbCommand.Parameters.Add(new OleDbParameter("@id",username));
//Add your comments here
dbCommand.ExecuteNonQuery();
//Add your comments here
dbConnection.Close();
}PART II: STEP E: Implement the Business Layer Functionality to Verify User Credentials
The business layer calls the data layer to validate login credentials, but must also implement our business rules restricting the number of login attempts. We have two rules that must be implemented:
If the same user fails to correctly enter his or her password three times, that user's account is locked and the person must contact the system admin to unlock it.
If there is a total of six failed login in attempts during the session, no matter the user, the application locks by hiding the login/submit button.
To accomplish these tasks, clsBusinessLayer needs access to the Session variable. This is only directly available on forms, so our presentation layer form will need to pass that to the business layer as an argument.
Here is the method we need to add to our business layer to validate the user's credentials and possibly lock the user's account:
CheckUserCredentials Method in clsBusinessLayer
public bool CheckUserCredentials(System.Web.SessionState.HttpSessionState currentSession, string username, string passwd)
{
// Add your comments here
currentSession["LockedSession"] = false;
// Add your comments here
int totalAttempts = Convert.ToInt32(currentSession["AttemptCount"])+1;
currentSession["AttemptCount"]=totalAttempts;
// Add your comments here
int userAttempts=Convert.ToInt32(currentSession[username])+1;
currentSession[username]=userAttempts;
// Add your comments here
if((userAttempts>3)||(totalAttempts>6))
{
currentSession["LockedSession"]=true;
myDataLayer.LockUserAccount(username);
}
return myDataLayer.ValidateUser(username,passwd);
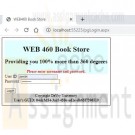
}PART II: STEP F: Create the Login Form
Now that the backend processing code is complete, we need to create a login form.1. Create a new Web Form named pgLogin.aspx.
2. Edit the form to use the master page we created in Week 2, Web460Store.master.
3. In the left content area of the form, add the following fields:
Control Type ID / Name Value
Label lblUserID User ID:
TextBox txtUserID
Label lblPassword Password:
TextBox txtPassword **Should have TextMode set to Password
Button btnLogin Login
4. When you are finished, the form in design view should look similar to this image:PART II: STEP G: Implement Login functionality
1. Last, we'll implement the code for the pgLogin form to tie together all the previous work in this lab. In the Click handler for btnLogin, we'll pass the login credentials to the business layer for verification. If the user is a valid user, we'll redirect to pgCheckOut.aspx.cs. If the account is locked, we display the appropriate message and hide the Login
button to prevent further login attempts. If the user simply entered an incorrect password or username, we'll display a message indicating the mistake.
btnLogin_Click Method in pgLogin.aspx.cs
protected void btnLogin_Click(object sender,EventArgs e)
{
// Add your comments here
// Please verify that your data directory path is correct!!!!
clsBusinessLayer myBusinessLayer = new clsBusinessLayer(Server.MapPath("~/App_Data/"));
// Add your comments here
bool isValidUser = myBusinessLayer.CheckUserCredentials(Session,txtUserID.Text,txtPassword.Text);
// Add your comments here
if(isValidUser)
{
// Add your comments here
Response.Redirect("~/pgCheckOut.aspx");
}
else if(Convert.ToBoolean(Session["LockedSession"]))
{
Master.UserFeedBack.Text="Account is disabled. Contact System Administrator";
// Hide login button :-)
btnLogin.Visible=false;
}
else
{
// Add your comments here
Master.UserFeedBack.Text="The User ID and/or Password supplied is incorrect. Please try again!";
}
}2. We can modify the Page_Load method in pgLogin to prompt the user for their credentials.
Revised Page_Load Method in pgLogin.aspx.cs
protected void Page_Load(object sender, EventArgs e)
{
Master.UserFeedBack.Text="Please enter username and password.";
}3. Set pgLogin.aspx as your Start Page and test your application. You should be able to log in with the username jsmith and password password1 or jdoe and password2. Also test the validation and lockout code.
PART II: STEP H: Harden Your Application (Optional)
This is an optional step that you can complete on your own. Below are two actions that can make our web application even more secure.
SQL Injection Prevention
Our application is vulnerable to an SQL injection attack since ValidateUser only checks to see if a record is found and not if the found record is the correct user record. Attackers can fool our application into always returning records by sending carefully crafted SQL as the username or password on our login form. The ValidateUser method will then return true
as if the correct username and password were given.
A quick fix for this is to modify our Data Layer ValidateUser method to verify that the username in the record returned matches the one we were sent as an argument. To implement this, you need to change the query to be similar to the query used in the FindCustomer method. Then compare the UserID field in the record returned from the database to the username
sent as an argument.
Encrypting Passwords in the Database
Our application stores user passwords in plaintext. If an attacker gains access to our server through a vulnerability in our application or possibly another application on the same server,user account passwords are exposed and easily compromised. The passwords should be stored as SHA1 hashes which will make them nearly impossible to reverse engineer.
Unless you have a hashing application available, it is easiest to create new user accounts and store the passwords for these new users as the SHA1 hash. Once you have new users created with hashed passwords stored in the database, you can delete the current user accounts that have unencrypted passwords.
Here is an overview of the steps needed to implement securely stored passwords:
- On the form pgLogin.aspx, add fields (User ID,Password,Verify Password) and a button to Create New User Account.
- Verify the two password fields match.
- Create a new record in tblUsers for this user and store the SHA1 hash of the password instead of the password.
- When a user logs in, search for the username in the database.
-- If a record is found, compute the SHA1 hash of the password the user supplied during the login attempt. Compare the SHA1 of the password entered by the user to the SHA1 password hash stored in the database. If they match, we have a valid user.
The following code uses the ASP .NET class SHA1CryptoServiceProvider to create theSHA1 hash of the variable userPassword and store it in the variable hashedPassword:
UnicodeEncoding encoding = new UnicodeEncoding();
SHA1 sha1Hasher = new SHA1CryptoServiceProvider();
byte[] hashedPassword = new byte[encoding.GetByteCount(userPassword)];
hashedPassword=sha1Hasher.ComputeHash(hashedPassword);
You can make your application even more secure by using salt with a SHA1 password hash, but that is beyond the scope what we can cover here.1. Optionally add features to obscure passwords and prevent SQL injection
2. Finalize the LabPART II: STEP I: Finalize the Lab
Learn More
1. Save your work!
2. Test it! Make changes as appropriate until it works. Try adding new records to the database.
3. Remember to add comments for each step being performed.
4. Please zip and submit the entire web project folder. -
WEB460 Lab 6 of 7: Sending E-mail and Testing Your Application
Regular Price: $12.00
Special Price $10.00
WEB460 Lab 6 of 7: Sending E-mail and Testing Your Application
Lab Overview
This lab will not work if your Gmail, Yahoo, Outlook, or other email account is set up with two-factor authentication. You should use or create an account that does not have two-factor authentication to fully test this lab.
If you try to use your work or school email accounts, this lab has a better chance of working if you run it and try to send the email from your work computer or on campus. This is because some mail servers are set up to block sending emails from outside their domain.TABLE OF CONTENTS
Scenario/Summary
This week, we add the ability to send e-mails from our application. Then you will develop and implement a test plan for your application. Here is an outline of the lab:
STEP A: Set up a Web Application — this should be a copy of your Week 5 Lab as a starting point.
STEP B: Implement E-mail Functionally in the Business Layer
STEP C: Add E-mail Fields to pgConfirm.aspx
STEP D: Add Send E-mail Functionality to pgConfirm.aspx.cs
STEP E: Develop a Test Plan and Test your Application
STEP F: (Optional) Add Functionality to Autofill the Recipient's E-mail Address
STEP G: Finalize the LabSTEP A: Set up a Web Application
To begin this week's lab, create an empty Web Site and copy the files from the Week 5 Lab into your website folder.
Test your application. It should function the same as it did at the end of the Week 5 Lab.STEP B: Implement E-mail Send Functionality in the Business Layer
1. Because e-mail is a form of communication, we implement the SendEmail method in the business layer. First we create a MailMessage object that has the information for the e-mail, such as To, From, Subject, and the message Body. Then, to connect to a mail server and send the e-mail, we create an SmtpClient object. We need to tell the server about these two ASP.NET classes, so place the following at the start of clsBusinessLayer.cs:
Modules for clsBusinessLayer.cs
using System.Net;
using System.Net.Mail;2. Let's begin by stubbing out the SendMail method. The method accepts as parameters information needed to build and send the e-mail. We also return a message to the client that called the method indicating success or failure. We'll be optimistic and assume success. Stubbing a method is a useful development technique that lets your program compile and use the method, yet you don't have to have all the features implemented-only the correct return type.
SendMail method stub in clsBusinessLayer.cs
public string SendEmail(string emailFrom, string emailTo, string emailSubject, string emailBody, string acctPassword)
{
string mailSendMessage = "Email Status: The message was sent successfully to: " + emailTo;
//**** TODO: Create email message! *** //
//**** TODO: Add send mail functionality! *** //
return mailSendMessage;
}3. Next we create the MailMessage object and set its data fields using the values in the parameters. Replace the TODO comment for creating an e-mail message with the following code:
Creating a Message in SendMail method
// Add your comments here
MailMessage objMailMessage = new MailMessage();
objMailMessage.From = new MailAddress(emailFrom);
objMailMessage.To.Add(new MailAddress(emailTo));
objMailMessage.Subject = emailSubject;
objMailMessage.Body = emailBody;4. Now we create an SmptClient object to connect to your service provider and send thee-mail message.
Network Credentials
The two parameters for the NetworkCredential constructor should be the username (e-mail address) and account password for your web e-mail service. The values for these will be entered in the web form we build in a later step.
Do not hard code these values in your application—I don't want to know your e-mail password!Connecting to the Mail Service
Two very important fields in the SmptClient object are the Host and Port fields. These must be set to the values required by your personal e-mail service! Normally these would be set to an organization's SMTP server, but because there is no company for this lab, you must use your own web mail service. Host values for several common web mail providers is provided in the code comments. If your provider is not listed, you can check its support instructions to see how a local client e-mail application, such as Outlook or Mac OS X Mail can connect. These two fields, alongwith the NetworkCredentials object, make it possible to send the e-mail.Replace the TODO comment for adding send mail functionality with the following code:
Adding Send Functionality to SendEmail method
// Add your comments here
NetworkCredential objSMTPCredentials = new NetworkCredential(emailFrom,acctPassword);
// Add your comments here
SmtpClient mailObj = new SmtpClient();
// This needs to change based on your email Host
// to permit your application to send email
// for GMAIL
mailObj.Host = "smtp.gmail.com";
// for YAHOO, YMAIL, ROCKETMAIL, YAHOOMAIL
// mailObj.Host = "smtp.mail.yahoo.com";
// for HOTMAIL, MSN, OUTLOOK and LIVE.COM
// mailObj.Host = "smtp.live.com";
// for AOL
// mailObj.Host = "smtp.aol.com";
// Add your comments here
mailObj.Port = 587;
// if this does not work, try port 25
// Add your comments here
mailObj.UseDefaultCredentials = false;
mailObj.Credentials = objSMTPCredentials;
mailObj.EnableSsl = true;
mailObj.DeliveryMethod = SmtpDeliveryMethod.Network;
try
{
// Add your comments here
mailObj.Send(objMailMessage);
}
catch(Exception error)
{
mailSendMessage = " Email Status: An error has happened sending the email, " + emailTo;
}STEP C: Add E-mail Fields to pgConfirm.aspx
In this step, we modify pgConfirm.aspx so the user can send an e-mail. For this application to successfully send an e-mail, it will need your e-mail credentials. You may hard code your e-mail address, but please do not hard code your password! It should be entered in the SENDAuthorization field. This field should have the TextMode property set to Password so that the password is not displayed when typed.1. Begin by moving the Credit Card information and the Submit Order button into the left ContentArea of the Master Page. This leaves room for only our e-mail feature to be in the right ContentArea.
2. In this right ContentArea, add the controls as shown below. Structure the layout of your form to appear similar to an e-mail message.
ControlType Name or ID Text (if applicable)
Label lblFrom From:
TextBox txtFrom yourEmail@yourProvider.com
Label lblTo To:
TextBox txtTo
Label lblSubject Subject:
TextBox txtSubject
Label lblMessage Message:
TextBox txtMessage
Label lblPassword Enter SMTP account password for SEND authorization:
TextBox txtPassword
Button btnSendEmail Send Email3. Several of the controls require the following special property settings.
Textbox txtMessage - Set the TextMode property to MultiLine so that the user can type several lines of text for the e-mail message body. You can also adjust the size of this text box to show several lines of text.
Textbox txtFrom - Set the Text property to the e-mail address from the account you use to send e-mail.
Textbox txtPassword - Set the TextMode property to Password so that your e-mail account password is not displayed.4. When this step is complete, in Design Mode, pgConfirm.aspx should look similar to the image below:
STEP D: Sending an E-mail From pgConfirm.aspx
In pgConfirm.aspx.cs, create the method btnSendEmail_click() so that it calls SendEmail() and passes the data the user entered in the form.
1. Add a data field to represent the business layer object:
clsBusinessLayer myBusinessLayer;
2. Add the following line to the Page_Load method to instantiate the business layerobject:
myBusinessLayer = new clsBusinessLayer(Server.MapPath("~/App_Data/"));
3. Create the btnSendMail_Click method by entering the code below into pgConfirm.aspx.cs and enter your comments for each step being performed.
btnSendMail_Click method in pgConfirm.aspx.cs
protected void btnSendEmail_Click (object sender, EventArgs e)
{
Master.UserFeedBack.Text = myBusinessLayer.SendEmail(txtFrom.Text, txtTo.Text, txtSubject.Text, txtMessage.Text, txtPassword.Text);
}STEP E: Develop a Test Plan and Test Your Application!
1. Develop a test plan that has at least ten different features to test. You should test *the entire* application, not just the email functionality from this week. You can test more; being thorough is a good thing!
An Excel spreadsheet (Wk6_Test_Plan.xlsx (https://devryu.instructure.com/courses/60316/files/9167014/download?wrap=1)) that you can use as a test plan template can be found in the Files section of the Course Menu.2. Test your application! Make changes as appropriate until it works. Try sending several e-mails to yourself. If your application fails to send mail, try the following adjustments.
There are usually three possible values that cause issues: email username (usually your e-mail address), your password, and the host's STMP address.
Double-check that mailObj.Host matches the name of your e-mail or ISP's SMTPserver.
The From e-mail address and password should be what you use to log in to your e-mail account. If your username is different, change the emailFrom parameter in the call to the NetworkCredentials constructor to reflect your e-mail account username.
A fourth, less common problem is that some e-mail providers may use ports other than 587 for SSL e-mail. Try setting mailObj.Port to either 25 or 465.3. Execute the tests in your test plan and record the results in the spreadsheet . Upload the spreadsheet as part of this week's deliverables.
STEP F: (OPTIONAL) Auto-fill Recipient's E-mail Address (OPTIONAL)
OPTIONAL ACTIVITY:
Each user record in the database has an e-mail address associated with it. To have pgConfirm automatically fill the To field with this address, two small changes need to be made to the application:
1. Modify the FindCustomer method in clsBusinessLayer.cs so that it validates the e-mailaddress in addition to the other fields in the record.
2. In the Page_Load method of pgConfirm.aspx.cs, call the business layer FindCustomer method and use the result to fill the txtTo control.
Then test away!STEP G: Finalize the Lab
Learn More
1. Save your work!
2. Test it! Make changes as appropriate until it works.
3. Remember to add comments for each step being performed.
4. Please zip and submit the entire web project folder and your test plan. -

WEB460 Lab 7 of 7: Model-View-Controller Application
Regular Price: $12.00
Special Price $10.00
WEB460 Lab 7 of 7: Model-View-Controller Application
Scenario/Summary
This lab will introduce you to the ASP.NET MVC application architecture. You will create a controller and views for the controller. In this lab, we will not explore models but with the foundation you gain here, you should be able to follow tutorials you discover online.TABLE OF CONTENTS
Lab Steps
STEP A: Create a Model-View-Controller Application
MVC applications are not created as Visual Studio Web Sites. Instead we create a Project, similar to what we do for a desktop application. Follow the directions in this week's lecture to create an ASP.NET MVC web application. The application should be named web460_wk7_ilab.
The name is very important because this project uses namespaces. If the namespace in your code files is not web460_wk7_ilab, you can either:
delete the project and recreate a new with the correct name (web460_wk7_iLab), or
adjust the code in the Lab to match the namespace of your application.
When you build and run the default web application, you should see a website similar to the image below that has a responsive web layout. As you adjust the window size, elements move to accommodate the narrower screen size, such as for a mobile device.Because URLs are very important in determining the classes and actions called in an MVC application, you should note the URL and port number IIS Express is using to run the application. localhost refers to your own computer, and the number following is the port. In the image below, the port is 51071.
In the examples shown in the lab steps below, replace the port number (51071) with the port number on your computer.STEP B: Adding a Controller
In this step, we will build a controller that returns HTML directly to the browser. This will help us begin with a simple example before adding more features. In the next step we will have the controller call a View( ) to create a full web page.
1. Right-click on the Controllers folder and select Add => Controller... from the menu.
2. Name the controller HelloEarthController and select the Empty MVC controller template.
3. You should see HelloEarthController.cs in the Controllers folder in the Solution Explorer pane. Double-click the file to open it and examine the code. The index action method is
the default action method for each controller. Replace the HelloEarthController Index( ) action method with the following code:
Index Action Method in HelloEarthController.cs
// Add your comments here
public string Index()
{
return "This is the <strong>default action</strong> for this web site ...!";
}
4. Run the application and append HelloEarth to the base URL:
http://localhost:51071/HelloEarth
You should see the following:
5. We just called the HelloEarth Controller. The URL routing logic in ASP.NET MVC applications is a format like this to determine what code to invoke:
/[Controller]/[ActionName]/[Parameters]
Add the following Welcome action method to the HelloEarth Controller:
Welcome Action Method in HelloEarthController.cs
// Add your comments here
public string Welcome()
{
return "<h2>Welcome to Earth visitor!</h2>";
}
6. Run the application and append HelloEarth/Welcome to the base URL:
http://localhost:51071/HelloEarth/Welcome
You should see the following:
7. Now, let's pass information in arguments to the Welcome method. Change the Welcome method to the following:
Revised Welcome Action Method in HelloEarthController.cs
// Add your comments here
public string Welcome(string visitor, int numTimes = 1)
{
return HttpUtility.HtmlEncode("Hello " + visitor + "! Your number is " + numTimes);
}
8. Run the application and again append HelloEarth/Welcome to the base URL:
http://localhost:51071/HelloEarth/Welcome
You should see the default values for visitor and numTimes:
9. Run the application and again append query string parameters to the base URL:
http://localhost:51071/HelloEarth/Welcome?visitor=Jose&numTimes=5
MVC will bind the query string values to the action method parameters. You shouldSTEP C: Creating a View
In this step we'll create a View that displays default information when the site visitor goes to /HelloEarth.
1. Return to the HelloEarth Controller action method and return it to the original version (don't forget to change the return type back to ActionResult):
Original Index Action Method in EarthController.cs
// Add your comments here
public ActionResult Index()
{
return View();
}
2. To add a View for the Index method, right-click inside the Index method and select Add View...
3. In the Add View dialog, the view name should be Index and the view engine should be ASPX (C#). Also be sure the Use layout or master page is checked and Site.Master is selected as the master page.
4. You should now see a HelloEarth folder containing Index.aspx under the Views folder.
5. Double-click HelloEarth/Index.aspx to examine the code and you should see four content areas from the master page referenced. In the Content1 container, enter the following (this is the page title):
Hello Earth Index
6. In the Content2 container, enter the following (this is the main content heading):
<h2>Welcome to the Earth Index!</h2>
7. In the Content3 container, enter the following:
This web application is your introduction Earth culture.
8. Run the application and append HelloEarth to the base URL:
http://localhost:51071/HelloEarth
You should see the following:STEP D: Passing To the View From the Controller
MVC uses an object called the ViewBag to communicate between the controller and views. The ViewBag is a dynamic object that can have data fields added to it on the fly (as the program is running). We will use the ViewBag to send the Welcome View data to display on the web page.
1. Return to the HelloEarth Controller and change the Welcome action method to look like the code below (don't forget to change the return type back to ActionResult). We are setting the VisitorName and NumTimes data fields of the ViewBag object. Those data fields are not part of the ViewBag object but will be added when these statements are executed. In our example, we simply pass the parameters to the View, but we could also pass computed values or values retrieved from a Model.
Second Revision of Welcome Action Method in HelloEarthController.cs
// Add your comments here
public ActionResult Welcome(string visitor, int numTimes = 1)
{
ViewBag.VisitorName = visitor;
ViewBag.NumTimes = numTimes;
return View();
}
2. Right-click on the Welcome action method and select Add View... just as we did for the Index action method above. The %> name should be Welcome, use the ASPX (C#) view engine and the master page Site.Master. After clicking OK, you should see the file Welcome.aspx inside the HelloEarth folder under Views.
3. To access the ViewBag data fields in the View, we enclose it in <%: and %> as an ASPX directive. Open Welcome.aspx for editing. Inside the Content2 container, place the following:
<h2>Welcome to Earth <%: ViewBag.VisitorName %>!</h2>
4. Let's use ASPX Page directives along with the ViewBag data to repeatedly print our the visitor's name. Add the code below to the Content3 container:
Add to Content3 Content Container
<ul>
<% for (int i = 0; i < ViewBag.NumTimes; i++ )
{ %>
<li><%: ViewBag.VisitorName%></li>
<% } %>
</ul>
5. Run the application and again append query string parameters to the base URL:
http://localhost:51071/HelloEarth/Welcome?visitor=Jose&numTimes=5
MVC will bind the query string values to the action method parameters. The Controller will then pass those to the View. You should see:STEP E: Finalize the Lab
Learn More
1. Save your work!
2. Test it! Make changes as appropriate until it works.
3. Remember to add comments for each step being performed.
4. Please zip and submit the entire web project folder.
7 Item(s)
Grid List

You have no items in your shopping cart.

