WBG310 Interactive Web Page Scripting with Lab
Need Help in WBG 310 Javascript Labs and Course Project?
We can help you if you are having difficulty with your WBG310 Course. Just email your assignments at support@assignmentcache.com.
We provide help for students all over the world.
2 Item(s)
Grid List
-
WBG310 Week 1 Lab Interactive Web Page Scripting with Lab
Regular Price: $15.00
Special Price $12.00
WBG310 Week 1 Lab Interactive Web Page Scripting with Lab
Scenario/Summary
Apply skills learned in the tutorials to a real-world form specification. Create a form and validate the input, reporting errors and feedback directly to the web page.Deliverables
Zip all files into one folder titled W1_Lab1_YourName.zip. When you are done, submit your assignment.STEP 1: Create a Simple Form
1. Download the template file here: jsTemplate.zip
2. Unzip the jsTemplate.html file and save the file as w1_Lab1.html.
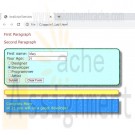
3. Within the form tags already coded in the template HTML file, create two text boxes, two buttons, and a radio button group (view Figure 1 for layout). Make sure the textboxes and radio buttons are labeled according to Figure 1.
4. Use the "name" attribute for all instances of the radio group set to: "skilltype."
5. Use input type of button for the Submit button NOT input type submit.
6. Use input type reset for the clear form button.
Figure 1: Using the Form Section of the TemplateSTEP 2: Create a Validation Function
1. Create a JavaScript function that will collect the information from the form and verify that it is the correct type and that there are no blank textboxes. Save and test the file to ensure that the textbox information is collected and the script is working correctly. Use the onclick event within the submit button tag to call this function.
2. Output validation error messages by writing directly to the <div> with the id of "results." (You may want to use Alert boxes for testing at first.)
3. Create a loop within the above function that collects the checked value of the radio button group. Once the value from the radio group is collected, create a function to pass the value for evaluation and return a message for the user based on his or her selected skill type using the <div> with the id of "more."STEP 3: Save and Test
1. Save the file.
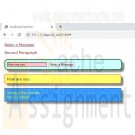
2. View the page in a browser and test the program. A sample output looks like the following.
Figure 2: Series of Expected Results From TestingSTEP 4: Prep for Turn-In
Learn More
1. When your application functions as expected, zip the file and submit your assignment. -
WBG310 Week 3 Lab Interactive Web Page Scripting with Lab
Regular Price: $15.00
Special Price $12.00
WBG310 Week 3 Lab Interactive Web Page Scripting with Lab
Scenario/Summary
Using the skills acquired in the tutorials from Chapter 5, build a web page of your own design that has jQuery-programmed event handlers. Find errors and omissions in existing files and repair them to function correctly.Deliverables
W3iLab_1.html. Zip the file and submit your assignment.Lab Steps
STEP 1: Open the Template
Open jsTemplate.html from Week 1.
Save the file as w3_Lab3.html.STEP 2: Collect jQuery Library File
Use the link to jQuery at Google as shown here, and as described in the week lesson:
<script src="https://code.jquery.com/jquery-3.5.1.js"></script>
...or, download the current jQuery library file from https://jquery.com/download/ (https://jquery.com/download/) and place the file in the _js folder.
Note: You may need to right-click on the download link an and then select "Save Link as...", or "Download Linked File as . . ." depending on your browser.STEP 3: Set the Source for the Library File
1. If you download your own copy, create a set of script tags above the current script tag set, and set the src to the library file in Step 2.STEP 4: Create jQuery Functions for Events
1. Set an id="p1" for the first paragraph <p>.
2. Create the document ready function for your page as explained in the text in Chapter 4.
3. Within the document function, create an event handler that will append the contents of the ‘more’ div tag with the message ‘You Clicked!’. Include a line break. The expected results are pictured below.STEP 5: Create jQuery Functions for Events
1. Create a textbox inside the form. Name the new input element with id=“box1”
2. Create a function that changes the background color of the box to light blue when the box gains the focus.
3. Create a function that changes the background color of the box to pink when the box loses the focus. Hint: Blur.STEP 6: Create jQuery Functions for Events
1. Create a button next to the textbox on the form. Make the button read, ‘Relay a Message.’
2. Create a function that appends the contents of the results DIV when clicked. The message should be ‘Here is your message’ or something similar. The expected results are pictured below.STEP 7: Create jQuery Functions for Events
1. When the page loads (onload), hide the form.
2. Change the value of #p1 to ‘Relay a Message’ and make it a hyperlink with the href="#"
3. Reset the function for the paragraph click event.
Include the designation in the identifier for the anchor tag.
Have the form slide down. Use the ‘slow’ modifier.
4. In the button click event, reset the message to come from the textbox. Hint: Use .val() to collect the user input. Include a line break with the message. The expected results are pictured below.STEP 8: Prep for Turn-In
Learn More
1. When your application functions as expected, zip the file submit your assignment.
2 Item(s)
Grid List

You have no items in your shopping cart.

