HTML/JS
-
New Perspectives on HTML and XHTML Tutorial 9 Case Problem 2 Solution
$12.00New Perspectives on HTML and XHTML Tutorial 9 Case Problem 2 Solution
Data Files needed for this Case Problem: cassini.jpg, dtd_list.txt, gargtxt.htm, gbar.jpg, glogo.jpg, maa.jpg, and oneil.jpg
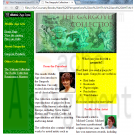
Middle Age Arts Nicole Swanson is the head of the Web site team at Middle Age Arts, a company that creates and sells replicas of historical European works of art for home and garden use. She has recently started a project to update the old HTML code in the site’s many pages. She’s asked you to update the page describing the company’s collection of decorative gargoyles. She wants the page to comply with XHTML 1.0 strict standards. Figure 9-30 shows a preview of the completed Web page.
Complete the following:
Learn More
1. Use your text editor to open gargtxt.htm from the tutorial.09\case2 folder included with your Data Files. Enter your name and the date in the comment section and save the file as gargoyle.htm in the same file.
2. Insert an XML prolog at the top of the file. Use the standard attribute defaults for an XHTML file.
3. After the XML prolog, insert a DOCTYPE declaration for the XHTML 1.0 strict DTD.
4. Set the default namespace of the document to the XHTML namespace.
5. Test the file on the validator. Fix the errors as follows:
• Convert the attributes for the body element into styles in an embedded style sheet.
(Hint: The link, alink, and vlink attributes are used to set the colors of hyperlinks, active links, and visited links in the Web page.)
• Use proper syntax for any empty elements.
• Set the color and text alignment of an h4 element using an inline style.
• Ensure that all two-sided tags are properly closed.
• Use the float style to align all inline images.
• Use an inline style to set a table cell’s width and background color.
• Remove all deprecated elements and attributes.
6. Save your final version of the file once it passes the validation test for XHTML 1.0 strict, and then test it in your browser to ensure that it looks like Figure 9-30.
7. Submit your completed files to your instructor. -
New Perspectives on HTML and XHTML Tutorial 6 Case Problem 1 Solution
$12.00New Perspectives on HTML and XHTML Tutorial 6 Case Problem 1 Solution
Data Files needed for this Case Problem: parch.jpg, pcg.css, pcglogo.jpg, sformtxt.css, and subtxt.htm
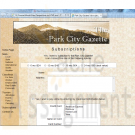
The Park City Gazette Kevin Webber, the editor of the Park City Gazette of Estes Park, Colorado, has asked for your help in developing a subscription page for the newspaper’s Web site. The page includes a form where customers can enter the length of the subscription they want to purchase, their mailing address, and their credit card information. Kevin has already created much of the layout and text of the Web page. Your job is to add the fields and control elements for the subscription form. A preview of the Web page you’ll create for Kevin is shown in Figure 6-60.The form contains several labels and control elements placed side-by-side in two columns. To create this two-column layout, you’ll float the labels and control elements on the left margin. You’ll identify the labels that are floated by putting them into the float-Label class. The floated control elements will belong to the floatCtrl class.
Complete the following:
Learn More
1. Use your text editor to open the sformtxt.css and subtxt.htm files from the tutorial.06\case1 folder included with your Data Files. Enter your name and the date in the comment section of each file. Save the files as sform.css and subscription.htm, respectively, in the same folder.
2. Go to the subscription.htm file in your text editor and insert a link to the sform.css style sheet.
3. Scroll down the file and insert a form element with the id subForm, directly below the paragraph in the rightColumn div container.
4. At the top of the form, Kevin wants an option list showing the four different payment plans. Insert a field set with the id subPlans. Within the field set do the following:
• Insert four option buttons belonging to the subplan field.
• Give the option buttons the ids plan1 through plan4 and the values 1 through 4.
• After each option button, insert a label element associated with the preceding option button. The text of the four labels is "6 mo./$24", "12 mo./$45", "18
mo./$64", and "24 mo./$80 (best value)".
5. After the subPlans field set, insert a label containing the text "Name". Associate the label with the cName field and put it in the class floatLabel.
6. After the label, insert an input box for the cName field. Place the input box in the floatCtrl field and set the size of the input box to 50 characters.
7. Insert another label containing the text "Address" associated with the address field and belonging to the floatLabel class. After the label, insert a text area box for the address field. Set the size of the box to six rows by 50 columns and place the text area box in the floatCtrl field.
8. Insert a label with the id agreeLabel associated with the agree field. Place the label in the floatLabel class. Within the label element, insert a check box for the agree field. After the check box, but within the label element, insert the text "Yes, I wish to pay online by entering my credit card information below."
9. Insert a field set with the id payment. At the top of the field set, insert a label belonging to the floatLabel class, containing the text "Credit Card" and associated with the cardType field.
10. Insert a selection list for the cardType field. Do the following for the selection list:
• Place the selection list in the floatCtrl class.
• Set the selection list to display four items.
• Add the following options to the selection list: American Express, Discover, MasterCard, and Visa.
• Set the values of the four options to: Amex, Disc, MC, and Visa.
11. Below the selection list, insert two labels. The first label should contain the text "Name on Card" and should be associated with the cardName field. The second label should contain the text “Card Number” and should be associated with the cardNumber field. Put both labels in the floatLabel class.
12. Directly after each label, insert an input box. The first input box should be for the cardName field; the second input box is for the cardNumber field. For both input boxes, set the width to 30 characters and place the input box into the floatCtrl class.
13. Insert a label belonging to the floatLabel class and containing the text "Expiration Date". After the label, insert two selection lists for the expMonth and expYear field. Do the following for the selection lists:
• Place both selection lists in the floatCtrl class.
• Add 12 options to the expMonth selection list containing the text "01" through "12". The values of the options should range from 1 to 12.
• Add five options to the expYear selection list containing the text "2011" through "2015". Set the values of each option to match the option text.
14. Insert a field set with the id buttons. Within the field set, insert a submit and reset button. Give the submit button the value Subscribe. Give the reset button the value Cancel.
15. Use the CGI script at http://www.theparkcitygazette.com/subscribe with the post method.
16. Save your changes to the file.
17. Go to the sform.css file in your text editor and add the following styles to the style sheet:
• Set the background color of the subPlans field set to white. Set the padding to 5 pixels and the bottom margin to 20 pixels. Center the contents of the field set.
• For label elements within the subPlans fieldset element, set the right margin to 15 pixels.
• Display objects belonging to the floatLabel class as block-level elements, floated on the left margin but only when the left margin is clear. (Hint: Use the clear style.) Set the width to 150 pixels and the bottom margin to 10 pixels. Right-align the label text.
• Display objects belonging to the floatCtrl class as block-level elements, floated on the left margin. Set the left margin to 20 pixels and the bottom margin to 10 pixels.
• Set the width of the agreeLabel label to 600 pixels with top/bottom margins of 20 pixels and left/right margins of 0 pixels. Center the label text.
• Display the payment field set only when the left margin is clear. Set the background color to white. Set the width of the field set to 400 pixels with a left margin of 100 pixels and 5 pixels of padding.
• Center the contents of the buttons field set with top/bottom margins of 10 pixels and left/right margins of 0 pixels. Set the border style to none.
18. Save your changes to the sform.css file and open subscription.htm in your Web browser. Verify that the layout and content of the Web form resemble that shown in Figure 6-60.
19. Submit your completed files to your instructor. -
New Perspectives on HTML and XHTML Tutorial 4 Case Problem 3 Solution
$12.00New Perspectives on HTML and XHTML Tutorial 4 Case Problem 3 Solution
Data Files needed for this Case Problem: image0.jpg – image9.jpg, longstxt.htm, and lpmap.jpg
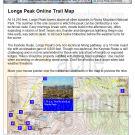
Longs Peak Interactive Map Longs Peak is one of the most popular attractions of Rocky Mountain National Park (RMNP). Each year during the months of July, August, and September, thousands of people climb Longs Peak by the Keyhole Route to reach the 14,255-foot summit. Ron Bartlett, the head of the RMNP Web site team, has asked for your help in creating an interactive map of the Keyhole Route. The map will be installed at electronic kiosks in the park’s visitor center. Ron envisions a map with 10 numbered waypoints along the Keyhole Route, displaying photos and text descriptions of each waypoint when a mouse pointer hovers over its corresponding numbered point. Figure 4-59 shows a preview of the online map with the first waypoint highlighted by the user.Ron also wants to create a print version of the waypoint descriptions. Users can print the map elsewhere on the park’s Web site, so he wants the print style sheet to display just the list of waypoints in a bulleted list.
Complete the following:
Learn More
1. Use your text editor to open the longstxt.htm file from the tutorial.04\case3 folder included with your Data Files. Enter your name and the date in the comment section at the top of the file. Save the file as longs.htm in the same folder. Take some time to study the contents of the file. Notice that the waypoint descriptions are nested within the online_map div container. Each waypoint description has been placed in a separate div container with the class name notes and id names ranging from point0 to point9.
2. To create a rollover effect for the nine waypoints, you need to mark the waypoint contents as hyperlinks.Within each of the nine div containers, enclose the img element and paragraph element within a single <a> tag. Point each link to the longs.htm file so that if a user clicks the link, it will simply refresh the currentWeb page.
3. Add a style to the embedded style sheet at the top of the file to remove underlining from all hypertext links.
4. Currently the online_map div container does not display the Longs Peak map. Add the following style to the embedded style sheet to display the map:
• Set the width of the container to 600 pixels wide by 294 pixels high.
• Add a 1-pixel-wide solid black border to the container.
• Apply the lpmap.jpg graphic file as the background image.
• Use relative positioning to place the container on the page. Set the top and left coordinates to 0 pixels.
5. In the embedded style sheet, add the following styles for all of the div containers belonging to the notes class:
• For paragraphs nested within each note, set the font size to 8 points and the margin to 5 pixels.
• Set the font color to yellow for each span element nested within a note.
6. For each link nested within a notes class element, apply the following styles:
• Set the width and height of the link to 20 pixels.
• Hide any content that overflows the boundary of the link.
• Set the background color to blue and the font color to white.
• Set the z-index value to 1.
7. When the mouse hovers over a link within a notes class element, have the browser apply the following style:
• Change the width to 150 pixels and the height to 170 pixels.
• Change the overflow property to visible.
• Set the z-index value to 2.
8. Use absolute positioning to place the link nested within the #point0 selector at the coordinates (560, 60).
9. Repeat Step 8 for the nine remaining waypoints:
• #point1 at (277, 90)
• #point2 at (175, 0)
• #point3 at (110, 115)
• #point4 at (55, 165)
• #point5 at (5, 180)
• #point6 at (15, 222)
• #point7 at (50, 245)
• #point8 at (100, 245)
• #point9 at (90, 220)
10. Go to the top of the file and add a media attribute to the embedded style sheet indicating that the sheet is designed for screen and tv media.
11. Save your changes to the file and then open longs.htm in your Web browser. Verify that the placement of the waypoints follows the locations shown in Figure 4-59. Confirm that when you hover your mouse over each of the nine waypoints, a description of the waypoint appears on the top of the trail map.
12. Return to the longs.htm file in your text editor. Create a new embedded style sheet designed for print media.
13. Scroll down to the “Longs Peak Online Trail Map” h2 heading and enclose the text “Online Trail Map” within a span element.
14. Add the following styles to the embedded print style sheet:
• Set the font family for the page body to sans-serif.
• Remove underlining from all hypertext links.
• Do not display the #instructions selector, the span element nested within the h2 element, or the img element nested within elements belonging to the notes class.
• Display the notes class of elements as list items with a disc marker. Set the margin to 20 pixels.
• Change the display property of paragraphs nested within the notes class of elements to inline.
• Display span elements nested within the notes class of elements in a bold font.
15. Add a style that inserts the text string “Trail Itinerary” after the h2 heading.
16. Save your changes to the file.
17. Refresh the longs.htm file in your Web browser. By either printing the page or viewing the page within the Print Preview window, confirm that the printed page only shows a bulleted list of the waypoint descriptions. If you are running Firefox, Opera, or Safari, confirm that the heading at the top of the page reads “Longs Peak Trail Itinerary.” (If you are using Internet Explorer, the title will simply read “Longs Peak.”)
18. Submit your completed files to your instructor. -

New Perspectives on HTML and XHTML Tutorial 4 Case Problem 4
$12.00New Perspectives on HTML and XHTML Tutorial 4 Case Problem 4
Data Files needed for this Case Problem: bizet.jpg, bizetbio.txt, bizetlist.txt, mozart.jpg, mozartbio.txt, mozartlist.txt, puccini.jpg, puccinibio.txt, puccinilist.txt, verdi.jpg, verdibio.txt, verdilist.txt, wagner.jpg, wagnerbio.txt, and wagnerlist.txt
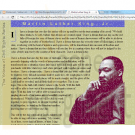
Gresham Children’s Choir Faye Dawson is an instructor for Gresham Children’s Choir in Gresham, Oregon. The choir is a chance for talented youth to perform and to learn about music history. Faye is working on a Web site describing the history of opera. She’s asked for your help in creating a design. Faye has provided you with information on five different composers: Bizet, Mozart, Puccini, Verdi, and Wagner. For each composer, she’s given you an image file containing the composer’s picture, a text file listing the composer’s works, and a text file containing a biographical sketch. Use this information to design your Web site. You may supplement these files with any other material you think will enhance your site’s design.
Complete the following:
Learn More
1. Use your text editor to create four HTML files named bizet.htm, mozart.htm, puccini.htm, verdi.htm, and wagner.htm, placing them in the tutorial.04\case4 folder included with your Data Files. Enter your name and the date in a comment section of each file. Include any other comments you think will aptly document the page’s purpose and history.
2. Use the provided text files and image files to create a Web page describing each composer’s life and accomplishments. Include hypertext links between the five composer Web pages.
3. Create an external style sheet named gresham.css for your Web site. Insert a comment section in the style sheet file that includes your name and the date as well as other comments that describe the style sheet.
4. The content of the gresham.css style sheet is up to you, but it must include the following features:
• Styles that use contextual selectors
• A style that uses a pseudo-element and a pseudo-class
• Styles that use positioning styles (either absolute or relative)
• A style that creates or modifies an ordered or unordered list
• A style to create a rollover effect
5. Create another style sheet named printer.css containing styles for a printed version of the pages in your Web site. Add appropriate comments to the different parts of your style sheet.
6. Test your Web site on a variety of browsers to ensure your design works under different conditions.
7. Submit your completed files to your instructor. -
New Perspectives on HTML and XHTML Tutorial 3 Case Problem 3
$12.00New Perspectives on HTML and XHTML Tutorial 3 Case Problem 3
Data Files needed for this Case Problem: banner.jpg, king1.gif – king6.gif, kingtxt.htm, and centertxt.css
Center for Diversity Stewart Tompkins is the project coordinator for the Midwest University Center for Diversity. He is currently working on a Web site titled The Voices of Civil Rights, containing Web pages with extended quotes from civil rights leaders of the past and present. He has asked you to help develop a design for the pages in the series.He has given you the text for one of the pages, which is about Dr. Martin Luther King, Jr.
Complete the following:
1. In your text editor, open the kingtxt.htm and centertxt.css files from the tutorial.03\case3 folder included with your Data Files. Enter your name and the
date in the comment section of each file. Save the files as king.htm and center.css in the same folder. Take some time to study the content and layout of the king.htm file as it appears in your text editor and Web browser.
2. Return to the king.htm file in your text editor. Directly below the opening <body> tag, insert a div element with the id banner. Within the div element, insert an inline image for the banner.jpg graphic file. Give the inline image the id, bannerImage, and specify the alternate text “The Voices of Civil Rights Series.”
3. Enclose the rest of the page content, starting with the h1 heading at the top of the page through the address at the bottom of the file, in a div element with the id, pageContent.
4. Save your changes to the file.
5. In your text editor, go to the center.css file. Create a style for the body element that sets the font color to black, the background color to the value (204, 204, 153), and the margin to 0 em.This tutorial includes complete steps from 1-20
Learn More -

New Perspectives on HTML and XHTML Tutorial 5 Case Problem 3
$12.00New Perspectives on HTML and XHTML Tutorial 5 Case Problem 3
Data Files needed for this Case Problem: blank.gif, bottom.jpg, bottomleft.jpg, bottomright.jpg, dhometxt.htm, dlogo.jpg, domepaper.css, dometxt.css, dtabletxt.css, left.jpg, leftbox.jpg, right.jpg, rightbox.jpg, tableback.jpg, top.jpg, topleft.jpg, and topright.jpg
dHome, Inc. Olivia Moore is the director of advertising for dHome, one of the nation’s newest manufacturers of geodesic dome houses. She’s hired you to work on the company’s Web site. Olivia has provided you with all of the text you need for the Web page, and your job is to design the page’s layout. You’ll start by designing a draft of the company’s home page. Olivia wants the page to include information about dHome’s pricing structure for various dome models. The page should also contain links to other pages on the Web site. A preview of the design you’ll create for Olivia is shown in Figure 5-78.
Complete the following:
1. Use your text editor to open dhometxt.htm, dometxt.css, and dtabletxt.css from the tutorial.05\case3 folder included with your Data Files. Enter your name and the date in the comment section of each file. Save the files as dhome.htm, dome.css, and dtable.css, respectively, in the same folder.
2. Go to the dhome.htm file in your text editor. Create links to the dome.css and dtable.css style sheets.
3. Scroll down to the pageContent div element, and above the paragraphs within that element, insert a table with the class name domeSpecs. Add the table summary, “A table describing six dome models sold by dHome, Inc.” and add the caption, “Building Models”.
4. Create a column group containing three col elements with class names of firstColumn, middleColumns, and lastColumn. The middleColumns element should span
two columns in the table.This tutorial includes complete steps from 1-22.
Learn More -
CIS 363B Week 2 iLab 2 Site Navigation and Styles
$15.00CIS 363B Week 2 iLab 2 Site Navigation and Styles
Scenario and Summary
Complete Tutorial 3, Case Problem 1.
Complete Tutorial 4, Case Problem 1.Deliverables
Following the directions below on how to upload to the Web Lab Server, you will create a subfolder within your root folder for each assignment and then upload your files to the appropriate folder.STEP 1
Complete Tutorial 3, Case Problem 1. Click on Tutorial 3 Files to download the support files for the case project. Follow all the directions to complete this task in your book.Create a subfolder called Week2Lab1 and upload your files to this folder.
STEP 2
Complete Tutorial 4, Case Problem 1. Click on Tutorial 4 Files to download the support files for the case project. Follow all the directions to complete this task in your book.Create a subfolder called Week2Lab2 and upload your files to this folder.
Learn More -
Website with JavaScript and Mobile Device Stylesheet
$12.00Website with JavaScript and Mobile Device Stylesheet
1. Review the articles at http://www.hand-interactive.com/resources/detect-mobile-javascript.htm and/or http://www.abeautifulsite.net/blog/2011/11/detecting-mobile-devices-with-javascript/. Also review the articles at http://www.thesitewizard.com/javascripts/change-style-sheets.shtml and/or http://www.w3schools.com/dhtml/default.asp.
Learn More
2. Create a page that uses JavaScript to determine if the user is viewing the site with a mobile device and changes the stylesheet to display the page appropriately. Your page should meet the following technical requirements:
• The page should ask the user for some kind of input. This can be text input to a textbox, a choice from a pulldown or a radio button.
• The page should use this input to modify the display in some way. For example, the user may choose a background color from a pulldown menu, or the page may refer to the user by name once the name is entered into a text box.
• The page should have some kind of interactive graphic capability, such as a picture that changes on click or mouseover.
• The page should report some information obtained from the user without human input, such as the type of browser or the time set on the user’s computer. -

Principles of Web Design Sklar Chapter 6 Hands-On Projects 3 4 CIT-150
$15.00Principles of Web Design Sklar Chapter 6 Hands-On Projects 3 4 CIT-150
3. In this project, you will create a floating text box.
a. Copy the floatactivity.html file from the Chapter06 folder provided with your Data Files to the Chapter06 folder in your work folder. (Create the Chapter06
folder, if necessary.)
b. Open the file floatactivity.html in your HTML editor, and save it in your work folder as floatactivity1.html.
c. In your browser, open the file floatactivity1.html. When you open the file, it looks like Figure 6-30.
Figure 6-30 Original HTML file for Project 3
d. Examine the page code. Notice that an existing style rule sets a background-color for a floatbox class, as shown in the following code fragment:
.floatbox {background-color: #ccddee;}
e. This class is applied to the first <p> element in the document, as shown in Figure 6-30. Your goal is to use a variety of box properties to create a finished page that looks like Figure 6-31.
Figure 6-31 Completed HTML file for Project 3
f. Use the following properties to create the finished floating text box:
• width
• height
• float
• padding
• margin-right
• border
• text-align
Experiment with the different properties until you achieve results that look as close to the finished page as possible.4. In this project, you will have a chance to test the border properties. Save and view the file in your browser after completing each step.
Learn More
a. Using your HTML editor, create a simple HTML file (or open an existing file) that contains heading and paragraph elements. Save the file in your Chapter06
folder as borders.html.
b. Add a <style> element to the <head> section as shown in the following code:
<head>
<title>CSS Test Document</title>
<style type="text/css">
</style>
</head>
c. Experiment with the different border styles. Start by applying any of the following style rules to your document’s elements:
h1 {border: solid 1px black;}
h2 {border-top: solid 1px; border-bottom: solid 3px;}
p {border-left: double red; border-right: solid 1px;}
d. Experiment with adding padding properties to your style rules to off set the borders from the text. The following style rules have sample padding properties
to try:
h1 {border: solid 1px black; padding: 20px;}
h2 {border-top: solid 1px; border-bottom: solid 3px;
padding-top: 15px; padding-bottom: 30px;}
p {border-left: double red; border-right: solid 1px;
padding-left: 30px; padding-right: 20px;}
e. Continue to experiment with the border and padding properties. Try adding color and margin properties to see how the elements are displayed. -

Principles of Web Design Sklar Chapter 5 Hands-On Projects CIT-150
$15.00Principles of Web Design Sklar Chapter 5 Hands-On Projects CIT-150
1. In the following set of steps, you will learn how to style listitem elements with the list-style properties. As you work through the exercise, refer to Figure 5-27 to see the results you will achieve. Save your file and test your work in the browser as you complete each step.
To apply the list-style properties:
a. Open the file lists.html in your HTML editor, and save it in your work folder as lists1.html.
b. Copy the image file diamond.gif into your work folder.
c. In your browser, open the file lists1.html. When you open the file, it looks like Figure 5-26. Notice that the file contains three lists. You will apply a different liststyle to each list.
d. The first list on the page is a bulleted list that currently displays the default disc (bullet) style. Write a style rule that uses a class selector circle to uniquely select the list. Set the list-style-type property to change the bullet style to circle.
ul.circle {list-style-type: circle;}
e. Now apply the style to the first list by adding the class attribute to the <ul> element.
<!-- Bulleted List -->
<ul class="circle">
<li>Bread</li>
<li>Milk</li>
<li>Cheese</li>
<li>Eggs</li>
</ul>
f. The second list on the page is an ordered list that currently displays the default decimal style. Write a style rule that uses a class selector alpha to uniquely select the list. Set the list-style-type property to change the style to upper-alpha.
ol.alpha {list-style-type: upper-alpha;}
g. Now apply the style to the first list by adding the class attribute to the <ol> element.
<!-- Alphabetical List -->
<ol class="alpha">
<li>Spring</li>
<li>Summer</li>
<li>Fall</li>
<li>Winter</li>
</ol>
h. The third list on the page is an unordered list that currently displays the default bullet style. Write a style rule that uses a class selector image to uniquely select the list. Set the list-style-image property to a URL value, using the image file diamond.gif.
ul.image {list-style-image: url(diamond.gif);}
i. Now apply the style to the first list by adding the class attribute to the <ol> element. Figure 5-27 shows the finished document.
<!-- List Image -->
<ul class="image">
<li>Spruce</li>
<li>Pine</li>
<li>Elm</li>
<li>Birch</li>
</ul>2. Modify an existing HTML document to use Cascading Style Sheets.
Learn More
a. Build styles using the existing standard HTML elements in the file.
b. Test the work in multiple browsers to verify that all styles are portable.
c. Remove the files and place them in an external style sheet.
d. Link the HTML file to the style sheet. Test to make sure the file is displayed properly.

You have no items in your shopping cart.

