HTML/JS
-
New Perspectives on HTML, CSS, and Dynamic HTML 5th edition Tutorial 14 Case 3 Sporting Abstract and Statistical Review
Regular Price: $25.00
Special Price $20.00
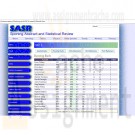
New Perspectives on HTML, CSS, and Dynamic HTML 5th edition Tutorial 14 Case 3 Sporting Abstract and Statistical ReviewData Files needed for this Case Problem: gradient.png, modernizr-1.5.js, nfltxt.htm, sasr.css, sasrlogo.png, stats.js, table.css, tabletxt.jsSporting Abstract and Statistical Review Walter Delacreaux is the owner and operator of Sporting Abstract and Statistical Review, a new blog and forum to report on and analyze data from the world of sports. Walter wants to fill his Web site with useful tables that other people who share his enthusiasm for statistics can review and study. He wants these tables to be as interactive as possible. One feature he wants to add to his tables is the ability to sort them in a different order by clicking a column heading. Figure 14-70 shows a preview of the Web page you'll create for Walter.Learn More
Walter has stored statistics about quarterbacks, running backs, wide receivers, kick returners, and punt returners in a set of multidimensional arrays. He also has created design styles for the stats table that he wants to appear on his Web page. Your job will be to write the code that generates the node tree for the Web table, and to provide commands to sort the contents of that table when a user clicks one of the table heading cells. Walter wants the table to be sorted by default in descending order, but users should be able to change the sort direction by clicking the same column heading twice in succession. Walter also has provided buttons to allow users to switch from one category of player to another.
Complete the following:
1. Using your text editor, open the nfltxt.htm and tabletxt.js files from the tutorial.14\case3 folder. Enter your name and the date in the comment section of each file, and then save them as nflstats.htm and table.js, respectively.
2. Take some time to view the contents of the nflstats.htm, table.js, and stats.js files, noting the structure of the HTML document and the global variables and functions in the two JavaScript files.
3. Return to the nflstats.htm file in your text editor, and then add a link element to connect the file to the table.css style sheet file. Add script elements to connect to the stats.js file followed by the table.js file. Save your changes to the file.
4. Go to the table.js JavaScript file. Below the comment section, declare the following global variables:
a. caption, which is used to store the text of the table caption. Set its initial value to the value of the qbStatsCaption variable.
b. head, which is used to store the array of column headings. Set its initial value to the value of the qbStatsHead variable.
c. sortIndex, which is used to store the column index of the table column by which the stats table will be sorted. Set its initial value to the value of the qbStatsSort variable.
d. stats, which is used to store the multidimensional array of player statistics. Set its initial value to the value of the qbStats variable.
e. sortDown, which is used to indicate whether the table is sorted in descending or ascending order. Set its initial value to true.
5. Add a command to run the makeStatsTable() function when the page is loaded by the browser.
6. You’ll create the Web table with separate functions for each part of the table. The first function you’ll create is the createTableCaption() function, which is used to create the structure of the table caption. The function has two parameters, table and caption, which are used for the table element node and the caption text, respectively. Have the function create the element node <caption>caption</caption> where caption is the value of the caption parameter, and then append that element node to the table parameter.
7. Create the createTableColumns() function. The purpose of this function is to create the structure of the colgroup element. The function has two parameters: table, which represents the table element, and cols, which is an integer containing the number of columns in the column group. Use a for loop to generate the node structure <colgroup> <col /> <col class=”sortColumn” /> <col /> … </colgroup>
where the number of nested col elements is equal to the value of the cols parameter. Note that Walter wants the column by which the table is sorted to be given the class name sortColumn. Therefore, within your for loop, test each index number to determine whether it equals the sortIndex variable. If it does, add the class attribute to the col element. Append the node structure to the table parameter.
8. Create the createTableHead() function. The purpose of this function is to write the table header. The function has two parameters: table for the table element and cols for the number of columns in the header. Use a for loop to create the node structure <thead> <tr> <th id=”1sortcolumn”>head[1]</th> <th id=”2sortcolumn”>head[2]</th> … </tr> </thead> where head[1], head[2], etc., are the values from the head array global variable you declared in Step 4. Append the node structure to the table parameter.
9. Create the createTableFoot() function. The purpose of this function is to write the table footer. The function has two parameters, table and cols, and creates the node structure
<tfoot> <tr> <th colspan=”cols”> Stats compiled by SASR © 2015. All rights reserved. </th> </tr> </tfoot> where cols is the value of the cols variable. (Hint: You must use the colSpan property to reference the colspan attribute.) Append the node structure to the table parameter.
10. Create the createTableBody() function. The purpose of this function is to write the rows and columns of the table body. The function has three parameters: table representing the Web table, rows, which contains the integer value of the number of rows in the table body, and cols, which contains the integer value of the number of cells within each table row. Use a nested for loop to generate the node structure <tbody> <tr> <td class=”textCell”>stats[0][0]</td> <td class=”numCell”>stats[0][1]</td> … </tr> <tr> <td class=”numCell”>stats[1][0]</td> … </tr> … </tbody>
where stats[0][0], stats[0][1], etc., are the values from the stats multidimensional array you declared in Step 4. Note that for each td element, you add a class attribute with the value textCell or numCell based on whether the value displayed in the cell is a number or a text string. Use the isNumeric() function provided in the table.js file to make this determination. Append the node structure to the table parameter.
11. Create the makeStatsTable() function. The purpose of this function is to sort the statistical values, put the different parts of the table together, and append the table to the Web document. Add the following commands to the function:
a. Declare a variable named rows equal to the length of the stats array.
b. Declare a variable named cols equal to the length of the head array.
c. Use the JavaScript sort method along with the colSort() function to sort the contents of the stats array.
d. Create a table element named tableElem with the id statsTable.
e. Call the createTableCaption(), createTableColumns(), createTableHead(), createTableFoot(), and createTableBody() functions using tableElem as the parameter value for the table parameter and caption, rows, and cols as the values for the caption, rows, and cols parameters, respectively, to construct the entire node structure of the Web table.
f. Declare the statsBox variable, referencing the element in the Web document with the id statsBox.
g. Replace the first child node of statsBox with the tableElem element node.
12. Save your changes to the file, and then load nflstats.htm in your Web browser. Verify that the content of the Quarterbacks table is displayed on the page.
13. Next, you’ll enable users to sort the table by different columns. Return to the table.js file in your text editor. Go to the createTableHead() function. For each th element node generated in your for loop, add an onclick event handler to run the changeDirection() function when clicked.
14. Create the changeDirection() function. The purpose of this function is to either
change the sorting direction of the currently selected column, or sort the table by a
newly selected column. Add the following commands to the function:
a. Use the parseInt() function to extract the index number from the currently selected column. (Hint: Use the this keyword.)
b. If the index number is equal to the value of the sortIndex global variable you created in Step 4 (indicating that the user has clicked the current sort column), use the negation operator to change the Boolean value of the global sortDown variable from false to true or from true to false. Otherwise, change the value of the sortIndex variable to the index number of the currently selected column.
c. Call the makeStatsTable() function to regenerate the statistics table.
15. Save your changes to the file, and then reload nflstats.htm in your Web browser. Verify that you can change the sorting column by clicking each column heading, and that you can toggle the sorting direction by clicking each column heading in succession.
16. Next, you’ll enable users to select different statistics tables to view in the Web page. Return to the table.js file in your text editor. Create the changeTable() function with a single parameter: statsCategory. The statsCategory parameter will contain a text string indicating the statistics table to view. Add the following commands to the function:
a. Use the eval() function to change the values of the global variables caption, head, sortIndex, and stats to the value of the statsCategoryCaption, statsCategoryHead, statsCategorySort, and statsCategory variables, respectively, where statsCategory is the value of the statsCategory parameter.
b. Change the value of the sortDown global variable to true.
c. Call the makeStatsTable() function to regenerate the statistics table.
17. Add informative comments to the code in your file and then close the file, saving your changes.
18. Return to the nflstats.htm file in your text editor. Locate the input elements for the five table buttons, and then add an onclick attribute to each input button to run the command changeTable(stats) where stats is either qbStats, rbStats, wrStats, krStats, or prStats depending on whether the Quarterbacks, Running Backs, Wide Receivers, Kick Returners, or Punt Returners button is clicked.
19. Save your changes to the file, and then reload nflstats.htm in your Web browser. Verify that you can load different statistics tables by clicking the five statistical category buttons.
20. Submit your completed files to your instructor, in either printed or electronic form, as requested. -

New Perspectives on HTML, CSS, and Dynamic HTML 5th edition Tutorial 12 Case 2 The VoterWeb
Regular Price: $15.00
Special Price $12.00
New Perspectives on HTML, CSS, and Dynamic HTML 5th edition Tutorial 12 Case 2 The VoterWeb
VoterWeb is an online source for election news and results from national. state, and local races. Faye Summerall is one manager of the Web site development team. Faye wants to add horizontal bar charts to Web pages displaying election results. The length of each bar should correspond to the percentage of votes that a candidate receives in a given race. She has asked you to develop a JavaScript program that automatically writes the bar chat. Figure 12-37 shows a preview of the Web page for a series of Congressional races.
The horizontal bar charts will be created within table rows. The length of each bar will be determined by the number of blank table cells it contains. For example, to display a horizontal bar representing 45% of the vote, you'll write 45 blank table cells. The color of each bar is determined by the background color of its table cells. To apply the background color, you'll add class attributes to the blank table cells. A style rule in the results. css style sheet will determine the background color for each class of table cells.
The data for each election has been stored in arrays in an external file named votes.js. The file includes data from five elections for different Congressional seats. The names of the races have been stored in an array named race. The name1 array contains the candidate names for the first race, thename2 array contains the candidate names for the second race, and so on through the name5array. The party affiliations for the candidates in the first race have been stored in theparty1 array, for the second race in the party2 array, and so forth. The votes1 through votes5 arrays store the votes for each candidate in each of the five races.Complete the following:
1. Using your text editor, open electtxt.htm and bartxt.js from the tutorial.12\case2 folder, enter your name and the datein the head section, and then save the files as election.htm and barchart.js, respectively.2. Open the votes.js ile from the tutorial.12\case2 folder in your text editor, study the file to become familiar with the different arrays and their contents, and then close the file. Return to theelection.htmfile in your text editor, and then add two script elements to the head section of the file pointing to thebarchart.js and votes.jsfiles. Save your changes to the document.
3. Go to the barchart.jsfile in your text editor. Insert a function namedtotalvotes(). The purpose of this function is to calculate the sum of all the values within an array. The function has a single parameter, votes, representing one of the five vote arrays (vote1 through vote5). Add the following commands to the function:
a. Declare a variable named total, setting its initial value to 0.
b. Create a for loop that loops through each of the items in the votes array, adding that item's value to the total variable.
c. After the for loop is completed, return the value of the total variable from the function.
4. Insert another function named calcPercent(). The purpose of this function is to calculate a percentage, rounded to the nearest integer. The function has two parameters: item and sum. Have the function return the value of the item parameter divided by sum, multiplied by 100, and then rounded to the nearest integer. (Hint: Use the Math.round() method to round the calculated percentage.)5. Insert a function named createbar(). The purpose of this function is to write the blank table cells that make up each horizontal bar in the election results. The function has two parameters: partytype and percent. The partyType parameter will be used to store the party affiliation of the candidate (D, R, I, G, or L). The percent parameter will be used to store the percentage the candidate received in the election, rounded to the nearest integer. Add the following commands to the function:
a. Create a switch statement that tests the value of the partyType parameter. If partyType equals D, store the following text string in a variable named bartext: <td class='dem'> </td> If partyType equals R, barText should equal the following: <td class='rep'> </td> If partyType equals I, barText should equal the following: <td class='ind'> </td>
If partyType equals G, barText should equal the following: <td class='green'> </td> Finally, if partyType equals L, barText should equal the following: <td class='lib'> </td> Be sure to add a break statement after each case statement so browsers do not attempt to test additional cases after finding a match.
b. Create a for loop in which the counter variable goes from 1 up through the value of the percent parameter in increments of 1. At each iteration, write the value of the barText variable to the Web document.6. Insert a function named showresults(). The purpose of this function is to show the results of a particular race. The function has four parameters: race, name, party, and votes. The race parameter will contain the name of the race. The name parameter will contain the array of candidate names. The party parameter will contain the array of party affiliations. Finally, thevotes parameter will contain the array of votes for each candidate in the race. Add the following commands to the function:
a. Declare a variable named totalv equal to the value returned by the totalVotes() function using votes as the parameter value.
b. Write the HTML code <h2>race</h2> <table> <tr> <th>Candidate</th> <th class='num'>Votes</th> <th class='num'>%</th> </tr> to the document, where race is the value of the race parameter.7. Next, within the showResults() function, add a for loop in which the counter variable starts at 0 and, while the counter is less than the length of the name array, increase the counter in increments of 1. At each iteration of the for loop, run the commands outlined in the following five steps:
a. Write the HTML code <tr> <td>name (party)</td> <td class='num'>votes</td> where name, party, and votes are the entries in the name, party, and votes arrays, respectively, for the index indicated by the counter variable.
b. Create a variable named percent equal to the value returned by the calcPercent() function. Use the current value from the votes array for the value of the item parameter, and use the value from totalV for the value of the sum parameter.
c. Write the HTML code <td class='num'>(percent%)</td> where percent is the value of the percent variable.
d. Call the createBar() function using the current value of the party array and percent as the parameter values.
e. Write a closing </tr> tag to the document.8. After the for loop has completed within the showResults() function, write a closing </table> tag to the document.
9. Write comments throughout your code to document your work.
10. Save your changes to the file, and then return to theelection.htmfile in your text editor. Scroll down the document. After the Congressional Races h1 heading, insert a script element containing the following commands:
a. Call the showresults() function using race[0], name1, party1, and votes1 as the parameter values.
b. Repeat the previous command for the remaining four races, using race[1] through race[4] as the parameter values for the race parameter, party2 through party5 for the party parameter, name2 through name5 for the name parameter, and votes2 through votes5 for the votes parameter.11. Save your changes to the file, and then openelection.htm in your Web browser. Verify that the correct percentage appears for each candidate, and that a horizontal bar chart representing the percent value is displayed next to each candidate.
12. Submit your completed Web site to your instructor, in either printed or electronic form, as requested.
Learn More -

CIS363A Week 3 iLab 3 Create a Web Page Using CSS
Regular Price: $20.00
Special Price $15.00
CIS363A Week 3 iLab 3 Create a Web Page Using CSS
A local recruiter wants you to make a Web page for his information technology staffing company. He wants a Web page that has informed recent graduates about careers as Web programmers and Web designers. Create a Web page that will give information about each of the positions mentioned. The page content should be as followed:
Descriptions about each of the positions
Skills and/or education required for these positions
Salaries, benefits associated with these positions
Professional organizations of which people who hold these positions are typical membersThis page must have at least five graphical elements. You must implement the following CSS features:
Box Model
Floating Elements
Borders
Remember that the recruiter wants this page to be well organized, informative, and attractive. Use colors and great graphics to make this Web page interesting so that he can attract more business.Software Citation Requirements
This course uses open-source software which must be cited when used for any student work. Citation requirements are on the Open Source Applications page.
Please review the installation instruction files to complete your assignmentDeliverables
Submit your assignment to the Dropbox, located at the top of this page. For instructions on how to use the Dropbox, read these step-by-step instructions. (See the Syllabus section "Due Dates for Assignments & Exams" for due dates.)
Submit a Week 3 Lab folder, including
The HTML Web page
Associated CSS files
Images and multimedia (if any)Category Points
Use of Box Model, bordering, and floating elements 15
Completed Web page based on project specifications 15
Correct External CSS file that attaches to each page 10
Total 40Required Software
Software Name 1
Access the software at https://lab.devry.edu.
Steps: 1, 2, and 3
Software Name 2
Access the software at https://devrydesktop.rkon.com.
Steps: 4 and 5Lab Steps
STEP 1: Gather Web Content
Create written Web content about each of the positions.
Gather all images that you will use.STEP 2: Create Your Web Page
Create an informal page layout for the Web page.
Create the Web page based on criteria mentioned.STEP 3: Submit Your Assignment
Learn More
Upon completion of this step, upload your site to the Web server and attach a copy of the zipped folder to the Dropbox.
Submit your assignment to the Dropbox, located at the top of this page. For instructions on how to use the Dropbox, read these step-by-step instructions. -

IT 270 HTML Form Module 6 Assignment
Regular Price: $20.00
Special Price $15.00
IT 270 HTML Form Module 6 Assignment
In this assignment you need to create an HTML page that meets the following requirements. The theme and content of the page can be of your choice. (Refer to Tutorial 13)
1. Create an HTML form.
2. Create and Initialize three arrays.
3. Use for-loops to populate those arrays.
4. Add an element to the end of one array.
5. Remove an element from the end of another array.
6. Add a new element to the beginning of one array.
7. Add at least one additional array method of your choice.
8. Convert an array to a string.
9. Use the converted string, assign to a string variable, and use it to populate a form field.
10. Create different functions to handle the operations of steps 4, 5, 6, and 7. (You can create additional array methods.)
11. Create four or more buttons on the form with different event handlers to start the above functions upon clicking them.
12. Create an additional button with an event handler to complete the operation in step 10.
For additional details, refer to the IT 270 Assignments Rubric document in the Assignment Guidelines and Rubrics section of the course.
Critical Elements Exemplary Proficient Needs Improvement Not Evident Value
Design
The design is clean and professional looking and has a high level of creativity.
(27-30) Most of the design is clean and professional looking and has a moderate level of creativity.
(24-26) The design is adequate but shows little creativity.
(21-23) The design is poor and shows no creativity.
(0-20) 30
Integration and Application All relevant course and module concepts are correctly applied where required.
(54-60) Most of the relevant course and module concepts are correctly applied where required.
(48-53) Some of the relevant course and module concepts are correctly applied where required.
(44-47) Does not correctly apply any of the course or module concepts where required.
(0-43) 60
Writing Mechanics No errors related to organization, grammar and style, and citations
(9-10) Minor errors related to organization, grammar and style, and citations
(8) Some errors related to organization, grammar and style, and citations
(7) Major errors related to organization, grammar and style, and citations(0-6) 10
Learn More
Earned Total
Comments: 100% -

IT 270 HTML5 Multimedia Assignment
Regular Price: $20.00
Special Price $15.00
IT 270 HTML5 Multimedia Assignment
Create an HTML webpage that meets the following requirements. The theme and content of the page can be of your choice.
Learn More
Use and integrate at least two different audio formats (sound clips).
Use and integrate at least two different video formats (YouTube videos, Flash players, etc).
Embed at least one Java applet.
Use CSS3 to display and rotate an object on your page. -

New Perspectives on HTML, CSS, and Dynamic HTML 5th edition Tutorial 11 Case 3 Kiddergarden
Regular Price: $20.00
Special Price $15.00
New Perspectives on HTML, CSS, and Dynamic HTML 5th edition Tutorial 11 Case 3 Kiddergarden
Kiddergarden Pete Burnham manages the Web site kiddergarden, a family-friendly site containing games, puzzles, stories, and other activities. Pete has asked for your help in developing a Web page containing a number guessing game.
Pete needs you to create a script that generates a random integer between 1 and 500. A user has up to 10 guesses to guess the number. After each guess, the page will tell the user whether his or her guess is too high, too low, or exactly correct. A preview of the page is shown in the Figure 11-40.You will be provided with a function named checkEndGame() that displays an alert box telling the user whether he or she has won the game by guessing the number within the allotted number of guesses, or has a lost by failing to guess the correct number. The rest of the code is left for you to complete.
Complete the following:
1. Use your text editor to open the guesstxt.htm file from the tutorial.11\case3 folder included with your Data Files. Enter your name and the date in the comment section of the file and save it as guess.htm. Take some time to study the content and structure of the document, including the elements within the guessform web form.2. Within the script element, declare the following four global variables: lowest, size, randNum, and guess. The lowest variable will be used to store the lowest possible random integer in the guessing game. The size variable will store the number of random integers in the game. The randNum variable will store the random number generated by the Web page. The guess variable will store the users current guess. Set the initial values of the lowest and size variable to 1 and 500, respectively. Do not set the initial values for the randNum and guess variables.
3. Below the four variable declarations you just created, insert the generateRandom() function. The function, will be used to generate a random number, has no parameters. It should contain a single statement to set the value of randNum variable to a random integer between the values of the lowest and size variables. (Hint: Use the code describing how to generate random integers presented in the tutorial to aid you in writing this function.)
4. Insert a function named reportResult() that display the result of each guess. The function has no parameters and should include the following commands:
a. Set the value of the guess variable to the value of the guess field in the guessform Web form. Use the eval() method to convert the text in the field to a numeric field.
b. Declare a variable named result that will contain the result of the users guess. Use nested conditional operator to set the value of result to the text right! if guess equals randNum; if guess is greater than randNum, set the value of result to the text string too high; otherwise, set the value result to the text string too low.
c. Reduce the value of the guesses field in the guessform Web form by 1 to indicate that the user has one fewer guess left.
d. Set the value of result field in the guessform Web form to the value of the result variable.
e. Call the checkEndGame()function to test whether the game has been concluded by the user.5. Create a function named resetGame(). The purpose of this function is to reset the game with a new random number and a new set of guesses. The function has no parameters and should include the following commands:
a. Set the value of the guesses field in the guessform Web form to 10.
b. Set the value of the guess field in the guessform Web form to an empty text string ("").
c. Set the value of the result field to an empty text string ("").
d. Call the generateRandom() function.6. Add an onload event handler to the <body> tag to run the generateRandom() function when the browser initially loads the page.
7. Add an onclick event handler to the input element for the guess button to run the reportResult() function when the button is clicked.
8. Add an onclick event handler to the Play Again button to run the resetGame() function when the button is clicked.
9. Save your changes to the file, and then load the guess.htm in your Web browser. Verify that the page generates a random number, and that it reports whether your guess is too high, too low, or correct when you enter a number in a guess field and click the Guess button. Further verify that the number of guesses remaining counts down by 1 starting from 10 and going to 0.
10. Submit your completed project to your instructor, in either printed or electronic form, as requested.
Learn More -

CIS 273 Week 8 Assignment Single Page Website
$15.00CIS 273 Week 8 Assignment Single Page Website
Deliverables: One (1) Web page and one (1) Cascading Style Sheet (.css), including the image file.
Imagine that you have just started your own freelancing business. You have been hired to create a Web page for a company of your choice that announces the item of the week, month, or year. (e.g., Car of the Year, Pet of the Month, Sandwich of the Week, etc.)
1. Create a Cascading Style Sheet (.css) that applies a minimum of background color and font.
2. Create one (1) Web page and a heading tag that overrides the Cascading Style Sheet (.css) font settings and makes the font of the heading different from the rest of the page.
3. The page must also include:
a. An image depicting the item of the week, month, or year.
b. At least three (3) hyperlinks to Websites of associated interest to the item and a brief description of what they are about.
Example: Click here to visit Strayer University
This link will take you to the University’s main page where you can find further information.
4. At the bottom of the page, create a link that would allow the user to email you with questions using the mailto: tag and your email address.
Note: When the email opens the subject line should automatically say, "More Information Please".
5. Create a footer displaying the Copyright symbol (using the character entity reference), the year, and your name.
Example: © 2012 Mary Smith
6. Include a piece of JavaScript in the page.The specific course learning outcomes associated with this assignment are:
Learn More
Describe the structure of the World Wide Web as interconnected hypertext documents.
Create and validate HTML documents.
Create presentations using Cascading Style Sheets and DHTML.
Summarize Web standards in terms of specifications, guidelines, software, and tools.
Write clearly and concisely about Web design and development using proper writing mechanics and technical style conventions. -

CIS 273 Lab Assignment 9 JavaScript
$15.00CIS 273 Lab Assignment 9 JavaScript
Deliverable: Two (2) Web pages and one (1) Cascading Style Sheet (.css)
Follow the directions below to complete Lab Assignment 9:
Learn More
1. Create two (2) Web pages describing what is displayed and how.
2. Create one (1) Cascading Style Sheet (.css) file with background color, font type, and font size, and assign it to both Web pages.
3. On one Web page, add JavaScript that creates an effect on the whole page. Note: If you use the Internet for JavaScript samples, please use free or open source samples only.
4. On the other Web page, add JavaScript that does something to the cursor. Note: If you use the Internet for JavaScript samples, please use free or open source samples only. -
CIS 273 Lab Assignment 7 Form Page
$12.00CIS 273 Lab Assignment 7 Form Page
Deliverables: One (1) Web page and one (1) Cascading Style Sheet (.css)
Follow the directions below to complete Lab Assignment 7:
Note: The CGI bin script does not work for us because we do not have a server to run it on.
Therefore, we will use the code listed here instead of the .js files.In order to have the Submit and Cancel buttons clear the fields, put this line in your code:
After your <head> tag:
<meta charset="utf-8" />
And this line after your <body> tag:
<form id='sampleform' method='post' action='' >
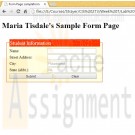
The above code will help the fields clear without taking you away from the page.1. Re-create the Web page with a form, and create a heading that states your name and the purpose of the page. Example: “Mary Smith’s Sample Form Page” states the purpose of the page.
Learn More
2. Create an entry field for:
a. “Name”.
b. “Street Address”.
c. “City”.
d. “State (abbr.)”.
3. Create the formstxt.css sheet and apply it to the page.
4. Enter your city and state as the default values for the fields.
5. Use local tags on the page to override the .ccs and set the size of the font for “Student Information” to 6 pt.
6. Create the “Submit” and “Cancel” buttons.
7. Validate that the buttons clear the name and street address when selected. -

CIS 363B Week 6 iLab 6 JavaScript and Dynamic Content
$15.00CIS 363B Week 6 iLab 6 JavaScript and Dynamic Content
iLAB OVERVIEW
Scenario and Summary
Complete Tutorial 10, Case Problem 1.Deliverables
Following the directions below on how to upload to the Web Lab Server, you will create a subfolder within your root folder for each assignment and then upload your files to the appropriate folder.iLAB STEPS
Learn More
STEP 1
Complete Tutorial 10, Case Problem 1. Click on Tutorial 10 Files to download the support files for the case project. Follow all the directions to complete this task in your book.
Create a subfolder called Week6Lab1 and upload your files to this folder.
Shopping Options
- Category
- Price
-
- $0.00 - $9.99 (1)
- $10.00 - $19.99 (63)
- $20.00 - $29.99 (8)
- $30.00 and above (3)

You have no items in your shopping cart.

