HTML/JS
-
WBG310 Week 1 Lab Interactive Web Page Scripting with Lab
Regular Price: $15.00
Special Price $12.00
WBG310 Week 1 Lab Interactive Web Page Scripting with Lab
Scenario/Summary
Apply skills learned in the tutorials to a real-world form specification. Create a form and validate the input, reporting errors and feedback directly to the web page.Deliverables
Zip all files into one folder titled W1_Lab1_YourName.zip. When you are done, submit your assignment.STEP 1: Create a Simple Form
1. Download the template file here: jsTemplate.zip
2. Unzip the jsTemplate.html file and save the file as w1_Lab1.html.
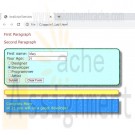
3. Within the form tags already coded in the template HTML file, create two text boxes, two buttons, and a radio button group (view Figure 1 for layout). Make sure the textboxes and radio buttons are labeled according to Figure 1.
4. Use the "name" attribute for all instances of the radio group set to: "skilltype."
5. Use input type of button for the Submit button NOT input type submit.
6. Use input type reset for the clear form button.
Figure 1: Using the Form Section of the TemplateSTEP 2: Create a Validation Function
1. Create a JavaScript function that will collect the information from the form and verify that it is the correct type and that there are no blank textboxes. Save and test the file to ensure that the textbox information is collected and the script is working correctly. Use the onclick event within the submit button tag to call this function.
2. Output validation error messages by writing directly to the <div> with the id of "results." (You may want to use Alert boxes for testing at first.)
3. Create a loop within the above function that collects the checked value of the radio button group. Once the value from the radio group is collected, create a function to pass the value for evaluation and return a message for the user based on his or her selected skill type using the <div> with the id of "more."STEP 3: Save and Test
1. Save the file.
2. View the page in a browser and test the program. A sample output looks like the following.
Figure 2: Series of Expected Results From TestingSTEP 4: Prep for Turn-In
Learn More
1. When your application functions as expected, zip the file and submit your assignment. -

WEB/240 Week 1 HTML Basics
Regular Price: $8.00
Special Price $5.00
WEB/240 Week 1 HTML Basics
Using the course software and Week One Template as a starting point, create a new HTML webpage and include the following:
Write a code to display your name in the largest-size heading element.
Write the markup language code for an unordered list to display the days of the week.
Write the markup language code for an ordered list that uses uppercase letters to order the items. This ordered list will display the following: Spring, Summer, Fall, and Winter.
Modify the following code snippet to indicate that the bolded text has strong importance:
<p>A diagram of the organization of a website is called a <b>site map</b> or <b>storyboard</b>. Creating the <b>site map</b> is one of the initial steps in developing a website.</p>Submit your assignment.
Learn More -

Project 3 Twin Life Magazine
Regular Price: $15.00
Special Price $12.00
Project 3 Twin Life Magazine
For your last project, you will design and build a web site for an online version of a magazine about twins.
1. Plan and design the layout of the web site. You will need to review the files provided and the specifications for the web site before you begin this part.2. You are to create an online version of a magazine created for parents of twins, triplets, and other multiple birth children following the guidelines below.
Learn More
a. There are to be a total of five web pages for the site that you need to hand in plus one style sheet. A front page called twinlife.htm, a news page called news.htm, a monthly features page called features.htm, a page for special articles called articles.htm and a customer survey page called survey.htm. In addition you need to create a style sheet containing all the styles for the site called twinstyles.css.
b. You will need to download the skeleton web pages, some text files and some images to use from the link on the Project 3 Instructions page. The text files contain information that you must use on the pages. Go through all of these files and decide what should go on each page. It is up to you what you put on which page although some of the information clearly goes on certain pages. Feel free to supplement them if you want but if you use additional images be sure to include them when you submit your assignment. The design of the web site is up to you.
c. General instructions for all pages.
1. Add your name, the date and an appropriate description to the head of every page.
2. The logo, twinlife.gif, must appear as an image map with links to the other pages at the top of every page. You will have to determine the coordinates using an image map editor like, http://www.image-maps.com.
3. Regular links to the other pages must appear in the footer of every page.
4. All image files provided must be used.
5. Code on every page must be neat, properly indented and easy to read
6. All content of the text files provided must be used.
d. All formatting should be done in twinstyles.css.
1. All formatting and styles for the web pages must appear in this stylesheet.
2. All style categories must have a descriptive comment before it in the page.
3. Styles must be grouped and organized.
4. All pages must have a common color scheme.
5. Styles must be added for each page to insure that it is attractive and easy to navigate.
e. Requirements for twinlife.htm.
1. Must be the home page for the site.
2. Must be attractive and easy to navigate.
3. Must contain the current date. Use the showDate() function from dates.js JavaScript file to generate the text of the current date (do not write your own date code).
f. Requirements for articles.htm.
1. Must contain articles about twins and child care.
2. Must be attractive and easy to navigate.
3. Must have at least two columns.
g. Requirements for features.htm
1. Must contain the advice column, photo of the month and a recipe of the month.
2. Must have borders around at least two elements.
3. Must be attractive and easy to navigate.
h. Requirements for news.htm
1. Must contain a page of news stories neatly formatted and easy to read.
2. Has a drop shadow around one object on the page.
3. Must be attractive and easy to navigate.
i. Requirements for survey.htm
1. Must contain a web form requesting information from the newsletter subscribers. The required content can be found in survey.txt.
2. Must be attractive and easy to navigate.
3. Must contain, a Submit button and a Reset Button. The form should be submitted using the CGI script at: http://www.twinlifemag.com/cgi/survey.
j. There are numerous files available with information that you must use in your website.
1. twinlife.htm – A homepage.
2. news.htm – A news page.
3. features.htm - A page containing monthly features.
4. articles.htm – A containing special articles about twins.
5. survey.htm - A customer survey page
6. twinstyles.css - A style sheet that must contain all the styles for the site.
7. twinlogo.gif – Image for logo of newsletter.
8. editor.txt - Content for a letter from an editor of the newsletter
9. howard.jpg - Image of the editor of the newsletter.
10. staff.txt - A list of the newsletter staff.
11. twins.jpg - An image of a set of twins.
12. chicago.txt - An article about a twins convention held in Chicago.
13. lasker.jpg – Image of author of convention article.
14. twintips.txt - Content of a Q&A page.
15. lawson.jpg - An image of the author of the Q&A information.
16. talk.txt - Content for an article about twins and talking.
17. kuhlman.jpg - An image of the author of the twins and talking article.
18. roles.txt - Content for an article about twins switching roles.
19. kerkman.jpg - An image of the author of twins switching roles.
20. rates.txt - Content for an article about the frequency of twins.
21. mbirths.txt - Content for an article about multiple births increasing.
22. recipe.txt - Recipe of the month.
23. deliver.txt - Photo of the month – goes with deliver.jpg
24. deliver.jpg - An image of the twins being delivered.
25. survey.txt - Specifics for the survey page.
26. dates.js - Javascript code to handle all date manipulation. -

New Perspectives on HTML, CSS, and Dynamic HTML 5th edition Tutorial 13 Case 3 The 221B Blog
Regular Price: $15.00
Special Price $12.00
New Perspectives on HTML, CSS, and Dynamic HTML 5th edition Tutorial 13 Case 3 The 221B Blog
The 221B Blog Kyle Harris is a fan of mystery stories. His favorites are the Sherlock Holmes stories by Sir Arthur Conan Doyle. Kyle decided to create a Web site for other fans of the fictional detective; the site is called The 221B Blog, named after the street number of Holmes’ fictional Baker Street address.
On his Web site, Kyle has added a discussion forum, links to other mystery Web sites, and a place for members to post artwork, essays, and fan fiction. Kyle also has created links to online text versions of all of the 56 short stories and four novels in the Sherlock Holmes canon. Kyle is concerned that having so many links on the home page will make it difficult for users to navigate the site. He’s seen sites in which lists of links are stored in popup or pull-down menus, remaining out of sight until needed by a user. Kyle wants to add a similar feature to his Web site and has asked you to help him write the code.
Each pull-down menu will have a heading that identifies the contents of the menu. Kyle envisions the HTML structure shown in Figure 13-41 in which the pull-down menus are nested within another list that acts as a menu bar. Each pull-down menu is identified with the class name submenu, and the h1 element containing each heading is identified with the class name submenuHead.Kyle already has created the style sheet for the menus and the HTML code for the Web page. Your job will be to write the JavaScript code to control the operation of the pull-down menus on the page.
Complete the following:
Learn More
1. Using your text editor, open the holmestxt.htm, pulltxt.css, and pulltxt.js files from the tutorial.13\case3 folder, enter your name and the date in the comment section of each file, and then save the files as holmes.htm, pullmenu.css, and pullmenu.js, respectively.
2. Take some time to view the contents of the holmes.htm file in your text editor, noting the structure of the two navigation lists and the submenus within each of those lists.
3. Open the holmes.htm file in your Web browser, and then study the placement of the six pull-down menus for the stories and novels of Sherlock Holmes. The page also contains four pull-down menus in the vertical navigation bar containing links to Web sites for User Submissions, Holmes on the Web, Arthur Conan Doyle, and Other Fictional Detectives, but these are obscured by the horizontal pull-down menus at the moment.
4. Go to the pullmenu.css file in your text editor. At the bottom of the file, insert the following two style rules: i) hide the ul elements nested within the li elements belonging to the submenu class by setting their display property to none; and ii) display a pointer cursor for h1 elements belonging to the submenuHead class.
5. Save your changes to the file and then return to the holmes.htm file in your text editor.
6. Add a script element linking the file to the pullmenu.js file and then close the file, saving your changes.
7. Go to the pullmenu.js file in your text editor. Insert a command to run the init() function when the page is loaded by the browser.
8. Create the init() function. The purpose of this function is to add a dynamic id attribute
to each pull-menu heading, and to create an onclick event handler for each submenu heading. Add the following commands to the function:
a. Create the submenuHeads variable containing the object collection for all elements in the document belonging to the submenuHead class.
b. Loop through the submenuHeads object collection, and for each item in the collection do the following: i) add the id attribute isubmenu_heading to the element, where i is the index number of the item in the object collection; and ii) run the showMenu() function when the item is clicked.
9. Create the hideAllMenuLists() function. The purpose of this function is to hide all pull-down menus on the page. Add the following commands to the function:
a. Create the allMenuLists variable referencing all of the ul elements in the document that are nested within the li elements belonging to the submenu class. (Hint: Use the querySelectorAll() method.)
b. Loop through the allMenuLists object collection. For each item in the collection, set the display style property value to none.
10. Create the showMenu() function. The purpose of this function is to display the pulldown menu corresponding to the menu heading that was clicked by the user. Add the following commands to the function:
a. Create the subIndex variable containing the index number found within the id property of the heading that was clicked by the user. (Hint: Use the parseInt() function to extract the index number.)
b. Create the allMenus variable containing the object collection of all elements belonging to the submenu class.
c. Create the currentMenu variable containing the element from the allMenus object collection with the index number indicated by the subIndex variable.
d. Create the currentMenuList containing the first ul element nested within the currentMenu object. This will be the pull-down menu that you will either hide or display on the page.
e. If the display property of currentMenuList is equal to block, change the display property to none to hide it; otherwise, because currentMenuList must be hidden, run the hideAllMenuLists() function to hide all other pull-down menus on the page and change the display style property of currentMenuList to block.
11. Document your code with informative comments throughout the JavaScript file.
12. Save your changes to the file, and then reload holmes.htm in your Web browser. Verify that when you click the pull-down menu headings located on the menu bar or on the vertical navigation list, the corresponding menu is displayed. Further verify that only one pull-down menu can be displayed at a time. Finally, verify that you can hide any pull-down menu by clicking the menu heading a second time.
13. Submit your completed files to your instructor, in either printed or electronic form, as requested. -

New Perspectives HTML5 and CSS3 7th Edition Tutorial 10 Case 4 VoterWeb
Regular Price: $20.00
Special Price $15.00
New Perspectives HTML5 and CSS3 7th Edition Tutorial 10 Case 4 VoterWeb
VoterWeb Pam Carls is a manager for the website Voter Web, which compiles voting totals and statistics from local and national elections. Pam has the results of recent congressional elections from eight districts in Minnesota stored as multidimensional arrays in a JavaScript file. Pam wants you to create a script displaying these results and calculating the vote percentage for each candidate within each race. A preview of the page is shown in Fig 10-38
Complete the following:
1. Use your editor to open the vw_election_txt.html and vw_results_txt.js files from the html10 case4 folder. Enter your name and the date in the comment section of each file, and save them as vw_election.html and vw_results.js respectively.2. Go to the vw_election.html file in your editor. Directly above the closing tag, insert script elements to link the page to the vw_congminn.js and vw_results.js files in that order. Defer the loading and running of both script files until after the page has loaded.
3. Scroll down the file and, directly above the footer, insert an empty section element. You will write the HTML code of the election report in this element. Save your changes to the file.
4. Open the vw_congminn.js file in your editor and study the contents. Note that the file contains the results of 8 congressional elections in Minnesota. The candidate information is stored in multidimensional arrays named candidate, party, and votes. Do not make any changes to this file.
5. Go to the vw_results.js file in your editor. Declare a variable named reportHTML containing the following HTML text
<h1>title</h1>
where title is the value of the raceTitle variable stored in the vw_congminn.js file.6. Create a for loop that loops through the contents of the race array using i as the counter variable. Place the commands specified in Steps a through e within this program for loop:
a. Create a variable named totalVotes that will store the total votes cast in each race. Set its initial value to 0.
b. Calculate the total votes cast in the current race by applying the forEach() method to ith index of the votes array using the calcSum() function as the callback function.
c. Add the following HTML text to the value of the reportHTML variable to write the name of the current race in the program loop
<table>
<caption>race</caption>
<tr><th>Candidate</th><th>Votes</th></tr>
where race is the ith index of the race array.
d. Call the candidateRows() function (you will create this function shortly) using the counter variable i and the totalVotes variable as parameter values. Add the value returned by this function to the value of the reportHTML variable.
e. Add the text </table> to the value of the reportHTML variable.7. After the for loop has completed, write the value of the reportHTML variable into the innerHTML of the first (and only) section element in the document.
8. Next, create the candidateRows() function. The purpose of this function is to write individual table rows for each candidate, showing the candidate's name, party affiliation, vote total, and vote percentage. The candidateRows() function has two parameters named raceNum and totalVotes. Place the commands in Steps a through c within this function.
a. Declare a local variable named rowHTML that will contain the HTML code for the table row. Set the initial value of this variable to an empty text string.
b. Create a for loop in which the counter variable j goes from 0 to 2 in steps of 1 unit. Within the for loop do the following:
i. Declare a variable named candidateName that retrieves the name of the current candidate and the current race. (Hint: Retrieve the candidate name from the multidimensional candidate array using the reference, candidate[raceNum][j].)
ii. Declare a variable named candidateParty that retrieves the party affiliation of the current candidate in the current race from the multidimensional party array.
iii. Declare a variable named candidateVotes that retrieves the votes cast for the current candidate in the current race from the multidimensional votes array.
iv. Declare a variable named candidatePercent equal to the value returned by the calcPercent() function, calculating the percentage of votes received by the current candidate in the loop. Use candidateVotes as the first parameter value and totalVotes as the second parameter value.
v. Add the following HTML code to the value of the rowHTML variable
<tr>
<td>name (party)</td>
<td>votes (percent)</td>
</tr>
where name is the value of candidateName, party is the value of candidateParty, votes is the value of candidateVotes, and percent is the value of candidatePercent. Apply the toLocaleString() method to votes in order to display the vote total with a thousands separator. Apply the toFixed(1) method to percent in order to display percentage values to 1 decimal place.
c. Return the value of the rowHTML variable.9. Save your changes to the file, and then load vw_election.html in your browser. Verify that the three candidate names, party affiliations, votes, and vote percentages are shown for each of the eight congressional races.
10. Pam also wants the report to display the vote percentages as bar charts with the length of the bar corresponding to the percentage value. Return to the vw_results.js file in your editor. At the bottom of the file, create a function named createBar() with one parameter named partyType. Add the commands described in Steps a through b to the function:
a. Declare a variable named barHTML and set its initial value to an empty text string.
b. Create a switch/case statement that tests the value of the partyType parameter.
If partyType equal "D" set barHTML equal to:
<td class="dem"></td>
If partyType equals "R" set barHTML equal to:
<td class="rep"></td>
Finally, if partyType equals "I" set barHTML to:
<td class="ind"></td>11. Return the value of barHTML.
Next, add these empty data cells to the race results table, with one cell for every percentage point cast for the candidate.12. Scroll up to the candidateRows() function. Directly before the line that adds the HTML code to the value of the rowHTML variable, insert a for loop with a counter variable k that goes from 0 up to a value less than candidatePercent in increments of 1 unit. Each time through the loop call the createBar() function using candidateParty and candidatePercent as the parameter values.
13. Add comments throughout the file with descriptive information about the variables and functions.
14. Save your changes to the file, and then reload vw_election.html in your browser. Verify that each election table shows a bar chart with different the length of bars representing each candidate’s vote percentage.
Learn More -
New Perspectives HTML5 and CSS3 7th Edition Tutorial 10 Case 1 Trophy Case Sports
Regular Price: $20.00
Special Price $15.00
New Perspectives HTML5 and CSS3 7th Edition Tutorial 10 Case 1 Trophy Case Sports
Trophy Case Sports Sarah Nordheim manages the website for Trophy Case Sports, a sports memorabilia store located in Beavercreek, Ohio. She has asked you to work on creating a script for a shopping cart page. The script should take information on the items that the customer has purchased and present in it table form, calculating the total cost of the order. A preview of the page you will create is shown in Figure 10-35.
Sarah has already designed the page layout. Your job will be to use JavaScript to enter the order information (this task will later be handled by a script running on website) and to write a script that generates the HTML code for the shopping cart table.
Complete the following:
1. Use your editor to open the tc_cart_txt.html, tc_cart_txt.js and tc_order_txt.js files from the htm10 case 1 folder. Enter your name and the date in the comment section of each file, and save them as tc_cart.html, tc_cart.js and tc_order.js respectively.2. Go to the tc_cart.html file in your editor. Directly above the closing </head> tag, insert script elements to link the page to the tc_order.js and tc_cart.js files in that order. Defer the loading and running of both script files until after the page has loaded.
3. Scroll down the file and directly below the h1 heading titled "Shopping Cart" insert a div element with the ID cart.
4. Save your changes to the file and go to the tc_ordet.js file in your editor.
5. Within the tc_order.js file, you will create arrays containing information on a sample customer order. Create an array named item that will contain the ID numbers of the items purchased by the customer. Add the following four item numbers to the array: 10582, 23015, 41807, and 10041.
6. Create an array named itemDescription containing the following item descriptions:
• 1975 Green Bay Packers Football (signed), Item 10582
• Tom Land, 1955 Football Card (unsigned), Item 23015
• 1916 Army-Navy Game, Framed Photo (signed), Item 41807
• Protective Card Sheets, Rem 100417. Create an array named itemPrice containing the following item prices: 149.93, 89.98, 334.93, and 22.67.
8. Create an array named itemQty containing the following quantities that the customer ordered of each item: 1, 1, 1, and 4.
9. Save your changes to the file, and then open the tc_cart.js file in your editor.
10. In your script, you will calculate a running total of the cost of the order. Declare a variable named orderTotal and set its initial value to 0.
11. Declare a variable named cartHTML that will contain the HTML code for the contents of the shopping cart, which will be displayed as a table. Set its initial value to the text string:
<table>
<tr>
<th>Item</th><th>Description</th><th>Price</th><th>Qty</th><th>Total</th>
</tr>12. Create a for loop that loops through the entries in the item array. Each time through the loop, execute the commands described in Steps a through e.
a. Add the following HTML code to the value of the cartHTML variable
<tr> <td><img src='tc_item.png' alt='item' /> </td>
where item is the current value from the item array.
b. Add the following HTML code to the cartHTML variable to display the description, price, and quantity ordered of the item
<td> description</td> <td>price</td> <td>quantity</td>
where description is the current value from the itemDescription array, price is the current value from the itemPrice array preceded by a $ symbol, and quantity is from the itemQty array.
c. Declare a variable named itemCost equal to the price value multiplied by the quantity value for the current item.
d. Add the following HTML code to the cartHTML variable to display the cost for the item(s) ordered, completing the table row
<td>$cost</td></tr>
where cost is the value of the itemCost variable, preceded by a $ symbol.
e. Add the value of the itemCost variable to the order Total variable to keep a running total of the total cost of the customer order.13. After the tor loop has completed, add the following HTML code to the value of the cartHTML variable, completing the shopping cart table
<tr>
<td colspan= '4'>Subtotal</td>
<td>Total</td>
</tr>
</table>
where total is the value of the orderTotal variable, preceded by a $ symbol.14. Apply the cartHTML value to the inner HTML of the div element with the ID cart.
15. Document your script file with appropriate comments, and then save your work.
16. Open the tc_cart.html file in your browser and verify that the page now shows the shopping cart data for the sample customer order.
Learn More -

New Perspectives on HTML, CSS, and Dynamic HTML 5th edition Tutorial 14 Case 1 New Accents Photography
Regular Price: $15.00
Special Price $12.00
New Perspectives on HTML, CSS, and Dynamic HTML 5th edition Tutorial 14 Case 1 New Accents Photography
After you have completed all of the tutorials in Chapter 14, turn to page 1001 in your textbook and do Case Problem 1, New Accents Photography. Make sure all files are uploaded to cPanel and submit your URL for the accents.htm file when you are finished.
Use JavaScript to create a dynamic style sheet switcher.
Data files needed for this Case Problem: accentstxt.htm, base.css, elegant.css, elegant.png, elegant_back.png, elegant_small.png, innovative.css, innovative.png, innovative_back.png, innovative_small.png, joyous.css, joyous.png, joyous_back.png, joyous_small.png, modernizr-1.5.js, nalogo.png, romantic.css, romantic.png, romantic_back.png, romantic_small.png, styletxt.js, zany.css, zany.png, zany_back.png, zany_small.png
New Accents Photography Christine Drake is the owner and chief photographer at New Accents Photography, a photography studio in Ashland, Oregon, that specializes in wedding photos. Wedding portraiture is a competitive business. and Christine wants to improve the design of her Web site's opening page to help interest couples in viewing her work. Christine is proud of the many and varied styles of portraiture that New Accents Photography offers, and she would like to create an interactive style sheet switcher that loads different style designs based on her photos.
Christine envisions making several style sheets, and she wants to limit the amount of work she'll have to do when updating the HTML code as she adds new sheets to her site. She would like your help with writing a JavaScript app that examines the list of style sheets in the site's home page and creates a figure box of clickable thumbnail images for each sheet design. A preview of the page you'll create for Christine is shown In figure 14-66.Christine already has written the style sheet code and most of the HTML code. Your job will be to write the JavaScript code to enable her customers to switch from one style design to another.
Complete the following:
1. Using your text editor, open accentstxt.htm and styletxt.js from the tutorial.14\case1 folder. Enter your name and the date in the comment section of each file, and then save the files asaccents.htm and stylebox.js, respectively.2. Go to the accents.htm file in your text editor. Currently, Christine has only one persistent style sheet linked to her document. Create a link to the preferred style sheet romantic.css and give it the title romantic.
3. Create links to the following alternate style sheets: elegant.css, joyous.css, innovative.css, and zany.css. Give the style sheets the titles elegant, joyous, innovative, and zany, respectively. Do not disable any of these style sheets at this time.
4. Create a link to the styleBox.js file. Take some time to study the rest of the HTML code and then close the file, saving your changes.
5. Go to the styleBox.js file in your text editor. Below the comments, declare a global variable named allSheets and set it equal to an empty array. The purpose of the allSheets variable will be to store references to each preferred and alternate style sheet in the document.
6. Add a command to run the loadStyles() function when the page is initially loaded.
7. Create the loadStyles() function. The purpose of this function is to load all of the preferred and alternate style sheets into the allSheets variable. Add the following commands to the function:
a. Declare the links variable referencing all link elements in the document.
b. Loop through the contents of the links object collection. For each item, determine whether it represents a preferred or alternate style sheet with a defined title.
c. Disable each alternate style sheet, but leave the preferred style sheet enabled.
d. Use the push() array method to add each preferred or alternate style sheet to the allSheets array.
e. After the completion of the for loop, call the displayThumbs() function.
8. Create the displayThumbs() function. The purpose of this function is to display thumbnail images of each style sheet design from the allSheets array. Add the following commands to the function:
a. Create an element node for the figure element and store it in the figBox variable.
b. Set the id of the figBox element node to the text string thumbnails.
c. Loop through each item in the allSheets array, and do the following for each item:
i) create an element node for the img element and store it in the sheetImg variable;
ii) set the source of the sheetImginline image to the file title_small.png, where title is the title value of the current style sheet in the loop; iii)set the title attribute of the inline image to match the title attribute of the current style sheet;
iv) add an onclick event handler to the inline image to run the showSheet() function when clicked; and
v) append sheetImg to the figBox node.
d. After the for loop has completed, append the figBox node to the document element with the id main.
9. Create the showSheet() function. The purpose of this function is to change the style sheet used in the document. Add the following commands to the function:
a. Declare the variable sTitle, setting it equal to the title attribute of the inline image that called the showSheet() function. (Hint: Use the this keyword to reference the inline image.)
b. Loop through all of the sheets in the allSheets array. Enable the style sheet whose title attribute equals sTitle and disable all of the others.
10. Document your work with descriptive comments throughout your code.11. Save your changes to the file, and then open accents.htm in your Web browser. Verify that five inline images have been added near the bottom of the Web page. Click each thumbnail image and verify that it loads a different style sheet. (Note: If you are using Safari for Windows or Macintosh Version 5.1.2, this style sheet switcher will not work.)
12. Submit your completed files to your instructor, in either printed or electronic form, as requested.
Learn More -

New Perspectives HTML5 and CSS3 7th Edition Tutorial 5 Case 3 Cauli-Wood Gallery
Regular Price: $20.00
Special Price $15.00
New Perspectives HTML5 and CSS3 7th Edition Tutorial 5 Case 3 Cauli-Wood Gallery
Cauli-Wood Gallery Sofia Fonte is the manager of the Cauli-Wood Gallery, an art gallery and coffee shop located in Sedona, Arizona. She has approached you for help in redesigning the gallery's website to include support for mobile devices and tablets. Your first project will be to redesign the site's home page following the principles of responsive design. A preview of the mobile and desktop versions of the website's home page is shown in Figure 5-61.
Sofia has already written much of the HTML code and some of the styles to be used in this project. Your job will be to finish the redesign and present her with the final version of the page.
Complete the following:
1. Using your editor, open the cw_home_txt.html and cw_styles_txt.css files from the html05 case3 folder. Enter your name and the date in the comment section of each file, and save them as cw_home.html and cw_styles.css respectively.2. Go to the cw_home.html file in your editor. Within the document head, insert a meta element that sets the browser viewport for use with mobile devices. Also, create links to cw_reset.css and cw_styles.css style sheets. Take some time to study the contents and structure of the document and then close the file saving your changes.
3. Return to the cw_styles.css file in your editor. At the top of the file, use the @import rule to import the contents of the cw_designs.css file, which contains several style rules that format the appearance of different page elements.
Explore 4. At the bottom of the home page is a navigation list with the id bottom containing several ul elements. Sofia wants these ul elements laid out side-by-side. Create a style rule for the bottom navigation list displaying it as a flexbox row with no wrapping. Set the justify-content property so that the flex items are centered along the main axis. Be sure to include the WebKit browser extension in all of your flex styles.
5. Define flex values for ul elements within the bottom navigation list so that the width of those elements never exceeds 150 pixels but can shrink below that value.
6. Sofia wants more highly contrasting colors when the page is displayed in a mobile device. Create a media query for mobile screen devices with maximum widths of 480 pixels. Within that media query, insert a style rule that sets the font color of all body text to rgb(211,211,211) and sets the body background color to rgb(51, 51, 51).
7. Sofia also wants to reduce the clutter in the mobile version of the home page. Hide the following elements for mobile users: the aside element, any img element within the article element, and the spotlight section element.
8. At the top of the web page is a navigation list with the ID top. For mobile devices, display the ul element within this navigation list as a flexbox row with wrapping. For each list item within this ul element, set the font size to 2.2em. Size the list items by setting their flex values to 1 for the growth and shrink rates and 130 pixels for the basis value.
9. Under the mobile layout, the six list items in the top navigation list should appear as square blocks with different background images. Using the selector nav#top ul li:nth-of-type( 1 ) for the first list item, create a style rule that changes the background to the background image cw_image01.png. Center the background image with no tiling and size it so that the entire image is contained within the background.
10. Repeat the previous step for the next five list items using the same general format. Use the cw_image02.png file for background of the second list item, the cw_image03.png file for the third list item background, and so forth.
Explore 11. Sofia has placed hypertext links for the gallery's phone number and e-mail address in a paragraph with the id links. For mobile users, she wants these two hypertext links spaced evenly within the paragraph that is displayed below the top navigation list. To format these links, create a style rule that displays the links paragraph as a flexbox row with no wrapping, then add a style that sets the value of the justify-content property of the paragraph to space-around.
12. She wants the telephone and e-mail links to be prominently displayed on mobile devices. For each a element within the links paragraph, apply the following style rule that: a) displays the link text in white on the background color rgb(220, 27, 27), b) sets the border radius around each hypertext to 20 pixels with 10 pixels of padding, and c) removes any underlining from the hypertext links.
13. Next, you'll define the layout for tablet and desktop devices. Create a media query for screen devices whose width is 481 pixels or greater. Within this media query, display the page body as a flexbox in row orientation with wrapping.
14. The page body has four children: the header, the footer, the article element, and the aside element. The article and aside elements will share a row with more space given to the article element. Set the growth, shrink, and basis values of the article element to 2, 1, and 400 pixels. Set those same values for the aside element to 1,2, and 200 pixels.
Explore 15. For tablet and desktop devices, the top navigation list should be displayed as a horizontal row with no wrapping. Enter a style rule to display the top navigation list ul as a flexbox with a background color of rgb(51, 51, 51) and a height of 50 pixels. Use the justify-content and align-items property to center the flex items both horizontally and vertically.
16. Define the flex size of each list item in the top navigation list to have a maximum width of 80 pixels but to shrink at the same rate as the width if the navigation list is reduced.
17. Sofia doesn't want the links paragraph displayed for tablet and desktop devices. Complete the media query for tablet and desktop devices by hiding this paragraph.
18. Save your changes to the style sheet and then open the cw_home.html file in your browser or device emulator. Verify that the layout and contents of the page switch between the mobile version and the tablet/desktop version shown in Figure 5-61 as the screen width is increased and decreased.
Learn More -
New Perspectives on HTML, CSS, and Dynamic HTML 5th edition Tutorial 8 Case 2 Willet Creek Golf Course
Regular Price: $15.00
Special Price $12.00
New Perspectives on HTML, CSS, and Dynamic HTML 5th edition Tutorial 8 Case 2 Willet Creek Golf Course
Willet Creek Golf Course Willet Creek is a popular golf course resort in central Idaho. You’ve been asked to work on the design of the resort’s Web site by Michael Carpenter, the head of promotion for the resort. He would like you to add some CSS3 visual effects for drop shadows and gradients. Figure 8-66 shows a preview of the screen version of the Web page.
Complete the following:
1. In your text editor, open the willettxt.htm and wceffectstxt.css files from the tutorial.08\case2 folder included with your Data Files. Enter your name and the date in the comment section of each file. Save the files as willet.htm and wceffects. css, respectively.2. Go to the wceffects.css file and create a shadow effect for the body element. The effect should contain two box shadows, both with a color value of (31, 61, 31) and an opacity of 0.9. Place the first shadow with a horizontal offset of 20 pixels, a vertical offset of 0 pixels, and a blur of 25 pixels. Do the same for the second shadow, except place the shadow with a horizontal offset of 220 pixels.
3. Set the opacity of the div elements nested within the aside elements to 75%. Use both the CSS3 opacity style and the IE Alpha filter. Add a box shadow that has a color value of (101, 101, 101) with an opacity of 0.7. Set the horizontal and vertical offsets to 5 pixels and the blur to 10 pixels. You do not have to add an IE filter for the box shadow.
4. Save your changes to the file, and then return to the willet.htm file in your text editor. Add a link to the wceffects.css style sheet file, using the style sheet for screen devices that have a minimum width of 501 pixels. Add the same media query for the wclayout.css style sheet file.
5. Use an Internet Explorer conditional comment for versions of IE before version 9 to link to the wclayout.css and wceffects.css style sheet files for screen devices.
6. Save your changes to the document, and then open the willet.htm file in your Web browser. Verify that the appearance and layout of your page resemble those shown in Figure 8-66.
7. Many golfers playing the courses at Willet Creek like to receive information and advice about each hole. Michael would like you to create a mobile version of the Web page so that golfers with mobile devices can view information about the course during their rounds. Figure 8-67 shows a preview of the Web app you’ll create.
8. Open the wcmobiletxt.css file from the tutorial.08/case2 folder in your text editor. Enter your name and the date in the comment section of the file, and then save it as wcmobile.css.
9. Within the style sheet file, add a style rule to hide the navigation list in the header, the inline image in the header, the main section, the aside
element, and the page footer.10. Set the background color to the value (107, 140, 80).
11. For the header element, create a style rule to: a) change the background color to the value (151, 201, 151) with the image file willet.jpg placed in the left-center of the background with no tiling; b) set the size of the background image to contain; c) set the width to 100%; and d) set the height to 50 pixels.
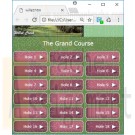
12. The navigation list containing links to each of the 18 holes in the Grand Course has the id holes. Create a style rule to set the width of this navigation list to 100%.
13. For h1 elements within the holes navigation list, create a style rule to: a) set the font size to 25 pixels; b) set the font color to white; c) set the margin to 15 pixels; and d) center the text of the heading.
14. For list items in the holes navigation list, create a style rule to: a) display the items as blocks; b) add the background image file arrow.png to the right-center of the background with no tiling; c) set the width to 60% and the height to 50 pixels; d) add top and bottom margins of 5 pixels, and add left and right margins of auto; e) add a 1-pixel-wide solid white border to each list item and create rounded borders with a radius of 10 pixels; and f) add inset box shadows to the list items with a color value of (51, 51, 51) and an opacity of 50% (the inset shadows should appear in the lowerleft corner of each list item with a horizontal offset of 10 pixels, a vertical offset of 5 pixels, and a blur of 20 pixels).
15. For hypertext links within each list item, add a style rule to: a) display the link as blocks; b) set the width to 100% and the line height to 50 pixels; c) set the font color to white; and d) horizontally center the text of the link.
16. For odd-numbered list items, set the background color to the value (187, 105, 123). (Hint: Use the pseudo-class nth-of-type(odd).) For even-numbered list items, set the background color to the value (150, 80, 100).
17. The preceding styles will be applied by default to the page in portrait orientation. Create an @media rule for the page in landscape orientation.
18. Add the following style rule for list items displayed in landscape orientation: a) set the width to 30%; b) float the list items on the left; and c) set the margins to 5 pixels.
19. Save your changes to the style sheet, and then return to the willet.htm file in your text editor.
20. Within the willet.htm file, insert a viewport meta element.
21. Create a link to the wcmobile.css file to be accessed by only screen devices with maximum widths of 500 pixels.
22. Save your changes to the file, and then open the willet.htm file in your mobile device or with your browser window resized to a width of less than 500 pixels. Verify that for smaller screen widths, the mobile version of the page is displayed. Further verify that the layout of the links to individual holes changes depending on whether the page is in portrait or landscape orientation.
23. Submit your completed files to your instructor.
Learn More -

New Perspectives on HTML, CSS, and Dynamic HTML 5th edition Tutorial 14 Case 2 JSWorks
Regular Price: $25.00
Special Price $20.00
New Perspectives on HTML, CSS, and Dynamic HTML 5th edition Tutorial 14 Case 2 JSWorks
Data Files needed for this Case Problem: js.css, jslogo.png, modernizr-1.5.js, nodestxt.htm, tree.css, treetxt.js
JSWorks Jorge Soto is the owner and administrator of JSWorks, a Web site containing JavaScript tutorials, tips, and specialized apps. Jorge is working on a multipage tutorial concerning the creation and use of document nodes. You are helping Jorge maintain his Web site. You've volunteered to work on his Web page that describes the appearance of the document node tree. Jorge would like you to include a node tree that is based on the article he's writing so that visitors to his site can see the complete appearance of the node tree for a sample HTML fragment. Figure 14-67 shows a preview of the Web page you'll complete for Jorge.
The JavaScript program you'll design will need to use recursion to navigate through the entire structure of Jorge's article. As it proceeds through the article, it will record each element, attribute, and text node and display those nodes in a nested list alongside the article text. The CSS styles for the nested list already have been created for you; your only job will be to generate the HTML code of the nested list. Jorge also wants your code to keep a running count of the total number of nodes, element nodes, attributes, and text nodes, including text nodes containing only white space.
Learn More
Complete the following:
1. Using your text editor, open nodestxt.htm and treetxt.js from the tutorial.14\case2 folder. Enter your name and the date in the comment section, and then save the files as nodes.htm and tree.js, respectively.
2. Go to the nodes.htm file in your text editor and add a link element to connect the document to the tree.css style sheet. Also add a script element to connect the file to the tree.js JavaScript file.
3. Take some time to study the contents and structure of the document and then close the file, saving your changes.
4. Go to the tree.js file in your text editor. Declare the following global variables: nodeCount to keep a running count of all of the nodes in the source document; elemCount to count the element nodes; attCount to count the attribute nodes; textCount to count the text nodes; and wsCount to count the text nodes containing white space only. Set the initial value of all of these variables to 0.
5. Insert a command to run the setup() function when the page is initially loaded by the browser.
6. Create the writeElemLI() function. The purpose of this function is to create a single list item for the node tree diagram based on the contents of an element node. The structure of the list item is shown in Figure 14-68.
The function has two parameters: elemNode, which represents the element node from the source document on which the list item is based, and nestedList, which represents the nested list that the list item will be appended to. Add the following commands to the function:
a. Create a list item element named liElem containing the text string +--.
b. Create a span element named spanElem. Set the class attribute of the span element to elemLI. (Hint: Use the className property to set the value of the class attribute.)
c. Declare a variable named elemText setting its initial value to the text string <elem where elem is the node name of the element specified in the elemNode parameter.
d. Next you'll examine all of the attribute nodes for the element specified by the elemNode parameter. Create a for loop to go through the nodes in the attributes collection for the elemNode parameter. Each time through the loop increase the value of the nodeCount and attCount variables by 1. Also add the following text string to the value of the elemText variable att='value'
where att is the node name of the attribute node and value is the node value of the attribute node.
e. After the for loop completes, append the text string > to the value of the elemText variable.
f. Create a new text node named elemTextNode containing the text of the elemText variable.
g. Append elemTextNode to spanElem; append spanElem to liElem; and finally, append liElem to nestedList.
7. Create the writeTextLI() function. The purpose of this function is to create a single list item for the node tree diagram based on the contents of a text node. The structure of the list item will be one of the two structures shown in Figure 14-69.
The function has two parameters: textNode, which represents the text node from the source document on which the list item is based, and nestedList, which represents the nested list that the list item will be appended to. Add the following commands to the function:
a. Create the liElem variable for a list item element node containing the text string +--.
b. Create the spanElem variable for a span element node.
c. Store the node value of the textNode parameter in the variable textString.
d. Jorge has provided a function named isWhiteSpaceNode() to determine whether
a text node represents white space or not. Call the isWhiteSpaceNode() function using textString as the parameter value.
e. If the isWhiteSpaceNode() function returns the value true, then: i) increase the value of the wsCount variable by 1; ii) set the class name of spanElem to wsLI; and iii) set the inner HTML of spanElem to the text string #text.
f. If the isWhiteSpaceNode() function returns the value false, then: i) set the class name of spanElem to textLI; and ii) set the inner HTML of spanElem to the value of the nodeValue property for the textNode parameter.
g. Append the spanElem node to the liElem node, and then append the liElem node to the nestedList parameter.
8. Create the makeTree() function. The purpose of this function is to recursively generate all of the nested lists contained in the node tree diagram. The function has two parameters: sourceNode, which represents the current node in the source document being added to the node tree diagram, and nestedList, which represents the nested list in the tree diagram that is being written. Add the following commands to the function:
a. Increase the value of the nodeCount variable by 1.
b. Using the nodeType property, determine whether sourceNode represents an element node or a text node. If it represents an element node, increase the value of the elemCount variable by 1 and call the writeElemLI() function using sourceNode and nestedList as parameter values. If it represents a text node, increase the value of the textCount variable by 1 and call the writeTextLI() function using sourceNode and nestedList as parameter values.
c. Use the childNodes.length property value to determine whether sourceNode contains any child nodes. If it does, then do the following: i) declare the newList variable containing an element node for the ol element; ii) store the text string | in newList; iii) loop through all of the child nodes for sourceNode, and for each child node call the makeTree() function using the child node and newList as the values for the sourceNode and nestedList parameters; and iv) after the loop has finished, append newList to nestedList.
9. Create the setup() function. The purpose of this function is to set up the node tree diagram and report the results. The function has no parameters. Add the following commands to the function:
a. Declare the sourceNode variable referencing the article element with the id main in the current document.
b. Declare the treeBox variable containing an aside element node. Set the id of treeBox to treeBox and set the innerHTML property to h1 Node Tree </h1>.
c. Declare the newList variable containing an ol element node, and then call the makeTree() function using sourceNode and newList as parameter values.
d. Append newList as a child of treeBox.
e. Append treeBox as a child of the section element with the id main.
f. Using the innerHTML property, display the values of the nodeCount, elemCount, attCount, textCount, and wsCount variables within the span elements whose ids are totalNodes, elemNodes, attNodes, textNodes, and wsNodes, respectively.
10. Use comments to document your JavaScript code throughout the program.
11. Save your changes to the file, and then load nodes.htm in your Web browser. Verify that a node tree similar to that shown in Figure 14-67 is displayed alongside Jorge's article, and that the article contains 247 total nodes, 99 element nodes, 8 attribute nodes, and 140 text nodes, of which 56 are white space nodes. (Note: Safari running under iOS may report 57 white space nodes.)
12. Submit your completed files to your instructor, in either printed or electronic form, as requested.
Shopping Options
- Category
- Price
-
- $0.00 - $9.99 (1)
- $10.00 - $19.99 (63)
- $20.00 - $29.99 (8)
- $30.00 and above (3)

You have no items in your shopping cart.

