HTML/JS
-
WBG310 Week 3 Lab Interactive Web Page Scripting with Lab
Regular Price: $15.00
Special Price $12.00
WBG310 Week 3 Lab Interactive Web Page Scripting with Lab
Scenario/Summary
Using the skills acquired in the tutorials from Chapter 5, build a web page of your own design that has jQuery-programmed event handlers. Find errors and omissions in existing files and repair them to function correctly.Deliverables
W3iLab_1.html. Zip the file and submit your assignment.Lab Steps
STEP 1: Open the Template
Open jsTemplate.html from Week 1.
Save the file as w3_Lab3.html.STEP 2: Collect jQuery Library File
Use the link to jQuery at Google as shown here, and as described in the week lesson:
<script src="https://code.jquery.com/jquery-3.5.1.js"></script>
...or, download the current jQuery library file from https://jquery.com/download/ (https://jquery.com/download/) and place the file in the _js folder.
Note: You may need to right-click on the download link an and then select "Save Link as...", or "Download Linked File as . . ." depending on your browser.STEP 3: Set the Source for the Library File
1. If you download your own copy, create a set of script tags above the current script tag set, and set the src to the library file in Step 2.STEP 4: Create jQuery Functions for Events
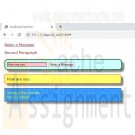
1. Set an id="p1" for the first paragraph <p>.
2. Create the document ready function for your page as explained in the text in Chapter 4.
3. Within the document function, create an event handler that will append the contents of the ‘more’ div tag with the message ‘You Clicked!’. Include a line break. The expected results are pictured below.STEP 5: Create jQuery Functions for Events
1. Create a textbox inside the form. Name the new input element with id=“box1”
2. Create a function that changes the background color of the box to light blue when the box gains the focus.
3. Create a function that changes the background color of the box to pink when the box loses the focus. Hint: Blur.STEP 6: Create jQuery Functions for Events
1. Create a button next to the textbox on the form. Make the button read, ‘Relay a Message.’
2. Create a function that appends the contents of the results DIV when clicked. The message should be ‘Here is your message’ or something similar. The expected results are pictured below.STEP 7: Create jQuery Functions for Events
1. When the page loads (onload), hide the form.
2. Change the value of #p1 to ‘Relay a Message’ and make it a hyperlink with the href="#"
3. Reset the function for the paragraph click event.
Include the designation in the identifier for the anchor tag.
Have the form slide down. Use the ‘slow’ modifier.
4. In the button click event, reset the message to come from the textbox. Hint: Use .val() to collect the user input. Include a line break with the message. The expected results are pictured below.STEP 8: Prep for Turn-In
Learn More
1. When your application functions as expected, zip the file submit your assignment. -
CIS363A Week 3 iLab 3 Create a Web Page Using CSS in Dreamweaver
Regular Price: $12.00
Special Price $10.00
CIS363A Week 3 iLab 3 Create a Web Page Using CSS in Dreamweaver
iLAB OVERVIEW
Scenario and Summary
Create an index.html file and create an external CSS file based on the specifications given in the assignment.
You will need to create an internal and external CSS.
You will also need to attach an external CSS file to the original page.Deliverables
index.html with attached external CSS sheet
style.css fileiLAB STEPS
Lab Preparation
Download the lab3Content.docx document found in Doc Sharing.Part A: Create HTML and CSS Files (3 Points)
Step 1: Create a New HTML File (1 point)
Open Dreamweaver and create a new HTML page.
Enter index.html as the web page name.Step 2: Copy Content From the Word Document (1 point)
Open the lab3Content document found in Doc Sharing.
Paste the content into the index.html page.Step 3: Create a CSS File (1 point)
Create a new CSS page.
Save the file and name it styles.css.
Note: If your styles.css file does not show when needed in the remaining steps, then click on the attach stylesheet icon, select browse, locate the styles.css file, and then click OK. (The styles.css will automatically be linked to the index.html file in the head section of the code.)Part B: Internal CSS (22 Points)
Step 1: Create an Internal CSS (10 points)
Go to the index.html file and create an internal CSS for the following properties. Use the Page Properties option in the Properties Panel.
Background color for the body A light tan: #FC6
Font color for all text in the body A dark blue: #039
Font for all text in the body Comic Sans MS
Font size for all the text in the body Body: 14 points
Link color for all links Dark red: #CC0000
Visited link color for all links Dark red: #CC0000
Rollover link color for all links Dark green: #060
Active link color for all links Dark red: #CC0000
No link should be underlined for all links Never underlineStep 2: Apply Internal CSS (12 points)
Your index.html page should reflect the styles from above.
Go back to Page Properties if the page did not update with your internal CSS.Part C: Tag CSS (22 Points)
Step 1: Create Tag CSS (10 Points)
For all of the following tags, create the CSS rule from the descriptions below.
Hint: To create a CSS, you need to click on the New CSS Rule in the CSS panel on the right-hand side. Watch Adobe TV on best practices for creating a style sheet. You will need to enter Style Sheets or CSS in the Adobe TV searchbox (http://help.adobe.com/en_US/dreamweaver/cs/using/WScbb6b82af5544594822510a94ae8d65-7e32a.html).
H2 Text color: #333, bold
H3 Background color: #39f
Border on the bottom with the following rules
Width: thin
Style: solid
Color: #003
Centered text
Margin on all sides: 35 pixels
p Font: Georgia
Text color: #030
Padding of 15 pixels on all sides
li Font family: Arial
Background color: gray
Text color:black, bold
Text size: 18 pointsStep 2: Apply Tag CSS (12 points)
Apply the new tag CSS to the content on the page.Part D: Class CSS (23 Points)
Step 1: Create a Class CSS (10 points)
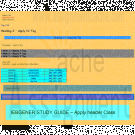
Create a new CSS rule using a class CSS. You will need to select the option to include the class CSS to the styles.css file.Navtable: This class will be applied to a navigation table. Font family: Times Roman
Background color: #0ff
Text color: bold, centerexample1:This class will be applied to Example 1.
Background color: #699
Text color: #033, bold
Text size: 10 points
Margin on all sides: 25 pixels
Padding on all sides: 25 pixelsexample2:This class will be applied to Example 2.
Background color: #66c
Border on all sides with the following rules
Width: 10px
Style: solid
Color: #06c
Text size: 10 pixels
Text color: #cccheader:This class will be applied to the heading "IEBGENER STUDY GUIDE."
Font family: Arial
Background color: #6ff
Text color: 030
Text size: 36 points
Margin on all sides: 50 pixels
Padding on all sides: 50 pixelsStep 2: Apply the Class CSS (12 points)
Apply the class CSS as done in the class CSS steps above.Step 3: Upload Zipped File (1 point)
Learn More
Your index.html page should have all inline, tags, and class CSS applied.
Create a folder called CIS363A_YourLastName_Lab3.
Put copies of each required deliverable into the new folder.
Right-click on the folder and select Send To -> Compressed (zipped) Folder. You can also use other tools to compress the files into a single zip folder (e.g., 7-zip).
Upload the zip file to the weekly iLab Dropbox in eCollege. -

New Perspectives on HTML, CSS, and Dynamic HTML 5th edition Tutorial 13 Case 1 Twin Life Magazine
Regular Price: $15.00
Special Price $12.00
New Perspectives on HTML, CSS, and Dynamic HTML 5th edition Tutorial 13 Case 1 Twin Life Magazine
Twin Life Magazine Elise Howard is the editor of Twin Life, a magazine for parents of twins, triplets, and other multiple births. The magazine is upgrading its Web site and Elise has approached you to help with the website design. She would like to give readers the ability to increase or decrease the font size of the articles the magazine publishes to make the text easier to read, or to allow readers to view an entire article on the same screen. Although readers can use their Web browsers to zoom in and zoom out of the Web pages, Elise wants an app that will affect only the article text and accompanying photo, while leaving the rest of page features - the magazine logo and list of links - unaffected.
To create this effect, her sample page has two buttons: one to increase the font size and other to decrease it. All text and page objects that are to be resized have been set using the relative em unit, while the other page text and objects that are to remain fixed in size have been set in pixels. Thus to change the size of all of the resizable objects, your code simply needs to change the default size of the document page body; all of the resizable objects will change proportionally based on the default font size. Figure 13-39 shows a preview of the article and resizing buttons that you'll work on for Twin Life.Complete the following:
Learn More
1. Using your text editor, open twinstxt.htm, tlmtxt.css, and fonttxt.js from the tutorial.13\case1 folder. Enter your name and the date in the head section, and then save the files as twins.htm, tlm.css, and fontsizer.js, respectively.
2. Go to the twins.htm file in your text editor and add a script element linking to the fontsizer.js file.
3. Scroll down the file and locate the fontbuttons div element, which contains two image buttons. Place both image buttons in the fontsizer class. Set the values associated with those buttons to -0.1 for the fontdown.png image and 0.1 for fontup.png.
4. Save your changes to the file, and then go to the tlm.css file in your text editor.
5. At the bottom of the file, insert a style rule to set the width of the inline image within the figure box in the article element to 12em.
6. Add another rule to set the font size of paragraph text within the article element to 1em.
7. Save your changes to the file, and then go to the fontsizer.js file in your text editor.
8. Add a command to run the startup() function when the page is initially loaded by the browser.
9. Create the startup() function. The purpose of this function is to apply onclick event handlers to the two font resize buttons. Create the fontButtons variable containing all of the page elements that belong to the fontsizer class. Loop through that collection and add an event handler to each item in the collection to run the resizeText() function when clicked.
10. Create the resizeText() function. The purpose of this function is to change the default font size of the document body based on the value of the font button being clicked. When that value is changed, all object sizes based on em units automatically will be resized. Add the following commands to the function:
a. Using the parseFloat() function, store the numeric value of the button being clicked in the fontChange variable.
b. Next, you must determine whether an inline style has been used to set the default document body font size. First, test whether the font size of the document body is equal to an empty text string. If it is, set the font size to 1.0em. (Hint: Use the reference document.body to reference the document body.)
c. Use the parseFloat() function to store the numeric value of the document body font size in the currentFontSize variable.
d. Change the document body font size to the text string current font size + font change + "em" where current font size is the value of the currentFontSize variable and font change is the value of the fontChange variable.
11. Document your code with appropriate comments throughout.
12. Save your changes to the file, and then load twins.htm in your Web browser. Verify that when you click the buttons to increase or decrease the font size, the paragraph text and the size of the author’s photo change in response, but no other part of the Web page changes in size.
13. Submit your completed files to your instructor, in either printed or electronic form, as requested. -
New Perspectives on HTML, CSS, and Dynamic HTML 5th edition Tutorial 12 Case 1 The Lighthouse
Regular Price: $15.00
Special Price $12.00
New Perspectives on HTML, CSS, and Dynamic HTML 5th edition Tutorial 12 Case 1 The Lighthouse
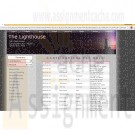
The Lighthouse is a charitable organization located in central Kentucky that matches donors with needy groups. The fundraising coordinator for The Lighthouse is Aaron Kitchen. On an administration Web page available only to Lighthouse staff, Aaron wants to display a list of information on recent donations, including the name and address of the donor, the amount donated, and the date of the donation. A list of donations from the last month has been downloaded from an external database and stored in a collection of arrays named firstName, lastName, street, city, state, zip, amount, and date. Aaron needs your help with displaying the data from those arrays in a Web table. He also wants a summary table that displays the total number of contributors and the total contribution amount. Figure 12-36 shows a preview of the Web page you’ll create.
Complete the following:
Learn More
1. Using your text editor, open clisttxt.htm and tablestxt.js from the tutorial.12\case1 folder. Enter your name and the date in the head section, and then save the files as clist.htm and tables.js, respectively.
2. Go to the clist.htm file in your text editor. The firstName, lastName, street, city, state, zip, amount, and date arrays have been created and populated for you in the april.js file. In the head section of the document, insert a script element that points to this file.
3. Aaron already has created a style sheet for the tables that will display the list of contributors and the summary of their contributions. Add a link to the tables.css style sheet in the Web page.
4. Save your changes to the file, and then go to the tables.js file in your text editor.
5. Add a function named showTable() that will be used to display the table containing the contributor list. The function has no parameters. Add the following commands to the function:
a. Write the following code to the document to create the header row for the table of contributions:
<table id='contributors'>
<thead>
<tr>
<th>Date</th><th>Amount</th>
<th>First Name</th><th>Last Name</th>
<th>Address</th>
</tr>
</thead>
b. Write the <tbody> tag to the document.
c. Next, you’ll create a table row for each person listed in the lastName array. Create a for loop that loops through each entry in the lastName array. Each time through the loop, write the HTML code
<tr>
<td>date</td>
<td class='amt'>amount</td>
<td>firstName</td>
<td>lastName</td>
<td>street <br />
city, state zip
</td>
</tr>
to the document, where date, amount, firstName, lastName, street, city, state, and zip are the items from the date, amount, firstName, lastName, street, city, and zip arrays, respectively, corresponding to the value from the counter variable in the for loop.
d. After the for loop, write the </tbody> tag to close off the table body.
e. Write the </table> tag to close off the Web table.
6. Create a function named showSummary() that will be used to calculate and display the total number of contributors and the total amount of contributions. The function has no parameters. Add the following commands to the function:
a. Declare the total variable, setting its initial value to 0.
b. Loop through each of the entries in the amount array, adding each item's value to the total variable.
c. Write the HTML code
<table id='sumTable'>
<tr>
<th id='sumTitle' colspan='2'>Summary</th>
</tr>
<tr>
<th>Contributors</th>
<td>contributors</td>
</tr>
<tr>
<th>Amount</th>
<td>$total</td>
</tr>
</table>
to the document, where contributors is the length of the lastName array and total is the value of the total variable.
7. Document your code using descriptive comments. Close the file, saving your changes, and then return to the clist.htm file in your text editor.
8. Add a script element to link to the tables.js file you created.
9. Scroll down to the figure box for the contribution totals. Within the figure box, insert a script element that runs the showSummary() function.
10. Scroll down to the figure box for the contributors data list. Within the figure box, insert a script element that runs the showTable() function.
11. Save your changes to the file, and then open clist.htm in your Web browser. Verify that the summary and contributor list tables appear as shown in Figure 12-36.
12. Submit your completed files to your instructor, in either printed or electronic form, as requested. -
New Perspectives on HTML, CSS, and Dynamic HTML 5th edition Tutorial 10 Case 3 MidWest Student Union
Regular Price: $15.00
Special Price $12.00
New Perspectives on HTML, CSS, and Dynamic HTML 5th edition Tutorial 10 Case 3 MidWest Student Union
MidWest Student Union Sean Lee manages the Web site for the student union at MidWest University in Salina, Kansas. The student union provides daily activities for the students on campus. As Web site manager, part of Sean's job is to keep the Web site up to date on the latest activities sponsored by the union. At the beginning of each week, she revises a set of seven Web pages detailing the events for each day in the upcoming week.
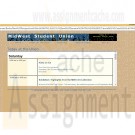
Sean would like the Web site to display the current day's schedule in an inline frame within the Web page titled Today at the Union. To do this, her Web page must be able to determine the day of the week and then load the appropriate file into the frame. She would also like the Today at the Union page to display the current day and date. Figure 10-39 shows a preview of the page she wants you to create.Sean has created the layout of the page, and she needs you to write the scripts to insert the current date and the calendar of events for the current day. To assist you, she has located two functions:
• The showDate() function returns a text string containing the current date in the format Weekday, Month Day, Year. The function has no parameter values.
• The weekDay() function returns a text string containing the name of the current weekday, from Sunday through Saturday. This function also has no parameter values.
The two functions are stored in an external JavaScript file named functions.js. The daily schedules have been stored in files named sunday.htm through saturday.htm.Complete the following:
Learn More
1. Use your text editor to open the todaytxt.htm file from the tutorial.10\case3 folder included with your Data Files. Enter your name and the date in the comment section of the file and save it as today.htm.
2. In the head section just above the closing </head> tag, insert a script element accessing the functions.js file.
3. Scroll down the file and locate the div element with the id dateBox. Within this element insert a script element. The script should run the following two commands:
a. Write the following HTML code to the Web page:
Today is<br/>
b. Write the text string returned by the showDate() function to the Web document.
4. Scroll down the file and locate the h1 heading with the text Today at the Union. Within the empty paragraph that follows this heading, insert another script element. Within the script element, do the following:
a. Insert the following multiline comment:
Display the daily schedule in an inline frame.
Daily schedules are stored in the files sunday.
htm through saturday.htm.
b. Insert a command to write the HTML code
<iframe src='weekday.htm'></iframe>
to the Web page, where weekday is the text string returned by the weekDay() function.
5. Save your changes to the document.
6. Open today.htm in your Web browser. Verify that it shows the current date and that the daily schedule matches the current weekday.
7. If you have the ability to change your computer's date and time, change the date to different days of the week and reload (not simply refresh) the Web page. Verify that the date and the daily schedule change to match the new date you selected. Debug your code as necessary.
8. Submit your completed files to your instructor. -

New Perspectives on HTML, CSS, and Dynamic HTML 5th edition Tutorial 8 Case 1 dessertWeb
Regular Price: $15.00
Special Price $12.00
New Perspectives on HTML, CSS, and Dynamic HTML 5th edition Tutorial 8 Case 1 dessertWeb
dessertWeb Amy Wu has asked for your help in redesigning her Web site, dessertWeb, taking advantage of some of the new CSS3 styles. The dessertWeb Web site is a cooking site for people who want to share dessert recipes and learn about cooking in general. In addition to redesigning the site’s appearance, she wants you to create a print style sheet so that users can easily print out recipes and ingredient lists without having to print the headers, footers, and navigation lists that appear on each Web page. Figure 8-64 shows a preview of the screen version of the page.
Complete the following:
Learn More
1. In your text editor, open the recipetxt.htm and dweffectstxt.css files from the tutorial.08\case1 folder included with your Data Files. Enter your name and the date in the comment section of each file. Save the files as recipe.htm and dweffects.css, respectively.
2. Go to the dweffects.css file in your text editor. Create a style rule for the body element to add two box shadows. One shadow should be placed on the right edge of the page body with the color value (211, 211, 211) and an opacity of 0.5. Set the horizontal offset to 10 pixels, the vertical offset to 0 pixels, and the blur to 15 pixels. Create the same drop shadow on the left edge of the page body as well.
3. Apply the following style rules to each list item in the horizontal navigation list of the page header: a) set the background color to the value (224, 238, 238); b) add rounded corners 10 pixels in radius; and c) create two inset box shadows: one white shadow located in the upper-left corner offset 3 pixels in the horizontal and vertical direction with a blur of 2 pixels, and the other, a shadow in the lower-right corner with a color value of (147, 207, 207) offset 5 pixels in the horizontal and vertical direction with a blur of 5 pixels.
4. Add box shadows to the article element with the following properties: a) create an inset box shadow in the lower-right corner with a color value of (171, 171, 171), offset 15 pixels in the horizontal and vertical direction, and with a blur of 75 pixels; and b) create an external shadow located in the lower-right corner with a color value of (101, 101, 101), offset 5 pixels in the vertical and horizontal direction with a blur of 5 pixels.
5. Add a horizontal background gradient to the blockquote element with the following properties: a) set the gradient to go from the left to the right starting with the color value (166, 230, 230), having a color stop at the 5% point with a value (231, 231, 231), and ending with the color value (255, 255, 255) 15% of the way across the block quote; b) create the same color gradient using the WebKit gradient() function with a color stop for the middle color occurring at the 33% point; and c) using the Internet Explorer Gradient filter, create a horizontal gradient that starts with the hexadecimal color value DEF4F4 and ends with the value FFFFFF.
6. Save your changes to the file, and then return to the recipe.htm file in your text editor. Add a link to the dweffects.css style sheet file. Specify that the dwlayout.css and dweffects.css style sheets should be used with screen devices.
7. Save your changes to the document, and then view the page in your Web browser. Verify that the appearance of the page resembles that shown in Figure 8-64. (Note: If you are using Internet Explorer version 8 or earlier, your page will show only the gradient effect around the block quotes, and the gradient will go from light teal to white.)
8. Figure 8-65 shows a preview of the printed version of the recipe page, displaying the recipe description and ingredients on the first page and the directions on the second page. In your text editor, open the dwprinttxt.css file from the tutorial.08/case1 folder. Enter your name and the date in the comment section of the file, and then save it as dwprint.css.
9. Set the page size of the printout to 8.5 3 11 inches in portrait orientation with a margin of 0.5 inch.
10. Hide the following page elements on the printout: page header, left section, right section, all navigation lists, the aside element, the page footer, the h2 element nested within a heading group, and the last paragraph in the article element.
11. Set the font size of all h1 headings to 200% with a bottom margin of 0.2 inches. Set the font size of all h2 elements to 150% with a top margin of 0.5 inches.
12. Set the line height of all list items to 1.5 em.
13. Set the left margin of all ordered lists to 0.5 inches, displaying a decimal value.
14. Set a page break to always occur before the last h2 element in the page.
15. Save your changes to the file, and then return to the recipe.htm file in your text editor. Add a link to the dwprint.css style sheet file, setting the style sheet to be used with a print device.
16. Save your changes to the document, and then view the printed version of the file or preview the printed version in your Web browser. Verify that the contents and layout resemble that shown in Figure 8-65.
17. Submit your completed files to your instructor. -
New Perspectives on HTML, CSS, and Dynamic HTML 5th edition Tutorial 6 Case 1 Sblogger
Regular Price: $15.00
Special Price $12.00
New Perspectives on HTML, CSS, and Dynamic HTML 5th edition Tutorial 6 Case 1
Sblogger Sports enthusiast Steve Lavent is working on a Web site called Sblogger that will contain articles and commentary on the world of sports. He's asked for your help in designing the page on which users can submit their own comments on the articles that Steve posts to his blog. Your job will be to create a prototype for the commentary form, and to include HTML code and CSS styles to help validate user input. A preview of the Web form you'll create is shown in Figure 6-78.
Complete the following:
Learn More
1. In your text editor, open the sblogtxt.htm and commtxt.css files from the tutorial.06\case1 folder included with your Data Files. Enter your name and the date in the comment section of the file. Save the files as sblogger.htm and comments.css, respectively.
2. Go to the sblogger.htm file in your text editor and review the contents and structure of the document. Link the file to the comments.css style sheet.
3. Scroll down to the h2 heading title Post Your Comments, and directly below this heading insert a form element with the action www.sblogger/cgi-bin/subcomments using the post method.
4. Within the form element, create a field set with the name and id commentFS.
5. Create a label element with the text Username. Within the label element, insert an input box for the username field. Make the field required and add the title Supply your username.
6. Create a label element with the text E-mail. Within the label element, insert an input box for the email field. Set the data type to email and make the field required. Add the title Supply a valid e-mail address.
7. Create a label element with the text Password containing an input box for the password field. Set the data type to password and make the field required. Add the title You must provide your password.
8. Create a label element with the text Comment (500 character limit), placing the parenthetical text on a new line, and within the label element insert a text area box for the commentBox field. Limit the number of characters that can be typed into the text area box to 500 characters.
9. Add a submit button with the text Submit Comment.
10. Save your changes to the file and then go to the comments.css file in your text editor. Create style rules for the styles described in the following steps.
11. Display the field set with a background color of (245, 245, 255). Set the top and bottom margins to 15 pixels and the left and right margins to auto. Add 5 pixels of padding and set the width of the field set to 90%.
12. Display labels as blocks floated on the left once the left margin is clear of elements. Set the font size to 0.9 em and the width to 100%. Set the top and bottom margins to 5 pixels.
13. Display input boxes and text area boxes as blocks floated on the right margin. Set the font size to 0.9 em and the width to 55%. Set the left and right margins to 10 pixels. In addition, set the height of text area boxes to 150 pixels.
14. Display the submit button as a block once both margins are clear. Do not float the submit button. Set the dimensions of the button to 200 pixels wide by 30 pixels high.Set the top and bottom margins to 5 pixels, and the left and right margins to auto.
15. When input boxes and text area boxes receive the focus, change the background color to the value (225, 225, 240).
16. When input boxes receive the focus and are valid, change the background color to (225, 240, 225) and display the background image go.png in the bottom-right corner of the box with no tiling. Resize the background image so that it is contained within the input box.
17. When input boxes receive the focus and are invalid, change the background color to (240, 225, 225) and display the background image stop.png in the bottom-right corner of the box with no tiling. Resize the background image so that it's contained within the input box.
18. Close the style sheet file, saving your changes.
19. Open sblogger.htm in your Web browser and test the form. Verify that you cannot leave the username, email, and password fields blank and still submit the form. Also verify that the form is rejected if an invalid e-mail address is submitted in the email field.
20. If you have access to the Google Chrome browser, test the Web page in that browser and verify that the title text you entered for the input boxes in Steps 5 through 7 is included in the error box supplied by the browser when those input boxes fail the validation test.
21. Submit your completed files to your instructor, in either printed or electronic form, as requested. -
New Perspectives on HTML, XHTML, and Dynamic HTML Chapter 6 Case Problem 2 Civil War Studies
Regular Price: $15.00
Special Price $12.00
New Perspectives on HTML, XHTML, and Dynamic HTML Chapter 6 Case Problem 2 Civil War Studies
Civil War Studies Adanya Lynne, a professor of military history at Ridgeview State College in Bartlett, Tennessee, has been preparing a series of online quizzes for her students. She has created the basicWeb page design and layout, but has come to you for help in designing the quiz form. She envisions a series of multiple choice questions displayed in a collection of option buttons. Students will be able to click answers on the form and then submit their answers to a CGI script running on theWeb server for their scores. Figure 6-61 shows a preview of the page you’ll create for Professor Lynne.
Complete the following:
Learn More
1. Use your text editor to open the cwquiztxt.htm and qformtxt.css files from the tutorial.06\case2 folder included with your Data Files. Enter your name and the date in the comment section of each file. Save the files as cwquiz.htm and qform.css, respectively.
2. Go to the cwquiz.htm file in your text editor and insert a link to the qform.css style sheet.
3. Scroll down the file to the rightColumn div element. Professor Lynne has inserted the 10 questions for the online quiz. Enclose the questions in a form element with the id quizForm. Call the CGI script at http://www.ridgeviewcollmil.edu/quiz using the post method.
4. Go to the first question and enclose the text of the question in a div element with the class name question.
5. Enclose the set of answers for the first question within a field set.
6. Place a label element around each possible answer for the first question. Put the first answer in the class answerA, the second answer in the class answerB, the third answer in the class answerC, and the fourth answer in the class answerD.
7. Within each of the four labels for the answers to the first question, insert an option button directly before the text of the answer. Assign the ids ans1a, ans1b, ans1c, and ans1d to the four option buttons. Assign the field name question1 to each of the four option buttons. Finally, set the values for the four option buttons to a, b, c, and d.
8. Associate each of the four labels with a different id. Associate the first label with the ans1a field, the second with ans1b, the third with ans1c, and the fourth with ans1d.
9. Repeat Steps 4 through 8 for the remaining nine questions in the quiz, with the following changes:
- Change the ids for the four option buttons to the question number. For example, the ids for the second question are: ans2a, ans2b, ans2c, and ans2d.
- Change the field name of the four option buttons to the number of the question. For example, the field name for the second question is question2, for the third question is question3, and so forth.
10. After the last question, insert a div element with the id buttons. Within the element, insert a submit button with the value Submit, a command button with the value Answers, and a reset button with the value Reset.
11. Save your changes to the file.
12. Go to the qform.css file in your text editor and add the following styles to the style sheet:
- Float all elements of the question class on the left margin. Set their widths to 200 pixels and right-align the text. Set the clear style to left so that the element is only displayed when the left margin is clear.
- Display all field sets as block-level elements floated on the left margin. Set the size of the field sets to 400 pixels wide by 50 pixels high. Add a 20-pixel left margin and a 5-pixel bottom margin. Set the position property to relative. Finally, display the tan.jpg file as the background image for the field sets.
- Use absolute positioning to place all elements of the answerA class at the coordinates (0, 0), place answerB class elements at the coordinates (200, 0), place answerC class elements at (0, 25), and place answerD class elements at (200, 25).
- Center the contents of the div element with the buttons id. Set the width to 600 pixels and the top/bottom padding to 10 pixels. Set the left/right padding to 0 pixels.
- For input elements within the buttons div element, set the width to 100 pixels, set the top/bottom margin to 0 pixels, and set the left/right margin to 10 pixels.
13. Save your changes to the file and open cwquiz.htm in your Web browser. Verify that the layout and design resemble that shown in Figure 6-61.
14. Submit your completed files to your instructor. -

CIS 273 Techincal Project Business Website
Regular Price: $25.00
Special Price $20.00
CIS 273 Lab Assignment 10 Business Website
This assignment consists of three (3) sections: a narrative, a storyboard, and a business Website. You must submit all three (3) sections for the completion of this assignment. The assignment is to be submitted in a single compressed folder (zip file) to the online course shell. Section 3 must contain all .htm files, along with any other files that may be necessary for your project to run (ex: text files, images, etc.). When saving the compressed folder (zip file), it should be saved as Techincal Project_Last name_First initial.zip. For example, if your name is Mary Smith, the file for submission should be saved as Techincal Project_Smith_M.htm
Select a business that you are interested in. (e.g., pet store, travel site, fishing gear, appliances, automobiles, housewares, furniture, etc.). Imagine that you have just been hired to create a four (4) page hierarchical Website for the business you selected.Section 1: Narrative
Write a half (1/2) page paper in which you:
1. Create a narrative that describes the site to your prospective client.Section 2: Storyboard
Imagine that your narrative has been approved. Use Word, Visio, or Dia to:
2. Create a storyboard diagram depicting the layout of your Website.Section 3: Business Website
In order to receive full credit for this section, you will need to submit:
1) One (1) screen shot of your emailed data from the guestbook.
2) One (1) CSS style sheet.
3) Four (4) Web pages.3. Create your Website based on the following requirements:
a. Create a Cascading Style Sheet (.css) for all pages, which:
i. Applies a background color.
ii. Applies style to font.
iii. Changes the ordered list markers to anything other than the default.
iv. Changes the unordered list markers to anything other than the default.
v. Applies style to a copyright footer.b. Include:
i. A graphic or logo on the home page.
ii. A navigation bar with links to every other page on the home page.
iii. A guestbook registry on the home page using the mailto: tag with an entry field for:
a. A person’s name.
b. An email address.
iv. A piece of JavaScript on the home page.c. Create a submit button for the guestbook registry that will email the information to your email address. Note: Test the function and take a screen shot of the emailed information you receive. You must submit the screen shot in your zipped file of deliverables as proof.
d. Create three (3) sub pages that include:
i. The same graphic / logo.
ii. A navigation bar with links to every other page.
iii. An ordered list of at least two (2) items, and then at least two (2) unordered list entries under each ordered list item where one (1) of the items must be a hyperlinked to a Website (the hyperlink should not show the address printed on the page).
Note: Each of the three pages should have unique lists.
Example:
A. Food
? Dry food
? Wet food
? Canned food
B. Toys
? Indoor
? OutdoorThe specific course learning outcomes associated with this assignment are:
Learn More
1) Describe the structure of the World Wide Web as interconnected hypertext documents.
2) Create and validate HTML documents.
3) Create presentations using Cascading Style Sheets and DHTML.
4) Write clearly and concisely about Web design and development using proper writing mechanics and technical style conventions. -
Penn foster Graded Project 41885200 Teenage Mutant Ninja Turtles
Regular Price: $20.00
Special Price $15.00
Penn foster Graded Project 41885200 Teenage Mutant Ninja Turtles
Turn to page 321 of the textbook and use the Practice Creating iFrames exercise to create a page listing the Teenage Mutant Ninja Turtles. You’ll need to modify the music types pages created earlier in your reading of the chapter to reflect the new focus of the pages. Use CSS formatting to change the color of each turtle’s name in the frame to the color of the headband each one wears. After completing the pages, validate the code using the XHTML validator at http://validator.w3.org/.
Learn More
Shopping Options
- Category
- Price
-
- $0.00 - $9.99 (1)
- $10.00 - $19.99 (63)
- $20.00 - $29.99 (8)
- $30.00 and above (3)

You have no items in your shopping cart.

