HTML/JS
-
Penn foster Graded Project 41885100 WEB PAGES LISTS AND TABLES
Regular Price: $20.00
Special Price $15.00
Penn foster Graded Project 41885100 WEB PAGES LISTS AND TABLES
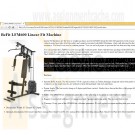
Body Systems is one of the leading manufacturers of home gyms. The company recently hired you to assist in developing their web site. Your first task is to create a Web page for the LSM400, a popular weight machine sold by the company.
Learn More
You'll download three files from your My Courses page:
1. smith.txt, describing the features of the LSM400
2. image file, logo.jpg, displaying the company logo
3. smith.jpg, an image of the LSM400
You can supplement these files with any other resources available to you. You're responsible for the page's content and appearance.
To complete this task:
1. Create an XHTML file named smith.htm.
2. In the head element, include an appropriate page title, along with a comment describing the purpose of the page, your name, and the date.
3. Include at least one example of each of the following in the document:
a. Heading
b. Paragraph
c. Ordered or unordered list
d. Character formatting element
e. Inline image
f. Horizontal line
g. Special character
h. Block-level element that is not a heading, paragraph, list, or horizontal line
4. Demonstrate your understanding of inline styles by including at least two different examples of an inline style.
5. Use proper XHTML syntax at all times. Close all two sided tags. Properly nest all tags. Use lowercase element and attribute names. Enclose attribute values in quotes. Include alternate text for non-graphical browsers with inline images.
6. Write your code so that it will be easy to read and understand. (You may download two image files from the Internet and use those, citing where you downloaded the files, and create a list of 3 to 5 features at your discretion.)
7. Save your XHTML file, and then view the resulting Web page in a browser.
8. Submit your completed project. -
New Perspectives on HTML and CSS Edition 6 Tutorial 9 Case Problem 3 Math High
Regular Price: $20.00
Special Price $15.00
New Perspectives on HTML and CSS Edition 6 Tutorial 9 Case Problem 3 Math High
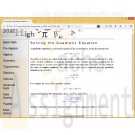
Math High Professor Laureen Cole of Coastal University, owner of the Web site Math High, has been studying the XML vocabulary MathML and how it can be used to display mathematical equations and information. She's asked you to create an XHTML document that contains elements from both XHTML and MathML. A preview of the page that you'll create is shown in Fig 9-31.
Complete the following:
Learn More
1. Use your text editor to open the quadtxt.xhtml file from the tutorial.09\case3 folder included with your Data Files. Enter your name and the date in the comment section of the file. Save the file as quad.xhtml in the same folder.
2. Add an XML prolog at the top of the document.
3. Within the html element, insert two namespace declarations: one for the XHTML namespace and the other for the MathML namespace (http://www.w3.org/1998/Math/MathML). Make XHTML the default namespace for the document and make MathML a local with the prefix m.
4. Scroll down the document to the paragraph element with the id eq1. Within this paragraph, copy and paste the MathML element from the mathml.txt file for the first equation.
5. Repeat Step 4 for the paragraphs with ids from eq2 through eq4.
6. For each MathML element, and the MathML namespace prefix m to indicate that these elements are part of the MathML vocabulary.
7. Close the file, saving your changes.
8. Open the quad.xhtml file in a browser that provide built-in support for MathML. At the time of this writing, that includes the FireFox and Opera browsers. Verify that your page resembles that shown in Figure 9-31.
9. Submit your completed files to your instructor, in either printed or electronic form, as requested. -
New Perspectives on HTML and CSS Edition 6 Tutorial 6 Case Problem 2 Creating a Web Form
Regular Price: $20.00
Special Price $15.00
New Perspectives on HTML and CSS Edition 6 Tutorial 6 Case Problem 2 Creating a Web Form
Learn More
Data Files needed for this Case Problem: diners.png, discover.png, formsubmit.js, go.png, master.png, modernizr-1.5.js, paytxt.css, regex.txt, sb.css, sbback.png, sblogo.png, spicetxt.htm, state.txt, stop.png, visa.png
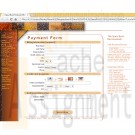
The Spice Bowl Rita Sato is the manager of the Web development team for The Spice Bowl, a new online grocery store specializing in gourmet spices. She's asked you to work on the Web forms for the site. The first form you'll create is a payment form in which customers enter their billing address and credit card data. She wants you to include validation tests for customers postal codes, phone numbers, e-mail addresses, and credit card numbers. A preview of the form you'll create is shown in Figure 6-79.
Complete the following:
1. In your text editor, open the spicetxt.htm and paytxt.css files from the tutorial.06\case2 folder included with your Data Files. Enter your name and the date in the comment section of each file. Save the files as spice.htm and payment.css respectively.
2. Go to the spice.htm file in your text editor and review the contents and structure of the document. Link the file to the payment.css style sheet.
3. Scroll down to the h1 heading Payment Form, and below it insert a form element with the action http://www.thespicebowlcorp.com/cgi-bin/payment using the post method.
4. Within the form, create three field sets with the ids billing, creditcard, and info, and with the legend text Billing Information (required), Credit Card (required), and Additional Information, respectively.
5. Within the billing field set, create input boxes for the customer's first name, last name, street address, second line of the street address, and city with the field names fNane, lNane, street, street2, and city, respectively. Add field labels for these input boxes as shown in Figure 6-79.
6. Create a selection list for the state field containing two-letter abbreviations of the state names. You can find a list of state abbreviations in the state.txt file. Add the label text State.
7. Create an input box for the zip field along with the label text ZIP/Postal Code. The pattern of the field value should match the regular expression for postal codes. You can use the regular expression patterns listed in the regex.txt data file.
8. Create an input box for the country field along with the label text Country. Make the default value of the field equal to the text string United States.
9. Create an input box for the phone field along with the label text Phone. The pattern of the field value should match the regular expression for phone numbers.
10. All of the fields within the billing field set should be marked as required fields with the exception of the street2 field.
11. Within the creditcard field set, create a field set belonging to the class optionGroup. Within this field set, create four label elements. Within each label, create an option button belonging to the card field followed by an inline image belonging to one of four credit card companies. The field values associated with the four option buttons are diners, discover, master, and visa, and the inline images are diners.png, discover.png, master.png, and visa.png, respectively.
12. Directly below the optionGroup field set, create an input box for the ccardnumber field along with the label text Credit Card Number. The text of the field value should match the regular expression for credit card numbers found in the regex.txt file.
13. Add a label containing the text Expiration Date followed by a selection list for the ccardmonthfield field that contains the first entry --Month-- followed by the text for each individual month in chronological order from January (01) through December (12). Also add a selection list for the ccardyear field with the first entry --Year-- followed by year values for 2014 through 2018.
14. Add a label containing the text CSC followed by an input box for the csc field. The csc field should be limited to three characters, follow the regular expression pattern \d{3 }$ and display the placeholder text nnn.
15. Make all of the fields within the creditCard field set required fields.
16. Within the info field set, create a label containing the text Contact Email followed by an input box for the email field that uses the email data type.
17. Add a label containing the text Special Notes followed by a text area box for the notes field.
18. At the bottom or the form, directly above the closing </form> tag, insert a submit button with the button text Submit Order.
19. Save your changes to the file, and then go to the payment.css file and add styles rules for the different form elements as described in the following steps.
20. Display all field sets without borders and with a 5-pixel margin. Display all field set legends with a background color of (239, 198, 145) and a text color of black. Set the top and bottom margins to 10 pixels and indent the legend text 20 pixels. Set the width of the legend to 1O0% of the width of the field set. Finally, add rounded borders to the legend, 1 0 pixels in radius.
21. Display all labels as blocks, floated on the left margin once the left margin is clear. Set the font size to 0.8em and align the label text to the right. Set the top and bottom margins to 2 pixels, and set the left and right margins to 5 pixels. Set the width of the labels to 25%.
22. Display all input elements as blocks, floated on the left with a font size of 0.9cm and a width of 60%. Set the top and bottom margins to 2 pixels, and set the left and right margins to O pixels.
23. Display all select elements as blocks floated on the left with a font size of 0.9 em and a margin of 2 pixels.
24. Display all textarea elements as blocks floated on the left with a font size of 0.9 em, a height of 75 pixels, and a width of 60%.
25. Set the left margin of the field set belonging to the optionGroup class to 25%. For label elements nested within the optionGroup field set: a) display the labels inline; b) do not float the labels; and c) set the label width to 100 pixels.
26. Display option buttons inline with no floating. Set the margin of the option buttons to 0 pixels and the width to 20 pixels.
27. Set the width of the input box for the csc field to 50 pixels.
28. For the submit button, add the following styles: a) set the background color to the value (239, 198, 145); b) do not float the input box; c) set the dimensions of the button to 150 pixels wide by 30 pixels high; d) set the top and bottom margins to 10 pixels. and set the left and right margins to auto; and e) add a rounded border with a 15-pixel radius.
29. When input, select, and textarea elements receive the focus, change the background color to the value (255, 218, 165).
30. When an input element receives the focus and is invalid, change the background color to the value (255, 245, 215) and display the stop.png background image file in the bottom-right corner of the input box with no tiling.
31. When an input element receives the focus and is valid, change the background color to the value (215, 255, 215) and display the go.png image in the bottom-right corner of the input box with no tiling.
32. Save your changes to the style sheet.
33. Open the spice.htm file in your Web browser. Verify that you cannot submit the form without all required fields filled out, and without phone number, e-mail address, and CSC values entered in the proper format.
34. Verify the validation checks for the credit card number by confirming that the form rejects the following credit card numbers (which are not valid card numbers):
• 31012345678901
• 6012123456789019
• 5912345678901235
• 8123456789012349
35. Further verify the validation checks for the credit card number by confirming that the form accepts the following credit card numbers which are valid card numbers:
• 30312345678901
• 6011123456789019
• 5112345678901235
• 4123456789012349
36. Submit your completed files to your instructor, in either printed or electronic form, as requested. -
New Perspectives on HTML and CSS Edition 6 Tutorial 4 Case Problem 2 Creating Page Layouts with CSS
Regular Price: $20.00
Special Price $15.00
New Perspectives on HTML and CSS Edition 6 Tutorial 4 Case Problem 2 Creating Page Layouts with CSS
Learn More
Data Files needed for this Case Problem: modernizr-1.5.js, notice.png, pizzatxt.c, rblogo.png, redhalltxt.htm, redbar.png, slice.png, toppings.png
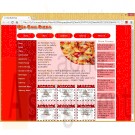
Red Ball Pizza Alice Nichols is the owner of Red Ball Pizza, a well-established pizzeria in Ormond Beach, Florida. She's asked for your help in creating a design for the company's Website. After discussing the issue with Alice, you settle on a fixed width layout. Alice has created a sample home page for you to work on. She already created all of the content and the graphics. She needs your help with the design. Figure 4-79 shows a preview of the page you'll create for her.
Complete the following:
1. In your text editor, open the pizzatxt.css and redballtxt.htm files from the tutorial.04\case2 folder. Enter your name and the date in the comment section of each file. Save the files as pizza.css and rcdhall.htm, respectively.
2. Return to the redball.htm file in your text editor. Take some time to review the content and structure of the document, and then link the file to the pizza.css style sheet. Close the file, saving your changes.
3. Go to the pizza.css file in your text editor. Create a style rule to display the header, section, aside, tooter, and nav elements as blocks.
4. Set the default padding and margin size to 0 pixels.
5. Create a style for the body element to: a) set the background color to red; and b) set the font family to Verdana, Geneva, or sans-serif.
6. The entire content of the page has been enclosed in a div container element with the id container. Create a style rule for this container to: a) set the width to 1000 pixels; b) center the container in the browser window by selling the top/bottom margins to 0 pixels and the left/right margins to auto; c) display a 1-pixel solid black border on the left and right edges; and d) set the background color to white and display the redbar.png image file as the background image, placing the image file in the top-left corner of the container and tiling it in the vertical direction only.
7. Change the background color of the header element to white and set its height to 100 pixels.
8. Create a style rule for the horizontal navigation list to: a) set the height to 70 pixels and the width to 100%; and b) set the background color to white.
9. For eath list item within the horizontal navigation list, create a style rule to: a) set the background color to white; b) set the font size to 16 pixels, the height and the line height to 50 pixels, and the width to 180 pixels; c) display the item as a block and float it on the left; d) set the left and right margins to 5 pixels; and e) horizontally center the contents.
10. For each hypertext link within a list item in the horizontal navigation list, create a style rule to: a) display the link as a block; b) set the background color to red and the text color to white; c) create elongated corners with a horizontal radius of 10 pixels and a vertical radius of 25 pixels (use progressive enhancement to support browser extensions); and d) remove the text underlining. If a user hovers a mouse pointer over these links, change the background color to the value (255, 101, 101) and the text color to black.
11. Create a style rule for the vertical navigation list to: a) float it on the left only when the left margin is clear; and b) set the width to 200 pixels.
12. For list items within the vertical navigation list, create a style rule to: a) remove the list item marker; b) indent the text 20 pixels; and c) set the top and bottom margins to 20 pixels.
13. For hypertext links within the vertical navigation list, set the text color to white and remove the text underlining. When a user hovers the mouse pointer over these links, change the text color to black.
14. The main content of the Web page is contained in a section element with the id main. Create a style rule for this element to: a) change the background color to the value (255, 211, 211); b) float the element on the left; and c) set the width to 600 pixels.
15. For paragraphs that are direct children of the main section, set the font size to 20 pixels and the margin to 15 pixels.
16. For inline images within the main section, create a style rule to: a) float the image on the right; b) set the margin to 15 pixels; c) set the width to 350 pixels; and d) set the radius of the bottom-left corner to 350 pixels (use progressive enhancement to support the Mozilla and WebKit browser extensions).
17. Alice has included six coupons in the home page that have been nested within div elements belonging to the coupon class. For each coupon div element: a) add a 5-pixel dashed black border; b) float the coupons on the left; c) set the width to 170 pixels and the height to 150 pixels; and d) set the top and bottom margins to 20 pixels, and the left and right margins to 10 pixels.
18. To the style rule for the coupons, add style properties to create the following two background images: a) place the slice.png image in the center of the coupon without tiling; and b) place the notice.png image in the bottom-right corner of the coupon without tiling. Set the background color of the coupon to white.
19. For h1 headings within the coupons, add a style rule to: a) set the text color to white on a background with the color value (192, 0, 0); b) set the font size to 16 pixels and the kerning to 2 pixels; c) center the text; d) set the height to 25 pixels; and e) display the text in small caps.
20. For paragraphs within the coupons, create a style rule to: a) set the font size to 14 pixels; b) center the text; and c) set the margin to 5 pixels.
21. Alice has placed interesting tidbits about pizza in an aside element. Float the aside element on the left with a width of 200 pixels.
22. For h1 headings within the aside element, create a style rule to: a) set the text color to the value(l92, 0,0); b) set the font size to 20 pixels and the kerning to 2 pixels; c) set the font weight to normal; and d) center the text of the headings.
23. For list items within the aside element, create a style rule to: a) set the background color to the value (255, 135, 1 35); b) add round corners with a 5-pixel radius; c) set the text color to black; d) remove the list style maker; and e) set the margin to 10 pixels and the padding to 5 pixels.
24. Display the footer element when the left margin is clear, and set the size of the left margin to 200 pixels.
25. For the address element within the footer element, create a style rule to: a) add a l-pixel solid red border to the top of the element; b) change the text color to red; c) set the font size to 10 pixels, set the font style to normal, and center the address text; and d) set the top margin to 25 pixels and the bottom padding to 20 pixels.
26. Add style comments throughout your style sheet to document your work and then save your changes.
27. Open the redhall.htm file in your Web browser and verify that the design and layout resemble that shown in Figure 4-79.
28. Submit your completed files to your instructor, in either printed or electronic form, as requested. -
CIS 273 Lab Assignment 6 Working with Tables
Regular Price: $15.00
Special Price $12.00
CIS 273 Lab Assignment 6 Working with Tables
Deliverable: One (1) Web page and one (1) Cascading Style Sheet (.css).
Follow the directions below to complete Lab Assignment 6:
Learn More
1. Create a Web page and a Cascading Style Sheet (.css) that adds color to the page.
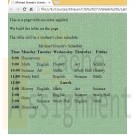
2. Re-create the Web page and the table as shown.
3. Create a caption for a student’s name.
4. Create a 1px table border.
5. Create weekday headings.
6. Create time headings.
7. Create multiple column coverage as shown for:
a. "Homeroom".
b. "Dismissed".
8. Create multiple column coverage and a centered bold tag for "Lunch" as shown.
9. Create multiple row coverage for “Gym” on Monday from 2:00 and 3:00 as shown. -
CTI 110 Web Programming and Database Foundations HTML and CSS Website Project
Regular Price: $40.00
Special Price $30.00
CTI 110 Web Programming and Database Foundations HTML and CSS Website Project
Project Guidelines
The following are the minimum guidelines for the HTML and CSS Website Project. As such, simply meeting the guidelines does not guarantee you a grade of 100 on the project.You may choose your own topic for your website. Pick a topic that you are already familiar with or that you wish to learn about. You may create a fictional topic, but this actually tends to increase the amount of work necessary to complete the project. Remember, this project is designed to be a website project, not a research project - keep it simple.Your site must contain a minimum of four(4)HTML pages and one(1)cascading style sheet.
All pages in your site should be based off of a template. All styling, formatting, and placement of elements should be controlled by CSS. Complete the template first then make copies and fill in the blanks. Refer to your textbooks and the assignments that you have already completed for ideas. It is ok to reuse your code, just not someone else's.
Follow the design tips found in your textbook and in any supplemental materials in Moodle.
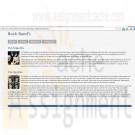
The homepage of your site should explain the concept of your site and/or provide some type of introduction.
All pages in your site must be linked together through a common navigational structure. Your navigation elements must have some type of hover effect similar to those used in your textbook.
Your site must include atleast one image. Your image should be optimized to reduce file size.
Your site must include relevant data displayed in a table.
Your site must include atleast one link to an external site as well as a mailto link. The external link should open in a new window/tab.
To facilitate uploading your files to Moodle, all files in your site should be saved in a single .zip file.
Be creative. This is one of the few opportunities in the class where you can "do your own thing."
Keep a backup copy of your files.
If you have questions, ask!
When you are finished with your project, upload the .zip file containing all of the files in your project using the appropriate link in Moodle. You should have a single file to upload, and the file cannot be larger than 20 MB.
Learn More -
New Perspectives on HTML and CSS Edition 6 Tutorial 5 Case Problem 2
Regular Price: $12.00
Special Price $10.00
New Perspectives on HTML and CSS Edition 6 Tutorial 5 Case Problem 2
Learn More
Data Files needed for this Case Problem: bottom.jpg, bottomleft.jpg, bottomright.jpg, caltxt.css, css.css, ccc.jpg, febtxt.htm, left.jpg, modernizr-1.5.js, right.jpg, tab.jpg, tabred.jpg, top.jpg, topleft.jpg, and topright.jpg
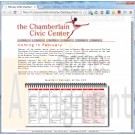
The Chamberlain Civic Center Lewis Kern is an events manager at the Chamberlain Civic Center in Chamberlain, South Dakota. The center is in the process of updating its Website, and Lewis has asked you to work on the pages detailing events in the upcoming year. He's asked you to create a calendar page for the month of February. Lewis wants the page design to catch the reader’s eye and so he suggests that you create a Web table with a background showing a spiral binding. The spiral binding graphic must be flexible to accommodate calendars of different sizes, so you’ll build the borders for this image by nesting the February calendar table within eight div elements. The February calendar must list the following events:
- Every Sunday, the Carson Quartet plays at 1:00 pm ($8)
- February 1, 8:00 pm: Taiwan Acrobats ($16/$24/$$36)
- February 5, 8:00 pm: Joey Gallway ($16/$24/$36)
- February 7-8, 7:00 pm: West Side Story ($24/$36/$64)
- February 10, 8:00 pm: Jazz Masters ($18/$24/$32)
- February 13, 8:00 pm: Harlem Choir ($18/$24/$32)
- February 14, 8:00 pm: Chamberlain Symphony ($18/$24/$32)
- February 15, 8:00 pm: Edwin Drood ($24/$36/$44)
- February 19, 7:00 pm: The Yearling ($8/$14/$18)
- February 21, 8:00 pm: An Ellington Tribute ($24/$32/$48)
- February 22, 8:00 pm: Othello ($18/$28/$42)
- February 25, 8:00 pm: Madtown Jugglers ($12/$16/$20)
- February 28, 8:00 pm: Ralph Williams ($32/$48/$64)
- March 1, 8:00 pm: Othello ($18/$28/$42)
Lewis wants the weekend events (Friday and Saturday night) to be displayed with a light red background. A preview of the page you'll create is shown at the end of this write-up.
Complete the following:
1. In your text editor, open the caltxt.css and febtxt.htm files from the tutoril.05\case2 folder. Enter your name and the date in the comment section of each file. Save the files as calendar.css and feb.htm, respectively.
2. Go to the feb.htm file in your text editor. Create links to the calendar.css and ccc.css style sheets.
3. Scroll down to the events section element. Within the element, insert a table with the class name calendar. Add the table caption Events in February at the CCC to the calendar.
4. Create a column group for the calendar consisting of two col elements. The first col element should belong to the weekdays class and span five columns. The second col element should belong to the weekends class and span two columns.
5. Create a table header row group consisting of one row of table headings displaying the three-letter abbreviations for the days of the week, starting with Sun and ending with Sat.
6. Create a table body row group containing the days in the month of February. The row group should contain five rows and seven columns of the table data cells. There are no spanning
cells in any of the rows or columns.
7. Each table data cell should have the following content:
- The day of the month should be marked as an h3 heading (refer to Figure 5-55 for the starting and ending days in the calendar).
- On the days when there is a CCC event, enter the event information as a definition list with the name of the event marked as a dt element, and the time and price of the event each marked with a dd element.
8. Save your changes to the file and then go to the calendar.css file in your text editor. Create a style rule for the calendar table to: a) create separate borders for the different parts of the table with a 5 pixel space between the borders; b) set the font size to 8 pixels; c) set the top margin to 20 pixels, the bottom margin to 5 pixels, and the left and right margins to auto; d) set the padding space to 40 pixels; and e) set the width to 650 pixels.
9. In the style rule you created in the previous step, add a style rule that specifies multiple background images for the calendar table in the following order:
- the topleft.jpg image in the top-left corner of the table with no tiling
- the topright.jpg image in the top-right corner with no tiling
- the bottomleft.jpg image in the bottom-left corner with no tiling
- the bottomright.jpg image in the bottom-right corner with no tiling
- the top.jpg image in the top-left corner, tiled only in the horizontal direction
- the left.jpg image in the top-left corner, tiled only in the vertical direction
- the right.jpg image in the top-right corner, tiled only in the vertical direction
- the bottom.jpg image in the bottom-left corner, tiled only in the horizontal direction.
10. Create a style rule to center the table caption along the top of the calendar table and do the following: a) set the bottom padding to 10 pixels; b) set the font size to 16 pixels; c) set the kerning to 3 pixels; and d) set the width to 650 pixels.
11. Set the width of the table columns to 14% of the width of the table. For columns belonging to the weekends class, change the background color to the value (255, 232, 232).
12. For table heading cells in the table header row group, set the background color to red, the font color to white, and the letter spacing to 5 pixels.
13. Set the height of the table row within the table header row group of the calendar table to 5%. Set the height of the table rows within the table body row group to 19% each.
14. Add a 1-pixel solid gray border to every table data cell within the calendar table. Set the vertical alignment of the cell content to the top of the cell.
15. Set the font size of h3 headings within the data table cells of the calendar table to 8 pixels.
16. The paragraphs in the summary section are enclosed within a div element. Create a style rule for this div element to: a) display the contents in a columnar layout with the column width set to 300 pixels; b) set the column gap to 20 pixels and; c) add a 1-pixel solid black divider rule between columns.
17. Save your changes to the file and then open feb.htm in your Web browser. Verify that the layout and design of page resemble that shown in Figure 5-55. (Note: If you are running Internet Explorer or Opera, you might not see multiple columns in the description of the upcomming Feburary events.)
18. Submit your completed files to your instructor, in either printed or electronic form, as requested. -
New Perspectives on HTML and CSS Edition 6 Tutorial 7 Case Problem 3 Franklin High School
Regular Price: $15.00
Special Price $12.00
New Perspectives on HTML and CSS Edition 6 Tutorial 7 Case Problem 3 Franklin High School
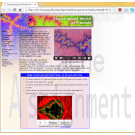
Franklin High School Fractals are geometric objects that closely model the seemingly chaotic world of nature. Doug Hefstadt, a mathematics teacher at Franklin High School in Lake Forest, Illinois, has just begun a unit on fractals for his senior math class. He's used the topic of fractals to construct a Web page to be placed on the school network, and he needs your help to complete the Web page. He has a video clip of a fractal that he wants placed in the Web page, along with a Java applet that allows students to interactively explore the Mandelbrot Set, a type of fractal object. He wants our assistance with putting these two objects in his Web page. A preview of the page you'll create is shown in Figure 7-47.
Complete the following:
Learn More
1. Use your text editor to open the fractaltxt.htm file from the tutorial.07\case3 folder included with your Data Files. Enter your name and the date in the comment section of the file. Save the file as fractal.htm in the same folder.
2. Scroll down to the figure element. Directly above the figure caption, insert a video element. Set the width and height of the video to 320 pixels by 260 pixels. Add attributes to display the zoom.png file as a poster image for the video, and have the video automatically loop back to the beginning when played. Display the mandel.mp4 and mandel.webm Video files in the player. Display the video controls in the player.
3. Within the video element, nest an object element displaying the mandel.swf Flash player. Add an attribute and a parameter to loop the player back to the beginning when played.
4. If the browser does not support flash player, display a message telling the user that he or she must have the Shockwave player. Include a link too the Website where the user can download the player.
5. Scroll down to the article element, Within the paragraph in this element, insert an object element containing the Java applet for the Mandel.class file; set the width of the Java window to 280 pixels and height to 240 pixels.
6. If your browser does not support Java, have it display the text Your browser does not support Java applets in place of the Mandel.class applet.
7. Save your changes to the file.
8. Open the Web page in an HTML5-enabled browser and verify the video plays correctly.
9. Open the Web page in a browser that does not support HTML5 but support Flash, and verify that you can play the Flash video. If the browser does not support HTML5 and Flash, verify that the browser displays a message indicating that the user should install Flash. Re-enable Flash if you disabled it.
10. Test the fractal applet to verify that you can use it to zoom into the Mandelbrot Set at different levels of magnification.
11. Disable Java support and verify that the browser displays a message indicating that you should install Java. Re-enable Java support in the browser.
12. Submit your completed files to your instructor, in either printed or electronic form, as requested. -
ITCO381 Unit 1 IP assignment
Regular Price: $20.00
Special Price $15.00
ITCO381 Unit 1 IP assignment
In an era where Web sites are highly dynamic, interactive, and database dependent, a static Web page consisting of only HTML may seem archaic. However, Web developers must begin somewhere and a good understanding of the language of the Web (HTML) is the right place to start. You have decided to develop a static Web page that contains valid HTML as the newsletter for an organization that interests you.
Create a static Web page that includes the basic structure of a valid HTML (not XHTML) document. Make sure to include the language attribute of the html element and the character set attribute of the metadata element. You may want to save this basic document as the starting structure for development of all static Web pages.
Continue to structure the newsletter using the HTML semantic elements
header
section
footer
Within the structure of the newsletter add other HTML elements including at least one:
heading
paragraph
image that implements accessibility guidelines
navigation that includes a
list of at least
four links that
navigate to actual Web pages and
implement accessibility guidelines
Use of any inline elements should follow current standards
No style should be applied
Validate the finished web page.
Zip (compress) the into a .zip file.
Please submit your assignment.Grading
Learn More
You will be graded on the content, structure, and validity of your final HTML page. -

New Perspectives on HTML, CSS, and Dynamic HTML 5th edition Tutorial 11 Case 2 The Math Table
Regular Price: $20.00
Special Price $15.00
New Perspectives on HTML, CSS, and Dynamic HTML 5th edition Tutorial 11 Case 2 The Math Table
The Math Table Theresa Kaine runs The Math Table, a Web site containing math resourses for homeschooling families and educators. She wants to add an online calculator to the site and has asked for your help in designing a simple prototype. Theresa already has designed the Web page and would like you to write the JavaScript code to make the calculator work. A preview of Theresa's sample Web page is shown in Figure 11-39.
The calculator is actually a Web table using CSS styles to give it the appearance of a calculator. Each calculator button is a form button and the calculator screen is a textarea element. When a user clicks a calculator button, the number or symbol represented by the button should be appended to the text on the calculator screen.
When the user clicks the equal button( = ), the calculator should evaluate the expression and display the calculated value. When the user clicks the Clear button, the text in the calculator screen should be replaced with an empty text string. Finally, when the user clicks the backspace button(<-), the browser should remove the last character on the calculator screen. To aid you in programming the backspace key, Theresa has provided a function named erase(). You will create all of the other JavaScript functions yourself.Complete the following:
Learn More
1. Use your text editor to open the calctxt.htm file from the tutorial.11\case2 folder included with your Data Files. Enter your name and the date in the comment section of the file. Save the file as calculator.htm in the same folder.
2. In your text editor, scroll down to the Web table elements and locate the input elements for the 0 through 9 buttons; the /, *, -, and + buttons; the (and) buttons; and the . button. For each of those 17 buttons, and an onclick attribute to run the statement
calcPress('value')
where value is the number or character displayed on the button.
3. Locate the input element for the Clear button and add an onclick attribute to run the clearWin() function when the button is clicked.
4. Locate the input element for the backspace button (<-) and add an onclick attribute to run the erase() function when the button is clicked.
5. Add an onclick attribute to the equal button (=) to run the calcExpression() function when the button is clicked.
6. Scroll to the top of the file and add the calcPress() function to the embedded script element. The purpose of this function is to append a symbol to the text displayed in the calculator screen. The calcPress() function should include the following:
a. A single parameter named symbol
b. A command that uses the += operator to add the value of the symbol parameter to the value of the calcwindow field within the calculator form
7. Create a function named calcExpression(). The purpose of this function is to append the calculated value to the expression displayed on the calculator screen. The function has no parameters. Add the following commands:
a. Declare a variable named cString that is equal to the text contained in the calcwindow field of the calculator form.
b. Use the eval() method to store the numeric value of cString in a variabe named cValue.
c. Change the text string value of the calcwindw field from the calculator form to
cString = cValue
where cString is the value of the cString variable and cValue is the value of the cValue variable.
8. Create a function named clearWinn(). The purpose of this function is to erase the contents of the calculator screen. The function has no parameters but should have a single command that changes the value of the calcwindow field in the calculator field in the calculator to an empty text string ("").
9. Save your changes to the files.
10. Open the calculator.htm file in your Web browser. Click the different calculator buttons and verify that you can enter a mathematical expression into the calculator. Click the backspace button (<-) and verify that you can erase the last character from the screen Click the equal button (=) and verify that the calculator adds the calculated numeric value to the expression. Finally, click the Clear button and verify that all of the text is removed from the calculator screen.
11. Submit your completed project to your instructor, in either printed or electronic form, as requested.


