Oracle
Need Help in Oracle Assignment?
We can help you if you are having difficulty with your Oracle Assignment. Just email your Oracle Assignment at admin@assignmentcache.com.
We provide help for students all over the world in Oracle Assignment.
-
CMIS 420 Homework 3 Online Vehicle Sales OVS Database
$15.00CMIS 420 Homework 3 Online Vehicle Sales OVS Database
1) Complete your OVS database through the Homework #2 requirements.
Learn More
2) Add 25 customers so that you now have 50 total.
3) Add 25 vehicles so that you now have 50 total.
4) Add 200 sales so that you now have 250 total.
5) Via a single SELECT query display the total count of sales, and the lowest, average, and highest sale price.
6) Via a single SELECT query display all customer IDs, names, and zip codes of customers having purchased 5 or more vehicles.
7) Via a single SELECT query display the institution and loan type of the financing plan used for the most sales.
8) Via a single SELECT query display the vehicle make involved in the most sales and all customers having purchased a vehicle of that make.
9) Produce a detailed and formatted report showing the customer IDs, names, and zipcodes along with makes and models sold with summarized customer counts and make and model counts. -
Student Database Oracle DDL and Queries
$40.00Student Database Oracle DDL and Queries
Create the following tables.
STUDENT
Student Number (PK)
Student Last Name
Student Major
Department ID (FK)
Student GPA
Student Hours
Student Class
Advisor ID (FK)ADVISOR
Advisor ID (PK)
Advisor Last Name
Advisor Office
Advisor Building
Advisor PhoneDEPARTMENT
Department ID (PK)
Department Code
Department Name
Department Phone*NOTE* You will have to decide on how to handle the Department and Advisor ID foreign keys in terms of a numbering system as well as appropriate field widths and types for the fields.
The business rules which govern this database are: A student may have one advisor while an advisor may advise multiple students. A student belongs to only one department but each department can have many students.
Populate the table with data from Table P6.4 (p. 217).
There is an error in the book! Change Ortiz’s student number to be 200888. In addition, add these three students to your database.
STU_NUM 123984 995133 367181
STU_LNAME Freeman Wilder Green
STU_MAJOR CIT CIT BIS
DEPT_CODE CS CS IS
DEPT_NAME Computer Science Computer Science Business Informatics
DEPT_PHONE 5234 3951 3951
COLLEGE_NAME Informatics Informatics Informatics
ADVISOR_LNAME Strand Zhang Goh
ADVISOR_BLDG Griffin Griffin Griffin
ADVISOR_OFFICE 5132 3451 5612
ADVISOR_PHONE 1603 3512 7922
STU_GPA 2.5 3.9 2.3
STU_HOURS 97 58 63
STU_CLASS Senior Junior JuniorPart 1
Provide all DDL-related code. This includes table definition and creation, fk/pk creation, and populating the tables with data. Please include the output from Oracle that shows that everything was created correctly.Part 2
Learn More
Queries – For each query provide 1) What the output, specifically, should be based upon eyeballing the data 2) the SQL code used to generate the query, and 3) the output from Oracle. Please include any relevant fields you think the user of the query would need to interpret the output.
1. Advisors need the capability to generate a query that returns *all* student information based upon a student number. This will help them in the advisement process. Create a query that returns all information for student Freeman from each table.
2. Each year, college administrators need to know how many students are in each major. Create a query that counts the number of students in each major while displaying the major name.
3. Kroger has approached NKU with an internship opportunity! The business department chair needs to generate a mailing list to inform great students about a job opportunity. Create a query that shows all the student numbers, last names, majors, department names, and advisor’s last name for students in Business Admin. Students should have a minimum GPA of 2.5 or greater to be on this mailing list. List in ascending order of GPA.
4. To get an idea of the adequacy of admission standards, NKU needs to have an idea of the breakdown of students. By each college, show the number of students in each classification (freshmen, sophomore, junior, senior).
5. Due to a fire, Griffin Hall has burnt down. Write a SQL statement that updates all faculty who had offices in Griffin Hall to now be housed in the University Center.
6. New funding may be able to pay for an advising center. The dean would like to get an idea of how many students each faculty member currently advises. Create a query that shows the names and majors of students for each advisor along with the advisor’s name.
7. (Extra credit) Create a query that counts the number of students who are eligible for the Dean’s list (GPA >= 3.5) in each department. -
IM300 Week 5 Optimizing the Database Hotel Database Part 4
$25.00IM300 Week 5 Optimizing the Database Hotel Database Part 4
Resources: SR-bi-003 – Hotel Database, the results from SR-bi-003 – Hotel Database Part 3, and Oracle® Database Express® Virtual Desktop
Complete the service request by implementing referential integrity and constraints in your database:
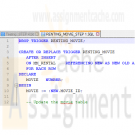
Create an AFTER trigger on the Hotel table that deletes any records from the Rooms table that match (:old.HOTEL_ID).
Apply at least six constraints within the database.
Create a newly generated DDL script.Create a fax cover sheet addressed to the project manager for the referential integrity and constraints work you have completed and include a newly generated DDL script to show your progress on the project.
Learn More -

IM300 Week 5 Learning Team Analyze the Execution Plan Letter
$20.00IM300 Week 5 Learning Team Analyze the Execution Plan Letter
A member of your team questions the necessity of an execution plan for the new database system. You reply in a letter.
Resources: University of Phoenix Material: Execution Plan Instructions
Analyze the execution plan created by the database using the query and instructions found in the Execution Plan Instructions document.Write a draft of your business letter to a database administrator including the following:
Learn More
An explanation of why it is important for them to understand execution plans.
How execution plans can be used to improve the performance of the database.
Format your letter consistent with APA guidelines.
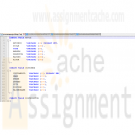
The execution plan is attached which I ran against the oracle DB HR and the attached pictures are the result. -
DBM 405 Lab 1 SQL Review Advanced Database Oracle
$20.00DBM 405 Lab 1 SQL Review Advanced Database Oracle
Learn More
Scenario/Summary
The purpose of the first week's lab is to review the SQL language, and familiarize you with the database example that we will use in labs through this course. If you have not done it yet, please download the MovieRentals.SQL file to your computer from Doc Sharing. This script file will need to be run once logged into your Oracle user account to create the tables and data that will be used for this lab and subsequent labs in the course.
Setting up your environment:
Before attempting Lab 1, you need to be sure you have read through the SQL*Plus tutorial which can be found in Doc Sharing as well as under the SQL*Plus Tutorial tab in Week 1. This tutorial describes the functionality of the editor and will step you through the process of setting up and using the SQL*Plus in the iLab environment so that it will best serve your needs for the remainder of the labs required for this course. Once you have logged into Oracle through iLab then execute the MovieRental.SQL script and create the tables and data for the lab.
For the lab, you will need to create a script file containing the eight queries that will address the lab steps below. Run the script file in your SQL*Plus session using the SET ECHO ON session command at the beginning to capture both the query and result set. Spool your output to a file named with your last name plus lab 1 and give the file a text (.txt) extension. For example, if your last name was Johnson then the file would be named johnson_lab1.txt. Submit both the spooled output AND the script file for grading of the lab.
LAB STEP
Step 1:
Within SQL*Plus, list names of the tables that you have created whose name starts with MM (Hint: use data dictionary view USER_TABLES).
Step 2:
Use DESCRIBE (in short: DESC) command in SQL*Plus for each of these tables to show columns and their datatypes.
Step 3:
Use SELECT * command to display all data from each of the tables in the MoreMovies schema. Make sure that the LINESIZE and PAGESIZE have large enough values, and that you format columns so that the report looks good. You should end up with five queries and result sets.
Step 4:
Using the mm_movie and mm_movie_type tables, write a query that will list all movie categories together with the count of movies in each category. Give the column with the count in it a meaningful name such as IN STOCK.
Step 5:
Using the mm_movie and mm_rental tables, write a query that will list titles and checkout dates for all movies that were signed out by Wild Coyote (MEMBER_ID=13).
Step 6:
Using the same two tables used in Step 5, write an SQL sub-query that will list all movies (movie ids and titles) of all movies that have never been rented.
Step 7:
Using the mm_member and mm_rental tables, write a query that will list all members (member ID, first name, and last name) and the number of movies they have rented, for all members who have rented at least one movie. Order the result set so that it shows the largest number of movies rented as the first row.
Step 8:
Write a query that will display the largest number of movies rented by one member and that member's name. Give the output column a meaningful name such as MAXIMUM NUMBER.
Step 9:
Using the mm_member and mm_rental tables, write a query that will display member ID, last name, first name, and the number of movies rented for each member. Give the column with the number of movies rented a meaningful name such as NUMBER RENTED.
Step 10:
Using the mm_member, mm_movie and mm_rental tables, write the query that will prepare a report that shows who rented which movie. Use member names (first and last) and movie title rather than the corresponding IDs. Order the report by member names, and for a single member by the movie titles.
This concludes the Lab for Week 1. -

DBM 405 Lab 6 Reading and Writing to External Files
$20.00DBM 405 Lab 6 Reading and Writing to External Files
Learn More
Scenario/Summary
This week, we are going to make a change to the processing in our schema by altering one of the procedures contained in the package previously created. At this point, we have dealt with procedures that required us to pass parameter values each time the procedure was executed. This type of processing greatly limits the ability to process large amounts of data efficiently. The lab this week will introduce you to a couple of the procedures contained in the UTL_FILE package that is part of Oracle's group of built-in packages. By using the GET_LINE and PUT_LINE procedures contained in UTL_FILE, you will be able to process multiple records from a file and create a results report on the events performed by your movie rental procedure with one call to execute the procedure.
For the lab, you will need to create a script file containing the PL/SQL code that will address the lab steps below. Run the script file in your SQL*Plus session using the SET ECHO ON session command at the beginning to capture both the PL/SQL block code and output from Oracle after the block of code has executed. You will only need to recompile both the package specifications and the package body since you will be making a change to the movie_rental_sp procedure in the specifications. You will be running tests to verify that the changes to your procedure are working as they should. Spool your output and name your files with your last name plus lab 6 and give the file a text (txt) extension. For example, if your last name was Johnson then the file would be named johnson_lab6.txt. Submit both the spooled output files AND the script file for grading of the lab.
IMPORTANT: Before beginning the lab, you will want to refresh the tables in your schema by running the movierental.sql script.
LAB STEP
Step 1: Setting Up Your Environment
Before you can effectively use the procedures in UTL_FILE to work with external files for this lab, you will need to set up your environment. The first step of this process will involve creating a directory folder under the R: drive which is the mapped drive for DBM405. The second part of the process will involve creating the Directory Object in Oracle to point to this folder. To accomplish this task, please follow the steps listed here.
1. Create the directory folder (You can refer to the SQL*Plus Tutorial in Week 1 for visuals of this process).
• First, log into the iLab and open up your Oracle folder. Next, open Windows Explorer and expand the R: drive tree.
• Under the R: drive, create your own folder by selecting File/New/Folder from the main menu bar. Name your folder using a unique name such as DBM405_lastname_lab6 or some other unique name. Make sure that there are no other folders under the R: drive with the same name as yours. You are the only person who has access to your folder, but the name must be unique.
2. Create the Directory Object.
• In Windows Explorer (the one in the Oracle folder in the iLab), you want to take note of the path name for the R: drive. It will be DBM405\ followed by the session you are in. For example, if you are in Spring A, the path would be DBM405\SPRINGA, or if Spring B, it would be DBM405\SPRINGB. This is important because this will be used to define the path for the Directory Object. Remember that the R: drive is really mapped to the Oracle server F: drive.
• Start up a session in SQL*Plus and log into your user schema.
• Use the following SQL command to create the Directory Object that you will use for this lab.
Create or Replace Directory DBM405_YOURNAME_DIR As 'F:\DBM405\session\YourFolderName';
IMPORTANT: Replace the word YOURNAME with your actual last name, the word session with the session name found in the path for the R: drive (see first bullet above), and the word YourFolderName with the name of the folder you created in Part 1 above. For example, if your last name were SMITH and you were taking this course is Spring session A and the folder you create was named DBM405_SMITH_lab6, the statement would be:
Create or Replace Directory DBM405_SMITH_DIR As 'F:\DBM405\SPRINGA\DBM405_SMITH_LAB6';
3. Set up the data file.
• Download the file "movierentaldata.txt" from Doc Sharing and place this file in the directory folder you created above in Part 1.
You have now set up Oracle to work with the procedures in UTL_FILE that we will use for this lab.
Step 2: Changing the Package Specifications
We are now ready to start updating the package that we modified in Lab 5 so that it will allow us to read a file and make changes to the database. To do this, we will need to make changes to the parameter list of the MOVIE_RENT_SP procedure to reflect a new process. Since we will be changing the parameter list, we will need to make changes to the Package Specifications as well as to the Package Body.
For the change to the Package Specifications, you will need to define a parameter for the Directory Object, one for the input file, and one for an output file that will be used for a verifications report. Each of these parameters can be defined as VARCHAR2 data types.
Step 3: The DECLARE (IS) Section of the Procedure
Now, we can move on to the Package Body and the MOVIE_RENT_SP procedure itself. The first thing you want to do is make sure that the parameter list in the procedure matches the parameter list that you just changed in the Specifications in Step 2. The two parameter lists must match exactly or you will get errors when trying to compile the Package Body.
When you read in the file, you will need several variables to handle both the record and the various pieces of data in the record. When the record is read in, you will need to substring each piece of data from the record into a variable which then can be used like you were using the parameters before. To keep from having to make numerous changes in the code, you might want to consider using the actual parameter names from your parameter list in the code from Lab 5. For example, if the parameter name for the movie ID was P_MOVIE_ID then you would create a variable named P_MOVIE_ID. Each of the variables for movie ID, member ID, and payment method can be cast to the data type in the MM_RENTAL table. For example:
p_movie_id mm_rental.movie_id%TYPE;
You will also need a variable to hold the record data that will be read in and a variable to hold record data that will be written out. Check the length of the data in the movierentaldata.txt file to determine the length for the input data variable. For the output data variable, you can use your own judgment, but using VARCHAR2(80) would probably be more than adequate.
The last thing you will need to add is a variable to act as the handle for the input record and one for the output record. Remember that the name for these is not important, but they must be based on the FILE_TYPE data type.
Step 4: Opening the Files
Now, we move to the body of the code and the BEGIN section. The first thing that needs to happen is to open both the files. Remember that we are going to set up our processing just like we would any IPO logic, i.e., we need to open the files, read a record, process the data, read the next record, and repeat this process until there is no more data.
To accomplish this first step of opening the files, you will need to initialize the two variables you declare to handle the files. For the input file, you will need to use the FOPEN program. Remember that you have to pass this program three variables: the name of the parameter for the directory object, the name of the parameter for the input file, and the mode the file is to be in. For the input file, the mode needs to be "r", and for the output file, the mode needs to be "w".
An example of what your code might look like can be found in the lecture material for this week.
Step 5: Setting Up the LOOP
Since our code in its current format is designed for only one set of input values (remember that in previous labs we were using an EXECUTE command and then passing data to the procedure) and we now want to process multiple records of data, we need to make a change to the overall structure of the code. We need to put all of the processing in the body of the procedure after the files are opened into a basic LOOP using the LOOP/END LOOP commands. Also, we will need a new BEGIN section inside this LOOP that all of the existing code will go into. The basic structure of body of your code should look like the following when you complete this step.
BEGIN
open files
LOOP
BEGIN
file processing
BEGIN
existing process to increment rental_id
EXCEPTION
END
EXCEPTION
END
END LOOP
END
Step 6: Setting Up the File Read and Process
Now, we need to get our data record so that we can process the data brought into the program. To do this, we need to read a record using the GET_LINE program in UTL_FILE. This involves using the UTL_FILE.GET_LINE process while passing the file handle variable and input record variable to the GET_LINE program.
Once the record is in the input variable, we then need to parse out the individual pieces of data (movie ID, customer ID, and payment method) from the record using the SUBSTR function. Remember that the parameters for the SUBSTR function are the record variable name, the value for the first byte of data we want to pull, and the length of the data. For example, to get the movie ID from our record, the code might look like the following.
p_movie_id := SUBSTR(v_rental_record, 1, 2);
This would pull two bytes of data from the data record and put them in the variable p_movie_id. Now we can use the variable in our code that follows to see if that movie ID exists in the mm_rental table. You will need to repeat the process above for the member ID and the payment method. Do all three together between the line of code that reads the file and the first SELECT statement.
Step 7: Setting Up the Output Process
If you have used the same names for your three data variables that you used for the original parameter names in the previous lab then you should not have to make any changes at all to any of the SELECT statements or the INSERT statement in the main body of code. Now, we need to set up the processing that will create the output data that will go into our output validation record. To do this, you will be using the PUT_LINE program within UTL_FILE.
There are going to be six different places you will want to write out a record. The first will be after the insert statement when a new rental record is added to the mm_rental table. To create this output line you can concatenate variables and character strings together to create the data record. For example, to create an output line that would read "Rental record 13 for member 10 has been added" after the new record has been inserted, you would use code similar to the following (keep in mind that your variable names might be different).
v_report_record := 'Rental record '||v_rental_id||' for member '||p_member_id||
' has been added';
UTL_FILE.PUT_LINE(v_report_filehandle, v_report_record);
This same type of process and format will need to be repeated for each exception handler that in the previous lab used the DBMS_OUTPUT.PUT_LINE package and procedure. In these cases, your output line is already formatted and set, you just need to replace the DBMS_OUTPUT.PUT_LINE with the initialization of your output record and then add the UTL_FILE.PUT_LINE code.
Step 8: Getting Out of the LOOP and Closing the Output File
There is one final step that has to be taken care of before you can start testing your code. Since we are reading a record file within a LOOP we need to be able to EXIT out of the loop after the last record has been processed. To do this you will need to add a NO_DATA_FOUND exception to your main exception handling section. This exception handle must be added before the WHEN OTHERS exception handle (remember, that on has to be last). This exception handle will have three pieces to process.
The first will be some form of message stating that all the records have been processed and this is the end of the report, i.e., ALL RECORDS PROCESSED - END OF REPORT. The second piece will be a line that will close the output file using UTL_FILE.FCLOSE. The only parameter you will need to pass is the name of the output file variable. This must be done or your output file will not have any data in it. The third thing will be the word EXIT which will tell the program to exit out of the loop.
You are now ready to compile your package specifications (must be done first) and then the package body. Debug any errors you might have and then run your test.
Step 9: Testing Your New Procedure
For this lab, you only need to test the MOVIE_RENT_SP procedure of the package. To do this, enter an EXECUTE command for the package.procedure and pass the name of your Directory Object, input file name, and output file name to the procedure. IMPORTANT: The Directory Object name MUST BE IN UPPERCASE! This is the way it is stored in the data dictionary in Oracle and if it is not in uppercase, an error will be generated. Your call to the new procedure should look similar to the following.
execute MM_RENTALS_PKG.movie_rent_sp('DBM405_SMITH_DIR','movierentaldata.txt','rentalreport.txt');
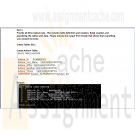
The output in your output file should look similar to the following (the wording may be different but the processes recorded should be the same).
There is no movie with id 13. Cannot proceed with rental.
There is no member with id 20. Cannot proceed with rental.
There is no payment method with id 7. Cannot proceed with rental.
Rental record 13 for member 10 has been added.
Movie id 5 is not available at this time. Cannot proceed with rental.
This concludes the Lab for Week 6. -
DBM 405 Lab 5 User Defined Database Triggers
$20.00DBM 405 Lab 5 User Defined Database Triggers
Learn More
Scenario/Summary
This week, we are going to continue to expand the functionality of our database schema by adding a couple of triggers to that will help us automate some of the processing we already have in place. Triggers can be used to automate repetitive tasks within the database, such as adjusting inventory levels based on other actions taken in the database. Once you have created and tested your triggers, you will need to make some adjustments to the code in the package that was created in Lab 4.
For the lab, you will need to create a script file containing the PL/SQL code that will address the lab steps below. Run the script file in your SQL*Plus session using the SET ECHO ON session command at the beginning to capture both the PL/SQL block code and output from Oracle after the block of code has executed. You will be running tests to verify that your triggers are working once your package has been updated. Spool your output and name your files with your last name plus lab 5 and give the file a text (.txt) extension. For example, if your last name was Johnson then the file would be named johnson_lab5.txt. Submit both the spooled output files AND the script file for grading of the lab.
LAB STEP
Step 1: Creating the First Trigger
The first trigger you are going to create is to be named RENTING_MOVIE and is going to take care of the process of updating the mm_movie table to reflect a change downward in the quantity column for a movie when it is rented. Keep the following in mind:
1. The trigger needs to be an AFTER INSERT trigger on the mm_rental table. We want it to be an AFTER trigger so that, in case there are any exceptions raised, the trigger will not fire.
2. The trigger needs to be able to fire for each row that is inserted into the table.
3. The trigger process will only involve the update statement to lessen the quantity amount in the mm_movie table by one for the referenced movie ID.
Test your code by running the script in SQL*Plus. If you have any errors, debug them and once you have a clean compile, move on to Step 2.
Step 2: Creating the Second Trigger
The second trigger you are going to create is to be named RETURNING_MOVIE and is going to take care of the process of updating the mm_movie table to reflect a change upward in the quantity column for a movie when it is returned. Keep the following in mind:
1. The trigger needs to be an AFTER UPDATE trigger on the mm_rental table based on the updating of the check in date in the mm_rental table.
2. The trigger needs to be able to fire for each row that is updated.
3. The trigger process will only involve the update statement to increase the quantity amount in the mm_movie table by one for referenced movie ID.
Test your code by running the script in SQL*Plus. If you have any errors, debug them and once you have a clean compile, move on to step 2.
Step 3: Modifying the Package Code
Now, we have two triggers that will handle changes in our movie rental stock each time a movie is rented or returned. Since that same process currently exists in the procedures in our package then we need to make some changes.
To keep from having repetitive processes, and thus have a scenario for generating invalid inventory data, we need to take the processes out of the procedures in the package body by:
1. removing the update statement in the MOVIE_RENT_SP that decreases the quantity by one in the mm_movie table; and
2. removing the update statement in the MOVIE_RETURN_SP that increases the quantity by one in the mm_movie table.
Recompile the package body (you do not have to recompile the package specifications). If you have any errors, debug them and once you have a clean compile, move on to Step 4.
Step 4: Testing
To test your changes, you will only need to test a valid movie rental and a valid movie return. The following steps will help you with the process.
1. Query the mm_movie table to see all data for movie ID 1.
2. Execute the movie_rent_sp procedure in the package and use 1, 13, and 2 for the parameters.
3. Query the mm_movie table to verify the change in quantity for movie ID 1.
4. Query the mm_rental table to get the current rental ID for movie ID 1.
5. Execute the movie_return_sp procedure in the package using the rental ID from Step 4.
6. Query the mm_movie table to verify the change in quantity for movie ID 1.
This concludes the Lab for Week 5. -

DBM 405 Lab 4 PL/SQL Packages Advanced Database Oracle
$20.00DBM 405 Lab 4 PL/SQL Packages Advanced Database Oracle
Learn More
Step 1: Creating the Package Specifications
Before you begin, there are several things you will want to do to get ready for the lab.
1. Refresh your database tables by running the movierental.sql script. This will restore all of the data back to where it was in the beginning for the course.
2. Drop the two procedures and the function created in Lab 3. Be sure that you have your script file from Lab 3 so you can copy the procedure and function code from it.
Now you are ready to create your package specification. Your package name should be MM_RENTALS_PKG and it will contain the two procedures and the one function that were created in Lab 3.
Remember that for the specification, you only need to list the procedure and function header data (CREATE statement with parameters).
Test your package specification by running the script in SQL*Plus. If you have any errors, debug them and once you have a clean compile, move on to Step 2.
Step 2: Creating the Package Body
Creating the package body should be simple since you already have the code for the two procedures and the function, and you know it works.
Remember that the name for the package body must match the name of the specifications, and that the procedure and function header in the body must match that of the specification exactly.
Once you have created the body then run the script in your SQL*Plus session. Once you have a clean compile then move on to Step 3 to do your testing.
Step 3: Testing the Package
To test your package, you will need to run the same exact tests you did in Lab 3. The following outlines what you will test for:
Testing the first procedure -
1. No movie for the ID supplied (use 13, 10, and 2 for the parameters).
2. No member for the ID supplied (use 10, 20, and 2 for the parameters).
3. No payment method for the ID supplied (use 10, 10, and 7 for the parameters).
4. A successful rental (use 5, 10, and 2 for the parameters).
5. No movie available for the ID supplied (use 5, 11, and 2 for the parameters). Since there is only one movie available for ID 5, you will get this exception.
Testing the second procedure -
1. No rental for the ID supplied (use 20 for the parameter).
2. A successful rental return (use 1 for the parameter).
3. Try to return the same rental in Step 2.
Testing the function -
1. Test for a movie in stock using movie ID 11.
2. Test for a movie not in stock using movie ID 5 (from your tests of the second procedure above, the quantity should be 0).
3. Test for an invalid movie ID using movie ID 20.
IMPORTANT: Remember that all of your testing needs to be saved in a spool session so that it can be submitted to the Dropbox for grading.
Step 4: Determining Dependencies
Having created a package that contains program units to support the movie rental process is a major step in customizing the new database.
As application modifications are made in the future, however, we need to be able to identify all object dependencies to test changes.
For this step in the lab, you are to use either data dictionary views or the dependency tree utility found in Doc Sharing (utldtree.sql file) to compile a list of dependencies for all the More Movies database objects.
Remember that an object is anything that was created using the CREATE statement.
Present your finding in a separate Word document in a tabular format as in the following sample.
Each dependency type should be listed as either direct or indirect. -
CMIS 320 Project 2 Mom and Pop Johnson Video Store Oracle Database
$20.00CMIS 320 Project 2 Mom and Pop Johnson Video Store Oracle database
Learn More
In this project you will perform the physical design and implementation using SQL Data Definition Language (DDL) and proceed with populating the Mom and Pop Johnson Video Store database via Data Manipulation Language (DML) SQL commands. The ERD and detailed documentation from Project 1 will be supplied for your entry point for those who need it.
Project 2 Details:
1. Create Oracle database tables using SQL Data Definition Language (DDL) for each table listed in Project 1. Make sure that entity and referential integrity are enforced by declaring a primary key for each table (these may be composite keys) and declaring all appropriate foreign keys. Your CREATE TABLE statements must show integrity constraints, as appropriate, for NOT NULL, UNIQUE, PRIMARY KEY, FOREIGN KEY, REFERENCES, and CHECK constraints. Be sure to save your script used to create these tables as yournameproject2step1.sql. You should test your script to make sure it runs without error.
2. Provide two examples of SQL DML (i.e., "INSERT") commands that fail different table integrity constraints you set up in one of your table. Explain why the statements fail. Be sure to save your script used to as yournameproject2step2.sql. You can include comments in the SQL script describing why the insert statements failed.
3. Populate each of your tables with at least five valid rows of data each and show the SQL you used. Populate other tables in your database, as necessary, to satisfy referential integrity. Be sure to save your script used to create these records as yournameproject2step3.sql. You should test your script to make sure it runs without error.
4. Write SQL to perform the following queries and updates. Be sure to save your script used to create these records as yournameproject2step4.sql. You should test your script to make sure it runs without error:
a. Retrieve all of your customers' names, account numbers, and addresses (street and zip code only), sorted by account number.
b. Retrieve all of the videos rented in the last 30 days and sort in chronological rental date order.
c. Produce a list of your distributors and all their information sorted in order by company name.
d. Update customer names to change their maiden names to married names. You can choose which records to update.
e. Delete customers from the database. You can choose which records to delete.
Submissions:
1. You should submit your four SQL scripts satisfying each of the steps above. Feel free to compress the files using WinZip and save as YournameProject2.zip.
2. Submit in your portfolio in the Project 2 area before the due date. Please contact the instructor before the due date if you have any questions or concerns. -
DBM 405 Lab 3 Procedures and Functions Advanced Database Oracle
$20.00DBM 405 Lab 3 Procedures and Functions Advanced Database Oracle
Learn More
Step 1: Creating the First Procedure
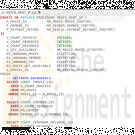
Your first procedure is to be named MOVIE_RENTAL_SP and is going to provide functionality to process movie rentals. Based on data that will represent the movie ID, member ID, and payment method your procedure will need to generate a rental ID and then insert a new row of data into the mm_rental table. The process will also need to update the quantity column in the mm_movie table to reflect that there is one less copy of the rented movie in stock. Along with the processing, you will also need to define some user-defined exception handlers that will be used in validating the input data. Since you may need to recreate your procedure several times during the debugging process, it is suggested that you use the CREATE OR REPLACE syntax at the beginning of the CREATE statement.
The following steps will help you in setting up your code.
1. You will need to define three parameters, one each for movie ID, member ID, and payment method. Make sure that each one matches the data type of the associated column in the database tables.
2. You will have several other variables that will need to be identified and defined. It might be easier to read through the rest of the specs before you start trying to define these (look for hints in the specifications).
3. You will need to define four user-defined exceptions; one for unknown movies, one for unknown member, one for unknown payment method, and one for if a movie is unavailable.
4. You will need to validate each of the three pieces of data passed to the procedure. One easy way to do this might be to use a SELECT statement with the COUNT function to return a value into a variable based on a match in the database table against the piece of data that you are validating. If the query returns a zero then there is no match and the data is invalid; any value greater than zero means a match was found and thus the data is valid. You will need the following validations.
1. Validate the movie ID to make sure it is valid. If not then raise the unknown movie exception.
2. Validate the member ID to make sure one exists for that ID. If not then raise the unknown member exception.
3. Validate the payment method to make sure it exists. If not then raise the unknown payment method exception.
4. Check the movie quantity to make sure that there is a movie to be rented for the movie ID. If not then raise the unavailable movie exception.
5. If all the data passes validation then you will need to create a new rental ID. This process should be in a nested block with its own EXCEPTION section to catch a NO_DATA_FOUND exception if one should happen. You can generate a new rental ID by finding the largest rental ID value in the mm_rental table (Hint: MAX function) and then increasing that value by one. The NO_DATA_FOUND exception would only be raised if there were no rental IDs in the table.
6. Now you are ready to insert a new row of data into the mm_rental table. Use the SYSDATE function for the checkout date and NULL for the check-in date.
7. Now, update the mm_movie table to reflect one less movie for the associated movie ID.
8. Finally, you will need to set up an EXCEPTION section for all of your exception handling. For each exception output, you want to state what the problem is, the invalid data value, and a note that the rental cannot proceed. For example, for an invalid movie ID number, you might say, "There is no movie with id: 13 - Cannot proceed with rental". You also want to include a WHEN OTHERS exception handler.
Compile and check your code. If you get a PROCEDURE CREATED WITH COMPILATION ERRORS message then type in SHOW ERRORS and look in your code for the line noted in the error messages (be sure to compile your code with the session command SET ECHO ON). Once you have a clean compile then your are ready to test.
Step 2: Testing the First Procedure
You will need to test for scenarios that will allow both a clean movie rental and test each exception. This means that you will need to run at least five test cases.
One each for the following:
1. No movie for the ID supplied (use 13, 10, and 2 for the parameters).
2. No member for the ID supplied (use 10, 20, and 2 for the parameters).
3. No payment method for the ID supplied (use 10, 10, and 7 for the parameters).
4. A successful rental (use 5, 10, and 2 for the parameters).
5. No movie available for the ID supplied (use 5, 11, and 2 for the parameters). Since there is only one movie available for ID 5, you will get this exception.
Your output from the testing should look similar to (this would be the output for the first test above):
exec movie_rent_sp(13, 10, 2);
Output:
There is no movie with id: 13
Cannot proceed with rental
PL/SQL procedure successfully completed.
Be sure that when you have verified that everything works, you run your testing in a spools session and save the file to be turned in.
Step 3: Creating the Second Procedure
Your second procedure should be named MOVIE_RETURN_SP and should facilitate the process of checking a movie rental back in. For this procedure, you will only need to pass one piece of data to the procedure; the rental ID. You will need two user-defined exceptions; one for no rental record and one for already returned. You will be able to use several of the same techniques you used in the first procedure for your validation.
The following steps will help in setting up your code.
1. You will need to define only one parameter for the rental ID number. Make sure that it matches the data type of the associated column in the database table.
2. You will have several other variables that will need to be identified and defined. It might be easier to read through the rest of the specs before you start trying to define these (look for hints in the specifications).
3. You will need to define the two user-defined exceptions mentioned above.
4. You will need to validate the rental ID that is passed to the procedure. If it is not a valid one then raise the associated exception.
5. If it is valid then get the movie ID and check-in date from the mm_rental table.
6. Now, check the check-in date to make sure that it is NULL. If it is not then raise the associated exception.
7. If everything checks out then update the mm_rental table for the rental ID you have and use the SYSDATE function for the check-in date.
8. Now, you can update the quantity in the mm_movie table for the associated movie ID to reflect that the movie is back in stock.
9. Last, set up your exception section using appropriate error message text and data.
Compile and check your code. If you get a PROCEDURE CREATED WITH COMPILATION ERRORS message then type in SHOW ERRORS and look in your code for the line noted in the error messages (be sure to compile your code with the session command SET ECHO ON). Once you have a clean compile then your are ready to test.
Step 4: Testing the Second Procedure
You will need to test for scenarios that will allow both a clean rental return and test each exception. This means that you will need to run at least three test cases.
One each for the following:
1. No rental for the ID supplied (use 20 for the parameter).
2. A successful rental return (use 1 for the parameter).
3. Try to return the same rental in Step 2.
You output from the testing should look similar to (this would be the output for the first test above):
exec movie_return_sp(20);
Output:
There is no rental record with id: 20
Cannot proceed with return
PL/SQL procedure successfully completed.
Be sure that when you have verified that everything works, you run your testing in a spools session and save the file to be turned in.
Step 5: Creating the Function
Your function should be named MOVIE_STOCK_SF and will be used to return a message telling the user whether a movie title is available or not based on the movie ID passed to the function. The exception handling that will be needed is for NO_DATA_FOUND but we are going to set it up as a RAISE_APPLICATION_ERROR.
The following steps will help in setting up your code.
1. You will need to define only one parameter for the movie ID number. Make sure that it matches the data type of the associated column in the database table. Also, since you will be returning a notification message, you will want to make sure your RETURN statement references a data type that can handle that (Hint: variable length data type).
2. You will have several other variables that will need to be identified and defined. It might be easier to read through the rest of the specs before you start trying to define these (look for hints in the specifications).
3. You will not be doing any validation so the first thing you need to do is retrieve the movie title and quantity available from the mm_movie table based on the ID passed to the function.
4. Now, you need to determine if any are available. IF the value in the quantity column is greater than zero then you will be returning a message saying something like "Star Wars is available: 0 on the shelf", ELSE if the value is zero then you should return a message saying something like "Star Wars is currently not available". Hint: A good way to return a test string is to assign it to a variable and then simply use the variable name in the RETURN clause.
5. Finally, set up your exception section to use a RAISE_APPLICATION_ERROR for the NO_DATA_FOUND exception handler. Assign an error number of -20001 to it and an error message that states there is no movie available for the ID (be sure to include the id in the message).
Compile and check your code. If you get a FUNCTION CREATED WITH COMPILATION ERRORS message then type in SHOW ERRORS and look in your code for the line noted in the error messages (be sure to compile your code with the session command SET ECHO ON). Once you have a clean compile then your are ready to test.
Step 6: Testing the Function
You will need to test for all three possible scenarios.
1. Test for a movie in stock using movie ID 11.
2. Test for a movie not in stock using movie ID 5 (from your tests of the second procedure above, the quantity should be 0).
3. Test for an invalid movie ID using movie ID 20.
For test number 2, you may need to manipulate the quantity amount in the database, which will be fine.
Test your function by using a select statement against the DUAL table like in the example below:
select movie_stock_sf(20) from dual;
Be sure that when you have verified that everything works, you run your testing in a spools session and save the file to be turned in.
This concludes the Lab for Week 3.
Deliverables
Your deliverable submission should consist of your Lab 3 script file and the spooled output files described at the beginning of the lab. If you would like, you can include both files in a single ZIP file to be submitted to the Week 3 Lab Dropbox.
Shopping Options
- Price
-
- $0.00 - $9.99 (4)
- $10.00 - $19.99 (20)
- $20.00 - $29.99 (36)
- $30.00 - $39.99 (3)
- $40.00 - $49.99 (1)
- $60.00 and above (1)

You have no items in your shopping cart.

