MS Access
Need Help in MS Access Assignment?
We can help you if you are having difficulty with your MS Access Assignment. Just email your MS Access Assignment at admin@assignmentcache.com.
We provide help for students all over the world in MS Access Assignment
-
Succeeding in Business with Microsoft Access 2013 Steps to Success Level 2
Regular Price: $25.00
Special Price $20.00
Succeeding in Business with Microsoft Access 2013 Steps to Success Level 2
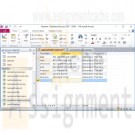
Hudson Bay Pharmacy is ready to crearte more complex queries to analyze employee data. Kim Siemers, human resources manager for Hudson Bay, asks for your help in creating queries that extract the employee information she needs from their database. As you create and save the new queries be certain to use the "qry" perfix as a part of the naming convention. Also consult your instructor for instruction about submitting results.
1. Start access and open Hudson.accdb database from STS folder.
2. Kim wants to identify employees who live in the same neighborhood in Edmonton so they can create car pools and share rides to work. In Edmonton, the postal codes roughly correspond to neighborhood. Prepare a list of employees who live in the same neighborhood so that Kim can create a list of employees who can share rides to work. Name the query qryDuplicatePostalCodes.
3. A new policy at Hudson Bay Pharmacy is that all employees must acquire and maintain certifications in adult, infant, and child CPR and in using defibrillators. Kim asks you to identify employees who have not completed any certification training. Save the query as qryNoTraining.
4. Kim also needs to list all employees and the classes they have taken. The results should include current employees who have not attended training as well as those who have. Save the query as qryEmployeeTraining.
5. Kim also needs to identify employees whose CPR or defibrillators certification has expired, depending on the time period she specifies. Show all employees whose Adult CPR, Child/Infant CPR, or Defibrillators Use certification has expired in any specified time period. Save the query as qryUpToDate.
6. Mai Yan, manager of Hudson Bay Pharmacy, wants to identify the five current nonsalaried employees who are earning the highest wages per hour. These are the five employees who have been working for the pharmacy the longest or who have regularly received raises for their work. List the top five wage earners of all the current nonsalaried employees. Save the query as qryTop5HourlyRates.
7. To prepare for employee reviews, Kim needs to calculate the minimum, maximum, and average hourly rates for each job category. Provide this information for her, saving the query as qryMaxMinAvgHourlyRate.
8. Mai is considering offering life insurance as an employee benefit, and needs to know the current age of all employees. Provide this information for her. Be certain to provide an appropriate name for the column with the result and to show the ages in descending order. Include the job title and format the results so that they include one decimal place. Also show the first name and last name together. Save the query as qryEmployeeAge.
9. Kim asks you to provide one other statistical analysis. Show the average age of employees by job title. Save this query as qryAvgEmployeeAge.
10. Close the Hudson.accdb database and Access.
Learn More -
MIS582 Week 4 Course Project ABC Company Order Inventory System Database
Regular Price: $25.00
Special Price $20.00
MIS582 Week 4 Course Project ABC Company Order Inventory System Database
PROJECT OVERVIEW:
Scenario and Summary
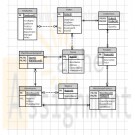
In this assignment, you will learn to create a physical database model in Visio from business requirements. To complete this assignment, you will need to be able to run Visio 2010, either through Citrix or installed on your workstation or laptop.Deliverables
Name your Visio file as Lastname_Task2.vsd. Create and save your database model in your Visio file. When you are done, submit your document to the Week 4: Course Project Task 2 Dropbox.STEP 1
Read the following business requirements closely to determine the entities and relationships needed to fulfill the requirements. The nouns in the paragraph will tell you the entities that will be needed. The adjectives that describe those nouns are the attributes of that entity. The verbs in the paragraph will help you determine the relationships between the entities.ABC Company Order Inventory System
Database Requirements
The ABC company has many stores in many locations that are divided in regions. The company supplies products to these stores. For the purposes of this database you may think that it is an American company in terms of regions such as Midwest.
Each store is their customer/client. The company recognizes these stores by their store ID. They also keep track of the store name, address, and contact name.
Stores may place orders online, or by phone/fax. Each order must be uniquely identified by an order number. Each order has a date on which the order was made, a date when the order was shipped, an employee who took the order (or it could be an online order), and the mode of payment.
To make sure that the stores get their order on time, the stores are assigned to different warehouses in different regions. Currently, there is one warehouse for every region. Each warehouse is identified by its warehouse number. The company also tracks the address of the warehouse as well as a contact phone number.
There are five regions: West, Midwest, Southwest, Southeast, and Northwest. Each region is identified by its unique name and unique number.
Each warehouse holds many products for this company. A product may be found in many warehouses. The company keeps track of this inventory. At any point in time, the company must be able to find which warehouses carry this item, the quantity in stock, reorder point and whether this item is out of stock.
Each product has a unique id, a description, a price. Each product could be on many orders, and an order may have multiple products on it. The company needs to track what quantity was ordered for each product and the total price for those products.
Phone/Fax orders are processed by the employees of the company. The company keeps track of the employee’s id, first and last names, position, hire date, department they work for, their supervisor, and their salary.STEP 2
• Run Visio 2010 either via Citrix or on your workstation.
• Click on the Software and Database template group in the main window.
• Double-click on the Database Model Diagram template to open a new file.
• Save the file with the name Lastname_Task2.vsd. You will need to click the computer icon in the Save As window to see the different drives. Be sure to save the file to a local drive so it will be on your workstation.
STEP 3
Add an entity for each entity you identified in the requirements.
• Drag the entity icon onto the drawing area in Visio.
• In the Database Properties window, add a physical name to identify it.
STEP 4
For each entity, create a list of attributes you think would be useful to describe the entity.
• Select an entity in the drawing area of Visio.
• In the Database Properties window, select the Columns category.
• Use the table to add your attributes to the selected entities.
• Select the primary key (PK).
STEP 5
Set the diagram to use crow's feet notation.
• On the Database tab, in the Manage group, click Display Options.
• In the Database Document Option dialog, select the Relationship tab.
• Select the Crow's Feet check box, and then click OK.
STEP 6
Draw relationships between your entities.
• Drag the relationship icon onto a blank part of the drawing area.
• Connect the two ends to each of the two entities in the relationship. The parent entity must have a PK defined. The entity will be outlined in bold red lines when it connects to one end of the relationship.
STEP 7
Set the cardinality of your relationships.
• Select a relationship line in the drawing area that is connecting two entities.
• In the Database Properties window, select the Miscellaneous category.
• Select the cardinality for the selected relationship.
STEP 8
When you are done, save the file on your local hard drive and upload it to the Week 4: Course Project Week 4 Task 2 Dropbox. Your file should have the following filename format: Lastname_Task2.vsd.
For instructions on how to copy files between the Citrix server and your local machine, watch the iLab tutorial, Copying Files From Citrix, located in the iLab menu tab under Course Home.Rubrics
Points for will be awarded according to the following rubrics.
• 10 Points: Visio drawing: E-R model is provided as a Visio diagram.
• 10 Points: Entities: A minimum of six entities are present.
• 10 Points: Attributes: There are more than two attributes per entity; in most cases there should be several.
• 10 Points: Relationships: A minimum of six correct relationships are present.
• 10 Points: Correct cardinality is specified on each relationship with crow's foot notation.Tutorials to Consult With
Learn More
DBP-e13-Appendix-F.pdf in the folder titled Visio Instructions Documents in Doc Sharing for how to use Visio 2013.
kroenke_dbp12e_appendix_f.pdf in the folder titled Visio Instructions Documents in Doc Sharing for how to use Visio 2010. -

Microsoft Access 2010 Chapter 3 Lab 1 Maintaining the ECO Clothesline Database
Regular Price: $20.00
Special Price $15.00
Microsoft Access 2010 Chapter 3 Lab 1 Maintaining the ECO Clothesline Database
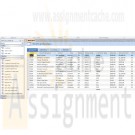
Problem: ECO Clothesline is expanding rapidly and needs to make some database changes to handle the expansion. The company needs to know more about its customers, such as the type of business, and it needs to ensure that data that is entered is valid. It also needs to update the records in the database.
Learn More
Use the database modified in the In the Lab 1 of Chapter 2 on page AC 132 for this assignment, or see your instructor for information on accessing the files required for this book.
Perform the following tasks:
1. Open the ECO Clothesline database and then open the Customer table in Design view.
2. Add a Lookup field, Customer Type, to the Customer table. The field should appear after the Postal Code field. The field will contain data on the type of customer. The customer types are SAL (Salons, Studios, Fitness Clubs), SPG (Sporting Goods), and WMN (Women’s Wear). Save these changes to the structure.
3. Using a query, change all the entries in the Customer Type column to WMN. Save the query as Customer Type Update Query.
4. Open the Customer table and make the following changes. You can use either the Find button or Filter By Selection to locate the records to change:
a. Change the customer type for customers CY12, FN19, LB20, RD03, TT21, and TW56 to SAL.
b. Change the customer type for customer WS34 to SPG.
c. Change the name of customer LB20 to Le Beauty Salon & Spa.
5. Change the alternate background color on the datasheet to white and remove the vertical gridlines. Save the changes to the layout of the table.
6. Create the following validation rules for the Customer table and save the changes.
a. Specify the legal values SAL, SPT, and WMN for the Customer Type field. Include validation text.
b. Assign a default value of WMN to the Customer Type field.
c. Ensure that any letters entered in the Customer Number field appear as uppercase.
d. Make Customer Name a required field.
7. Open the Customer table and use Filter By Form to find all records where the customer is located in Lowton and has a customer type of WMN, and then delete these records.
8. ECO Clothesline has signed up a sporting goods store, Ralph's (Customer Number RA21) and needs to add the record to the Customer table. Ralph's is at 72 Main in Lowton, TN 37084. Terry Sinson is the sales rep assigned to the account. To date, Ralph's has not been billed nor does the company owe for any services. Create a split form for the Customer table and use this split form to add the record. Save the split form as Customer Split Form.
9. Specify referential integrity between the Sales Rep table (the one table) and the Customer table (the many table). Cascade the update but not the delete.
10. Add the Customer Type field to the Customer Balance Report. The field should follow the Customer Name field. Save the changes to the report.
11. Submit the revised database in the format specified by your instructor. -

Microsoft Access 2010 Chapter 11 Lab 1 Designing a Database for Phils Limousine
$25.00Microsoft Access 2010 Chapter 11 Lab 1 Designing a Database for Phils Limousine
Lab 1: Designing a Database for Phil’s Limousine
Learn More
Instructions: Consider the following set of requirements for Phil’s Limousine Service:
• For each driver, the company keeps track of the driver’s name (first name and last name), driver’s address (street, city, state, postal code), driver’s license number, home telephone number, and cell telephone number.
• For each limousine, the company keeps track of a unique limousine ID number, limousine license number, limousine color, and number of passengers the limousine can hold.
• A driver can be assigned to more than one limousine. A limousine will have multiple drivers but only one driver at a time.
Based on these requirements, do the following:
1. Identify and list the entities and the attributes of those entities.
2. Identify and list the functional dependencies.
3. Create a set of 3NF relations using the shorthand notation given in the chapter. Be sure to identify all primary keys and foreign keys appropriately.
Submit your database design in the format specified by your instructor. -
Microsoft Access 2010 Chapter 10 Lab 1 Administering the ECO Clothesline Database
$25.00Microsoft Access 2010 Chapter 10 Lab 1 Administering the ECO Clothesline Database
Lab 1: Administering the ECO Clothesline Database
Problem: ECO Clothesline has determined a number of database administration tasks that need to be done. These include creating a template, splitting the database, creating indexes, and adding table and field properties.Instructions: If you are using the Microsoft Offce Access 2010 Comprehensive text, open the ECO Clothesline database that you used in Chapter 9. Otherwise, contact your instructor for more information about accessing the required files.
Perform the following tasks:
Learn More
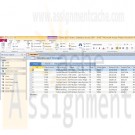
1. Open the Open Orders table in Datasheet view and add the Quick Start Priority field to the table. Assign a High priority to orders for customers AM23 and JN34. Assign a Low priority to the order for TT21. All other orders have a Normal priority.
2. The Main Menu navigation form should display automatically when a user opens the database.
3. Open the Customer table in Design view and create custom input masks for the following fields: Customer Number, State, Postal Code, and Sales Rep Number. The Customer Number field should consist of two uppercase letters followed by two numbers. The State field should contain two uppercase letters. Both the Postal Code and Sales Rep Number fields only can contain numbers.
4. Create an index on the Customer Name field that does not allow duplicates. Create an index on the combination of Customer Type and Customer Name. Name the index TypeName.
5. Save the ECO Clothesline database as a template with data but not as an application part. Create a new database from the ECO Clothesline template. Name the database ECO New. Split the ECO New database.
6. Open the front-end database and add a logo to the Customer Master Form. You can create your own logo or use one o the sample pictures included with Microsoft Access. (Hint: See the BTW on page AC 645 for assistance with this task.)
7. Submit the revised databases in the format specified by your instructor. -
Microsoft Access 2010 Chapter 10 Administering a Database System AC 602 to AC 666
$25.00Microsoft Access 2010 Chapter 10 Administering a Database System AC 602 to AC 666
Read and work through Project 10, starting on page AC 602 and work through AC 672
Save the Client-Trainer Query, p. AC 616Project - Administering a Database System
Camashaly Design realizes the importance of database administration, that is, the importance of administering its database system properly. Making a database available on the Web (Figure 10 – 1) is part of this activity. Another important activity in administering databases is the creation of custom templates, application parts, and data type parts. Application parts and data type parts are templates that you can add to your database to extend its functionality. Clicking an application part adds to your database a predetermined collection of objects such as tables, queries, forms, reports, and/or macros. Clicking a data type part adds a predetermined collection of felds to a table.Camashaly management realizes that database administration encompasses a wide variety of activities (Figure 10 – 2). Database administration can include conversion of an Access database to an earlier version of Access. Database administration usually includes such activities as analyzing tables for potential problems, analyzing performance to see if changes are warranted to make the system perform more effciently, and documenting the various objects in the database. It can include creating custom categories and groups in the Navigation Pane as well as changing table and database properties. It also can include the use of feld properties in such tasks as creating a custom input mask and allowing zero-length strings. It can include the creation of indexes to speed up retrieval. The inclusion of automatic error checking is part of the administration of a database system. Understanding the purpose of digital certifcates and the Trust Center is critical to the database administration function.
Learn More
Another important area of database administration is the protection of the database. This protection includes locking the database through the creation of an ACCDE file to prevent unauthorized changes from being made to the VBA source code or to the design of forms and reports. Splitting the database into a front-end and a back-end database is another way to protect the functionality and effciency of a database. -

Microsoft Access 2010 Chapter 9 Lab 1 Creating Macros a Navigation Form and a PivotTable for the ECO Clothesline Database
$25.00Microsoft Access 2010 Chapter 9 Lab 1 Creating Macros a Navigation Form and a PivotTable for the ECO Clothesline Database
Lab 1: Creating Macros, a Navigation Form, and a PivotTable for the ECO Clothesline Database
Problem: ECO Clothesline would like an easy way to access the various tables, forms, and reports included in the database. This would make the database much easier to maintain and update.Instructions: If you are using Microsoft Access 2010 Comprehensive text, open the ECO Clothesline database that you used in Chapter 8. Otherwise, contact your instructor for more information about accessing the required files.
Perform the following tasks:
1. Create a macro named Forms and Reports that will include submacros to perform the following tasks:
a. Open the Sales Rep Order Data form in read-only mode.
b. Open the Sales Rep Master Form.
c. Open Customer Master Form.
d. Preview the Sales Rep Master List.
e. Preview the Customer Balance Report.
f. Preview the Customer Discount Report.
g. Export the Sales Rep Master List in the PDF format.
h. Export the Customer Balance Report in the PDF format.
i. Export the Customer Discount Report in the PDF format.2. Create the menu form shown in Figure 9-80. The command buttons should use the macros you created in Step 1 to open the Customer Master Form, the Sales Rep Master Form, and the Sales Rep Order Data form.
3. Create the menu form shown in Figure 9-81. The option group should use the macros you created in Step 1 to preview and export the three reports.
4. Create a datasheet form for the Customer table and name the form Customer. Create a UI macro for the Customer form. When a user clicks a customer number on a row in the datasheet, the Customer Master Form should appear in a pop-up form.
5. Create a datasheet form for the Sales Rep table and name the form Sales Rep. Create a UI macro for the Sales Rep form. When a user clicks a sales rep number on a row in the datasheet, the Sales Rep Master Form should appear in a pop-up form.
6. Create the navigation form shown in Figure 9-82 for the ECO Clothesline database. Use the same design for your navigation form as the one illustrated in this chapter. For example, the Customer tab should display the Customer form you created in Step 4, and the Sales Rep tab should display the Sales Rep form you create in Step 5. The Forms tab should display the Form List form you created in Step 3, and the Reports tab should display the Reports List form you created in Step 3.
7. Submit the revised database in the format specified by your instructor.
Learn More -
Microsoft Access 2010 Chapter 9 Macros Navigation Form PivotTables and Charts AC 538 to AC 590
$25.00Microsoft Access 2010 Chapter 9 Macros Navigation Form PivotTables and Charts AC 538 to AC 590
The first part of the project you will be creating the Client View and Update Form.
Save the PivotTable for Analyst and Course Offerings Query, p. AC 579
Save the PivotChart for Analysts and Course Offerings Query, p. AC 589Project - Macros, Navigation Forms, PivotTables, and PivotCharts
The owner of Camashaly Design have heard about navigation forms that enable users to access forms and reports by simply clicking tabs and buttons. A navigation form like the one shown in the Figure 9-1a is a form that includes tabs to display forms and reports. This navigation form contains several useful features. With the Client tab selected, you can click the client number on any row to see the data for the selected client displayed in the Client View and Update Form (Figure 9-1b). The form does not appear in a tabbed sheet, the way tables, queries, forms and reports normally do. Rather, it appears a s a pop-up form, a form that stays on top of other open objects, even when another object is active. Clicking the Business Analyst tab displays business analyst data. As with clients, clicking the business analyst number on any record displays data for that analyst in a pop-up form. Clicking the Form tab in the Camashaly Design navigation form displays button for each of the available forms (Figure 9-1c). You can open the desired form by clicking the appropriate button. Clicking the Reports tab displays an option group for displaying reports (Figure 9-1d). You can preview or export any of the reports on at a time by clicking the corresponding option button. Camashaly would like such a navigation form because they believe it will improve the user-friendliness of the database, thereby improving employee satisfaction and efficiency.Befor creating the navigation form, Camashaly will create macros, which are collection of actions designed to carry out specific tasks. To perform the actions in a macro, you run the macro. When a macro is run, Access will execute the various steps, called actions, in the order indicated by the macro. The navigation form macros are run by clicking certain buttons in the form.
Learn More -
Microsoft Access 2010 Chapter 8 Lab 1 Applying Advanced Form Techniques to the ECO Clothesline Database
$25.00Microsoft Access 2010 Chapter 8 Lab 1 Applying Advanced Form Techniques to the ECO Clothesline Database
Lab 1: Applying Advanced Form Techniques to the ECO Clothesline Database
Problem: ECO Clothesline needs a form for the Customer table that will allow users to update data in the table ECO also needs a form to display open orders data for sales reps.Instructions: If you are using Microsoft Access 2010 Comprehensive text, open the ECO Clothesline database that you used in Chapter 7. Otherwise, see your instructor for information on accessing the files required in this book.
Perform the following tasks:
1. Create a query that includes the Sale Rep Number field from the Sales Rep tan;e, the Customer Number field from the Customer table and the Order Number and Amount fields from the Open Orders table. Sort the query in ascending order by Sales Rep Number, Customer Number, and Order NUmber Save the query as Sales Rep and Orders.2. Create the form shown in Figure 8-95. total Amount is a calculated control and is the sum of the Balance and Amount Paid amounts. Format the Total Amount control as Currency with two decimal places. (Hint: Use the property sheet for the control.) the form includes command buttons, a combo box for the Sales Rep Number field, and a combo box to search for customers by name. Be sure to sort the customer by names in ascending order, place a rectangle around the combo box, and update the combo box. The user should not be able to tab to the combo box. When the Add Record button is clicked, the insertion point should be in the customerNumber field. The form is similar in style to the form shown in Figure 8-1 on page AC 466.
3. Create the Sales Rep Order Data form shown in Figure 8-96. The subform that appears in the Datasheet tab uses the Sales Reps and Orders query (Figure 8-96a). The chart ghat appears in the Chart tab uses the same query (Figure 8-96b).
4. Submit the revised database in the format specified by your instructor.
Learn More -
Microsoft Access 2010 Chapter 8 Advanced Form Techniques Camashaly Design database AC 466 - AC 520
$25.00Microsoft Access 2010 Chapter 8 Advanced Form Techniques Camashaly Design database AC 466 - AC 520
Save the Client View and Update Form. AC 499 - AC 500.
Save the Multipage Form. AC 500 - AC 518Project - Advanced Form Techniques
Camashaly Design wants two additional form to use with its Clients and Business Analyst tables. The first form Client View and Update Form (Figure 8-1a), contains the fields in the Client table. The form has five command buttons: Next Record, Previous Record, Add Record, Delete Record, and Close Form. Clicking nay of these buttons causes the action indicated on the button to take place.
The form also contains a combo box for the Business Analyst Number field that assists users in selecting the correct analyst (Figure 8-1b).
To assist users in finding a client when they know the clients name, the form also includes a combo box they can use for this purpose (Figure 8-1c). After clicking the arrow, the user can simply click the client they want to find; Access then will locate the client and display that clients data in the form (Figure 8-1d).For the second new form, Camashaly Design needs a multipage form that lists the numbers and names of the analyst. Selecting the first tab, the one labelled Datasheet, displays a subform listing about the course offering for clients of the selected analyst (Figure 8-2a).
Learn More
Selecting the other tab, the one labelled Charts, displays two charts that illustrate the total hours spent and hours remaining by the analyst for the various courses (Figure 8-2b). In both charts, the slices of the pie represent the various course. They are color coded and legend at the bottom indicates the meaning of various colors. The size of pie slice gives a visual representation of the portion of the hours spent or hours remaining by the analyst for the particular course. The chats also includes specific percentages. If you look at the bottom purple slice in the Hours Spent by Course Offering chart, for example, you see that the color represent course C04. It signifies 42% of the total. Thus, for all the hours already spent on the various course offering by analyst 11, 42% have been spent on course C04.

You have no items in your shopping cart.

