Search results for 'cis 515'
-
Clearly Visual Basic 2010 Chapter 10 Exercise 9 Carlton Solution
$15.00Clearly Visual Basic 2010 Chapter 10 Exercise 9 Carlton Solution
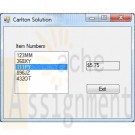
Carlton Industries stores the item numbers and prices of the items it sells in a sequential access file named ItemInfo.txt. The company's sales manager wants an application that displays the price corresponding to the item selected in a list box.
a. Create a Visual Basic Windows application. Use the following names for the solution, project, and form file, respectively: Carlton Solution, Carlton Project, and Main Form.vb. Create the interface shown in Figure 10-46.
b. Use Windows to copy the ItemInfo.txt file from the VB2010\Chap 10 folder to the project's bin\Debug folder. Open the Code Editor window and then open the ItemInfo.txt file contained in the project's bin\Debug folder. Each line contains an item's number followed by a comma and the price. Close the ItemInfo.txt window.
c. Define a structure named item. The structure should contain two member variables: a String variable to store the item number and a Decimal variable to store the price.
d. Declare a class-level array that contains five Item structure variables.
e. Code the form's Load event procedure so that it reads the item numbers and prices from the ItemInfo.txt file. The procedure should store the item numbers and prices in the class-level array. It also should add the item numbers to the list box.
f. When the user selects an item in the list box, the item?s price should appear in the lblPrice control. Code the appropriate procedure.
g. Save the solution and then start and test the application. Close the Code Editor window and then close the solution.
Learn More -

CIS247A Week 5 Lab Composition Inheritance and Polymorphism
$15.00CIS247A Lab 5 Composition Inheritance and Polymorphism
Scenario and Summary
The objective of the lab is to take the UML Class diagram and enhance last week’s Employee class by making the following changes:
1. Create a derived class called Salaried that is derived from Employee.
2. Create a derived class called Hourly that is derived from Employee.
3. Create generalized input methods that accept any type of Employee or derived Employee object
4. Create generalized output methods that accept any type of Employee or derived Employee object
5. Override the base class CalculatePay method
6. Override one of the base class CalculateWeeklyPay methodsSTEP 1: Understand the UML Diagram
Analyze and understand the object UML diagram, which models the structure of the program.
• There are two new Employee derived classes (1) Salaried and (2) Hourly that are derived from the Employee class.
• The Employee class contains a new attribute employeeType and a new constructor that accepts as an argument the assigned employee type.
• Both the Salaried and the Hourly classes override only the CalculateWeeklyPay method of the Employee class (note, this is the method without any parameters.)
• The Salaried class has one attribute “managementLevel” that has possible values from MIN_MANAGEMENT_LEVEL to MAX_MANAGEMENT_LEVEL and a BONUS_PERCENT.
• The Salaried class has a default constructor and parameterized constructor that accepts all the general employee information plus the management level.
• The Hourly has a wage attribute, which respresents the hourly wage that ranges from MIN_WAGE to MAX_WAGE, a hours attributes, which represents the number of hours worked in a week that ranges from MIN_HOURS to MAX_Hours, and a category attributes that accepts string values.
• The Hourly class has a default constructor and parameterized constructor that accepts all the general employee information plus the hours and wage value.
• The Presentation Tier contains two new classes (1) The EmployeeInput class and the EmployeeOutput class
• The EmployeeInput class contains three static methods (1) CollectEmployeeInformation, which accepts any type of Employee object as a argument; (2) CollectHourlyInformation, which accepts only Hourly objects as an argument, and (3) CollectSalariedInformation, which accepts only Salaried objects as an argument.
• The EmployeeOutput class contains two methods (1) DisplayEmployeeInformation, which accepts any Employee type as an argument and (2) DisplayNumberObjects method.
• All the access specifers for the Employee attributes are changed to protected and are depicted with the “#” symbol.STEP 2: Create the Project
You will want to use the Week 4 project as the starting point for the lab. Use the directions from the previous weeks labs to create the project and the folders.
1. Create a new project named “CIS247_WK4_Lab_LASTNAME”. An empty project will then be created.
2. Delete the default Program.cs file that is created.
3. Add the Logic Tier, Presentation Tier, and Utilities folders to your proejct
4. Add the Week 4 project files to the appropraties folders.
5. Update the program information in the ApplicationUtilities.DisplayApplicationInformation method to reflect your name, current lab, and program description
Note: as an alternative you can open up the Week 4 project and make modifications to the existing project. Remember, there is a copy of your project in the zip file you submitted for grading.
Before attempting this week’s steps ensure that the Week 4 project is error free.STEP 3: Modify the Employee Class
1. Change the access specifier for all the private attributes to protected.
2. Add the new attribute employeeType, along with a “read only” property (that is only a “get” method) to access the employee type value.
3. Add a new constructor that only accepts the type attribute, which is then used to set the employeeType value. Also, this constructor should initialize all the default values. You can call the default constructor using the syntax: public Employee(string employeeType) : this() { }
4. Modify the parameterized constructor that accepts the employee information to accept the employee type, and then set the employeeType with this value.
5. Modify the ToString Method to include the employee type.STEP 4: Create the Salaried Class
1. Using the UML Diagrams, create the Salaried class, ensuring to specify that the Salary class inherits from the Employee class.
2. For each of the constructors listed in the Salaried class ensure to invoke the appropriate super class constructor and pass the correct arguments to the super class constructor.
3. Override the CalculateWeeklyPay method to add a 10 percent bonus to the annualSalary depending on the management level. The bonus percent is a fixed 10 percent, and should be implemented as a constant. However, depending on the management level the actual bonus percentage fluctuates (i.e., actualBonusPercentage = managementLevel * BONUS_PERCENT).
4. Override the ToString method to add the management level to the employee information.STEP 5: Create the Hourly Class
1. Using the UML Diagrams, create the Hourly classes, ensuring to specify that the Hourly class inherits from the Employee class.
2. For each of the constructors listed in the Hourly class ensure to invoke the appropriate super class constructor and pass the correct arguments to the super class constructor. Notice, that the Hourly employee DOES NOT have an annual salary, which we will then have to calculate (see below).
3. Create a Category property (get/set) and the valid category types are “temporary”, “part time”, “full time”.
4. Create a Hours property (get/set) for the hours attributes and validate the input using the constants shown in the UML diagram, but since an Hourly employee does not have a formal annual salary we will need to calculate this each time the hour (and wage) properties are set. Add the following code after the validation code in the hours property: base.AnnualSalary = CalculateWeeklyPay() * 48; (assumes working 48 weeks a year).
5. Create an Wage property (get/set) for the wage attributes and validate the input using the constants shown in the UML diagram. Add the following code after the validation code in the wage property: base.AnnualSalary = CalculateWeeklyPay() * 48; (assumes working 48 weeks a year)
6. Override the CalculateWeeklyPay method by multiplying the wages by the number of hours.
7. Update the ToString method to add the category, hours, and wages to the hourly employee information.STEP 6: Create the EmployeeInput Class
1. Create a new class in the Presentation Tier folder called “EmployeeInput”
2. Create a static void method called CollectEmployeeInformation that has a single Employee parameter. The declaration should look something like the following:
public static void CollectEmployeeInformation(Employee theEmployee)
3. Write code statements similiar to what you created in the Week 4 project to collect the generic employee information from the user, except instead of using specific employee objects use the “theEmployee” parameters. For example:
In Week 4, you had something like:
employee1.FirstName = InputUtilities.GetStringInputValue(“First name”);
In the CollectionEmployeeInformation method this can be translated to the following;
theEmployee.FirstName = InputUtilities.GetStringInputValue(“First name”);
4. Write statements to collect all the generic employee information, including the Benefits information, as you did in the Week 4 project. However, since not all derived types have a AnnualSalary value, DO NOT collect the annual salary data.
5. Create a new static void method called CollectEmployeeInformation that accepts an Hourly employee object. Using the InputUtilities methods write statements to collect the wage and hours from the user.
6. Create a new static void method called CollectSalariedInformation that accepts a Salaried employee object. Using the InputUtilties methods write statements to collect the management level and the annual salary.STEP 7: Create the Main Program
1. Create an array of type Employee that will hold three employee objects. Create three new objects, one Employee, one Hourly and one Salaried in positions 0, 1 and 2 of the array respectively. Make sure to use the constructors the accept the employee type and provide appropriate values for the employee type (e.g. “Generic”, “Hourly”, “Salaried”).
2. Using a FOR loop iterate through the array and collect all the generic employee information, using the EmployeeInput.CollectEmployeeInformation method.
3. If the current item in the array is an Hourly object, then use the EmployeeInput.CollectHourlyInformation method to collect the hourly information.
4. If the current item in the array is a Salaried object, then use the EmployeeInput.CollectSalariedInformation method to collect the salaried information.
Use the following if statement to determine the specific type of object:
if (employeeList[i] is Hourly)
EmployeeInput.CollectHourlyInformation((Hourly)employeeList[i]);
else if (employeeList[i] is Salaried)
EmployeeInput.CollectSalariedInformation((Salaried)employeeList[i]);
5. After the information has been collected display the employee information using the EmployeeOutput.DisplayEmployeeInformation method.
6. Before terminating the program display the number of employee objects that have been created.STEP 8: Compile and Test
When done, compile and run your program.
Then debug any errors until your code is error-free.
Check your output to ensure that you have the desired output and modify your code as necessary and rebuild.
The output of your program should resemble the following:On-screen output display:
Welcome the Employee Hierarchy Program
CIS247, Week 5 Lab
Name: SolutionThis program tests an Employee inheritance hierarchy
Learn More
*********************** Display Employee’s Data **********************
Employee Type GENERIC
First Name John
Last Name Student
Gender Male
Dependents 3
Annual Salary $20,000.00
Weekly Pay $384
Health Insurance Blue Cross
Life Insurance $20,000
Vacation 21
*********************** Display Employee’s Data **********************
Employee Type Hourly
First Name Mary
Last Name Noia
Dependents 4
Annual Salary $100,000
Weekly Pay $2,080.00
Health Insurance Blue Cross
Life Insurance $175,000
Vacation 24
Hours 40
Wage 52
Category Full Time
*********************** Display Employee’s Data **********************
Employee Type Salaried
First Name Sue
Last Name Smith
Gender Female
Dependents 2
Annual Salary $100,000.00
Weekly Pay $2,500.00
Health Insurance Blue Cross
Life Insurance $300,000
Vacation 15
Level 3
total Number of Employess in Database: 3 -

CIS247A Week 6 Lab Abstract Classes
$15.00CIS247A Week 6 Lab Abstract Classes
Scenario and Summary
The objective of the lab is to take the UML Class diagram and enhance last week's Employee class by making the following changes:
1. Convert the Employee class to an abstract class
2. Add an abstract method called CalculateNetPay to the Employee class
3. In both the Salaried and Hourly classes implement the CalculateNetPay methodSTEP 1: Understand the UML Diagram
Analyse and understand the object UML diagram, which models the structure of the program.
• The Employee class has been specified as abstract, which is denoted by the name of the class being initialized Employee
• The Employee class as a new method CalculateNetPay which is an abstract method, denoted by the italized name of the method. Since this method is an abstract method the CalculateNetPay method WILL NOT have an implementation in the Employee class.
• The Salaried and Hourly classes both have a new method CalculateNetPay that is inherited from the abstract Employee class and the Salaried and Hourly class both MUST implement the CalculateNetPay method.STEP 2: Create the Project
You will want to use the Week 5 project as the starting point for the lab. Use the directions from the previous weeks labs to create the project and the folders.
1. Create a new project named "CIS247_WK4_Lab_LASTNAME". An empty project will then be created.
2. Delete the default Program.cs file that is created.
3. Add the Logic Tier, Presentation Tier, and Utilities folders to your project
4. Add the Week 5 project files to the appropriates folders.
5. Update the program information in the ApplicationUtilities.DisplayApplicationInformation method to reflect your name, current lab, and program description.
Note: as an alternative you can open up the Week 5 project and make modifications to the existing project. Remember, there is a copy of your project in the zip file you submitted for grading.
Before attempting this week's steps ensure that the Week 5 project is error free.STEP 3: Modify the Employee Class
1. Modify the class declaration of the Employee class to specify that the Employee class is an abstract class
2. Declare an abstract method called CalculateNetPay that returns a double value.
3. Modify the ToString Method to include the weekly net pay in currency format.STEP 4: Modify the Salaried Class
1. Add a double constant called TAX_RATE and set the value to .73
2. Implement the CalculateNetPay method by multiplying the weekly pay by the tax rate.STEP 5: Modify the Hourly Class
1. Add a double constant called TAX_RATE and set the value to .82
2. Implement the CalculateNetPay method by multiplying the weekly pay by the tax rate.STEP 6: Create the Main Program
1. Change the employeeList array to only hold two objects.
2. Create one Hourly employee object and store it in the array.
3. Create one Salaried employee object and store it in the array.
4. As you did in the Week 5 lab, prompt for and collect the information for each of the objects.
Note: iterating through the array should not require any changes from the previous iteration of the project--but make sure that the loop stays within the bounds of the array.STEP 7: Compile and Test
When done, compile and run your program.
Then debug any errors until your code is error-free.
Check your output to ensure that you have the desired output and modify your code as necessary and rebuild.The output of your program should resemble the following:
Learn More -

CIS247A Week 7 Lab The Abstract Racer Inheritance Hierarchy Program
$15.00CIS247A Week 7 Lab The Abstract Racer Inheritance Hierarchy Program
Scenario and Summary
This week, you will be implementing inheritance by creating a generic Racer base class along with two derived classes called StreetTuner and HotRod. You will make the Racer class abstract and include the abstract method IsDead() in the Racer class.STEP 1: Understand the UML Diagram
The UML diagram four classes defined (1) Racer, (2) Engine, (3) Hot Rod, and (4) StreetTuner classes.The Racer class is the base parent abstract class of the Hot Rod and Street Tuner classes, which is represented by a directed line from the Hot Rod and Street Tuner classes to the Racer class and the end of the line touching the Racer class is a broad, unfilled arrow head. The racer class contains a engine object, which is represented by a directed line from the engine class to the Racer class, with a filled diamond touching the racer class, this line is labeled as a 1 to 1 relationship meaning that each racer object will contain one engine object and each engine is related to a single racer object.
The class's attributes and methods are defined in separate class diagrams, and each class diagram is represented by a rectangular box subdivided into three vertically separated rectangular sub-sections. The top section contains the class name, the middle section contains the class attributes, and the bottom section contains the class methods.
STEP 2: Build the Inheritance Hierarchy
1. Create a project called "CIS247_WK7_Lab_LASTNAME".
2. Build the class structure shown in the UML diagram. Remember to include properties for each class attribute.STEP 3: Implement the Logic for the HotRod Class
1. Provide suitable logic for the ToString method. As always, the ToString method should reveal the state of an object.
2. For the IsDead() method in HotRod, use the logic to implement the base class abstract IsDead method.
Hint: To generate a random number, use the following code, which returns a random number from 0 to 1:
Random rnd = new Random();
rnd.NextDouble();
Pseudocode for the IsDead method of HotRod
Random rnd = new Random();
boolean deadif (speed > 50 && rnd.NextDouble() > 0.6)
if (engineHorsePower < 300 && blower=true)
dead = false
else
dead = true
end if
else if (speed > 100 && rnd.NextDouble() > 0.4)
if (engineHorsePower >= 300 && blower = true)
dead = true
else
dead = false
end if
else
dead = false
end ifSTEP 4: Implement the logic for the StreetTurner class
1. Provide suitable logic for the ToString method. As always, the ToString method should reveal the state of an object.
2. For the IsDead method in StreetTurner, use the logic below to implement the inherited abstract base class method called IsDead.
Pseudocode for the IsDead method of StreetTuner
Random rnd = new Random();
boolean dead
if (speed > 50 && rnd.NextDouble() > 0.6)
if (engineHorsePower < 300 && nitrous=true)
dead = false
else
dead = true
end if
else if (speed > 100 && rnd.NextDouble() > 0.4)
if (engineHorsePower >= 300 && nitrous = true)
dead = true
else
dead = false
end if
else
dead = false
end ifSTEP5: Construct the Main Program
1. Create an array of Racer objects that will hold two Racer objects.
2. Write a method called CollectRacerInformation that accepts as an argument a Racer object, and then prompts the user to provide the following information for each racer:
a. Racer name;
b. Racer Speed;
c. Number of cylinders in the racer's engine;
d. Horsepower of the racer's engine; and
e. Nitrus or blower option, depending on the type of Racer object.
[Hint: In order to be able to collect all information for the derived classes as well, consider creating a base class method called ReadRacerData in the Racer class, which you will then override in the derived classes to capture the required info per class. Call the ReadRacerData method within the CollectRacerInformation method.]
3. Write a method called "DisplayRacerInformation" that accepts as an argument a Racer object, and then displays all of the information for the specific racer type.
4. Create a racer object of each type, and invoke the CollectRacerInformation passing in the Racer object. Then, store each object in the array.
5. Iterate through the Racer array list and, for each Racer, display all of the Racer's attribute information (call the DisplayRacerInformation method for each object). Don’t forget to indicate whether or not the Racer is dead!STEP 6: Compile and Test
Learn More
When done, compile and run your program.
Then, debug any errors until your code is error-free.
Check your output to ensure that you have the desired output and modify your code as necessary and rebuild. Your code may resemble the following:
Welcome the Abstract RAcer Inheritance Hierarchy Program
CIS247, Week 7 Lab
Name: Solution
This Program test an Anstract Racer Inheritance hierarchy
**************** Collecting Racer's Basic Data ****************
Enter racer's name: Fast One
Enter racer's speed: 345
Enter number of cylinders in racer's engine: 20
Enter horsepower of racer's engine: 250
Enter nitrus option (Y/N): Y
**************** Collecting Racer's Basic Data ****************
Enter racer's name: Lightning
Enter racer's speed: 380
Enter number of cylinders in racer's engine: 16
Enter horsepower or racer's engine: 275
Enter blower option (Y/N): Y
**************** Display Racer's Data ****************
Racer's Name : Fast One
Racer's Speed : 345
Engine Cylinders : 20
Engine Horsepower : 250
Racer's Type : STREET TUNER
With Nitrus Option : Yes
Still Working? : Yes!
**************** Display Racer's Data ****************
Racer's Name : Lightning
Racer's Speed : 380
Engine Cylinders : 16
Engine Horsepower : 275
Racer's Type : HOT ROD
With Nitrus Option : Yes
Still Working? : Yes!
Thank you for using the Abstract Racer Inheritance Hierarchy -

CIS 363B Week 2 iLab 2 Site Navigation and Styles
$15.00CIS 363B Week 2 iLab 2 Site Navigation and Styles
Scenario and Summary
Complete Tutorial 3, Case Problem 1.
Complete Tutorial 4, Case Problem 1.Deliverables
Following the directions below on how to upload to the Web Lab Server, you will create a subfolder within your root folder for each assignment and then upload your files to the appropriate folder.STEP 1
Complete Tutorial 3, Case Problem 1. Click on Tutorial 3 Files to download the support files for the case project. Follow all the directions to complete this task in your book.Create a subfolder called Week2Lab1 and upload your files to this folder.
STEP 2
Complete Tutorial 4, Case Problem 1. Click on Tutorial 4 Files to download the support files for the case project. Follow all the directions to complete this task in your book.Create a subfolder called Week2Lab2 and upload your files to this folder.
Learn More -

CIS 363B Week 4 iLab 4 Working With Multimedia
$15.00CIS 363B Week 4 iLab 4 Working With Multimedia
iLAB OVERVIEW
Scenario and Summary
Complete Tutorial 7, Case Problem 1.
Complete Tutorial 3, Case Problem 1.Deliverables
Following the directions below on how to upload to the Web Lab Server, you will create a subfolder within your root folder for each assignment and then upload your files to the appropriate folder.iLAB STEPS
STEP 1
Complete Tutorial 7, Case Problem 1. Click on Tutorial 7 Files to download the support files for the case project. Follow all the directions to complete this task in your book.
Create a subfolder called Week4Lab1 and upload your files to this folder.STEP 2
Learn More
Complete Tutorial 3, Case Problem 1. Click on Tutorial 3 Files to download the support files for the case project. Follow all the directions to complete this task in your book.
Create a subfolder called Week4Lab2 and upload your files to this folder. -

CIS 363B Week 5 iLab 5 Working With Frames and XHTML
$15.00CIS 363B Week 5 iLab 5 Working With Frames and XHTML
iLAB OVERVIEW
Scenario and Summary
Complete Tutorial 8, Case Problem 1.
Complete Tutorial 9, Case Problem 1.Deliverables
Following the directions below on how to upload to the Web Lab Server, you will create a subfolder within your root folder for each assignment and then upload your files to the appropriate folder.iLAB STEPS
STEP 1
Complete Tutorial 8, Case Problem 1. Click on Tutorial 8 Files to download the support files for the case project. Follow all the directions to complete this task in your book.
Create a subfolder called Week5Lab1 and upload your files to this folder.STEP 2
Learn More
Complete Tutorial 9, Case Problem 1. Click on Tutorial 9 Files to download the support files for the case project. Follow all the directions to complete this task in your book.
Create a subfolder called Week5Lab2 and upload your files to this folder. -

CIS 363B Week 6 iLab 6 JavaScript and Dynamic Content
$15.00CIS 363B Week 6 iLab 6 JavaScript and Dynamic Content
iLAB OVERVIEW
Scenario and Summary
Complete Tutorial 10, Case Problem 1.Deliverables
Following the directions below on how to upload to the Web Lab Server, you will create a subfolder within your root folder for each assignment and then upload your files to the appropriate folder.iLAB STEPS
Learn More
STEP 1
Complete Tutorial 10, Case Problem 1. Click on Tutorial 10 Files to download the support files for the case project. Follow all the directions to complete this task in your book.
Create a subfolder called Week6Lab1 and upload your files to this folder. -
CIS 273 Lab Assignment 8 Adding Sound
$10.00CIS 273 Lab Assignment 8 Adding Sound
Deliverable: One (1) Web page including supporting files (.jpg and .mp3)
Follow the directions below to complete Lab Assignment 8:
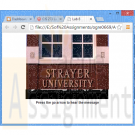
Note: The audio and image file required for this assignment can be found in the online course shell.Re-create the Web page shown below in which you:
Learn More
1. Insert the image .jpg file with the dimensions of 300px wide and 200px high.
2. Insert the audio .mp3 file with controls 300 wide and 35 high.
3. Insert and format the “Press the go arrow to hear the message” caption with the text font type set to Arial.
4. Validate that the sound does not start automatically. -
CIS363B Week 3 iLab 3 Navigation and Styles
$15.00CIS363B Week 3 iLab 3 Navigation and Styles
iLAB OVERVIEW
Scenario and Summary
Complete Tutorial 5, Case Problem 1.
Complete Tutorial 6, Case Problem 1.Deliverables
Following the directions below on how to upload to the Web Lab Server, you will create a subfolder within your root folder for each assignment and then upload your files to the appropriate folder.iLAB STEPS
STEP 1
Complete Tutorial 5, Case Problem 1. Click on Tutorial 5 Files to download the support files for the case project. Follow all the directions to complete this task in your book.
Create a subfolder called Week3Lab1 and upload your files to this folder.STEP 2
Learn More
Complete Tutorial 6, Case Problem 1. Click on Tutorial 6 Files to download the support files for the case project. Follow all the directions to complete this task in your book.
Create a subfolder called Week3Lab2 and upload your files to this folder.

You have no items in your shopping cart.
