Search results for 'Murachs MySQL My Guitar Shop Database Chapter 17'
-

DBM 405A Lab 3 Database Creation and Table Manipulation
Regular Price: $15.00
Special Price $12.00
DBM 405A Lab 3 Database Creation and Table Manipulation
I. OBJECTIVES
1. Understand and become familiar with Table Manipulation.II. PARTS LIST
1. EDUPE Omnymbus Environment (https://devry.edupe.net:8300); and/or
2. MySQL (dev.mysql.com/downloads).III. PROCEDURE
By now you have set up either the Omnymbus environment or the MySQL Server Community environment, or both. You may do the labs in this class on your own computer equipped with MySQL or you may use the MySQL environment hosted by the vendor Omnymbus. You may even use both.Lab Procedure Continued (common to both environments)
Learn More
1. Add a table named "Season" to your Baseball database, which consists of the following fields:
a. Season (Integer)
b. PlayDate (date)
c. HomeTeam (character 5)
d. HomeTeamScore (Integer)
e. AwayTeam (character 5)
f. AwayTeamScore (Integer)
2. Populate the table with 56 unique games where each plays the other 7 twice (once as the home team and once as the away team). Make the season equal to this year. Leave the scores blank and use any date for the PlayDate.
3. Create another table called "PastSeasons" by copying the structure of the table "Season" and copying all the data from "Season" into the new table.
4. Replace the Season field in the table Season with next year for all records.
5. Unload the Season table data to a comma-delimited file.
6. Load the comma-delimited file to PastSeasons table, appending the data to the data that is already there. -
WEB460 Lab 4 of 7: Create a Business Layer Class and Use an XML File
Regular Price: $15.00
Special Price $12.00
WEB460 Lab 4 of 7: Create a Business Layer Class and Use an XML File
Scenario/Summary
This week, we add the business layer to our application. This layer handles business rules and data validation based on those rules. It also handles communication with external websites and applications, so this layer is where we implement creating, reading, and writing an XML file for data transfer.
If you haven't noticed, pgCheckOut.aspx.cs has become fairly large, making it difficult to maintain. The reason for this is that we have the pgCheckOut class doing much of the work that belongs in the business layer and data layer. Next week, we deal with this situation and refactor our code to better distribute the workload among the classes in our application.
Refactoring does not change the external functionality of software, but it changes the internal structure by reorganizing it. After refactoring our application, it should look the same to users but execute more efficiently and be easier to maintain. More on this next week. For now, let's add some GridView controls and XML interaction.Here is an overview of the steps in this lab:
Step A: Set up a new website with a copy of the Week 3 Lab.
Step B: In the data layer, fill a DataSet with data on all the customers. We'll later bind this DataSet to a GridView.
Step C: Add control to pgCheckOUt.aspx. We will add two GridViews and two labels for the GridViews and a Button to update an XML file.
Step D: Bind one of the GridViews to the DataSet listing all customers in the database. We have it automatically update when the page is loaded and when customers are updated or added.
Step F: We build our business layer and have it read from and write to the XML file.
Step G: We bind the second GridView in pgCheckOut.aspx to the parsed data in the XML file and connect the Click event of btnUpdateXML to a method that updates the XML file.
This diagram shows the major components we will be working with in this lab and how they interact.
We have a lot to accomplish, so let's get started!Lab Steps
STEP A: Set Up a New Web Site
1. Create a new Empty Web Site project.
2. Copy all the files from last week's Lab into the website folder for this week.
3. Test that your application functions and runs the same as it did last week.STEP B: In the Data Layer, Fill a DataSet With all Customers
In our previous lab, we filled a DataSet with data on a single customer from the database. In this lab, we want to show the user a list of all customers, so we need to add a method to our data layer that fetches all the customers and fills a DataSet with this list.
In clsDataLayer.cs, add the following code for the GetAllCustomers method:
GetAllCustomers Method in clsDataLayer.cs
public dsAccounts GetAllCustomers()
{
//Add your comments here
OleDbDataAdapter sqlDataAdapter = new OleDbDataAdapter ( "select * from tblCustomers;", dbConnection );
//Add your comments here
dsAccounts myStoreDataSet = new dsAccounts();
sqlDataAdapter.Fill(myStoreDataSet.blCustomers);
// Add your comments here
return myStoreDataSet;
}STEP C: Add Controls to pgCheckOut.aspx
In this step, we add two Labels, two GridViews, and a Button to pgCheckOut.aspx. One GridView will be bound to the database and the other to an XML file. The labels will label the GridView so that the user knows which each is. The Button is used to update the XML file after changes have been made to the database.
We do not bind the GridViews to a data source at this time! This will be done later in our C# code.
The first GridView, gvCustomerList, will be bound to a DataSet with records from the database.
The second GridView, gvXML, will be bound to a DataSet comprised of record from an XMLfile that we can use to transmit customer information to another application.
1. Add the two Label and GridView controls by adding the following statements after the lines for the Phone Number textbox on the left column of the web page:
<asp:Label ID="lblGVDataBase" runat="server" Text="Customers in Database:"></asp:Label><br/>
<asp:GridView ID="gvCustomerList" runat="server" Font-Size="9"></asp:GridView><br/>
<asp:Label ID="lblGVXML" runat="server" Text="Customers in XML File:"></asp:Label><br/>
<asp:GridView ID="gvXML" runat="server" Font-Size="9"></asp:GridView>
2. On the right column of the web page, add the following line to place a Button for updating the XML file below the Submit Order button:
<br/><br/>
<asp:Button ID="btnUpdateXML" runat="server" Text="Update XML File"/>
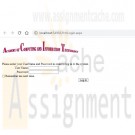
3.When you have completed this step, the design view of pgCheckOut.aspx should be similar to this image:STEP D: Bind the First GridView inpgCheckOut.aspx.cs
Now that we have a method in our data layer that returns all the customers in a DataSetobject, we can bind that DataSet to our GridView control.
1. The private method BindCustomerGridView calls the data layer to fetch a list of all customers and then binds that to the GridView. Additionally, it stores the DataSet in the cache. Later, we'll use the cache to update the XML file.
Add the following to pgCheckOut.aspx.cs:
BindCustomerGridView Method for pgCheckOut.aspx.cs
private dsAccounts BindCustomerGridView()
{
// Add your comments here
// Depending on where you placed your Access database,
// one of the following lines may work better:
// tempPath = Server.MapPath("Accounts.mdb")
// tempPath = Server.MapPath("~/FPDB/Accounts.mdb")
string tempPath = Server.MapPath("~/App_Data/Accounts.mdb");
clsDataLayer myDataLayer=new clsDataLayer(tempPath);
// Add your comments here
dsAccounts customerListing=myDataLayer.GetAllCustomers();
// Add your comments here
gvCustomerList.DataSource=customerListing.tblCustomers;
// Add your comments here
gvCustomerList.DataBind();
Cache.Insert("CustomerDataSet",customerListing);
return customerListing;
}
2. We must now call this method so the GridView, gvCustomerList, is updated to reflect the customers in the database. There are three times we must call this method if we want the GridView to update without user interaction:
In the method Page_Load: When the page first loads, we perform the initial binding of the GridView.
In the method btnAdd_Click: After creating a new customer record, we ensure that it shows up in the GridView.
In the method btnUpdate_Click: After updating customer information, we ensure that the new information shows up in the GridView.
Add the following statements to the end of the Page_Load, btnUpdate_Click and btnAdd_Click methods in pgCheckOut.aspx.cs.
// Add your comments here
BindCustomerGridView();
3. Test your to code to ensure the gvCustomerList is properly bound and updated.STEP E: Implementing the Business Layer
The business layer is implemented in C# class clsBusinessLayer. For this lab, there are three methods and two data fields that we need to create in clsBusinessLayer. In our next lab, we will refactor our application and add more functionality to this class.
The business layer functionality we need in this lab is the ability to read and write the XML file customers.xml. This is handled in the business layer because it does not directly involve the database and is part of the communication our application does with other applications. The XML file we create can be read from the disk by another application on our server or transmitted to a remote application.
1. Add a new class to your application, name it clsBusinessLayer.cs, and add the statement:
using System.Data;
2. Add two data fields to your class.
dataPath is the path on the server to the App_Data directory or whichever directory the user wants the XML file stored. This will be passed as an argument to the clsBusinessLayer constructor and initialized there.
The data field myDataLayer represents an instance of the data layer. We use this for our database interaction. Like all data fields, it is initialized in the constructor.
Data Fields for the Class clsBusinessLayer
// Add your comments here
string dataPath;
// Add your comments here
clsDataLayer myDataLayer;
3. Our clsBusinessClass constructor serves to initialize all our data fields (a programming best practice).
Constructor for clsBusinessLayer
public clsBusinessLayer(string serverMappedPath)
{
// Add your comments here
dataPath = serverMappedPath;
myDataLayer = new clsDataLayer(dataPath + "Accounts.mdb");
}
4. The next functionality to add to our business layer is the ability to read (or get) the XML file with customer data ( customers.xml). This method creates a DataSet to hold the customer records parsed from the XML file. It then attempts to read the XML file. If the file is not found, we catch the exception and fix the situation by creating a fresh XML file. We can read the new file and place it in the DataSet object.
Add this code to clsBusinessLayer.cs:
GetCustomerXMLFile Method in clsBusinessLayer.cs
public DataSet GetCustomerXMLFile()
{
// Add your comments here
DataSet xmlDataSet = new DataSet();
try
{
// Add your comments here
xmlDataSet.ReadXml(dataPath+"customers.xml");
}catch(System.IO.FileNotFoundException error)
{
// Add your comments here
dsAccounts customerListing = myDataLayer.GetAllCustomers();
customerListing.tblCustomers.WriteXml(dataPath+"customers.xml");
xmlDataSet.ReadXml(dataPath+"customers.xml");
}
// Add your comments here
return xmlDataSet;
}
5. Our last task with clsBusinessLayer.cs is to add a function that writes the XML data file, customers.xml. To do this, we will read the current list of customers from the Cache object. If you remember, previously, we saved the updated list of customer to the cache as a way to save returning to the database to read customer data. We can read from the cache, which is a much quicker operation.
Add this code to clsBusinessLayer.cs:
WriteCustomerXMLFile Method in clsBusinessLayer.cs
public DataSet WriteCustomerXMLFile(System.Web.Caching.Cache appCache)
{
// Add your comments here
DataSet xmlDataSet = (DataSet) appCache["CustomerDataSet"];
// Add your comments here
xmlDataSet.WriteXml(dataPath+"customers.xml");
// Add your comments here
return xmlDataSet;
}
We'll be able to test this code after we complete the next step.STEP F: Calling the Business Layer and Binding aGridView
The last task we have is to bind the GridView, gvXML, to the data parsed from the XML file and update the XML file based on data stored in the Cache object.
1. Because our presentation layer class, pgCheckOut, will need to access the business layer frequently, let's create a data field of type clsBusinessLayer and initialize it in our Page_Load method. This activity is similar to how we handled the clsDataLayer object in our business layer class. Add the following data field to pgCheckOut.aspx.cs:
clsBusinessLayer myBusinessLayer;
Then in the Page_Load, add the following to initialize the data field:
//Add your comments here
// Ensure the argument to MapPath reflects the path
// To where the database is stored. This is also where the
// XML file will be saved. Don't forget the closing '/'
// If you are using Citrix, the directory should be ~/FPDB/
myBusinessLayer = new clsBusinessLayer(Server.MapPath("~/App_Data/"));
2.We can easily bind the GridView to the data in the XML file by asking the business layer to process the file and handle any errors. We can expect back a DataSet that webind to the GridView. Add the following code to pgCheckOut.aspx.cs:
BindXMLGridView Method in pgCheckOut.aspx.cs
public void BindXMLGridView()
{
// Add your comments here
gvXML.DataSource = myBusinessLayer.GetCustomerXMLFile();
gvXML.DataBind();
}
3. This method needs to be called when the page first loads so that gvXML displays data. Add the following statement to the end of the Page_Load method:
BindXMLGridView();
4. For this lab, we want to update gvXML manually (as opposed to automatically as we do with gvCustomerList). The following click method will be called from the Button btnUpdateXML. It updates the XML from the Cache object and then binds gvXML.
btnUpdateXML_Click Method in pgCheckOut.aspx.cs
public void btnUpdateXML_Click(object sender, EventArgs e)
{
// Add your comments here
gvXML.DataSource = myBusinessLayer.WriteCustomerXMLFile(Cache);
gvXML.DataBind();
}
5. Finally, we need to set the Click event for btnUpdateXML. In the ASP file pgCheckOut.aspx , add the following to the definition for btnUpdateXML :
OnClick="btnUpdateXML_Click"
6. At this point, you should be able to test the entire application's functionality.STEP G: Finalize the Lab.
Learn More
1. Save your work!
2. Test it! Make changes as appropriate until it works. Try updating or adding new records to the database.
3. Remember to add comments for each step being performed.
4. Please zip and submit the entire web project folder. -
DBM 405A Lab 2 SQL Review
Regular Price: $15.00
Special Price $12.00
DBM 405A Lab 2 SQL Review
I. OBJECTIVES
1. Get access to a MySQL environment.
2. Familiarize yourself with the environment.II. PARTS LIST
3. EDUPE Omnymbus Environment (https://devry.edupe.net:8300); and/or
4. MySQL (dev.mysql.com/downloads).III. PROCEDURE
You may do the labs in this class on your own computer equipped with MySQL or you may use the MySQL environment hosted by the vendor Omnymbus. You may even use both.Using MySQL on your own computer means downloading a version from dev.mysql.com/downloads and installing the database engine on your computer. This can be done easily and there are a number of resources on the web to help you with this process.
You may also use the MySQL environment hosted by Omnymbus by logging in with your credentials to https://devry.edupe.net:8300.
Using the first approach will give you experience writing programs on a desktop computer and accessing a database. Using the second approach will give you experience writing applications that access a database in a cloud environment.
You are encouraged to use both approaches.
In the previous lab (Week 1), you have established a database environment (either MySQL Community Server or the Omnymbus environment). You may continue to use that environment or you my return to Week 1 to set up the alternate environment.
Lab Procedure Continued (common to both environments)
Learn More
1. Use the database named “Baseball” created in last week’s lab.
2. Use the table named “Teams” which consists of the following fields:
a. TeamCode (character 5)
b. TName (character 20)
c. TAddress (character 30)
d. TCity (character 20)
e. TState (character 2)
f. TZip (character 9)
g. Wins (integer)
h. Losses (integer)
3. You should have a table with 8 teams.
4. Use the table named “Players”, which consists of the following fields:
a. FirstName (character 20)
b. LastName (character 30)
c. MidInit (character 1)
d. PAddress (character 30)
e. PCity (character 20)
f. PState (character 2)
g. PZip (character 9)
h. Phone (character 11)
i. Team (character 5)
5. You should have a table with 80 players (10 on each team). Players are identified by the Team field which matches the TeamCode in the Teams table.
6. Demonstrate the use of the WHERE clause by selecting and displaying only the players from one team.
7. Demonstrate the use of the COUNT function by determining how many players are on each team and displaying the results.
8. For each City, find the number of players who list their home in that city.
9. Demonstrate the ORDER BY clause by listing all the players in alphabetical order by last name within Team. -
DBM 405A Lab 1 SQL Review
Regular Price: $15.00
Special Price $12.00
DBM 405A Lab 1 SQL Review
I. OBJECTIVES
a. Get access to a MySQL environment.
b. Familiarize yourself with the environment.II. PARTS LIST
1. EDUPE Omnymbus Environment (https://devry.edupe.net:8300); and/or
2. MySQL (dev.mysql.com/downloads).III. PROCEDURE
You may do the labs in this class on your own computer equipped with MySQL or you may use the MySQL environment hosted by the vendor Omnymbus. You may even use both.Using MySQL on your own computer means downloading a version from dev.mysql.com/downloads and installing the database engine on your computer. This can be done easily and there are a number of resources on the web to help you with this process.
You may also use the MySQL environment hosted by Omnymbus by logging in with your credentials to https://devry.edupe.net:8300.
Using the first approach will give you experience writing programs on a desktop computer and accessing a database. Using the second approach will give you experience writing applications that access a database in a cloud environment.
You are encouraged to use both approaches.
Desktop MySQL Environment
1. Download the MySQL Community Server from the http://dev.mysql.com/downloads/ website.
2. Install MySQL on your computer.
3. Open the MySQL Environment on your computer.Omnymbus Environment
1. Login to the MySQL Omnymbus Environment by following the instruction located in Doc Sharing (document titled “Login MySQL Omnymbus Environment”).Lab Procedure Continued (common to both environments)
1. Create a database named “Baseball”.2. Create a table named “Teams” and add the following fields:
a. TeamCode (character 5)
b. TName (character 20)
c. TAddress (character 30)
d. TCity (character 20)
e. TState (character 2)
f. TZip (character 9)
g. Wins (integer)
h. Losses (integer)3. Populate the table with 8 teams.
4. Create a table named “Players” and add the following fields:
a. FirstName (character 20)
b. LastName (character 30)
c. MidInit (character 1)
d. PAddress (character 30)
e. PCity (character 20)
f. PState (character 2)
g. PZip (character 9)
h. Phone (character 11)
i. Team (character 5)5. Populate the table with 80 players (10 on each team). For the team, use the TeamCode from the first table to identify the Team the player is on.
Learn More
6. Display or list the data from both table to the screen or printer. -
WBG310 Week 3 Lab Interactive Web Page Scripting with Lab
Regular Price: $15.00
Special Price $12.00
WBG310 Week 3 Lab Interactive Web Page Scripting with Lab
Scenario/Summary
Using the skills acquired in the tutorials from Chapter 5, build a web page of your own design that has jQuery-programmed event handlers. Find errors and omissions in existing files and repair them to function correctly.Deliverables
W3iLab_1.html. Zip the file and submit your assignment.Lab Steps
STEP 1: Open the Template
Open jsTemplate.html from Week 1.
Save the file as w3_Lab3.html.STEP 2: Collect jQuery Library File
Use the link to jQuery at Google as shown here, and as described in the week lesson:
<script src="https://code.jquery.com/jquery-3.5.1.js"></script>
...or, download the current jQuery library file from https://jquery.com/download/ (https://jquery.com/download/) and place the file in the _js folder.
Note: You may need to right-click on the download link an and then select "Save Link as...", or "Download Linked File as . . ." depending on your browser.STEP 3: Set the Source for the Library File
1. If you download your own copy, create a set of script tags above the current script tag set, and set the src to the library file in Step 2.STEP 4: Create jQuery Functions for Events
1. Set an id="p1" for the first paragraph <p>.
2. Create the document ready function for your page as explained in the text in Chapter 4.
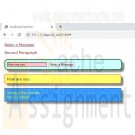
3. Within the document function, create an event handler that will append the contents of the ‘more’ div tag with the message ‘You Clicked!’. Include a line break. The expected results are pictured below.STEP 5: Create jQuery Functions for Events
1. Create a textbox inside the form. Name the new input element with id=“box1”
2. Create a function that changes the background color of the box to light blue when the box gains the focus.
3. Create a function that changes the background color of the box to pink when the box loses the focus. Hint: Blur.STEP 6: Create jQuery Functions for Events
1. Create a button next to the textbox on the form. Make the button read, ‘Relay a Message.’
2. Create a function that appends the contents of the results DIV when clicked. The message should be ‘Here is your message’ or something similar. The expected results are pictured below.STEP 7: Create jQuery Functions for Events
1. When the page loads (onload), hide the form.
2. Change the value of #p1 to ‘Relay a Message’ and make it a hyperlink with the href="#"
3. Reset the function for the paragraph click event.
Include the designation in the identifier for the anchor tag.
Have the form slide down. Use the ‘slow’ modifier.
4. In the button click event, reset the message to come from the textbox. Hint: Use .val() to collect the user input. Include a line break with the message. The expected results are pictured below.STEP 8: Prep for Turn-In
Learn More
1. When your application functions as expected, zip the file submit your assignment. -

WEB460 Lab 3 of 7: Adding Data Layer Functionality
Regular Price: $12.00
Special Price $10.00
WEB460 Lab 3 of 7: Adding Data Layer Functionality
Scenario/Summary
For our Lab this week, you will connect to a Microsoft Access database to store, update, and retrieve customer information. Here is an overview of the lab:
Step A: Create a New Web Site Project
Copy files from last week's Lab.
Step B: Add the ClearForm Functionality to pgCheckOut
Add a button and code to clear form fields.
Step C: Create a DataSet and Link It to an Access Database
This step also creates a TableAdapter that can be used in our code.
Step D: Create the clsDataLayer Class to Represent Our Application's Data Layer
Add a data field for the connection and modify the constructor.
Step E: Implement the FindCustomer Functionailty
This and the following two steps require editing three different files and then testing your changes.
Be careful to add the lab code to the correct file each time.
Generally, the parts of these steps are as follows:
– Add a method to the clsDataLayer class.
– Add a click method to pgCheckOut.aspx.cs that calls the method in clsDataLayer.
– Add a button to pgCheckOut.aspx that calls the click method.
Step F: Implement the UpdateCustomer Functionailty
Step G: Implement the InsertCustomer Functionality
Step H: Test and Finalize the Lab
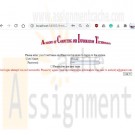
When you have completed and tested the lab, the web form pgCheckOut should look similar to this image:Deliverables
A zip archive of the ASP.NET Web Application directory. It should contain the following files in
addition to your database and dataset files:
– pgCheckOut.aspx **
– pgCheckOut.aspx.cs **
– pgConfirm.aspx
– pgConfirm.aspx.cs
– Web460Store.master
– Web460Store.master.cs
– clsDataLayer.cs **
The files with ** are the ones that should have been modified for this lab.Lab Steps
STEP A: Create a New Web Site Project
1. Create a new Empty Web Site project.
2. Copy the six files from last week's Lab into the folder for this new project. Be careful not to move the files. We want to work on a copy of last week's lab and leave the original untouched. The website folder should have the following files:
pgCheckOut.aspx
pgCheckOut.aspx.cs
pgConfirm.aspx
pgConfirm.aspx.cs
Web460Store.master
Web460Store.master.cs
web.config
web.Debug.config ( optional: depends on the version of Visual Studio you are using)
3. Set pgCheckOut.aspx as the start page and test your application. It should perform just as it did last week.STEP B: Add the ClearForm Functionality to pgCheckOut
Because we will be adding, retrieving, and updating customer information, we should give the user the ability to easily clear the form fields so that information from one customer is not mixed with that of another.
1. Add a private method to pgCheckOut.aspx.cs that examines each control on the page. If the control is a Textbox, DropDown list, or RadioButton, the control is cleared. If it is a panel or other container, the method calls itself recursively, passing the controls on that container so that they may be cleared.
ClearInputs Method in pgCheckOut.aspx.cs
private void ClearInputs(ControlCollection ctrls)
{
foreach (Control ctrl in ctrls)
{
if (ctrl is TextBox)
((TextBox)ctrl).Text = string.Empty;
else if (ctrl is DropDownList)
((DropDownList)ctrl).ClearSelection();
else if (ctrl is RadioButton)
((RadioButton)ctrl).Checked = false;
else if (ctrl is RadioButtonList)
((RadioButtonList)ctrl).ClearSelection();
else
ClearInputs(ctrl.Controls);
}
}
2. Next, we add a click method that will be called by a form button. The form button cannot call the recursive method directly because click methods require a different set of parameters. Because of this, we need the private helper method ClearInputs.
btnClearForm_Click in pgCheckOut.aspx.cs
public void btnClearForm_Click(object sender, EventArgs e)
{
ClearInputs(Page.Controls);
}
3. Add a button to pgCheckOut.aspx that calls the Clear Form click handler above. The button should have the name and ID btnClearForm and the text "Clear Form". You can use the image in the Lab Summary section above for guidance on placing the button.
4. Test your work. You should be able to enter data in the form fields on the left and when the Clear Form button is clicked, all form fields should be cleared.STEP C: Create a DataSet and Link it to Microsoft Access Database
These steps create and add a DataSet called dsAccounts to your project. Carefully read through these instructions as you step through the creation of the DataSet. If you cannot connect to the database when these steps are complete, delete the DataSet and recreate it from scratch to make sure all parts are initialized properly.
1. Download and copy the Microsoft Access database, Acounts.mdb, found in the Files section of the Course Menu to your website folder. Note that you can have the database at any location on your computer, but your code should be adjusted accordingly. It is best to have it in the top level of your website or in the App_Data folder. In Steps E, F, and G below, you will need to adjust your code to accurately reflect the path to where your database is stored.
If you are using the DeVry FTP site websol, you must place the database into the FPDB folder in your account top-level directory. It is recommended to use your local computer instead of the websol FTP server.
2. From the Solution Explorer pane, right click on the App_Code folder and select the Add New Item menu option. In the Add New Item dialog box, select DataSet and type the dsAccounts as the name of the DataSet. When prompted, allow Visual Studio to store the DataSet in the App_Code folder.
3. After creating dsAccounts, double-click TableAdapter in the Dataset Toolbox to configure the connection to the database using the TableAdapter Configuration wizard. The Dataset Toolbox panel is displayed by selecting dsAccounts.xsd in the Solution Explorer panel and then clicking the Toolbox link in the main window. You may also select Toolbox from the View menu.
4. On the first window, click the New Connection button.
5. In the Choose Data Source window, select the file Microsoft Access Database and click Continue.
6. In the Add Connection window, click the Browse button and select the Microsoft Access database that you downloaded from the Files section of the Course Menu named Accounts.mdb.
7. Click Test Connection to ensure that Visual Studio can access and connect to the database.
8. Click OK, and then click Next on the TableAdapter Wizard. If you expand the connection string + symbol, you can view the connection string used to access the database. This should closely match what we will use in our application.
9. Click Next again to save the connection string to a file.
10. On the Wizard's Choose a Command Type screen, select SQL Statements and then click Next.
11. We now enter the default SQL query for this DataSet connection. In the textbox on this screen, enter the following SQL SELECT statement whose result will be used to populate the DataSet:
SELECT * FROM tblCustomers
12. Click Finish to exit the TableAdapter wizard.STEP D: Create the clsDataLayer Class to Represent Our Application's Data Layer
1. Right-click on the project name in the Solution Explorer pane and select Add. From the submenu, select New Item. From the Add Dialog Box, add a Class called clsDataLayer.
The code file (clsDataLayer.cs) will automatically be placed in the App_Code folder in your website directory.
2. Add a data field to our class that represents the database connection and adjust the constructor to initialize it.
clsDataLayer Data Field and Constructor
OleDbConnection dbConnection;
Be sure to place this code in the correct location in the class file. Verify that your code does not have any syntax errors before continuing.
public clsDataLayer(string Path)
{
dbConnection = new OleDbConnection("PROVIDER=Microsoft.Jet.OLEDB.4.0;Data Source=" + Path);
}STEP E: Implement the FindCustomer Functionality Editing Multiple Files
This step, Step F, and Step G require you to add code to three different files. Carefully follow the directions to ensure that you add code to the correct files. Test your code after each step before moving to the next. You may want to make a copy of the following files before starting this step so that if you make a significant error, you can return to this point:
clsDataLayer.cs
pgCheckOut.aspx.cs
pgCheckOut.aspx
1. In the clsDataLayer class, create a method, called FindCustomer, that accepts LastName as a parameter. This method finds the all occurrences of customers with LastName in the database and places the results in the DataSet object mystoreDataSet, which is an instance of our dsAccounts DataSet.
You can add the following code to the class clsDataLayer. Be sure to replace the lines in the code below that read "Add your comments here with your own comments
explaining what the code does.
FindCustomer Method in clsDataLayer.cs
// Add your comments here
public dsAccounts FindCustomer(string LastName)
{
//Add your comments here
string sqlStmt = "select * from tblCustomers where LastName like '" + LastName + "'";
OleDbDataAdapter sqlDataAdapter = new OleDbDataAdapter(sqlStmt, dbConnection);
//Add your comments here
dsAccounts myStoreDataSet = new dsAccounts();
sqlDataAdapter.Fill(myStoreDataSet.tblCustomers);
// Add your comments here
return myStoreDataSet;
}
When adding this database code to clsDataLayer, do not forget to add the two Using directives in C# that must be placed at the start of your code that ensure that the compiler has the definition of the Data and OleDataAdapter objects necessary for the data layer. (Your challenge is to research and discover what they are.)
2. In pgCheckOut.aspx.cs, create the click method that calls the Data Layer method FindCustomer. This click method is invoked when the user clicks the Find Last Name button we add next. The following method calls FindCustomer and then fills the form fields with results from the Data Set. Be sure that the tempPath variable accurately reflects the path to where you have saved the Access database Accounts.mdb.
btnFindLastName_Click Method in pgCheckOut.aspx.cs
// Add your comments here
protected void btnFindLastName_Click(object sender, EventArgs e)
{
// Add your comments here
dsAccounts dsFindLastName;
// Add your comments here
// Depending on where you placed your Access database,
// one of the following lines may work better:
// tempPath = Server.MapPath("Accounts.mdb")
// tempPath = Server.MapPath("~/FPDB/Accounts.mdb")
string tempPath = Server.MapPath("~/App_Data/Accounts.mdb");
clsDataLayer dataLayerObj = new clsDataLayer(tempPath);
try
{
// Add your comments here
dsFindLastName = dataLayerObj.FindCustomer(txtLastName.Text);
// Add your comments here
if (dsFindLastName.tblCustomers.Rows.Count > 0)
{
// Add your comments here
txtFirstName.Text = dsFindLastName.tblCustomers[0].FirstName;
txtLastName.Text = dsFindLastName.tblCustomers[0].LastName;
txtStreet.Text = dsFindLastName.tblCustomers[0].Street;
txtCity.Text = dsFindLastName.tblCustomers[0].City;
txtState.Text = dsFindLastName.tblCustomers[0].State;
txtPhone.Text = dsFindLastName.tblCustomers[0].PhoneNumber;
customerID.Text = dsFindLastName.tblCustomers[0].CustomerID.ToString();
Master.UserFeedBack.Text = "Record Found";
}
else
{
// Add your comments here
Master.UserFeedBack.Text = "No records were found!";
}
}
catch (Exception error)
{
// Add your comments here
string message = "Something went wrong - ";
Master.UserFeedBack.Text = message + error.Message;
}
}
3. Add a button to pgCheckOut.aspx that calls btnFindLastName_Click for its click event. The button should have the name and ID btnFindLastName and the text Find Last Name. You can use the image in the Lab Summary section above for guidance on placing the button.
4. In Step F, when we update customer information, we must ensure that we update the correct customer. To do this, we use a field that uniquely identifies each row or customer in the table: the CustomerID field. We need to add this to pgCheckOut.aspx.
Add two labels to pgCheckOut.aspx with the names and IDs, lblCustID and customerID.
The text for lblCustID should be "Customer ID:".
The text for the label customerID can be left blank as the application will fill in that text.
5. Test your work. You should be able to enter a name in the Last Name field on the form and when the Find Last Name button is clicked, other form fields should be filled in with data on that customer. If the customer is not found, the appropriate message should be displayed to the user. The Access database comes with data already entered on four customers for testing: Smith, Doe, Rice, and Sue.STEP F: Implement UpdateCustomer Functionality
1. In the clsDataLayer class, create a method called UpdateCustomer that accepts the customer's name and address as parameters. This method finds the customer whose CustomerID field matches the parameter customerID and updates the field values to match the arguments sent when it was called.
You can add the following code to the class clsDataLayer. Be sure to replace the lines in the code below that read "Add your comments here with your own comments explaining what the code does.
UpdateCustomer Method in clsDataLayer.cs
// Add your comments here
public void UpdateCustomer(string firstName, string lastName,
string street, string city,
string state, string phoneNumber, int customerID)
{
// Add your comments here
dbConnection.Open();
// Add your comments here
string sqlStmt = "UPDATE tblCustomers SET FirstName = @first, " +
"LastName = @last, " +
"Street = @street, " +
"City = @city, " +
"State = @state, " +
"PhoneNumber = @phone " +
"WHERE (tblCustomers.CustomerID = @id)";
// Add your comments here
OleDbCommand dbCommand = new OleDbCommand(sqlStmt, dbConnection);
// Add your comments here
OleDbParameter param = new OleDbParameter("@first", firstName);
dbCommand.Parameters.Add(param);
dbCommand.Parameters.Add(new OleDbParameter("@last", lastName));
dbCommand.Parameters.Add(new OleDbParameter("@street", street));
dbCommand.Parameters.Add(new OleDbParameter("@city", city));
dbCommand.Parameters.Add(new OleDbParameter("@state", state));
dbCommand.Parameters.Add(new OleDbParameter("@phone", phoneNumber));
dbCommand.Parameters.Add(new OleDbParameter("@id", customerID));
//Add your comments here
dbCommand.ExecuteNonQuery();
//Add your comments here
dbConnection.Close();
}
2. In pgCheckOut.aspx.cs, create the click method that calls the Data Layer method UpdateCustomer. This click method is invoked when the user clicks the Update
Customer button we add next. The following method calls UpdateCustomer, passing the form field values as arguments.
Be sure that the tempPath variable accurately reflects the path to where you have saved the Access database Accounts.mdb.
btnUpdate_Click Method in pgCheckOut.aspx.cs
protected void btnUpdate_Click(object sender, EventArgs e)
{
// Add your comments here
bool customerUpdateError = false;
// Add your comments here
// Depending on where you placed your Access database,
// one of the following lines may work better:
// tempPath = Server.MapPath("Accounts.mdb")
// tempPath = Server.MapPath("~/FPDB/Accounts.mdb")
string tempPath = Server.MapPath("~/App_Data/Accounts.mdb");
clsDataLayer myDataLayer = new clsDataLayer(tempPath);
// Add your comments here
try
{
myDataLayer.UpdateCustomer(txtFirstName.Text, txtLastName.Text,
txtStreet.Text, txtCity.Text,
txtState.Text, txtPhone.Text, Convert.ToInt32(customerID.Text));
}
catch (Exception error)
{
customerUpdateError = true;
string message = "Error updating customer, please check form data. ";
Master.UserFeedBack.Text = message + error.Message;
}
if (!customerUpdateError)
{
ClearInputs(Page.Controls);
Master.UserFeedBack.Text = "Customer Updated Successfully.";
}
}
3. Add a button to pgCheckOut.aspx that calls btnUpdateCustomer_Click for its click event. The button should have the name and ID btnUpdateCustomer and the text
Update Customer. You can use the image in the Lab Summary section above for guidance on placing the button.
4. Test your work. You should be able to enter a name in the Last Name field on the form and when the Find Last Name button is clicked, other form fields should be filled in with data on that customer. If the customer is not found, the appropriate message should be displayed to the user.
Once a customer has been retrieved (found) in the database, you can update the customer's information and click the Update Customer button. If the application is working correctly, the updated information on the customer will be retrieved from the database the next time you find the customer.STEP G: Implement InsertCustomer Functionality
1. In the clsDataLayer class, create a method called InsertCustomer that accepts the customer's name and address as parameters. This method creates a new customer in the database with the data passed as arguments to the method.
You can add the following code to the class clsDataLayer. Be sure to replace the lines in the code below that read Add your comments here with your own comments explaining what the code does.
InsertCustomer Method in clsDataLayer.cs
// Add your comments here
public void InsertCustomer(string firstName, string lastName,
string street, string city,
string state, string phoneNumber)
{
// Add your comments here
dbConnection.Open();
// Add your comments here
string sqlStmt = "INSERT INTO tblCustomers (FirstName, LastName, Street, City,
State, PhoneNumber) ";
sqlStmt += "VALUES (@first, @last, @street, @city, @state, @phone)";
// Add your comments here
OleDbCommand dbCommand = new OleDbCommand(sqlStmt, dbConnection);
// Add your comments here
OleDbParameter param = new OleDbParameter("@first", firstName);
dbCommand.Parameters.Add(param);
dbCommand.Parameters.Add(new OleDbParameter("@last", lastName));
dbCommand.Parameters.Add(new OleDbParameter("@street", street));
dbCommand.Parameters.Add(new OleDbParameter("@city", city));
dbCommand.Parameters.Add(new OleDbParameter("@state", state));
dbCommand.Parameters.Add(new OleDbParameter("@phone", phoneNumber));
//Add your comments here
dbCommand.ExecuteNonQuery();
//Add your comments here
dbConnection.Close();
}
2. In pgCheckOut.aspx.cs, create the click method that calls the Data Layer method InsertCustomer. This click method is invoked when the user clicks the Add Customer button we add next. The following method calls AddCustomer, passing the form field values as arguments, and then clears the form to await information the user enters on the next customer. Be sure that the tempPath variable accurately reflects the path to where you have saved the Access database Accounts.mdb.
btnAdd_Click Method in pgCheckOut.aspx.cs
// Add your comments here
protected void btnAdd_Click(object sender, EventArgs e)
{
// Add your comments here
bool customerAddError = false;
// Add your comments here
// Depending on where you placed your Access database,
// one of the following lines may work better:
// tempPath = Server.MapPath("Accounts.mdb")
// tempPath = Server.MapPath("~/FPDB/Accounts.mdb")
string tempPath = Server.MapPath("~/App_Data/Accounts.mdb");
clsDataLayer myDataLayer = new clsDataLayer(tempPath);
// Add your comments here
try
{
// Add your comments here
myDataLayer.InsertCustomer(txtFirstName.Text, txtLastName.Text,
txtStreet.Text, txtCity.Text,
txtState.Text, txtPhone.Text);
}
catch (Exception error)
{
// Add your comments here
customerAddError = true;
string message = "Error adding customer, please check form data. ";
Master.UserFeedBack.Text = message + error.Message;
}
// Add your comments here
if (!customerAddError)
{
ClearInputs(Page.Controls);
Master.UserFeedBack.Text = "Customer Added Successfully.";
}
}
3. Add a button to pgCheckOut.aspx that calls btnAddCustomer_Click for its click event. The button should have the name and ID btnAddCustomer and the text Add Customer. You can use the image in the Lab Summary section above for guidance on placing the button.
4. Test your work You should be able to enter a customer's name and address in the appropriate fields on the form and when the Add Customer button is clicked, a record should be added to the database for the customer.
You should be able to view the record directly in the database or by finding the customer using the Find Last Name functionality of the application.STEP H: Test and Finalize the Lab
Learn More
1. Save your work!
2. Test it! Check the Clear, Find, Update, and Add capabilities. Until you add more of your own, the last names in the database that you can search for in this lab are Smith, Doe, Rice, and Sue.
3. Make changes as appropriate until it works.
4. Remember to add comments for each step being performed.
5. Please zip and submit the entire web project folder. -
PRG/420 Week 1 Java 1.29 LAB: Expression for calories burned during workout
Regular Price: $5.00
Special Price $3.00
PRG/420 Week 1 Java 1.29 LAB: Expression for calories burned during workout
The following equations estimate the calories burned when exercising (source):
Women: Calories = ( (Age * 0.074) - (Weight * 0.05741) + (Heart Rate * 0.4472) - 20.4022 ) * Time / 4.184
Men: Calories = ( (Ago * 0.2017) - (Weight * 0.09036) + (Heart Rate * 0.6309) - 55.0969 ) * Time / 4.184Write a program using inputs age (years), weight (pounds), heart rate (beats per minute), and time (minutes), respectively.
Output calories burned for women and men.
Output each floating-point value with two digits after the decimal point, which can be achieved as follows:
System.out.printf("%.2f", yourValue))Ex: If the input is:
Learn More
49 155 148 60
the output is:
Women: 580.94 calories
Men: 891.47 calories -
CIS115 Course Project Guess The Number
Regular Price: $15.00
Special Price $12.00
CIS115 Course Project Guess The Number
You will create a program that will ask the user to guess a number between 1 and 10. The pseudocode is below. Be sure to import random at the beginning of your code and use a comment block explaining what your program does
#Guess the number week 4
#Name:
#Date:
#Random number, loop while true
#ask user for number.
#if number is too high or too low, tell user, if they guessed it break out of loopDisplay "Welcome to my Guess the number program!"
random mynumber
while True
Display "Guess a number between 1 and 10"
Get guess
if (guess<mynumber)
Display "Too low"
else if (guess>mynumber)
Display "Too high"
else if (guess==mynumber)
Display "You guessed it!"When you run your program the result should be something like this:
Welcome to my Guess the number program!Please guess a number between 1 and 10: 5
Too high
Please guess a number between 1 and 10: 4
Too high
Please guess a number between 1 and 10: 3
Too high
Please guess a number between 1 and 10: 2
You guessed it!Be sure to submit your assignment
Learn More -
CIS407 Lab 7 of 7: Error Notification Via E-Mail
Regular Price: $12.00
Special Price $10.00
CIS407 Lab 7 of 7: Error Notification Via E-Mail
Scenario/Summary
In this lab, we will incorporate error handling into the login process so that a notice of each invalid login is automatically e-mailed to the technical support staff.STEP 1: Business Layer Functionality
1. Open Microsoft Visual Studio.NET.
2. Click the ASP.NET website named PayrollSystem to open it.
3. Create a new class called clsBusinessLayer.
4. Add the following code in the clsBusinessLayer class:
// **** Add the following at the top of the class file,
// Add your comments here
using System.Net.Mail;
//**** Add the following code inside the body of public class clsBusinessLayer ****
public static bool SendEmail(string Sender, string Recipient, string bcc, string cc,
string Subject, string Body)
{
try {
// Add your comments here
MailMessage MyMailMessage = new MailMessage();
// Add your comments here
MyMailMessage.From = new MailAddress(Sender);
// Add your comments here
MyMailMessage.To.Add(new MailAddress(Recipient));
// Add your comments here
if (bcc != null && bcc != string.Empty) {
// Add your comments here
MyMailMessage.Bcc.Add(new MailAddress(bcc));
}
// Add your comments here
if (cc != null && cc != string.Empty) {
// Add your comments here
MyMailMessage.CC.Add(new MailAddress(cc));
}
// Add your comments here
MyMailMessage.Subject = Subject;
// Add your comments here
MyMailMessage.Body = Body;
// Add your comments here
MyMailMessage.IsBodyHtml = true;
// Add your comments here
MyMailMessage.Priority = MailPriority.Normal;
// Add your comments here
SmtpClient MySmtpClient = new SmtpClient("localhost");
//SMTP Port = 25;
//Generic IP host = "127.0.0.1";
// Add your comments here
MySmtpClient.Send(MyMailMessage);
// Add your comments here
return true;
} catch (Exception ex) {
// Add your comments here
return false;
}
}STEP 2: Integration
5. Open the frmLogin Web form code behind the file and add the following code to the body of the if (dsUserLogin.tblUserLogin.Count < 1) statement, just above the return statement:
// Add your comments here
// Add your comments here
if (clsBusinessLayer.SendEmail("youremail@yourdomain.com",
"receiver@receiverdomain.com", "", "", "Login Incorrect",
"The login failed for UserName: " + Login1.UserName +
" Password: " + Login1.Password))
{
Login1.FailureText = Login1.FailureText +
" Your incorrect login information was sent to receiver@receiverdomain.com";
}
NOTE: Change the youremail@yourdomain.com (Links to an external site.)Links to an external site. and receiver@receiverdomain.com (Links to an external site.)Links to an external site. to your e-mail and someone else's e-mail for testing.6. Optional: Perform this step only if you are doing this lab using Visual Studio installed on your own computer and you have administrative rights on your computer. If you are doing this lab using the Lab (Citrix) server, or if you do not have access to IIS, skip to Step 8.
7. In previous versions of Windows, the SMTP server was built into IIS. Now we will need to get a separate one. On the Microsoft Codeplex site is an SMTP server called smtp4dev, specifically designed for development environments. Pages 652–653 in the text discuss how to download and use smtp4dev. The site is http://smtp4dev.codeplex.com. Click on Downloads. Another example is Papercut, downloadable at:http://papercut.codeplex.com/ You can use either smtp server.
Test the e-mail by logging in as someone other than Mickey or Minnie. You should receive an email to the SMTP client.
8. We have a security hole in our Web application. If you start the Web application by going to the login page, you can bypass the login page by simply typing the name of a form in the URL (try it). There is some limited protection because of the check that we are doing for the user role, but it still allows a user to get to pages that we don't want them to get to unless the role is set properly. Add a security check in the Page_Load of each sensitive page (Manage Users, Add New Employee, View User Activity, Edit Employees), check for the Session role item with a value of A, and, if the user is accessing these pages without the proper permissions, redirect back to the frmLogin.aspx page. For example:
if (Session["SecurityLevel"] != "A")
{
Response.Redirect("frmLogin.aspx");
}9. This still leaves the possibility of a person bypassing the login page. We will fix that by using forms authentication. Add the following to the web.configfile before the </system.web> tag.
<authentication mode="Forms">
<forms loginUrl="frmLogin.aspx" />
</authentication>
<authorization >
<deny users="?" />
</authorization>10. This will redirect users to the login page if they have not yet gone through it for login. This process will use a cookie – when the user successfully logs in, a cookie is set that allows the user to go to other pages. If that cookie is not set, then the user is redirected to the login page if they try to go to any other page. Add the cookie code by adding this code in the frmLogin.aspx C# code after each place that you have e.Authenticated = true:
FormsAuthentication.RedirectFromLoginPage(Login1.UserName, false);
If you receive an error when you enter this in the code, right click on the line and choose Resolve->Using System.Web.Security11. Hints:
- Make sure you reestablish your database connection if you copied the files from a previous lab. Also, make sure to update the web.config file with the database connection string.
- Update any DataSource controls that you added with the new payroll database location.
- When you manually try to go to a second page by skipping the login page, a cookie is set specifying the name of the page you were attempting to visit. Once you log in successfully, ASP.Net will automatically attempt to navigate back to that page. You can reset the cookie so that the next page is frmMain, as expected, by typing that page in the URL for the browser before logging in.
Submit Final Lab (includes all previous lab assignments).STEP 3: Test And Submit
12. Run your project. When you try to log in, enter a username that is not Mickey or Minnie (i.e., a username that is not found in tblUserLogin). An e-mail should be sent to the recipient@recipientdomain.com (Links to an external site.)Links to an external site. e-mail address.
13. Test that frmMain reconfigures properly based on user role. Make sure that the user cannot bypass the login page.
Learn More
Once you have verified that everything works, save your website, zip up all files, and submit them.
NOTE: E-mails may be blocked due to firewalls, antivirus software, or even Internet service providers that turned SMTP off because of some known security issues. If the code works (does not produce an error when submitting), you will get full credit for this project even if no e-mail message is actually transmitted. Consult with your instructor before submitting if an error occurs or if no e-mail is generated. It is expected that no e-mail will be sent if you are using the DeVry Lab (Citrix) server for this lab or if you were not able to download and install smtp4dev.
NOTE: Make sure that you include comments in the code provided where specified (where the " // Add your comments here" is mentioned), including code you wrote, or else a 5-point deduction per item (form, class, function) will be made. -
CIS407 Lab 6 of 7: login and security levels
Regular Price: $12.00
Special Price $10.00
CIS407 Lab 6 of 7: login and security levels
STEP 1: Login Form
1. In order to do this lab, we need to assign a primary key to the tblUserLogin table. This will allow us to modify the user login table from our Manage Users form that we will create later. Go to Windows Explorer and open the PayrollSystem_DB.accdb. Set the UserID as the Primary key and save the table. Close the database.
2. Open Microsoft Visual Studio.NET.
3. Click the ASP.NET website named PayrollSystem to open it.
4. Create a new Web form named frmLogin.
5. Add the ACIT logo to the top of the frmLogin page. Do not hyperlink the logo.
6. Under the login controls, you will see Login. Drop the Login control onto the form. Set the properties of the login control as follows:
Property Value
DestinationPageUrl frmMain.aspx
TitleText Please enter your UserName and Password in order to log in to the system.
7. Highlight everything in the form, then click Format, Justify, Center. Save your work.8. Go to the Solution Explorer, right-click on frmLogin, and left-click on Set As Start Page.
Then run the website to check if the Web form appears correctly.
If you receive an error, add the following code to the web.config file right above the </configuration> line:
<appSettings>
<add key="ValidationSettings:UnobtrusiveValidationMode" value="None" />
</appSettings>STEP 2: Login Check
9. Create a new DataSet called dsUser. Use the table tblUserLogin as the database table for this dataset. Do this in the same way that you added datasets in the previous labs.
10. Open the clsDataLayer and add the following function:
// This function verifies a user in the tblUser table
public static dsUser VerifyUser(string Database, string UserName, string UserPassword)
{
// Add your comments here
dsUser DS;
OleDbConnection sqlConn;
OleDbDataAdapter sqlDA;
// Add your comments here
sqlConn = new OleDbConnection("PROVIDER=Microsoft.ACE.OLEDB.12.0;" +
"Data Source=" + Database);
// Add your comments here
sqlDA = new OleDbDataAdapter("Select SecurityLevel from tblUserLogin " +
"where UserName like '" + UserName + "' " +
"and UserPassword like '" + UserPassword + "'", sqlConn);
// Add your comments here
DS = new dsUser();
// Add your comments here
sqlDA.Fill(DS.tblUserLogin);
// Add your comments here
return DS;
}11. Double-click on the login control that you added. Add the following code to the login control Authenticate event handler:
// Add your comments here
dsUser dsUserLogin;
// Add your comments here
string SecurityLevel;
// Add your comments here
dsUserLogin = clsDataLayer.VerifyUser(Server.MapPath("PayrollSystem_DB.accdb"),
Login1.UserName, Login1.Password);
// Add your comments here
if (dsUserLogin.tblUserLogin.Count < 1)
{
e.Authenticated = false;
return;
}
// Add your comments here
SecurityLevel = dsUserLogin.tblUserLogin[0].SecurityLevel.ToString();
// Add your comments here
switch (SecurityLevel)
{
case "A":
// Add your comments here
e.Authenticated = true;
Session["SecurityLevel"] = "A";
break;
case "U":
// Add your comments here
e.Authenticated = true;
Session["SecurityLevel"] = "U";
break;
default:
e.Authenticated = false;
break;
}STEP 3: User Authentication, Test and Submit
12. Open the frmPersonnel form and add the following code to its Page_Load() function:
// Add your comments here
if (Session["SecurityLevel"] == "A") {
btnSubmit.Visible = true;
//Add your comments here
} else {
btnSubmit.Visible = false;
}13. Set the start page as frmLogin.aspx. Run the website. Try to log in with both User Name = Mickey and Password = Mouse and User Name = Minnie and Password = Mouse. Any other user ID and password should not allow you to log in.
14. When the user logs in, we want to restrict what they can see and do based on their user role. The role is stored in the database table tblUserLogin. Mickey Mouse has all privileges, whereas Minnie Mouse has read only privileges. We want to control the visibility of the links on the frmMain page.
15. Initially, we did not set the ID of any of the Link Button or Image Button controls that we used on frmMain. In order to make our code more maintainable, we will change the IDs as follows:
Option Link Button ID Image Button ID
Annual Salary Calculator linkbtnCalculator imgbtnCalculator
Add New Employee linkbtnNewEmployee imgbtnNewEmployee
View User Activity linkbtnViewUserActivity imgbtnViewUserActivity
View Personnel linkbtnViewPersonnel imgbtnViewPersonnel
Search Personnel linkbtnSearch imgbtnSearch
Edit Employees linkbtnEditEmployees imgbtnEditEmployees16. Modify the main form so that the following options are turned off for nonadmin users:
- Add New Employee
- View User Activity
- Edit Employees17. You now have a Web application that honors the role of the logged-in user. We don't have a way of managing the user roles and users in the system.
18. Add a new form called frmManageUsers that will allow the user to add new users. The user will also need to be able to view all users and modify or delete any of the users in the database. Add a main form option called Manage Users that is only accessible to admin users. Add the link and image buttons as we have done in the past. Add the ACIT logo that is hyperlinked as you did in previous assignments.
- For the security level of the user, use a dropdown list control to allow the user to select from A or U.
- Name the controls with names that make sense.
- Add code as appropriate to the code behind and clsDataLayer. Note: You will need to create a SaveUser function that is very similar to the SavePersonnel function. Use the following as a guide:
public static bool SaveUser(string Database, string UserName, string Password, string SecurityLevel)
When creating the SaveUser function, be sure to insert the data into the tblUserLogin table with columns: userName, UserPassword, and SecurityLevel.19. Hints:
- Make sure you reestablish your database connection if you copied the files from a previous lab.
- Update any DataSource controls that you added with the new Payroll database location.
- You can turn a control on or off by setting its Visible property.
- You can add a data entry form for new users and a grid displaying all users all on the same form.
- To force a gridView to refresh, call its DataBind method in the btnAddUser_click event handler. For example, use the following code in the btnAddUser_click (be sure to include an Else condition as well if the user was not added successfully):
if (clsDataLayer.SaveUser(Server.MapPath("PayrollSystem_DB.accdb"), txtUserName.Text, txtPassword.Text,ddlSecurityLevel.SelectedValue))
{
lblError.Text = "The user was successfully added!";
grdUsers.DataBind();
}20. Test your application to make sure that you are logging in with a valid user ID. Try to log in with both Minnie and Mickey and make sure that the UI adjusts by the role properly. Make sure that you can utilize the Manage Users functionality to Add/Modify/Delete and view user information. Once you have verified that everything works, save your project, zip up all files, and submit it.
Learn More
NOTE: Make sure you include comments in the code provided where specified (where the " // Your comments here" is mentioned); also, any code you write needs to be properly commented, or else a 5-point deduction per item (form, class, function) will be made.

You have no items in your shopping cart.
