Search results for '''
-
CIS 170 Week 1 iLab 1 of 7 Getting Started Your First C# Programs
$15.00CIS 170 iLab 1 of 7 Getting Started Your First C# Programs
Week 1 Your First Program Data Types and Expressions
Scenario/Summary
Welcome to Programming with C#. The purpose of this three-part lab is to walk you through the following tutorial to become familiar with the actions of compiling and executing a C# program.iLab Steps
Part A: Getting Started
Step 1: Start the Application
Locate the Visual Studio 2010 icon and double click to open. Under Applications, click on the Microsoft Visual Studio.NET 2010 icon to open the C# software.
Step 2: Create a C# Console Project
Choose File->New Project, and click Console Application. In the project name box, enter LAB1A. Your screen should look like the screen below. If so, press the OK button.
Step 3: Delete All Code in Program.cs
Your screen should now look like what you see below. Now, highlight all of the code that you see [Ctrl + A] and press the Delete key. You will not need this code because you will now be getting experience writing every line of a new program.
Step 4: Type in Program
Now enter the following C# program exactly as you see it. Use the tab where appropriate. (Note: C# is case sensitive.) Instead of John Doe, type your name.
class Hello
{
static void Main()
{
// display output
System.Console.WriteLine("John Doe");
System.Console.WriteLine("CIS170B – Programming using C#");
System.Console.WriteLine("\n\n\nHello, world!\n\n");
System.Console.WriteLine("EOJ");
System.Console.ReadLine();
}
}
Step 5: Save Program
Save your program by clicking File on the menu bar and then clicking Save Program.cs, or by clicking the Savebutton on the toolbar or Ctrl + S.
Step 6: Build Solution
To compile the program, click Debug on the menu bar and then click the Build Solution or Build LabAoption. You should receive no error messages in the Error List window below the program. If you see some error messages, check the code above to make sure you didn't key in something wrong. You can double click on each error message to better navigate to the area where the problem might be. Once you make your corrections to the code, go ahead and build the solution again.
Step 7: Execute the Program
Once you have no compile errors, to execute or run your program, either:
click Debug on the menu bar, and then Start Debugging;
click the right arrow icon on the menu bar; or press the F5 key.
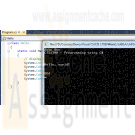
Step 8: Capture the Output
Print a picture of your screen output. (Do a print screen and paste this into your MS Word document.)
Step 9: Print the Source Code
Copy your source code and paste it into your Word document.
End of Part APart B: Calculate Total Tickets
Step 1: Create New Project
Make sure you close your previous program by clicking File >> Close Solution. Now, create a new project and name it LAB1B.
Step 2: Type in Program
Like before, delete the code that is automatically created and enter the following program. Type in your name for Developer and current date for Date Written.
// ---------------------------------------------------------------
// Programming Assignment: LAB1B
// Developer: ______________________
// Date Written: ______________________
// Purpose: Ticket Calculation Program
// ---------------------------------------------------------------
using System;
class FirstOutputWithUsing
{
static void Main()
{
// create variables and load values
int childTkts, adultTkts, totalTkts;
childTkts = 3;
adultTkts = 2;
// process (calculation)
totalTkts = childTkts + adultTkts;
// display output
Console.WriteLine(totalTkts);
// pause
Console.Write("\nPress Enter to continue...");
Console.ReadLine();
}
}
Step 3: Save Program
Save your program by clicking File on the menu bar and then clicking Save Program.cs, or by clicking the Savebutton on the toolbar or Ctrl + S.
Step 4: Build Solution
To compile the program, click Build on the menu bar and then click the Build Solution or Build LabB option. You should receive no error messages. If you see some error messages, check the code above to make sure you didn't key in something wrong. Once you make your corrections to the code, go ahead and click Build >> Build Solution again.
Step 5: Execute the Program
Once you have no syntax errors, to execute or run your program, click Debug on the menu bar and then clickStart Debugging.
Step 6: Comment the Program
Go back to the editor and insert meaningful comments that show that you understand what each line of code does.
Step 7: Capture the Output
1. Run the program again.
2. Capture a screen print of your output. (Do a PRINT SCREEN and paste into your MS Word document.)
3. Copy your commented code and paste it into your document
End of Part BPart C: Payroll Program
Step 1: Create a New Project
1. Make sure you close your previous program by clicking File >> Close Solution.
2. Create a new project and name it LAB1C.
3. This time, do not delete the code that gets automatically created. Instead, insert your code right between the curly braces, as illustrated below.
static void Main(string [] Args)
{
// your code goes here!
}
Include a comment box like what you coded in Part B at the very top of your program.
Step 1a: Write Your Own Program
Write a program that calculates and displays the take-home pay for a commissioned sales employee after deductions are taken. The employee receives 7% of his or her total sales as his or her gross pay. His or her federal tax rate is 18%. He or she contributes 10% to his or her retirement program and 6% to Social Security. Use the Processing Logic provided in Step 2 below as a guide. The program's output should look something like this:
Enter weekly sales: 28,000
Total sales: $28,000.00
Gross pay (7%): $1,960.00
Federal tax paid: $352.80
Social security paid: $117.60
Retirement contribution: $196.00
Total deductions: $666.40
Take home pay: $1,293.60
Press any key to continue.Step 2: Processing Logic
Basic Logic and Flowchart
Input: Prompt the user for the weekly sales.
Process: Perform the calculations. The employee receives 7% of his or her total sales as his or her gross pay. His or her federal tax rate is 18%. He or she contributes 10% to his or her retirement program and 6% to Social Security.
Output: Display the results.
Pseudocode:
1. Declare variables
2. Accept Input – weeklySales
3. Calculate Gross Pay = Weekly Sales * .07
4. Calculate Federal Tax = Gross Pay * .18
5. Calculate Social Security = Gross Pay * .06
6. Calculate Retirement = Gross Pay * .10
7. Calculate Total Deductions = Federal Tax + Social Security + Retirement
8. Calculate Total Take Home Pay = Gross Pay – Total Deductions
9. Display the following on separate lines and format variables with $ and decimal
1. Total Sales Amount: value of weekly sales
2. Gross Pay (.07): value of gross pay
3. Federal Tax paid (.18): value of federal tax
4. Social Security paid (.06): value of social security
5. Retirement contribution (.10): value of retirement
6. Total Deductions: value of total deductions
7. Take Home Pay: value of take home payStep 3: Save Program
Save your program by clicking File on the menu bar and then clicking Save Program.cs, or by clicking the Savebutton on the toolbar or Ctrl + S.Step 4: Build Solution
To compile the program, click Debug on the menu bar and then click the Build Solution or Build LabCoption. You should receive no error messages. If you see some error messages, check the code above to make sure you didn't key in something wrong. Double-click on an error to navigate to its location in the code. Once you make your corrections to the code, go ahead and click Debug >> Build Solution again.Step 5: Execute the Program
Once you have no syntax errors, to execute or run your program, click Debug on the menu bar and then clickStart Debugging, or press the right arrow icon or the F5 key.Step 6: Capture the Output
1. Capture a screen print of your output. (Do a PRINT SCREEN and paste into your MS Word document.)
2. Copy your commented code and paste it into the Word document.
End of Part C
END OF LABAfter you have completed your lab, complete the following for each part of the lab (if there are multiple parts).
Learn More
1. Capture a screen print of your output. (Do a PRINT SCREEN and paste into an MS Word document.)
2. Copy your code and paste it into the same MS Word document that contains the screen print of your output.
3. Save the Word document as CIS170B_Lab01_B_LastName_FirstInitial.docx.
4. Upload all three projects folder and save the compressed file as CIS170B_Lab01_B_LastName_FirstInitial.Zip.
5. Submit both the compressed project file and the Word document to the weekly Dropbox for this lab.
Zipping and Submitting Your Project Files
When you submit your project files, you will want to send the entire project folder that is created by MS Visual Studio when you create the project, along with your MS Word file. Use your favorite compression tool to zip the full contents of both projects, zip the single zip file, and submit the zip file to your Dropbox. -

CIS 170 Week 3 iLab 3 of 7 Looping DIVE Scoring Program
$15.00CIS 170 Week 3 iLab 3 of 7 Looping DIVE Scoring Program
DIVE Scoring Program
Your mission: The state diving commission wants to computerize the scoring at its diving competitions. You've been hired to write a program to automate the scoring of dives. Following are the requirements for the program.
After each dive, the user will be prompted to enter the:
diver's name
diver's city
degree of difficulty (ranges from 1.00 to 1.67); and scores from five judges (scores can range from 0 to 10).
If an invalid score is entered, an error message will be displayed. The user will be prompted for the score repeatedly until a valid score is entered.
The program will then display the following information:
Diver's name
Diver's city
Dive final score: This is calculated by dropping the highest and lowest of the five judges' scores. The remaining three scores are added together, and the result is divided by 3 and then multiplied by the degree of difficulty.
The program will then prompt the user if she/he wants to process another dive. The user can type "Y" or "y" to continue, and "N" or "n" to quit.
Sample output:
Diver's name: Sue Jones
Diver's city: Dallas
Dive degree of difficulty: 1.9
Invalid degree of difficulty - Please reenter (Valid Range: 1 - 1.67)
Dive degree of difficulty: 2
Invalid degree of difficulty - Please reenter (Valid Range: 1 - 1.67)
Dive degree of difficulty: 1.2
Judge #1 score: 45
Invalid score - Please reenter (Valid Range: 0 - 10)
Judge #1 score: 3
Judge #2 score: 4.5
Judge #3 score 6.7
Judge #4 score 89
Invalid score - Please reenter (Valid Range: 0 - 10)
Judge #4 score 8
Judge #5 score: 9.2
Diver: Sue Jones
City: Dallas
Dive score: 7.68
Do you want to process another dive (Y/N)? y
Diver's name: Dave Smith
Diver's city: Houston
Dive degree of difficulty: 1.1
Judge #1 score: 5.7
Judge #2 score: 6.8
Judge #3 score:: 7.6
Judge #4 score: 8.7
Judge #5 score: 6.7
Diver: Dave Smith
City: Houston
Dive score: 7.74
Do you want to process another diver (Y/N)? NTips
Learn More
Best practice: Note that a good way to implement the code is to write a first version for only a single dive without validating input. Put yourself in the place of the program. What steps would you personally need to perform in order to process a single dive yourself? Write out those steps on paper as pseudocode and/or in Visual Studio as C# comments, and then implement them one by one, testing as you go. After you have a single dive process working, implement one of the input validations, or the outer loop that repeats the whole process. Whichever you choose, remember to not write too much at one time. Always add and test functionality incrementally!
Pseudocode: Although there are several valid ways to write the program, the following is an outline of one way to design the overall logic.
Declare and initialize variables: name, city, judge score, highest score, lowest score, total score
Loop while there are dives to process
Get diver's name and city
Get degree of difficulty
Loop to validate input
End Loop
Loop five times to get judges' scores
Loop to Validate input
End Loop
Update highest and lowest scores if need be
Add score to total score
End Loop Calculate the final score (subtract highest and lowest scores from total score, divide by 3, multiply by degree of difficulty) Display the diver's information and final dive score Prompt the user if he or she wants to process another dive
End-Loop -

CIS 170 Week 4 iLab 4 of 7 Methods Phone Dialing Program
$15.00CIS 170 Week 4 iLab 4 of 7 Methods Phone Dialing Program
Scenario/Summary
You will code, build, and execute a program that simulates the dialing of a phone using methods.Phone Dialing Program
Your mission: A prepaid phone service needs a program that converts alphanumeric keyboard input into a phone number. The user will input eight characters and the program will output either an error message or the translated seven-digit phone number. The input may contain digits, letters, or both. Letters can be uppercase or lowercase.
The program will perform the conversion per a standard telephone keypad layout.
0
1
2
A B C
3
D E F
4
G H I
5
J K L
6
M N O
7
P Q R S
8
T U V
9
W X Y ZThe program implements the following methods.
Main(): Declares seven character variables and passes these to the following methods by reference:
ProcessInput(): gets user input and performs the conversion
ShowResults(): displays the results
GetInput(): Gets seven characters from the user and stores them into the seven variables Main() has passed by reference.
ProcessInput(): Calls ToDigit() for each, passing each character variable by reference, and returns one of these codes to Main() by value:
0 if there were no input errors
-1 if there were input errorsInput errors include the following:
The first character is 0 (seven-digit phone numbers can't start with 0).
The first three characters are "555" (no phone numbers start with 555).
Any character is not a digit or an uppercase or lowercase letter.
ToDigit(): Converts a character (passed by reference) to its corresponding digit per the table above, and returns one of these codes to ProcessInput() by value:
0 if the character is valid (a digit or uppercase or lowercase letter)
-1 if the character is not valid
ShowResults(): Writes converted telephone number to the screen, inserting a dash (-) between the third and fourth digits, and accepts the seven character variables from Main() by reference.Sample Output:
Enter a 7 character phone number: 2132121
The converted phone number is: 213-2121
Enter a 7 character phone number: 2scdfER
The converted phone number is: 272-3337
Enter a 7 character phone number: 555resw
Invalid input, please try again.
Enter a 7 character phone number: 0988765
Invalid input, please try again.
Enter a 7 character phone number: 12345678
Invalid input, please try again.
Enter a 7 character phone number: @34*uy
Invalid input, please try again.Tips
Best practice: Don't try to write too much at a time! First, write an outline in comments based on the requirements and the pseudocode. Then, implement declaring seven char variables. Make sure to fix any compiler errors before implementing more. Then, write and call an empty GetInput() method that accepts parameters, but does nothing but return a dummy value. Make sure you can pass the seven character variables by reference without compiler errors before implementing any of the GetInput() logic. Keep working incrementally like this, testing as you go. Set breakpoints and use the debugger at each phase to make sure your logic is working correctly. Then, use the same approach to implement the other methods. Test each phase with valid input before handling any invalid conditions.Pseudocode
ProcessInput( ) Method
Get 7 characters from the user and store them in the 7 variables that Main() has passed by reference
Call ToDigit() for each of the 7 characters
If toDigit returns an error code (-1), return an error code (-1)
If the first character is 0, return an error code (-1) to Main()
If the first three characters are 555, return an error code (-1)
If there are no errors, return 0
ToDigit ( ) Method
Convert the characters (passed from ProcessInput() by reference) to upper case
Use a switch statement to translate characters into their corresponding digits.
Write a case statement for each digit and for each valid uppercase letter
Write a default case that returns an error code (-1) for invalid letters
If there are no invalid letters, return 0
ShowResults ( ) Method
Display the Phone Number using the character variables Main() has passed by reference
Main() Method
Declare 7 char variables
Get user input by calling the GetInput() method, passing it the 7 variables by reference
Perform the conversion by calling the ProcessInput( ) method, passing it the 7 variables by reference
Display an error message or call ShowResults(), depending on the code ProcessInput() returnsEND OF LAB
Learn More -
Clearly Visual Basic 2010 Chapter 10 Exercise 9 Carlton Solution
$15.00Clearly Visual Basic 2010 Chapter 10 Exercise 9 Carlton Solution
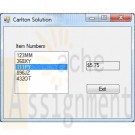
Carlton Industries stores the item numbers and prices of the items it sells in a sequential access file named ItemInfo.txt. The company's sales manager wants an application that displays the price corresponding to the item selected in a list box.
a. Create a Visual Basic Windows application. Use the following names for the solution, project, and form file, respectively: Carlton Solution, Carlton Project, and Main Form.vb. Create the interface shown in Figure 10-46.
b. Use Windows to copy the ItemInfo.txt file from the VB2010\Chap 10 folder to the project's bin\Debug folder. Open the Code Editor window and then open the ItemInfo.txt file contained in the project's bin\Debug folder. Each line contains an item's number followed by a comma and the price. Close the ItemInfo.txt window.
c. Define a structure named item. The structure should contain two member variables: a String variable to store the item number and a Decimal variable to store the price.
d. Declare a class-level array that contains five Item structure variables.
e. Code the form's Load event procedure so that it reads the item numbers and prices from the ItemInfo.txt file. The procedure should store the item numbers and prices in the class-level array. It also should add the item numbers to the list box.
f. When the user selects an item in the list box, the item?s price should appear in the lblPrice control. Code the appropriate procedure.
g. Save the solution and then start and test the application. Close the Code Editor window and then close the solution.
Learn More -

Midterm Exam Track Order and Video Bonanza Project
$15.00Midterm Exam Track Order and Video Bonanza Project
Question One:
Modify your work from midterm project to keep track of each order item in an array. You will then include all the ordered items in the summary. Remove the module level summary variables from the form and loop through the array when totaling the order.Create an array of a structure, which holds the description, quantity, sales price, and extended price (the quantity times the sales price). As each purchase item is added to the order, store the information in the structure array then update the summary text box to reflect the newly ordered item.
Test Data Output
Jane Smith
123 Someplace
Anywhere, CA 99999Quantity - Description @ Price = Extended Price
2 - Deluxe Cooler @ 68.00 = $136.00
1 - Axe @ 5.00 = $5.00Subtotal: $141.00
Shipping: 10.95
Total: $151.95Question Two:
Create a project for Video Bonanza to view a list of Movies. Use a dropdown list box for the movie categories. When a category is selected, display a list of released movie titles in a second list box titled Movie List. Using either buttons or a menu allow the user to display a count of the number of movie titles for the selected category.The category list will have these categories: All, Comedy, Drama, Action, Sci-Fi, Horror, and New Releases. Do not sort the category list. When the program begins, the All movies category will be selected and the Movie List listbox (which is sorted) will display all the movies. When a category is selected, clear the movie titles list box and fill it with only the movies for that category (hint: use the SelectedIndexChanged event).
Use a two dimensional array to store the movies by category. The movies by category are:
Comedy:
Mrs. Housefire
Twister Act
Home by YourselfDrama:
Dancing With FoolsAction:
A Dependent's Pay
Home and AroundSci-Fi:
Jura's ParkHorror:
Ghost ManNew Releases:
Women in White
An American ResidentFor the report display all the movie titles by category and output it in the Print Preview dialog box
Learn More -

Visual Basic 2010 How to Program Deitel Credit Checker Application
$12.00Visual Basic 2010 How to Program Deitel Credit Checker Application
4.12 (Credit Checker Application) Develop an application (as shown in Fig. 4.24) that determines whether a department-store customer has exceeded the credit limit on a charge account. Each customer enters an account number (an Integer), a balance at the beginning of the month (a Double), the total of all items charged this month (a Double), the total of all credits applied to the customer's account this month (a Double), and the customer's allowed credit limit (a Double). The application should input each of these facts, calculate the new balance (= beginning balance credits + charges), display the new balance and determine whether the new balance exceeds the customer's credit limit. You can use the format "{0:C}" with String method Format, to format the result as currency (see Fig. 4.24). If the customer's credit limit is exceeded, display a message (in messageLabel at the bottom of the Form) informing the customer of this fact; otherwise, display the customer's remaining credit amount. If the user presses the Clear Fields Button, the application should clear the TextBoxes and Labels. [Note: In the next chapter, we'll introduce the data type Decimal for financial calculations.]
Learn More -

Calculate Garage Parking Charges C# Program
$10.00Calculate Garage Parking Charges C# Program
A parking garage charges a $2.00 minimum fee to park for up to three hours and an additional $0.50 per hour for each hour or part thereof over three hours. The maximum charge for any given 24-hour period is $10.00. Assume that no car parks for longer than 24 hours at a time. Write a program that will calculate and print the parking charges for each of three customers who parked their cars in this garage yesterday. You should enter the hours parked for each customer.
Your program should print the results in a neat tabular format, and should calculate and print the total of yesterday's receipts. The program should use the
function calculateCharges to determine the charge for each customer.Your outputs should appear in the following format:
Learn More
Car Hours Charge
1 1.5 2.00
2 4.0 2.50
3 24.0 10.00
TOTAL 29.5 14.50 -

CIS247A Week 6 Lab Abstract Classes
$15.00CIS247A Week 6 Lab Abstract Classes
Scenario and Summary
The objective of the lab is to take the UML Class diagram and enhance last week's Employee class by making the following changes:
1. Convert the Employee class to an abstract class
2. Add an abstract method called CalculateNetPay to the Employee class
3. In both the Salaried and Hourly classes implement the CalculateNetPay methodSTEP 1: Understand the UML Diagram
Analyse and understand the object UML diagram, which models the structure of the program.
• The Employee class has been specified as abstract, which is denoted by the name of the class being initialized Employee
• The Employee class as a new method CalculateNetPay which is an abstract method, denoted by the italized name of the method. Since this method is an abstract method the CalculateNetPay method WILL NOT have an implementation in the Employee class.
• The Salaried and Hourly classes both have a new method CalculateNetPay that is inherited from the abstract Employee class and the Salaried and Hourly class both MUST implement the CalculateNetPay method.STEP 2: Create the Project
You will want to use the Week 5 project as the starting point for the lab. Use the directions from the previous weeks labs to create the project and the folders.
1. Create a new project named "CIS247_WK4_Lab_LASTNAME". An empty project will then be created.
2. Delete the default Program.cs file that is created.
3. Add the Logic Tier, Presentation Tier, and Utilities folders to your project
4. Add the Week 5 project files to the appropriates folders.
5. Update the program information in the ApplicationUtilities.DisplayApplicationInformation method to reflect your name, current lab, and program description.
Note: as an alternative you can open up the Week 5 project and make modifications to the existing project. Remember, there is a copy of your project in the zip file you submitted for grading.
Before attempting this week's steps ensure that the Week 5 project is error free.STEP 3: Modify the Employee Class
1. Modify the class declaration of the Employee class to specify that the Employee class is an abstract class
2. Declare an abstract method called CalculateNetPay that returns a double value.
3. Modify the ToString Method to include the weekly net pay in currency format.STEP 4: Modify the Salaried Class
1. Add a double constant called TAX_RATE and set the value to .73
2. Implement the CalculateNetPay method by multiplying the weekly pay by the tax rate.STEP 5: Modify the Hourly Class
1. Add a double constant called TAX_RATE and set the value to .82
2. Implement the CalculateNetPay method by multiplying the weekly pay by the tax rate.STEP 6: Create the Main Program
1. Change the employeeList array to only hold two objects.
2. Create one Hourly employee object and store it in the array.
3. Create one Salaried employee object and store it in the array.
4. As you did in the Week 5 lab, prompt for and collect the information for each of the objects.
Note: iterating through the array should not require any changes from the previous iteration of the project--but make sure that the loop stays within the bounds of the array.STEP 7: Compile and Test
When done, compile and run your program.
Then debug any errors until your code is error-free.
Check your output to ensure that you have the desired output and modify your code as necessary and rebuild.The output of your program should resemble the following:
Learn More -

CIS247A Week 7 Lab The Abstract Racer Inheritance Hierarchy Program
$15.00CIS247A Week 7 Lab The Abstract Racer Inheritance Hierarchy Program
Scenario and Summary
This week, you will be implementing inheritance by creating a generic Racer base class along with two derived classes called StreetTuner and HotRod. You will make the Racer class abstract and include the abstract method IsDead() in the Racer class.STEP 1: Understand the UML Diagram
The UML diagram four classes defined (1) Racer, (2) Engine, (3) Hot Rod, and (4) StreetTuner classes.The Racer class is the base parent abstract class of the Hot Rod and Street Tuner classes, which is represented by a directed line from the Hot Rod and Street Tuner classes to the Racer class and the end of the line touching the Racer class is a broad, unfilled arrow head. The racer class contains a engine object, which is represented by a directed line from the engine class to the Racer class, with a filled diamond touching the racer class, this line is labeled as a 1 to 1 relationship meaning that each racer object will contain one engine object and each engine is related to a single racer object.
The class's attributes and methods are defined in separate class diagrams, and each class diagram is represented by a rectangular box subdivided into three vertically separated rectangular sub-sections. The top section contains the class name, the middle section contains the class attributes, and the bottom section contains the class methods.
STEP 2: Build the Inheritance Hierarchy
1. Create a project called "CIS247_WK7_Lab_LASTNAME".
2. Build the class structure shown in the UML diagram. Remember to include properties for each class attribute.STEP 3: Implement the Logic for the HotRod Class
1. Provide suitable logic for the ToString method. As always, the ToString method should reveal the state of an object.
2. For the IsDead() method in HotRod, use the logic to implement the base class abstract IsDead method.
Hint: To generate a random number, use the following code, which returns a random number from 0 to 1:
Random rnd = new Random();
rnd.NextDouble();
Pseudocode for the IsDead method of HotRod
Random rnd = new Random();
boolean deadif (speed > 50 && rnd.NextDouble() > 0.6)
if (engineHorsePower < 300 && blower=true)
dead = false
else
dead = true
end if
else if (speed > 100 && rnd.NextDouble() > 0.4)
if (engineHorsePower >= 300 && blower = true)
dead = true
else
dead = false
end if
else
dead = false
end ifSTEP 4: Implement the logic for the StreetTurner class
1. Provide suitable logic for the ToString method. As always, the ToString method should reveal the state of an object.
2. For the IsDead method in StreetTurner, use the logic below to implement the inherited abstract base class method called IsDead.
Pseudocode for the IsDead method of StreetTuner
Random rnd = new Random();
boolean dead
if (speed > 50 && rnd.NextDouble() > 0.6)
if (engineHorsePower < 300 && nitrous=true)
dead = false
else
dead = true
end if
else if (speed > 100 && rnd.NextDouble() > 0.4)
if (engineHorsePower >= 300 && nitrous = true)
dead = true
else
dead = false
end if
else
dead = false
end ifSTEP5: Construct the Main Program
1. Create an array of Racer objects that will hold two Racer objects.
2. Write a method called CollectRacerInformation that accepts as an argument a Racer object, and then prompts the user to provide the following information for each racer:
a. Racer name;
b. Racer Speed;
c. Number of cylinders in the racer's engine;
d. Horsepower of the racer's engine; and
e. Nitrus or blower option, depending on the type of Racer object.
[Hint: In order to be able to collect all information for the derived classes as well, consider creating a base class method called ReadRacerData in the Racer class, which you will then override in the derived classes to capture the required info per class. Call the ReadRacerData method within the CollectRacerInformation method.]
3. Write a method called "DisplayRacerInformation" that accepts as an argument a Racer object, and then displays all of the information for the specific racer type.
4. Create a racer object of each type, and invoke the CollectRacerInformation passing in the Racer object. Then, store each object in the array.
5. Iterate through the Racer array list and, for each Racer, display all of the Racer's attribute information (call the DisplayRacerInformation method for each object). Don’t forget to indicate whether or not the Racer is dead!STEP 6: Compile and Test
Learn More
When done, compile and run your program.
Then, debug any errors until your code is error-free.
Check your output to ensure that you have the desired output and modify your code as necessary and rebuild. Your code may resemble the following:
Welcome the Abstract RAcer Inheritance Hierarchy Program
CIS247, Week 7 Lab
Name: Solution
This Program test an Anstract Racer Inheritance hierarchy
**************** Collecting Racer's Basic Data ****************
Enter racer's name: Fast One
Enter racer's speed: 345
Enter number of cylinders in racer's engine: 20
Enter horsepower of racer's engine: 250
Enter nitrus option (Y/N): Y
**************** Collecting Racer's Basic Data ****************
Enter racer's name: Lightning
Enter racer's speed: 380
Enter number of cylinders in racer's engine: 16
Enter horsepower or racer's engine: 275
Enter blower option (Y/N): Y
**************** Display Racer's Data ****************
Racer's Name : Fast One
Racer's Speed : 345
Engine Cylinders : 20
Engine Horsepower : 250
Racer's Type : STREET TUNER
With Nitrus Option : Yes
Still Working? : Yes!
**************** Display Racer's Data ****************
Racer's Name : Lightning
Racer's Speed : 380
Engine Cylinders : 16
Engine Horsepower : 275
Racer's Type : HOT ROD
With Nitrus Option : Yes
Still Working? : Yes!
Thank you for using the Abstract Racer Inheritance Hierarchy -
CMIS 320 Lab 2 Homework 2 Data modeling and Sample database
$15.00CMIS 320 Lab 2 Homework 2 Data modeling and Sample database
Homework Submission Requirements:
Homework should be submitted as an attached file in your assignment folder. text for coding and result of execution and MS Word format for documenting are preferred. Data modeling diagram could be copied and pasted into a Word doc.
You must name your file to include your first initial of your first name and last name.
Part I is 4 points and Part II is 1 points. Total is 5. Quiz is not required for grading.Part I Data Modeling
For each of the following descriptions:
a. A piano manufacturer wants to track all pianos it makes. Each piano has a unique serial number and a manufacturing completion date. Each instrument represents exactly one piano model, all of which have an identification number and model. The company produces thousands of pianos of a certain model, and the design is specified before any single piano exists.
b. A vendor builds multiple types of tablet computers. Each has a type identification number and a name. The key specifications for each type include amount of storage and display type. The company uses multiple processor types, exactly one of which is used for a specific tablet type. The same processor can be used in multiple types of tablets. Each processor has a manufacturer and a manufacturer's unique code that identifies it.
perform the following tasks:
1. Identify the degree and cardinalities of the relationship.
2. Express the relationships graphically with an E-R diagram.
Document your work into a single, well-organized, well-written word document and submit no later than due date.Part II Lab 2
In lab 2, you will learn how to run a SQL script to create a sample database in your schema in NOVA Oracle database. You also start to learn simple SQL commands, such as select and insertClick here to open Lab 2 instruction page
This part of lab is to learn to run a SQL script on NOVA Oracle database server, and spool screen output to a text file. These techniques will be used when you work on your project 1 and 2. Download script file. This is sql script file containing completed sql commands to create tables and constraints and populate data to each table. The database you create is called JustLee Book Store. The code should be bug free.
Learn More
Download lab2.sql script
Start spool command and run the script:
Log on NOVA, make a dir named scripts using command mkdir scripts
Then cd to newly created script directory
Upload your script to scripts directory using FTP
(I downloaded a free FTP client CORE FTP LE) and use it to upload and download file)
Now you have a newly create dir and your script is uploaded. You are ready to run your script.
Using SQL*Plus, log on NOVA Oracle database with your account
At SQL prompt,Type the following command to turn on spool function: SQL>spool spool01.lst
spool01.lst is the spool file name
Then use this command to run the script: SQL>@lab2.sql
The command will execute all the SQL commands inside the script and output will be spooled to spool01.lst
In the script, there are drop table statement as well. When first run, these commands will fail because the tables are not created yet.
You can run the script multiple times without any problems.
When you finish the execution, issue command SQL>spool off
This command will end spool function and save output to the file you defined
When you have done all of these. Use FTP get spool01.lst to your local computer and submit it as part of homework 2
You should know how to perform the following tasks using sqlplus on NOVA Oracle database after you complete this lab:
Using FTP to upload or download a file (scripts...)
Using sqlplus to log on to NOVA Oracle database
Using sqlplus command, spool to output screen output to a text file and transfer the file back to your local PC.
Understand the steps taken place when you perform FTP file transfer and Spooling your output.
Test the database you create and learn SQL queries.
You need to spool the execution results of the following commands.
Do a database query: select table_name from user_tables; USER_TABLES is a database system view that allow users to see the tables they created in their own schema.
You should be able to list the tables you just created
use this query: select * from "table_name from the above query"; you can retrieve the data in these tables one a time
use this query: select count(*) from "table_name from the above query"; you can retrieve the record counts in these tables one a time
Use SQL*Plus command "desc books" to check columns and their datatypes. And insert one record into the table. Use SQL command "commit" to save the record into your database.
When you have done all of these. Use FTP get spooled file to your local computer and submit it as part of homework 2

You have no items in your shopping cart.
