Search results for 'DBM 460'
-
DBM 405 Lab 2 Simple PL/SQL Applications Advanced Database Oracle
$20.00DBM 405 Lab 2 Simple PL/SQL Applications Advanced Database Oracle
Learn More
Scenario/Summary
The purpose of this week's lab is to work with basic PL/SQL syntax to create an anonymous block of code. In the lab, you will be using SQL*Plus to modify one of the tables in the MovieRental schema and then write a simple block of code to update the table with some new data and then execute the code in SQL*Plus. As an additional task in the lab, you will be asked to modify the existing PL/SQL block of code given to you to add exception handling and then execute it in SQL*Plus. Both of these concepts will help enforce the material covered in this second week.
For the lab, you will need to create a script file containing the PL/SQL code that will address the lab steps below. Run the script file in your SQL*Plus session using the SET ECHO ON session command at the beginning to capture both the PL/SQL block code and output from Oracle after the block of code has executed. To successfully test the code in Step 3, you will need to copy/paste your code into SQL*Plus for each movie ID as you change the value for the host variable. Spool your output to a file named with your last name plus lab 2 and give the file a text (.txt) extension. For example, if your last name was Johnson then the file would be named johnson_lab2.txt. Submit both the spooled output AND the script file for grading of the lab.
LAB STEP
Step 1:
As business is becoming strong and the movie stock is growing for More Movie Rentals, the manager wants to do more inventory evaluations. One item of interest concerns any movie for which the company is holding $75 or more in value. The manager wants to focus on these movies in regards to their revenue generation to ensure the stock level is warranted. To make these stock queries more efficient, the application team decides that a column should be added to the MM_MOVIE table named STK_FLAG that will hold a value '*' if stock is $75 or more. Otherwise, the value should be NULL. Add the new column to the MM_MOVIE table as a CHAR data type.
Execute a DESC MM_MOVIE on the table both before you add the new column and after the column is added.
Note: Since this is code will be in your script file, you will need to comment it out after the first time you have execute the ALTER TABLE statement successfully to avoid getting errors each additional time your script file is run.
Step 2:
Create an anonymous block of PL/SQL code that contains a CURSOR FOR loop to accomplish the task described above in Step 1. Your loop will need to interrogate the value (using an IF statement) found in the movie_qty field of the cursor loop variable to see if it is >= 75. If this is true then you will need to update the new column in the table with an '*' WHERE CURRENT OF the table. If the quantity is not >= 75 (the ELSE side of the IF statement) then update the new column with a NULL.
Execute a SELECT * from MM_MOVIE both before and after you execute the new PL/SQL block of code to show that the process works.
Step 3:
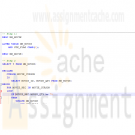
Here is a block that retrieves the movie title and rental count based on a movie ID provided via a host variable.
SET SERVEROUTPUT ON
VARIABLE g_movie_id NUMBER
BEGIN
:g_movie_id := 4;
END;
/
DECLARE
v_count NUMBER;
v_title mm_movie.movie_title%TYPE;
BEGIN
SELECT m.movie_title, COUNT(r.rental_id)
INTO v_title, v_count
FROM mm_movie m, mm_rental r
WHERE m.movie_id = r.movie_id
AND m.movie_id = :g_movie_id
GROUP BY m.movie_title;
DBMS_OUTPUT.PUT_LINE(v_title || ': ' || v_count);
END;
/
Modify the block of code to add exception handlers for errors that you can and cannot anticipate. You will need to execute the entire code listing shown above each time you wish to test it by changing the value of :g_movie_id for each test.
Once finished, test your exception handling by running the modified block for the following values of :g_movie_id. Be sure that you can capture the value in the :g_movie_id host variable.
• 12 - normal output will display title and number of rentals
• 13 - exception - there is no movie ID for 13
• 1 - exception - Movie with ID 1 has never been rented
This concludes the Lab for Week 2. -

DBM 405 Lab 7 Study Case Front-End GUI
$20.00DBM 405 Lab 7 Study Case front-end GUI
Learn More
Scenario/Summary
The More Movies company has hired you to redesign a database system for them that can facilitate the process of renting out and returning movies.
They already have an Oracle database that stores information about movies, members who rent the movies, and the rentals. This is the database that you already have become familiar with and the one which includes tables: MM_MOVIE, MM_MOVIE_TYPE, MM_MEMBER, MM_RENTAL, and MM_PAY_TYPE. The machine on which this database is running has both the server and client Oracle9i software installed on it. Every night, a clerk updates data to account for the day's activities, and periodically the reports are run to summarize business, show renting trends, etc. Access to the database is accomplished using a SQL*Plus environment that is very similar to the iSQL*Plus that you know from the previous database course. This business process worked okay for as long as More Movies stayed a very small business.
However, the company has grown substantially, expanding its operations to more movie selection and more members, and consequently, it has moved to a larger location. It occupies a two-story shop now. It became very impractical to record rentals at the end of the day. They also do not want to rely on clerks knowing any SQL programming in order to record updates and run reports.
In short, there is a need for a more convenient database system. The machine on which the database is currently running is powerful enough to host the database server. The database should be accessible from four checkout stations that process renting out and returning movies. This system should have an easy-to-use graphical user interface access.
For the lab, you will be creating several documents to be submitted for the lab. Be sure that you save the documents with your last name and lab7 in the file name. Place all documents into a single ZIP file and submit for grading.
LAB STEP
Step 1:
Describe what software you propose to use to develop the front-end GUI application for the new system. Be sure to justify your choice. Keep in mind portability, ease of use, scalability, and ability to update. What other options have you considered?
Step 2:
In setting up the servers and environment, do you propose to use middleware? If so, what kind, and where would you deploy it?
Step 3:
Provide a system diagram of the proposed system. Be sure to include such things as servers (application and database), user clients, and any other special pieces to the puzzle that you might think of.
Step 4:
Provide a detailed design of the GUI screen that facilitates renting out and returning movies. For every button, or other component that provides reaction to user's events, give detailed pseudocode. Also, clearly indicate where you would use any of the PL/SQL code that you developed for the labs in this course. If the application platform you have selected does not support PL/SQL then describe how you would take the processing developed in the procedures and functions and incorporate it into the system.
This concludes the Lab for Week 7. -
CMIS 420 Homework Assignment 3 Advanced Relational Database Concepts and Applications
$20.00CMIS 420 Homework Assignment 3 Advanced Relational Database Concepts and Applications
Learn More
Homework Task 1:
Create a PL/SQL block to complete the followings.
Output the cheapest movie information. You can use the view you created in project 1 - task 1
In your block, referential type should be used to receive the cursor return.
Use DBMS_OUTPUT to output your result.
Possible Exception should be handled in exception handling section. You are not required to use user-defined exception. Use Oracle predefined exception. When exception occurs, you need to output error code and error message.
Spool the output to a text file. Don't forget to use "Set serveroutput on"
Submit your code as .sql file and spooled output
Homework Task 2:
Create a stored procedure based on task 1 with an input parameter movie_id. Modify your cursor to use movie_id to select desired movie information. And execute the procedure and spool the execution result.
Spool the output to a text file. Don't forget to use "set serveroutput on"
Submit your code as .sql file and spooled output
Homework Task 3:
Create a statement trigger on orders table. The trigger fires after updating the table. When the trigger fires one record insert into the following temp table using the insert statement shown below:
Note: you need to create temp_table and its sequence using the following code.
PROMPT creating table temp_table ...............
DROP TABLE temp_table;
CREATE TABLE temp_table
( num_col NUMBER(5) not null primary key,
char_col VARCHAR2(30),
date_col VARCHAR2(30));
PROMPT creating SEQUENCE trigger_seq ...............
DROP SEQUENCE trigger_seq;
CREATE SEQUENCE trigger_seq
START WITH 1
INCREMENT BY 1;
INSERT INTO temp_table (num_col, char_col, date_col)
VALUES (trigger_seq.NEXTVAL, 'After Statement trigger', TO_CHAR(sysdate, 'DD-MON-YYY HH24:MI:SS'));
Submit your code as .sql file
Homework Task 4:
Create a row trigger on order_items table to fire after inserting the data into order_items table. When the trigger fires it inserts a record into temp_table using the following insert statement:
INSERT INTO temp_table (num_col, char_col, date_col)VALUES (trigger_seq.NEXTVAL, 'After Row Trigger', TO_CHAR(sysdate, 'DD-MON-YYY HH24:MI:SS'));
Submit your code as .sql file
Homework Task 5:
Test your triggers.
Update orders table to set total payment to 300. fire statement trigger on orders table.
Insert one record into order_items. Fire row trigger on order_items table.
Query temp_table to get the inserted records for trigger firing.
Spool the output to a text file and submit it. -

ITS407 Module 8 Project Ace Software MySQL Database For Mom and Pop Johnson video store
$25.00ITS407 Module 8 Project Ace Software MySQL Database For Mom and Pop Johnson video store
You are a database consultant with Ace Software, Inc., and have been assigned to develop a database for the Mom and Pop Johnson video store in town. Mom and Pop have been keeping their records of videos and DVDs purchased from distributors and rented to customers in stacks of invoices and piles of rental forms for years. They have finally decided to automate their record keeping with a relational database.
You sit down with Mom and Pop to discuss their business, and watch their operation for about a week. You discover quickly that a video and a DVD are both copies of a movie kept in a separate plastic case that is rented out. They have several copies of each movie they rent, therefore there are several videos and DVDs for each movie title. You learn that in their inventory they have several thousand videos and DVDs, which they get wholesale from about a half dozen distributors. The video and DVD prices to them are based on the quantity of their shipment and the past business they have done with each company.
The price of a DVD for a movie might be different than the price of a video for the same movie, even from the same distributor. Each distributor provides different types of movies (e.g., suspense, horror, mystery, comedy, etc.). A single distributor may provide several different types of movies in both video and DVD format. It is possible to obtain the same movie from multiple distributors and at different wholesale prices.
Each video and DVD has a unique identification number that Mom and Pop assign in their inventory, in addition to the distributor's serial number for the item. Each movie also has a unique identification number Mom and Pop assign in addition to the title and any movie IDs the distributors use in their electronic catalogs. Distributors provide electronic catalogs to Mom and Pop, and the information from these catalogs must be included in the database.
Mom and Pop need to record when a video or DVD is rented, when a video or DVD is returned, and all customer charges such as late and damaged fees, failure to rewind fees, and taxes. They need a report of which videos are returned late because there are standard and late charges. On occasion there are discount prices for certain movies or types of movies. Customers want to rent movies based on actors or actresses, running length, type of movie, rating, year released, the director, and the Academy Awards won (by the movie, the actors, the actresses and/or the directors). Customers also want to know how many videos they have rented in the last month, year, and so forth. Mom and Pop need to keep only basic information on customers in their database, such as name, address, telephone numbers, etc.
There must be no limit to the number of video and/or DVD copies of a movie that Mom and Pop can have in their inventory. Video/DVD ID numbers, movie ID numbers, and distributor ID numbers for videos, DVDs, and movies are all different. Also, each movie must be able to have an unlimited number of actors, actresses, directors, and Academy Awards (i.e., Oscars). Other types of awards (e.g., Golden Globe, People's Choice, etc.) are not of interest for this application. The rental of equipment, sale of videos, DVDs, popcorn, etc., is not to be kept in the database.
1) Identify and describe the entities and their attributes.
2) Develop relationship sentence pairs.
3) Draw an ERD with Visio.
4) Develop metadata from the ERD and document in an Excel spreadsheet.
5) Using your selected RDBMS (SQL Server, Oracle, or MySQL), develop and execute an SQL script file of DDL SQL to create the database tables in the metadata document.
6) Using your selected RDBMS, develop and execute an SQL script file of DML SQL INSERT statements to populate the tables using SQL INSERT statements for at least 5 rows of data per table.
7) Using your selected RDBMS develop and execute an SQL script file to:
a) Show the contents of all tables
b) Retrieve all of the customers' names, account numbers, and addresses (street and zip code only), sorted by account number
c) Retrieve all of the DVDs rented in the last 30 days and sort in chronological rental date order
d) Update a customer name to change their maiden names to married names. You can choose which row to update. Make sure that you use the primary key column in your WHERE clause to affect only a specific row.
e) Delete a specific customer from the database. You can choose which row to delete. Make sure that you use the primary key column in your WHERE clause to affect only a specific row.The metadata should be submitted in an Excel spreadsheet. All other outputs for the database design, SQL code, and SQL results should be submitted in a single Word file in order, by step, and clearly labeled.
Learn More -
DBM 502 WEEK 5 Protecting Database
Regular Price: $15.00
Special Price $12.00
DBM 502 WEEK 5 Protecting Database
Learn More
Password protect the database you created for your individual assignment in Week Three.
Create a CRUD matrix to indicate the permissions (read, insert, delete, modify) you would grant to different users of your database.
Create at least two different users and implement their permissions using SQL statements.
Submit the following deliverables to your instructor:
The command(s) to protect your entire SQL Server database
The matrix (categories of users are rows, categories of data are columns, and R, I, D, and/or M in the cells)
The SQL code for creating logins and 2 specific users from your matrix
The SQL code for granting appropriate permissions to your 2 new users -
WEB460 Lab 1 of 7: Basic ASP Page and Cross-Page Posting
Regular Price: $12.00
Special Price $10.00
WEB460 Lab 1 of 7: Basic ASP Page and Cross-Page Posting
Scenario/Summary
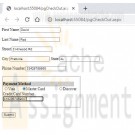
In this week's lab assignment, we'll be developing credit card information checkout pages of an online book store. Such pages are necessary in any developed e-commerce application. In these pages, users are required to enter information related to their payment and shipping options.
We will develop two pages. On the first page, the user provides personal, payment, and shipping information for the order submitted. The second page summarizes the user's input and requires the user to confirm.Learning Objectives
Create an ASP.NET web project in Visual Studio 2010 or Visual Studio 2012.
Create and design ASP.Net web forms.
Cross-page posting in ASP.NET
How to use ASP.NET web server controls (DropDownList, TextBox, RadioButtonList, Label, and Button)
Exception handlingDeliverables
A zip archive of the ASP.NET Application implementing cross-page posting consisting of the following files:
– pgCheckOut.aspx web form with all server controls defined in requirements
– pgCheckOut.aspx.cs with code for cross-page posting
– pgConfirm.aspx web form with all server controls defined in requirements
– pgConfirm.aspx.cs with code for cross-page posting and exception handlingLab Steps
STEP A: Create a New Web Site Project
1. Go to the File menu and select New. From the New sub-menu, select Web Site to create a new Web Site project.
2. In the New Web Site dialog box, select the language you want to use in developing your web application; for our applications choose Visual C#.
3. Select ASP.NET Empty Web Site to create a project with only a web.config file.
4. Then specify the location of your project or website. Note that in ASP.NET, you have the option of creating your website in different locations, whether in any folder on your local file system, on the local IIS server you have on your computer, or on a remote HTTP or FTP server. ASP.NET has an integrated IIS server with the Visual Studio .Net IDE.
I recommend using the default Web Sites folder in the Visual Studio project folder. This allows the development of web applications without the hassle of setting up an IIS server on your computer. If you don't have IIS server installed on your computer, this is the best option to select for your lab.STEP B: Create and Design a New Web Form, pgCheckOut.aspx
1. Add the first web form to the web application by right-clicking on the project name and selecting Add New Item. Name the web form pgCheckOut.aspx.
2. Add the controls in the table below to the form. If desired, you can visually layout the form using HTML and CSS after adding the controls.
The first column in the table shows the data the control represents or their label, the second column is the type of control, and the last column is the ID or name of the actual control. If the Visual Studio web form Toolbox Pane is not displayed, you can show it by going to the View menu and selecting Toolbox. All of these controls can be found in the Toolbox Pane.
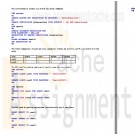
Data or Label Control Type Control ID or Name
First Name TextBox txtFirstName
Last Name TextBox txtLastName
Street TextBox txtStreet
City TextBox txtCity
State TextBox txtState
Payment Method RadioButtonList rblCCType
Credit Card Number TextBox txtCCNumber
Submit Button btnSubmit
Phone Number TextBox txtPhone3. When the user clicks on the submit button, pgConfirm.aspx should be displayed. This is done with cross-page posting. To implement this, set the PostBackUrl property of the Submit button to ~/pgConfirm.aspx. This will cause the pgCheckOut.aspx to post user requests to the web page pgConfirm.aspx, which we will create shortly.
STEP C: Add Code to the pgCheckOut.aspx Form (to Read User Input and Implement Cross-page Posting)
Implement public methods in the pgCheckOut.aspx.cs code file to expose the form's control values to other pages. The code below is an example of how to retrieve the value of the txtFirstName and txtLastName.
Sample Method to Get Control Values
public TextBox FirstName
{ get { return txtFirstName; } }
public TextBox LastName
{ get { return txtLastName; } }STEP D: Create and Design Another Web Form, pgConfirm.aspx
1. Add the second web form to your web application. Name the form pgConfirm.aspx.
2. Add label controls to display the user input values for the name, address, credit card type, and credit card number.
This allows the user to review and confirm order information before final submission. Add the controls in the table below to the form. The application will fill in the text displayed by the labels, so you don't need to. You should provide additional labels that describe these values for the user.
Control Type Control ID or Name Control Purpose
Label lblName Holds the concatenation string of first name and last name entered in pgChekout.aspx
Label lblAddress Holds the concatenation of all address-related fields user input in pgCheckOut.aspx
Label lblCCType Displays the credit card type the user selected in pgCheckOut.aspx
Label lblCCNumber Displays the credit card number the user entered in pgCheckOut.aspx
Label lblStatus Displays the message of any run time exception that might happen during run time
Button btnSubmit When the user clicks on the submit order button, this displays a note to the user that his or her order was submitted successfully. You should use the status label to display the message.STEP E: Add Code to the pgConfirm.aspx Form (to Allow User to Verify Order Input and Submit for Final Processing)
1. In the pgConfirm.aspx page, add the following code to the PreviousPageType directive to the pgConfirm.aspx file, and set it to the pgCheckOut.aspx.
<%@ Page Language="C#" AutoEventWireup=“true" CodeFile="pgConfirm.aspx.cs" Inherits="pgConfirm" %>
<%@ PreviousPageType VirtualPath="~/pgCheckOut.aspx" %>
2. Next, in the Page_Load() event of the pgConfirm.aspx.cs code page, check whether there is any cross-page posting by checking whether there is a cross-page postback, and set the values of the label controls with the corresponding user input values from the previous page as shown below. Be sure to implement for all controls on the form.
3. Enclose your code in a try/catch block to handle any run time exception thrown by the application for any reason, as shown below.
4. Add code to have lblStatus display the message of any thrown exception. Don't forget to add comments explaining what each line of code does.
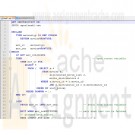
pgConfirm Page_Load method
protected void Page_Load(object sender, EventArgs e)
{
try
{
if (PreviousPage.IsCrossPagePostBack)
{
lblName.Text = PreviousPage.FirstName.Text + " " + PreviousPage.LastName.Text;
// Your code to set other form labels goes here
}
}
catch (Exception error )
{
lblStatus.Text = error.Message;
}
}STEP F: Compile, Test, Save, and Submit Your Project
Learn More
1. Save your work!
2. Test it! Make changes as appropriate until it works.
3. Remember to add comments for each step being performed.
4. Please zip and submit the entire web project folder. -
WEB460 Lab 2 of 7: Creating and Using Master Pages
Regular Price: $12.00
Special Price $10.00
WEB460 Lab 2 of 7: Creating and Using Master Pages
Scenario/Summary
In this Lab, you create a master page for our bookstore website and then modify the checkout and order confirm pages from last week's lab to use the master page.Deliverables
The deliverables for this week's lab are the following:
pgCheckOut.aspx
pgCheckOut.aspx.cs
pgConfirm.aspx
pgConfirm.aspx.cs
Web460Store.master
Web460Store.master.cs
web.config
Please zip and submit the entire web project folder.Lab Steps
STEP A: Create a New Web Site Project
In this step, we set up a new project and copy the files from the Week 1 Lab into it. This allows us to begin our lab this week where we left off last week and to add common elements to both pages.
1. To start this week's project, create a new Empty Web Application project.
2. Copy the four files from last week's Lab into the folder for this new project. Be careful not to move the files. We want to work on a copy of last week's lab and leave the original untouched. The website folder should have the following files:
pgCheckOut.aspx
pgCheckOut.aspx.cs
pgConfirm.aspx
pgConfirm.aspx.cs
web.config
web.Debug.config ( optional: it depends on the version of Visual Studio you are using)
3. Set pgCheckOut.aspx as the start page and test your application. It should perform just as it did last week.STEP B: Create a Master Page
In this step, we add a master page to our project.
1. Right-click on the name of your project and select Add => Add New Item ...
2. Select Master Page as the type of item to add. Be sure that Place code in separate file. is checked.
3. Name the master page Web460Store.master and click OK to create the maser page for our site.STEP C: Design Your Master Page
Our master page contains elements that we want common to all pages on our website, such as the header, the footer, and two side-by-side content areas. We mark areas that content pages can fill with the ContentPlaceHolder tag.
We also want a Label control that our content pages can modify to display messages directed to the user. Making the Label accessible to content pages requires editing the C# code for the master page, which we do in the next step.
1. View the source for Web460Store.master. We first set the title and a content area in the head of the master page. Make any changes necessary to the <head> tag so that it matches the code below:
<head runat="server">
<title>WEB460 Book Store</title>
<asp:ContentPlaceHolder id="HeadPlaceHolder" runat="server">
</asp:ContentPlaceHolder>
</head>
2. Next we create the page template in the <body> of the master page. We use a table to assist with the layout. The first row of the table is the header for our page, displaying the company name and motto. It also contains the Label we will use to send messages to the user. The second table row has two content areas side by side for the website pages to place content and additional controls. The last row of the table is the page footer.
Edit the <body> of your master page so that it looks like the following block of code:
<body>
<form id="form1" runat="server">
<table style="padding: 10px; border: 1px solid black;">
<tr style="background-color:lightcyan; text-align: center;">
<td colspan="2">
<!-- page header -->
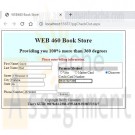
<h1>WEB 460 Book Store</h1>
<h2>Providing you 100% more than 360 degrees</h2>
<!-- Label for content pages to display user message -->
<strong><span style="color:red;">
<asp:Label ID="lblUserFeedBack" Runat="server">Welcome Traveler!</asp:Label>
</span></strong>
</td>
</tr>
<tr style="vertical-align: top;">
<td>
<!-- Left content area -->
<asp:ContentPlaceHolder ID="ContentPlaceHolder1" Runat="server">
</asp:ContentPlaceHolder>
</td>
<td>
<!-- right content area -->
<asp:ContentPlaceHolder ID="ContentPlaceHolder2" Runat="server">
</asp:ContentPlaceHolder>
</td>
</tr>
<tr style="background-color:lightgrey; text-align: center;">
<td colspan="2">
<!-- page footer -->
Copyright DeVry University<br />
<strong>User's GUID:
<asp:Label ID="lblGUID" Runat="server" /></strong>
</td>
</tr>
</table>
</form>
</body>STEP D: Expose the Label Control to Content Pages
In this step, we modify the C# code file for our master page, Web460Store.master.cs, to modify text displayed on the Label controls.
1. We need to establish set properties for the Label lblUserFeedback so that our content pages can change the message displayed to the user. Add the following method to the class Web460Store:
public Label UserFeedBack
{
get { return lblUserFeedBack; }
set { lblUserFeedBack = value; }
}
2. To provide a tool we can use for security in the future, we want to display the user GUID (globally unique identifier) for this page call. We only want to generate the GUID the first time the page is loaded (not on postback). We can accomplish this by adding the following code to the master page's Page_Load method:
if (!Page.IsPostBack)
{
lblGUID.Text = System.Guid.NewGuid().ToString();
}STEP E: Modify pgCheckOut to Use Our Master Page
In this step, we modify pgCheckOut.aspx to use the master page we created earlier. Since the master page contains <head>, <body>, and <form> tags, we do not need those in our content page, so we will be removing them as part of this step. We also must map the content on this page to the ContentPlaceHolder controls on the master page.
1. We begin by adding MasterPageFile="~/Web460Store.master" to the page directive to indicate that this page references our master page:
<%@ Page Language="C#" AutoEventWireup="true" MasterPageFile="~/Web460Store.master" CodeFile="pgCheckOut.aspx.cs" Inherits="pgCheckOut" %>
2. So we have access controls the master page has exposed to us, such as the Label for user feedback. We need to add the following directive next:
<%@ MasterType VirtualPath ="~/Web460Store.master" %>
3. We can then remove the <!DOCTYPE>, <html>, and <head> tags because we will be using the ones defined in the master page. Also remove the <body> and <form> tags, but leave the content.
4. Next we map the body content to the two ContentPlaceHolder controls on the master page. The customer name, address, and phone number should be in the left content area (ContentPlaceHolder1) and the credit card information in the right content area ( ContentPlaceholder2 ). We bracket the content for each with an ASP.NET Content control.
5. Before the Label control for the customer's first name, place the line:
<asp:Content ID="ContentArea1" ContentPlaceHolderID="ContentPlaceHolder1" Runat="Server">
6. Just after the line for the phone number TextBox control, close the first content area with the line:
</asp:Content>
7. On the next line, we begin the second content area the same way as the first begins:
<asp:Content ID="ContentArea2" ContentPlaceHolderID="ContentPlaceHolder2" Runat="Server">
8. We close the second content area at the end of the file, after the submit button:
</asp:Content>
At this point, the pgCheckOut.aspx design view should look similar to the following:STEP F: Update the Master Page User Feedback Label
On pgCheckOut.aspx we want the user to enter billing information. We can modify the master page Label lblUserFeedback by updating the master page's UserFeedBack property we setup earlier. So this happens when the page is loaded, making the Page_Load method in pgCheckOut.aspx.cs look like this:
protected void Page_Load(object sender, EventArgs e)
{
Master.UserFeedBack.Text = "Please enter billing information.";
}STEP G: Modify pgConfirm to Use the Site Master Page
In this step, we transform the confirmation page pgConfirm to use the website master page in a similar way to how we modified pgCheckOut.
First, modify pgConfirm.aspx:
1. Remove unneeded HTML tags and modify the page directives as necessary.
2. The left content area should contain the customer's name and address.
3. The right content area should contain the customer credit card information and the Submit Order button.
4. Remove the status label lblStatus because we will use the master page's user feedback Label.
Then, because we removed lblStatus, we need to modify pgConfirm.aspx.cs:
5. When the page first loads, it should display the user feedback message:
Please confirm your billing information.
6. After the user presses the Submit Order button, the user feedback should be:
Your order has been submitted for processing.
7. If there is an exception thrown by PreviousPage.IsCrossPagePostBack, it should display the message:
Sorry, there was an error processing your request.
When the application is rTuonpning, pgConfirm should appear similar to the following:STEP H: Finalize Your Lab
Learn More
1. Save your work!
2. Test it!
3. Make changes as appropriate until it works.
4. Remember to add comments for each step being performed. -

WEB460 Lab 3 of 7: Adding Data Layer Functionality
Regular Price: $12.00
Special Price $10.00
WEB460 Lab 3 of 7: Adding Data Layer Functionality
Scenario/Summary
For our Lab this week, you will connect to a Microsoft Access database to store, update, and retrieve customer information. Here is an overview of the lab:
Step A: Create a New Web Site Project
Copy files from last week's Lab.
Step B: Add the ClearForm Functionality to pgCheckOut
Add a button and code to clear form fields.
Step C: Create a DataSet and Link It to an Access Database
This step also creates a TableAdapter that can be used in our code.
Step D: Create the clsDataLayer Class to Represent Our Application's Data Layer
Add a data field for the connection and modify the constructor.
Step E: Implement the FindCustomer Functionailty
This and the following two steps require editing three different files and then testing your changes.
Be careful to add the lab code to the correct file each time.
Generally, the parts of these steps are as follows:
– Add a method to the clsDataLayer class.
– Add a click method to pgCheckOut.aspx.cs that calls the method in clsDataLayer.
– Add a button to pgCheckOut.aspx that calls the click method.
Step F: Implement the UpdateCustomer Functionailty
Step G: Implement the InsertCustomer Functionality
Step H: Test and Finalize the Lab
When you have completed and tested the lab, the web form pgCheckOut should look similar to this image:Deliverables
A zip archive of the ASP.NET Web Application directory. It should contain the following files in
addition to your database and dataset files:
– pgCheckOut.aspx **
– pgCheckOut.aspx.cs **
– pgConfirm.aspx
– pgConfirm.aspx.cs
– Web460Store.master
– Web460Store.master.cs
– clsDataLayer.cs **
The files with ** are the ones that should have been modified for this lab.Lab Steps
STEP A: Create a New Web Site Project
1. Create a new Empty Web Site project.
2. Copy the six files from last week's Lab into the folder for this new project. Be careful not to move the files. We want to work on a copy of last week's lab and leave the original untouched. The website folder should have the following files:
pgCheckOut.aspx
pgCheckOut.aspx.cs
pgConfirm.aspx
pgConfirm.aspx.cs
Web460Store.master
Web460Store.master.cs
web.config
web.Debug.config ( optional: depends on the version of Visual Studio you are using)
3. Set pgCheckOut.aspx as the start page and test your application. It should perform just as it did last week.STEP B: Add the ClearForm Functionality to pgCheckOut
Because we will be adding, retrieving, and updating customer information, we should give the user the ability to easily clear the form fields so that information from one customer is not mixed with that of another.
1. Add a private method to pgCheckOut.aspx.cs that examines each control on the page. If the control is a Textbox, DropDown list, or RadioButton, the control is cleared. If it is a panel or other container, the method calls itself recursively, passing the controls on that container so that they may be cleared.
ClearInputs Method in pgCheckOut.aspx.cs
private void ClearInputs(ControlCollection ctrls)
{
foreach (Control ctrl in ctrls)
{
if (ctrl is TextBox)
((TextBox)ctrl).Text = string.Empty;
else if (ctrl is DropDownList)
((DropDownList)ctrl).ClearSelection();
else if (ctrl is RadioButton)
((RadioButton)ctrl).Checked = false;
else if (ctrl is RadioButtonList)
((RadioButtonList)ctrl).ClearSelection();
else
ClearInputs(ctrl.Controls);
}
}
2. Next, we add a click method that will be called by a form button. The form button cannot call the recursive method directly because click methods require a different set of parameters. Because of this, we need the private helper method ClearInputs.
btnClearForm_Click in pgCheckOut.aspx.cs
public void btnClearForm_Click(object sender, EventArgs e)
{
ClearInputs(Page.Controls);
}
3. Add a button to pgCheckOut.aspx that calls the Clear Form click handler above. The button should have the name and ID btnClearForm and the text "Clear Form". You can use the image in the Lab Summary section above for guidance on placing the button.
4. Test your work. You should be able to enter data in the form fields on the left and when the Clear Form button is clicked, all form fields should be cleared.STEP C: Create a DataSet and Link it to Microsoft Access Database
These steps create and add a DataSet called dsAccounts to your project. Carefully read through these instructions as you step through the creation of the DataSet. If you cannot connect to the database when these steps are complete, delete the DataSet and recreate it from scratch to make sure all parts are initialized properly.
1. Download and copy the Microsoft Access database, Acounts.mdb, found in the Files section of the Course Menu to your website folder. Note that you can have the database at any location on your computer, but your code should be adjusted accordingly. It is best to have it in the top level of your website or in the App_Data folder. In Steps E, F, and G below, you will need to adjust your code to accurately reflect the path to where your database is stored.
If you are using the DeVry FTP site websol, you must place the database into the FPDB folder in your account top-level directory. It is recommended to use your local computer instead of the websol FTP server.
2. From the Solution Explorer pane, right click on the App_Code folder and select the Add New Item menu option. In the Add New Item dialog box, select DataSet and type the dsAccounts as the name of the DataSet. When prompted, allow Visual Studio to store the DataSet in the App_Code folder.
3. After creating dsAccounts, double-click TableAdapter in the Dataset Toolbox to configure the connection to the database using the TableAdapter Configuration wizard. The Dataset Toolbox panel is displayed by selecting dsAccounts.xsd in the Solution Explorer panel and then clicking the Toolbox link in the main window. You may also select Toolbox from the View menu.
4. On the first window, click the New Connection button.
5. In the Choose Data Source window, select the file Microsoft Access Database and click Continue.
6. In the Add Connection window, click the Browse button and select the Microsoft Access database that you downloaded from the Files section of the Course Menu named Accounts.mdb.
7. Click Test Connection to ensure that Visual Studio can access and connect to the database.
8. Click OK, and then click Next on the TableAdapter Wizard. If you expand the connection string + symbol, you can view the connection string used to access the database. This should closely match what we will use in our application.
9. Click Next again to save the connection string to a file.
10. On the Wizard's Choose a Command Type screen, select SQL Statements and then click Next.
11. We now enter the default SQL query for this DataSet connection. In the textbox on this screen, enter the following SQL SELECT statement whose result will be used to populate the DataSet:
SELECT * FROM tblCustomers
12. Click Finish to exit the TableAdapter wizard.STEP D: Create the clsDataLayer Class to Represent Our Application's Data Layer
1. Right-click on the project name in the Solution Explorer pane and select Add. From the submenu, select New Item. From the Add Dialog Box, add a Class called clsDataLayer.
The code file (clsDataLayer.cs) will automatically be placed in the App_Code folder in your website directory.
2. Add a data field to our class that represents the database connection and adjust the constructor to initialize it.
clsDataLayer Data Field and Constructor
OleDbConnection dbConnection;
Be sure to place this code in the correct location in the class file. Verify that your code does not have any syntax errors before continuing.
public clsDataLayer(string Path)
{
dbConnection = new OleDbConnection("PROVIDER=Microsoft.Jet.OLEDB.4.0;Data Source=" + Path);
}STEP E: Implement the FindCustomer Functionality Editing Multiple Files
This step, Step F, and Step G require you to add code to three different files. Carefully follow the directions to ensure that you add code to the correct files. Test your code after each step before moving to the next. You may want to make a copy of the following files before starting this step so that if you make a significant error, you can return to this point:
clsDataLayer.cs
pgCheckOut.aspx.cs
pgCheckOut.aspx
1. In the clsDataLayer class, create a method, called FindCustomer, that accepts LastName as a parameter. This method finds the all occurrences of customers with LastName in the database and places the results in the DataSet object mystoreDataSet, which is an instance of our dsAccounts DataSet.
You can add the following code to the class clsDataLayer. Be sure to replace the lines in the code below that read "Add your comments here with your own comments
explaining what the code does.
FindCustomer Method in clsDataLayer.cs
// Add your comments here
public dsAccounts FindCustomer(string LastName)
{
//Add your comments here
string sqlStmt = "select * from tblCustomers where LastName like '" + LastName + "'";
OleDbDataAdapter sqlDataAdapter = new OleDbDataAdapter(sqlStmt, dbConnection);
//Add your comments here
dsAccounts myStoreDataSet = new dsAccounts();
sqlDataAdapter.Fill(myStoreDataSet.tblCustomers);
// Add your comments here
return myStoreDataSet;
}
When adding this database code to clsDataLayer, do not forget to add the two Using directives in C# that must be placed at the start of your code that ensure that the compiler has the definition of the Data and OleDataAdapter objects necessary for the data layer. (Your challenge is to research and discover what they are.)
2. In pgCheckOut.aspx.cs, create the click method that calls the Data Layer method FindCustomer. This click method is invoked when the user clicks the Find Last Name button we add next. The following method calls FindCustomer and then fills the form fields with results from the Data Set. Be sure that the tempPath variable accurately reflects the path to where you have saved the Access database Accounts.mdb.
btnFindLastName_Click Method in pgCheckOut.aspx.cs
// Add your comments here
protected void btnFindLastName_Click(object sender, EventArgs e)
{
// Add your comments here
dsAccounts dsFindLastName;
// Add your comments here
// Depending on where you placed your Access database,
// one of the following lines may work better:
// tempPath = Server.MapPath("Accounts.mdb")
// tempPath = Server.MapPath("~/FPDB/Accounts.mdb")
string tempPath = Server.MapPath("~/App_Data/Accounts.mdb");
clsDataLayer dataLayerObj = new clsDataLayer(tempPath);
try
{
// Add your comments here
dsFindLastName = dataLayerObj.FindCustomer(txtLastName.Text);
// Add your comments here
if (dsFindLastName.tblCustomers.Rows.Count > 0)
{
// Add your comments here
txtFirstName.Text = dsFindLastName.tblCustomers[0].FirstName;
txtLastName.Text = dsFindLastName.tblCustomers[0].LastName;
txtStreet.Text = dsFindLastName.tblCustomers[0].Street;
txtCity.Text = dsFindLastName.tblCustomers[0].City;
txtState.Text = dsFindLastName.tblCustomers[0].State;
txtPhone.Text = dsFindLastName.tblCustomers[0].PhoneNumber;
customerID.Text = dsFindLastName.tblCustomers[0].CustomerID.ToString();
Master.UserFeedBack.Text = "Record Found";
}
else
{
// Add your comments here
Master.UserFeedBack.Text = "No records were found!";
}
}
catch (Exception error)
{
// Add your comments here
string message = "Something went wrong - ";
Master.UserFeedBack.Text = message + error.Message;
}
}
3. Add a button to pgCheckOut.aspx that calls btnFindLastName_Click for its click event. The button should have the name and ID btnFindLastName and the text Find Last Name. You can use the image in the Lab Summary section above for guidance on placing the button.
4. In Step F, when we update customer information, we must ensure that we update the correct customer. To do this, we use a field that uniquely identifies each row or customer in the table: the CustomerID field. We need to add this to pgCheckOut.aspx.
Add two labels to pgCheckOut.aspx with the names and IDs, lblCustID and customerID.
The text for lblCustID should be "Customer ID:".
The text for the label customerID can be left blank as the application will fill in that text.
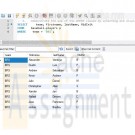
5. Test your work. You should be able to enter a name in the Last Name field on the form and when the Find Last Name button is clicked, other form fields should be filled in with data on that customer. If the customer is not found, the appropriate message should be displayed to the user. The Access database comes with data already entered on four customers for testing: Smith, Doe, Rice, and Sue.STEP F: Implement UpdateCustomer Functionality
1. In the clsDataLayer class, create a method called UpdateCustomer that accepts the customer's name and address as parameters. This method finds the customer whose CustomerID field matches the parameter customerID and updates the field values to match the arguments sent when it was called.
You can add the following code to the class clsDataLayer. Be sure to replace the lines in the code below that read "Add your comments here with your own comments explaining what the code does.
UpdateCustomer Method in clsDataLayer.cs
// Add your comments here
public void UpdateCustomer(string firstName, string lastName,
string street, string city,
string state, string phoneNumber, int customerID)
{
// Add your comments here
dbConnection.Open();
// Add your comments here
string sqlStmt = "UPDATE tblCustomers SET FirstName = @first, " +
"LastName = @last, " +
"Street = @street, " +
"City = @city, " +
"State = @state, " +
"PhoneNumber = @phone " +
"WHERE (tblCustomers.CustomerID = @id)";
// Add your comments here
OleDbCommand dbCommand = new OleDbCommand(sqlStmt, dbConnection);
// Add your comments here
OleDbParameter param = new OleDbParameter("@first", firstName);
dbCommand.Parameters.Add(param);
dbCommand.Parameters.Add(new OleDbParameter("@last", lastName));
dbCommand.Parameters.Add(new OleDbParameter("@street", street));
dbCommand.Parameters.Add(new OleDbParameter("@city", city));
dbCommand.Parameters.Add(new OleDbParameter("@state", state));
dbCommand.Parameters.Add(new OleDbParameter("@phone", phoneNumber));
dbCommand.Parameters.Add(new OleDbParameter("@id", customerID));
//Add your comments here
dbCommand.ExecuteNonQuery();
//Add your comments here
dbConnection.Close();
}
2. In pgCheckOut.aspx.cs, create the click method that calls the Data Layer method UpdateCustomer. This click method is invoked when the user clicks the Update
Customer button we add next. The following method calls UpdateCustomer, passing the form field values as arguments.
Be sure that the tempPath variable accurately reflects the path to where you have saved the Access database Accounts.mdb.
btnUpdate_Click Method in pgCheckOut.aspx.cs
protected void btnUpdate_Click(object sender, EventArgs e)
{
// Add your comments here
bool customerUpdateError = false;
// Add your comments here
// Depending on where you placed your Access database,
// one of the following lines may work better:
// tempPath = Server.MapPath("Accounts.mdb")
// tempPath = Server.MapPath("~/FPDB/Accounts.mdb")
string tempPath = Server.MapPath("~/App_Data/Accounts.mdb");
clsDataLayer myDataLayer = new clsDataLayer(tempPath);
// Add your comments here
try
{
myDataLayer.UpdateCustomer(txtFirstName.Text, txtLastName.Text,
txtStreet.Text, txtCity.Text,
txtState.Text, txtPhone.Text, Convert.ToInt32(customerID.Text));
}
catch (Exception error)
{
customerUpdateError = true;
string message = "Error updating customer, please check form data. ";
Master.UserFeedBack.Text = message + error.Message;
}
if (!customerUpdateError)
{
ClearInputs(Page.Controls);
Master.UserFeedBack.Text = "Customer Updated Successfully.";
}
}
3. Add a button to pgCheckOut.aspx that calls btnUpdateCustomer_Click for its click event. The button should have the name and ID btnUpdateCustomer and the text
Update Customer. You can use the image in the Lab Summary section above for guidance on placing the button.
4. Test your work. You should be able to enter a name in the Last Name field on the form and when the Find Last Name button is clicked, other form fields should be filled in with data on that customer. If the customer is not found, the appropriate message should be displayed to the user.
Once a customer has been retrieved (found) in the database, you can update the customer's information and click the Update Customer button. If the application is working correctly, the updated information on the customer will be retrieved from the database the next time you find the customer.STEP G: Implement InsertCustomer Functionality
1. In the clsDataLayer class, create a method called InsertCustomer that accepts the customer's name and address as parameters. This method creates a new customer in the database with the data passed as arguments to the method.
You can add the following code to the class clsDataLayer. Be sure to replace the lines in the code below that read Add your comments here with your own comments explaining what the code does.
InsertCustomer Method in clsDataLayer.cs
// Add your comments here
public void InsertCustomer(string firstName, string lastName,
string street, string city,
string state, string phoneNumber)
{
// Add your comments here
dbConnection.Open();
// Add your comments here
string sqlStmt = "INSERT INTO tblCustomers (FirstName, LastName, Street, City,
State, PhoneNumber) ";
sqlStmt += "VALUES (@first, @last, @street, @city, @state, @phone)";
// Add your comments here
OleDbCommand dbCommand = new OleDbCommand(sqlStmt, dbConnection);
// Add your comments here
OleDbParameter param = new OleDbParameter("@first", firstName);
dbCommand.Parameters.Add(param);
dbCommand.Parameters.Add(new OleDbParameter("@last", lastName));
dbCommand.Parameters.Add(new OleDbParameter("@street", street));
dbCommand.Parameters.Add(new OleDbParameter("@city", city));
dbCommand.Parameters.Add(new OleDbParameter("@state", state));
dbCommand.Parameters.Add(new OleDbParameter("@phone", phoneNumber));
//Add your comments here
dbCommand.ExecuteNonQuery();
//Add your comments here
dbConnection.Close();
}
2. In pgCheckOut.aspx.cs, create the click method that calls the Data Layer method InsertCustomer. This click method is invoked when the user clicks the Add Customer button we add next. The following method calls AddCustomer, passing the form field values as arguments, and then clears the form to await information the user enters on the next customer. Be sure that the tempPath variable accurately reflects the path to where you have saved the Access database Accounts.mdb.
btnAdd_Click Method in pgCheckOut.aspx.cs
// Add your comments here
protected void btnAdd_Click(object sender, EventArgs e)
{
// Add your comments here
bool customerAddError = false;
// Add your comments here
// Depending on where you placed your Access database,
// one of the following lines may work better:
// tempPath = Server.MapPath("Accounts.mdb")
// tempPath = Server.MapPath("~/FPDB/Accounts.mdb")
string tempPath = Server.MapPath("~/App_Data/Accounts.mdb");
clsDataLayer myDataLayer = new clsDataLayer(tempPath);
// Add your comments here
try
{
// Add your comments here
myDataLayer.InsertCustomer(txtFirstName.Text, txtLastName.Text,
txtStreet.Text, txtCity.Text,
txtState.Text, txtPhone.Text);
}
catch (Exception error)
{
// Add your comments here
customerAddError = true;
string message = "Error adding customer, please check form data. ";
Master.UserFeedBack.Text = message + error.Message;
}
// Add your comments here
if (!customerAddError)
{
ClearInputs(Page.Controls);
Master.UserFeedBack.Text = "Customer Added Successfully.";
}
}
3. Add a button to pgCheckOut.aspx that calls btnAddCustomer_Click for its click event. The button should have the name and ID btnAddCustomer and the text Add Customer. You can use the image in the Lab Summary section above for guidance on placing the button.
4. Test your work You should be able to enter a customer's name and address in the appropriate fields on the form and when the Add Customer button is clicked, a record should be added to the database for the customer.
You should be able to view the record directly in the database or by finding the customer using the Find Last Name functionality of the application.STEP H: Test and Finalize the Lab
Learn More
1. Save your work!
2. Test it! Check the Clear, Find, Update, and Add capabilities. Until you add more of your own, the last names in the database that you can search for in this lab are Smith, Doe, Rice, and Sue.
3. Make changes as appropriate until it works.
4. Remember to add comments for each step being performed.
5. Please zip and submit the entire web project folder. -

DBM 405A Lab 1 SQL Review
Regular Price: $15.00
Special Price $12.00
DBM 405A Lab 1 SQL Review
I. OBJECTIVES
a. Get access to a MySQL environment.
b. Familiarize yourself with the environment.II. PARTS LIST
1. EDUPE Omnymbus Environment (https://devry.edupe.net:8300); and/or
2. MySQL (dev.mysql.com/downloads).III. PROCEDURE
You may do the labs in this class on your own computer equipped with MySQL or you may use the MySQL environment hosted by the vendor Omnymbus. You may even use both.Using MySQL on your own computer means downloading a version from dev.mysql.com/downloads and installing the database engine on your computer. This can be done easily and there are a number of resources on the web to help you with this process.
You may also use the MySQL environment hosted by Omnymbus by logging in with your credentials to https://devry.edupe.net:8300.
Using the first approach will give you experience writing programs on a desktop computer and accessing a database. Using the second approach will give you experience writing applications that access a database in a cloud environment.
You are encouraged to use both approaches.
Desktop MySQL Environment
1. Download the MySQL Community Server from the http://dev.mysql.com/downloads/ website.
2. Install MySQL on your computer.
3. Open the MySQL Environment on your computer.Omnymbus Environment
1. Login to the MySQL Omnymbus Environment by following the instruction located in Doc Sharing (document titled “Login MySQL Omnymbus Environment”).Lab Procedure Continued (common to both environments)
1. Create a database named “Baseball”.2. Create a table named “Teams” and add the following fields:
a. TeamCode (character 5)
b. TName (character 20)
c. TAddress (character 30)
d. TCity (character 20)
e. TState (character 2)
f. TZip (character 9)
g. Wins (integer)
h. Losses (integer)3. Populate the table with 8 teams.
4. Create a table named “Players” and add the following fields:
a. FirstName (character 20)
b. LastName (character 30)
c. MidInit (character 1)
d. PAddress (character 30)
e. PCity (character 20)
f. PState (character 2)
g. PZip (character 9)
h. Phone (character 11)
i. Team (character 5)5. Populate the table with 80 players (10 on each team). For the team, use the TeamCode from the first table to identify the Team the player is on.
Learn More
6. Display or list the data from both table to the screen or printer. -
DBM 405A Lab 2 SQL Review
Regular Price: $15.00
Special Price $12.00
DBM 405A Lab 2 SQL Review
I. OBJECTIVES
1. Get access to a MySQL environment.
2. Familiarize yourself with the environment.II. PARTS LIST
3. EDUPE Omnymbus Environment (https://devry.edupe.net:8300); and/or
4. MySQL (dev.mysql.com/downloads).III. PROCEDURE
You may do the labs in this class on your own computer equipped with MySQL or you may use the MySQL environment hosted by the vendor Omnymbus. You may even use both.Using MySQL on your own computer means downloading a version from dev.mysql.com/downloads and installing the database engine on your computer. This can be done easily and there are a number of resources on the web to help you with this process.
You may also use the MySQL environment hosted by Omnymbus by logging in with your credentials to https://devry.edupe.net:8300.
Using the first approach will give you experience writing programs on a desktop computer and accessing a database. Using the second approach will give you experience writing applications that access a database in a cloud environment.
You are encouraged to use both approaches.
In the previous lab (Week 1), you have established a database environment (either MySQL Community Server or the Omnymbus environment). You may continue to use that environment or you my return to Week 1 to set up the alternate environment.
Lab Procedure Continued (common to both environments)
Learn More
1. Use the database named “Baseball” created in last week’s lab.
2. Use the table named “Teams” which consists of the following fields:
a. TeamCode (character 5)
b. TName (character 20)
c. TAddress (character 30)
d. TCity (character 20)
e. TState (character 2)
f. TZip (character 9)
g. Wins (integer)
h. Losses (integer)
3. You should have a table with 8 teams.
4. Use the table named “Players”, which consists of the following fields:
a. FirstName (character 20)
b. LastName (character 30)
c. MidInit (character 1)
d. PAddress (character 30)
e. PCity (character 20)
f. PState (character 2)
g. PZip (character 9)
h. Phone (character 11)
i. Team (character 5)
5. You should have a table with 80 players (10 on each team). Players are identified by the Team field which matches the TeamCode in the Teams table.
6. Demonstrate the use of the WHERE clause by selecting and displaying only the players from one team.
7. Demonstrate the use of the COUNT function by determining how many players are on each team and displaying the results.
8. For each City, find the number of players who list their home in that city.
9. Demonstrate the ORDER BY clause by listing all the players in alphabetical order by last name within Team.

You have no items in your shopping cart.
