Search results for 'Chapter'
-
DAT 210 Week 2 Using Loops in Python
Regular Price: $12.00
Special Price $10.00
DAT 210 Week 2 Using Loops in Python
You recently graduated college and you are applying for a programming job that requires the understanding of loops in Python. The manager you are interviewing with has asked you to take an assessment to prove your programming knowledge. Below are the requirements for the programming skills test.
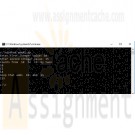
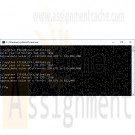
In Python, create a program that meets the following requirements:
• Take two integers from the user.
• Save the lower number as x.
• Save the largest integer as y.
• Write a loop that counts from x to y by twos.
• Print out the values of that loop using the Print function in Python.
• Write another loop that adds x and y, and saves the value as Z.
• Print out the values of Z using the Print function in Python.Provide the code and take a screenshot of the output, then paste the screenshot(s) into a Microsoft® Word document.
Review Chapters 6 and 11 of Python for Everyone if you have additional questions on creating a program in Python.
Submit your document.
In Python, create a program that meets the following requirements:
• Take two integers from the user.
• Save the lower number as x.
• Save the largest integer as y.
• Write a loop that counts from x to y by twos.
• Print out the values of that loop using the Print function in Python.
• Write another loop that adds x and y, and saves the value as Z.
• Print out the values of Z using the Print function in Python.
Provide the code and take a screenshot of the output, then paste the screenshot(s) into a Microsoft® Word document.
Review Chapters 6 and 11 of Python for Everyone if you have additional questions on creating a program in Python.
Submit your document.
Learn More -
ITS320 Module 3 Option 1 Creating a Program to Calculate the Value of a Ferrari
Regular Price: $10.00
Special Price $8.00
ITS320 Module 3 Option 1 Creating a Program to Calculate the Value of a Ferrari
Option #1: Creating a Program to Calculate the Value of a Ferrari
Assignment Instructions
Implement a program that reads in a year and outputs the approximate value of a Ferrari 250 GTO in that year. Use the following table that describes the estimated value of a GTO at different times since 1962.
Year Value
1962-1964 $18,500
1965-1968 $6,000
1969-1971 $12,000
1972-1975 $48,000
1976-1980 $200,000
1981-1985 $650,000
1986-2012 $35,000,000
2013-2014 $52,000,000
(Source: Programming in Python 3 with Zylabs, Chapter 4, Participation Activity 4.3.5)Assignment Submission Instructions
Learn More
Submit a text file containing your Python code into the Module 3 drop box. Name your file ITS320_CTA3_Option1.py. -

New Perspectives on HTML, CSS, and Dynamic HTML 5th edition Tutorial 14 Case 1 New Accents Photography
Regular Price: $15.00
Special Price $12.00
New Perspectives on HTML, CSS, and Dynamic HTML 5th edition Tutorial 14 Case 1 New Accents Photography
After you have completed all of the tutorials in Chapter 14, turn to page 1001 in your textbook and do Case Problem 1, New Accents Photography. Make sure all files are uploaded to cPanel and submit your URL for the accents.htm file when you are finished.
Use JavaScript to create a dynamic style sheet switcher.
Data files needed for this Case Problem: accentstxt.htm, base.css, elegant.css, elegant.png, elegant_back.png, elegant_small.png, innovative.css, innovative.png, innovative_back.png, innovative_small.png, joyous.css, joyous.png, joyous_back.png, joyous_small.png, modernizr-1.5.js, nalogo.png, romantic.css, romantic.png, romantic_back.png, romantic_small.png, styletxt.js, zany.css, zany.png, zany_back.png, zany_small.png
New Accents Photography Christine Drake is the owner and chief photographer at New Accents Photography, a photography studio in Ashland, Oregon, that specializes in wedding photos. Wedding portraiture is a competitive business. and Christine wants to improve the design of her Web site's opening page to help interest couples in viewing her work. Christine is proud of the many and varied styles of portraiture that New Accents Photography offers, and she would like to create an interactive style sheet switcher that loads different style designs based on her photos.
Christine envisions making several style sheets, and she wants to limit the amount of work she'll have to do when updating the HTML code as she adds new sheets to her site. She would like your help with writing a JavaScript app that examines the list of style sheets in the site's home page and creates a figure box of clickable thumbnail images for each sheet design. A preview of the page you'll create for Christine is shown In figure 14-66.Christine already has written the style sheet code and most of the HTML code. Your job will be to write the JavaScript code to enable her customers to switch from one style design to another.
Complete the following:
1. Using your text editor, open accentstxt.htm and styletxt.js from the tutorial.14\case1 folder. Enter your name and the date in the comment section of each file, and then save the files asaccents.htm and stylebox.js, respectively.2. Go to the accents.htm file in your text editor. Currently, Christine has only one persistent style sheet linked to her document. Create a link to the preferred style sheet romantic.css and give it the title romantic.
3. Create links to the following alternate style sheets: elegant.css, joyous.css, innovative.css, and zany.css. Give the style sheets the titles elegant, joyous, innovative, and zany, respectively. Do not disable any of these style sheets at this time.
4. Create a link to the styleBox.js file. Take some time to study the rest of the HTML code and then close the file, saving your changes.
5. Go to the styleBox.js file in your text editor. Below the comments, declare a global variable named allSheets and set it equal to an empty array. The purpose of the allSheets variable will be to store references to each preferred and alternate style sheet in the document.
6. Add a command to run the loadStyles() function when the page is initially loaded.
7. Create the loadStyles() function. The purpose of this function is to load all of the preferred and alternate style sheets into the allSheets variable. Add the following commands to the function:
a. Declare the links variable referencing all link elements in the document.
b. Loop through the contents of the links object collection. For each item, determine whether it represents a preferred or alternate style sheet with a defined title.
c. Disable each alternate style sheet, but leave the preferred style sheet enabled.
d. Use the push() array method to add each preferred or alternate style sheet to the allSheets array.
e. After the completion of the for loop, call the displayThumbs() function.
8. Create the displayThumbs() function. The purpose of this function is to display thumbnail images of each style sheet design from the allSheets array. Add the following commands to the function:
a. Create an element node for the figure element and store it in the figBox variable.
b. Set the id of the figBox element node to the text string thumbnails.
c. Loop through each item in the allSheets array, and do the following for each item:
i) create an element node for the img element and store it in the sheetImg variable;
ii) set the source of the sheetImginline image to the file title_small.png, where title is the title value of the current style sheet in the loop; iii)set the title attribute of the inline image to match the title attribute of the current style sheet;
iv) add an onclick event handler to the inline image to run the showSheet() function when clicked; and
v) append sheetImg to the figBox node.
d. After the for loop has completed, append the figBox node to the document element with the id main.
9. Create the showSheet() function. The purpose of this function is to change the style sheet used in the document. Add the following commands to the function:
a. Declare the variable sTitle, setting it equal to the title attribute of the inline image that called the showSheet() function. (Hint: Use the this keyword to reference the inline image.)
b. Loop through all of the sheets in the allSheets array. Enable the style sheet whose title attribute equals sTitle and disable all of the others.
10. Document your work with descriptive comments throughout your code.11. Save your changes to the file, and then open accents.htm in your Web browser. Verify that five inline images have been added near the bottom of the Web page. Click each thumbnail image and verify that it loads a different style sheet. (Note: If you are using Safari for Windows or Macintosh Version 5.1.2, this style sheet switcher will not work.)
12. Submit your completed files to your instructor, in either printed or electronic form, as requested.
Learn More -
Microsoft Visual Basic 2015 Reloaded Diane Zak Chapter 10 Password Solution
Regular Price: $20.00
Special Price $15.00
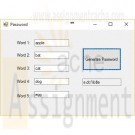
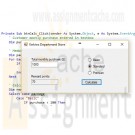
Create an application that allows the user to enter any five words. The application should create and display a password using the rules specified in Figure 10-39. Use the following names for the solution and project, respectively: Password Solution and Password Project. Save the application in the VbReloaded2015\Chap10 folder. Change the form file's name to Main Form.vb. (1-3,6,7)
Rules for creating a password:
Learn More
1. Assign the first letter in each of the five words as the passwords.
2. Insert a dollar sign as the second character in the password.
3. Insert a percent sign as the forth character in the password.
4. Insert a comma as the seventh character in the password.
5. Reverse all of the characters in the password. -
Microsoft Visual Basic 2015 Reloaded Diane Zak Chapter 5 Kelvins Department Store Solution
Regular Price: $20.00
Special Price $15.00
Kelvin's Department Store wants an application that displays the number of rewards points a customer earns each month. The reward points are based on customer's membership type and total monthly purchase amount, as shown in Figure 5-53. Use the following names for the solution and project, respectively: Kelvin Solution and Kelvin Project. Save the application in the VbReloaded2015\Chap05 folder. Change the form file's name to Main Form.vb. You can either create your own interface or create the one shown in Figure 5-53. Display the number of reward points without any decimal places.
Learn MoreMembership Type Total Monthly Purchase ($) Rewards Points Basic Less than 100 0 100-249.99 5% of the total monthly purchase 250 and over 6% of the total monthly purchase Standard Less than 50 2% of the total monthly purchase 50 and over 7% of the total monthly purchase Premium Less than 200 7% of the total monthly purchase 200 and over 9% of the total monthly purchase -
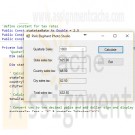
Microsoft Visual Basic 2015 Reloaded Diane Zak Chapter 3 Pink Elephant Photo Studio Solution
Regular Price: $20.00
Special Price $15.00
Create an application that allows the owner of the Pink Elephant Photo Studio to enter the studio's quarterly sales amount. The application should display the amount of state, country, and city sales taxes the studio must pay. It should also display the total sales tax. The sales tax rates for the state, country, and city are 2.5%, 0.5%, and 0.25%, respectively. Each sales tax is calculated by multiplying the appropriate rate by quarterly sales amount. Use the following names for the solution and project, respectively: Pink Elephant Solution and Pink Elephant Project. Save the application in the VbReloaded2015\Chap03 folder. Change the form file's name to Main Form.vb. Display the sales taxes with a dollar sign and two decimal places. You can either create your own interface or create the one shown in Figure 3-64. Be sure to include comments and the Option statements. (1-8)
Learn More -
Microsoft Visual Basic 2015 Chapter 9 Case 8 Moores Laws
Regular Price: $15.00
Special Price $12.00
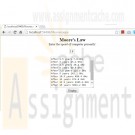
Microsoft Visual Basic 2015 Chapter 9 Case 8 Moore's Laws
Moore's Laws
Create a requirements document and a Use Case Definition document, and then create a Web application, based on the case project shown in Figure 9-93.Create a Web application that displays Moore's Law, which states that the computing power or the number of transistors within the same silicon processor doubles every months. In other words, computing speed doubles every months. As shown in the following table, allow the user to enter the current average speed in GHz and display the next 15 years of project speed. Use the validation controls to make sure the entry is filled in and that the decimal entered is between 1.0 and 10.0.
Learn More -
Programming Logic and Design Eight Edition Chapter 10 Exercise 4 Automobile Class
Regular Price: $10.00
Special Price $8.00
Programming Logic and Design Eight Edition Chapter 10 Exercise 4 Automobile Class
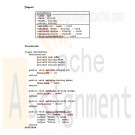
Design a class named Automobile that holds the vehicle identification number, make, model, and color of an automobile. Include methods to set the values for each data field, and include a method that displays all the values for each field. Create the class diagram and write the pseudocode that defines the class.
Learn More -
MIS582 iLab 4 Week 7 Webserver/Databaseserver Construction Using MySQL and PHP
Regular Price: $15.00
Special Price $12.00
MIS582 iLab 4 Week 7 Webserver/Databaseserver Construction Using MySQL and PHP
iLab Overview
Scenario/Summary
In this assignment learn to create and manipulate a MySQL database using the PHP. To complete this assignment, you will need to be able to run MySQL via Omnymbus. You should review Chapter 11's coverage on PHP, the tutorial titled "PHP and MySQL" listed in the Webliography and MySQL's own dialect of the SQL language via the file M10C_KROE8352_13_SE_WC10C.pdf in the Doc-Sharing folder titled My SQL Documents.
Please ensure that you can connect to MySQL/Omnymbus via the account your Professor has emailed to you. Please consult with the document titled MySQLOmnymbusSupport.docx located in the Doc-Sharing folder titled Omnymbus Tutorial Files for instructions on how to get help for any issues that you are having with the MySQL/Omnymbus Environment.Deliverables
Submit your assignment to the Dropbox, located at the top of this page. For instructions on how to use the Dropbox, read these step-by-step instructions. (See the Syllabus section "Due Dates for Assignments & Exams" for due dates.)
Name your MySQL database Lab4_xxxx where xxxx is your userid. Create and save your MySQL database file. You will be required to submit a web-link to your index.php file, along with 6 php script files and a sql file that will be executed from the Omnymbus public Web page from your Omnymbus account. Please note that your php and sql files will be based upon the templates provided the zip file titled MIS582_Wk7_templates.zip located in the folder titled iLab Documents in Doc Sharing.
You will need to modify the following php scripts and sql file from the MIS582_Wk7_templates.zip file.
• index.php
• insert.php
• insert_data.php
• update.php
• update_data.php
• delete.php
• MyAddressBook_CreateTable.sqlRequired Software
Omnymbus – MySQL
Access the software at https://devry.edupe.net:8300.Lab Steps
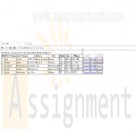
STEP 1: Review the Data Dictionary
Review the provided data dictionary below to understand the entity, attributes, and primary key of the supplied MySQL database.
Table Name ATTRIBUTE NAME CONTENTS TYPE FORMAT RANGE REQUIRED PK or FK
MyAddressbook id Contact ID Number Auto-Increment
Int(3) 999 000-999 Y PK
f_name Contact First Name VCHAR(25) Xxxxxx Y
L_name Contact Last Name VCHAR(25) Xxxxxx Y
ADDRESS Contact Address VCHAR(25) Xxxxxx Y
City Contact City VCHAR(25) Xxxxxx 0-9 Y
State Contact State CHAR(2) Xxxxxx Y
zip Contact Zip Code NUMBER(5) 99999 Y
phone Contact Phone NUMBER(10) 9999999999 Y
STEP 2: Create Table, Insert Statement
• Run MySQL via Omnymbus.
• Modify the table creation script that will be used to create the database with the outlined attributes from the Data Dictionary.
• Provide one Insert Statement that will add your contact information to the newly created table.
• Save the file with a name containing Lab7_, your first initial, and your last name (e.g., Lab7_JSmith.sql).
• Execute your script and ensure that the database is created.STEP 3: Build Index PHP Page
Building Your index.php Web Page
In this step, you will complete your php script page to connect to the Lab7 database and display the MyAddressbook table on the Web page.
• Complete the MySQL connection for the index.php page. Be sure to fill in appropriate host (127.0.0.1), username, password, and database information in the mysqli field.
• Modify the provided php code to display each attribute of your MyAddressbook table. Note that initially, only 1 entry should be present in your table.
• Save your index.php file in your public_html folder in Omnymbus file manager.
• Please note that you will find your public_html folder down the path zdisk/USERID/public html
• Direct your Web browser to your site url (ex. http://devry.edupe.net/~XXXX/index.php).
• Note that you’ll replace XXXX with your Omnymbus login ID.
• Ensure that your file executes and the database table displays on the screen.
• If you have a correct connect command but you get the error message "MySQL ERROR 1045 (28000): Access denied for user" you will have to create a new password with the box "Change password in other modules?" checked.
• There is a supplied image in the Doc Sharing that provides an example of how your index.php page should look. Note: Feel free to add any additional formatting or images to your index.php page.
STEP 4: Build, Update PHP Pages
Building Your update.php and update_data.php Pages
In this step, you will complete two php HTML pages. Your update.php page will provide a form for users to submit data to the database that will be updated. The update_data.php page will provide the actual queries in php to update the data in your database. When this process is complete, your page will redirect the user back to the index.php page.
• Review the update_data.php page template.
• You will need to modify the php code to add additional input forms for the user to enter all appropriate attributes that will need to be updated.
• In the update_data.php file, ensure that your <form action> tag is set equal to update.php
• Character data should have a character data type.
• When the action is complete, your page should redirect back to index.php.STEP 5: Build Delete PHP Page
Building Your delete.php Page
In this step, you will complete the delete.php page. Your delete.php page will process the query that will remove the necessary data for the database. When this process is complete, your page will redirect the user back to the index.php page.
• Review the delete.php page template.
• You will need to modify the php code to delete the provided entry based on the address id.
• When the action is complete, your page should redirect back to index.php.STEP 6: Test Links to Update, Delete, and Insert Pages. Submit Deliverables.
Learn More
Finishing Your Web-Enabled Database
Before submitting, ensure that you have added at least 5 entries to your Addressbook database.
Ensure that all links for update, delete, and insert work properly.
When you are done, submit your web-link to your index.php (e.g. http://devry.edupe.net/~####/index.php), If your web pages do not work according to the rubric below you can submit a zip file titled Lab4_FirstInitialLastName.zip which should contain your six php code pages and your database script for possible partial credit,
Rubric
Points will be awarded according to the following rubrics.
• 10 points: Script and Table created for the MyAddressbook entity as described in the Data Dictionary.
• 10 points: index.php created that correctly displays the contents of the database.
• 10 points: insert.php and insert_data.php pages created that correctly add data to the database.
• 10 points: update.php and update_data.php pages created that correctly update the data in the database.
• 10 Points: delete.php page created that correctly removes an entry from the database.
For a more advanced optional lab experience you can add error checking and comments and better appearance to the code. Use Chapter 11 as a guide. -

Programming Logic and Design Eight Edition Chapter 4 Exercise 5 A
Regular Price: $12.00
Special Price $10.00
Programming Logic and Design Eight Edition Chapter 4 Exercise 5 A
ShoppingBay is an online auction service that requires several reports. Data for each item up for auction includes ID number, item description, length of auction in days, and minimum required bid. Design for the following:
a. A program that accepts data for one auctioned item. Display data for an auction only if the minimum required bid is over $100.00.
Learn More

You have no items in your shopping cart.
