Search results for 'university'
-
WEB460 Lab 2 of 7: Creating and Using Master Pages
Regular Price: $12.00
Special Price $10.00
WEB460 Lab 2 of 7: Creating and Using Master Pages
Scenario/Summary
In this Lab, you create a master page for our bookstore website and then modify the checkout and order confirm pages from last week's lab to use the master page.Deliverables
The deliverables for this week's lab are the following:
pgCheckOut.aspx
pgCheckOut.aspx.cs
pgConfirm.aspx
pgConfirm.aspx.cs
Web460Store.master
Web460Store.master.cs
web.config
Please zip and submit the entire web project folder.Lab Steps
STEP A: Create a New Web Site Project
In this step, we set up a new project and copy the files from the Week 1 Lab into it. This allows us to begin our lab this week where we left off last week and to add common elements to both pages.
1. To start this week's project, create a new Empty Web Application project.
2. Copy the four files from last week's Lab into the folder for this new project. Be careful not to move the files. We want to work on a copy of last week's lab and leave the original untouched. The website folder should have the following files:
pgCheckOut.aspx
pgCheckOut.aspx.cs
pgConfirm.aspx
pgConfirm.aspx.cs
web.config
web.Debug.config ( optional: it depends on the version of Visual Studio you are using)
3. Set pgCheckOut.aspx as the start page and test your application. It should perform just as it did last week.STEP B: Create a Master Page
In this step, we add a master page to our project.
1. Right-click on the name of your project and select Add => Add New Item ...
2. Select Master Page as the type of item to add. Be sure that Place code in separate file. is checked.
3. Name the master page Web460Store.master and click OK to create the maser page for our site.STEP C: Design Your Master Page
Our master page contains elements that we want common to all pages on our website, such as the header, the footer, and two side-by-side content areas. We mark areas that content pages can fill with the ContentPlaceHolder tag.
We also want a Label control that our content pages can modify to display messages directed to the user. Making the Label accessible to content pages requires editing the C# code for the master page, which we do in the next step.
1. View the source for Web460Store.master. We first set the title and a content area in the head of the master page. Make any changes necessary to the <head> tag so that it matches the code below:
<head runat="server">
<title>WEB460 Book Store</title>
<asp:ContentPlaceHolder id="HeadPlaceHolder" runat="server">
</asp:ContentPlaceHolder>
</head>
2. Next we create the page template in the <body> of the master page. We use a table to assist with the layout. The first row of the table is the header for our page, displaying the company name and motto. It also contains the Label we will use to send messages to the user. The second table row has two content areas side by side for the website pages to place content and additional controls. The last row of the table is the page footer.
Edit the <body> of your master page so that it looks like the following block of code:
<body>
<form id="form1" runat="server">
<table style="padding: 10px; border: 1px solid black;">
<tr style="background-color:lightcyan; text-align: center;">
<td colspan="2">
<!-- page header -->
<h1>WEB 460 Book Store</h1>
<h2>Providing you 100% more than 360 degrees</h2>
<!-- Label for content pages to display user message -->
<strong><span style="color:red;">
<asp:Label ID="lblUserFeedBack" Runat="server">Welcome Traveler!</asp:Label>
</span></strong>
</td>
</tr>
<tr style="vertical-align: top;">
<td>
<!-- Left content area -->
<asp:ContentPlaceHolder ID="ContentPlaceHolder1" Runat="server">
</asp:ContentPlaceHolder>
</td>
<td>
<!-- right content area -->
<asp:ContentPlaceHolder ID="ContentPlaceHolder2" Runat="server">
</asp:ContentPlaceHolder>
</td>
</tr>
<tr style="background-color:lightgrey; text-align: center;">
<td colspan="2">
<!-- page footer -->
Copyright DeVry University<br />
<strong>User's GUID:
<asp:Label ID="lblGUID" Runat="server" /></strong>
</td>
</tr>
</table>
</form>
</body>STEP D: Expose the Label Control to Content Pages
In this step, we modify the C# code file for our master page, Web460Store.master.cs, to modify text displayed on the Label controls.
1. We need to establish set properties for the Label lblUserFeedback so that our content pages can change the message displayed to the user. Add the following method to the class Web460Store:
public Label UserFeedBack
{
get { return lblUserFeedBack; }
set { lblUserFeedBack = value; }
}
2. To provide a tool we can use for security in the future, we want to display the user GUID (globally unique identifier) for this page call. We only want to generate the GUID the first time the page is loaded (not on postback). We can accomplish this by adding the following code to the master page's Page_Load method:
if (!Page.IsPostBack)
{
lblGUID.Text = System.Guid.NewGuid().ToString();
}STEP E: Modify pgCheckOut to Use Our Master Page
In this step, we modify pgCheckOut.aspx to use the master page we created earlier. Since the master page contains <head>, <body>, and <form> tags, we do not need those in our content page, so we will be removing them as part of this step. We also must map the content on this page to the ContentPlaceHolder controls on the master page.
1. We begin by adding MasterPageFile="~/Web460Store.master" to the page directive to indicate that this page references our master page:
<%@ Page Language="C#" AutoEventWireup="true" MasterPageFile="~/Web460Store.master" CodeFile="pgCheckOut.aspx.cs" Inherits="pgCheckOut" %>
2. So we have access controls the master page has exposed to us, such as the Label for user feedback. We need to add the following directive next:
<%@ MasterType VirtualPath ="~/Web460Store.master" %>
3. We can then remove the <!DOCTYPE>, <html>, and <head> tags because we will be using the ones defined in the master page. Also remove the <body> and <form> tags, but leave the content.
4. Next we map the body content to the two ContentPlaceHolder controls on the master page. The customer name, address, and phone number should be in the left content area (ContentPlaceHolder1) and the credit card information in the right content area ( ContentPlaceholder2 ). We bracket the content for each with an ASP.NET Content control.
5. Before the Label control for the customer's first name, place the line:
<asp:Content ID="ContentArea1" ContentPlaceHolderID="ContentPlaceHolder1" Runat="Server">
6. Just after the line for the phone number TextBox control, close the first content area with the line:
</asp:Content>
7. On the next line, we begin the second content area the same way as the first begins:
<asp:Content ID="ContentArea2" ContentPlaceHolderID="ContentPlaceHolder2" Runat="Server">
8. We close the second content area at the end of the file, after the submit button:
</asp:Content>
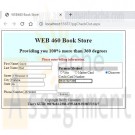
At this point, the pgCheckOut.aspx design view should look similar to the following:STEP F: Update the Master Page User Feedback Label
On pgCheckOut.aspx we want the user to enter billing information. We can modify the master page Label lblUserFeedback by updating the master page's UserFeedBack property we setup earlier. So this happens when the page is loaded, making the Page_Load method in pgCheckOut.aspx.cs look like this:
protected void Page_Load(object sender, EventArgs e)
{
Master.UserFeedBack.Text = "Please enter billing information.";
}STEP G: Modify pgConfirm to Use the Site Master Page
In this step, we transform the confirmation page pgConfirm to use the website master page in a similar way to how we modified pgCheckOut.
First, modify pgConfirm.aspx:
1. Remove unneeded HTML tags and modify the page directives as necessary.
2. The left content area should contain the customer's name and address.
3. The right content area should contain the customer credit card information and the Submit Order button.
4. Remove the status label lblStatus because we will use the master page's user feedback Label.
Then, because we removed lblStatus, we need to modify pgConfirm.aspx.cs:
5. When the page first loads, it should display the user feedback message:
Please confirm your billing information.
6. After the user presses the Submit Order button, the user feedback should be:
Your order has been submitted for processing.
7. If there is an exception thrown by PreviousPage.IsCrossPagePostBack, it should display the message:
Sorry, there was an error processing your request.
When the application is rTuonpning, pgConfirm should appear similar to the following:STEP H: Finalize Your Lab
Learn More
1. Save your work!
2. Test it!
3. Make changes as appropriate until it works.
4. Remember to add comments for each step being performed. -
CIS407 Lab 1 PayrollSystem ASP.NET Application
Regular Price: $8.00
Special Price $5.00
CIS407 Lab 1 PayrollSystem ASP.NET Application
In this Lab, you will create an Annual Salary Calculator ASP.NET Web application using Visual Studio.NET.
For the Labs, you will use the Microsoft Visual Studio software application. You have two options for using this application:
- You may use a copy of Visual Studio that is installed on your local PC. If you do not already have this software, there is a link in the Syllabus (in the Textbook and Required Materials section) that you can follow to obtain a copy at low or no cost through the DeVry Student Software Fulfillment Center.
or
- You may run Visual Studio over the Web from the DeVry Lab (Citrix) server. Instructions for using the Lab (Citrix) server are on the Lab page under the Introduction & Resources Module.
Throughout this course, you will be creating a Web application for a fictitious company called ACIT (Academy of Computing and Information Technology). To get familiar with the development environment, follow the Lab Steps to create a simple Annual Salary Calculator ASP.NET Web application. You will be adding to this application each week.Overview of Fictitious Company
The Academy of Computing and Information Technology is a mid-size indie (independent) film studio that is in need of a payroll system. We have outgrown our current system, a simple spreadsheet, to the extent that it takes three people over one week to pay everyone on a timely basis.Overview of Our Company
We have over 2,000 full-time and part-time employees. We produce comedy, fiction, and science fiction films with budgets of $250K–$20 million. We have produced over 50 films since we first began 20 years ago.
We are very profitable and have strong links to many of the industry's most powerful people.Current Payroll System
Our current system consists of mostly manual processing using an MS Excel spreadsheet to control who gets paid.
The system consists of the three payroll staff members reviewing each of the full-time staff members' wages, calculating how many hours they worked based on their hourly rate, and paying them by issuing a check.
The check needs to be entered in another worksheet for each of the people who were paid so that we can tell when it went out, how much it was for, and if it was cashed or not. If a [Date_Cashed] is entered, we deduct that amount from our working payroll capital account to track how much money we have for payroll.
This process is then repeated for all part-time staff and independent contractors.Our Needs
We need a more automated way to pay our staff. We need to use the same logical flow as a basis, yet improve on it by having a way to
1. easily calculate the projected annual salary based on rate and number of hours;
2. search, enter, update, and delete staff and independent employee information in one place;
3. search, enter, update, and delete payroll automation information for the employee to set up recurring payments or one-time payments;
4. produce reports to show the following: (a) summary of who got paid per week, (b) summary of all payments per week, (c) details of any employee to-date (allow entry of a specific employee ID);
5. allow transactions to be rolled back in case we pay someone too much;
6. make use of transaction processing in case the system unexpectedly shuts down;
7. ensure the system is secure (logins required);
8. allow only authorized payroll personnel to control all aspects of the system;
9. allow only authorized payroll personnel to view transactions and user activity;
10. allow only authorized payroll personnel to e-mail reports to users using the e-mail on file; and
11. incorporate error handling into all processes in the system and e-mail any errors to the technical support people.Required Software
Microsoft Visual Studio.Net
Access the software at https://lab.devry.edu (Links to an external site.)Links to an external site..
Steps: 1, 2, and 3
STEPs 1–3: Create Website and Home Page
Please watch this video for a similar example to the one we are doing. It introduces event handlers, getting data from textboxes, performing basic calculations, and formatting the output to be displayed:
In this Lab, we will learn how to create a simple ASP.NET Web application using Microsoft Visual Studio.NET. The application will display the text "Hello, World" on the home page.
1. Open Microsoft Visual Studio.
2. Create a new ASP.NET website called "PayrollSystem."
To do this, select File -> New -> Web Site
You will get the following screen which shows Visual Basic.
Select Visual C# template on the left of your screen if it is not already selected. Notice that your screen will now show Visual C# instead of Visual Basic.
Click Browse at the bottom of the screen to change Web Location, if necessary to get the screen below.
Notice that my Web Location is now different.
Select ASP.NET Empty project and click OK to get the screen below.
Right-click on the project name from Solution Explorer, then select Add->Add New Item to get the following screen.
Select Web Form, accept Default.aspx file, and click Add to get:
Click Design at the bottom left-hand of the window to show the following:
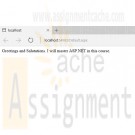
Edit the Default.aspx file (the home page for your site) to add the message "Greetings and Salutations. I will master ASP.NET in this course."
To do this, if necessary, click the Design button below the editing window to switch to Design view, then click in the editing window and type " Greetings and Salutations. I will master ASP.NET in this course." (without the quotes) to get the following screen.
Click the Save button on the toolbar to save the changes to Default.aspx.
STEPs 4–5: Start Debugging; NOTE: Citrix users have different steps!3. To ensure that everything is working properly, click the Start Debugging button on the toolbar, or press the F5 key on the keyboard, or pull down the Debug menu and select Start Debugging.
Save and run by Right-Click-> Run from Browser.
Press Yes.
Click the Start Debugging button on the toolbar, or press the F5 key on the keyboard, or pull down the Debug menu and select "Start Debugging."Notice that this time the project build and website validation started.
If the Debugging Not Enabled dialog box appears, select the option to add or modify the Web.config file to enable debugging and click OK. You should only have to do this the first time you debug the site.
You will get a clean run just as you did previously. Your output screen looks like the screen below.NOTE: To execute the application, you have these options:
• If you are using Citrix, press CTRL + F5 to Start Without Debugging. You will not be deducted points for this part.
• If you are using a standalone version, press F5 to Start with Debugging, or you can press CTRL + F5 to Start Without Debugging.
Create the Salary Calculator Form
1. Right click on the Project name. Choose Add, then Select Web Form to get the screen below.And you get the Add New Item screen, shown below.
2. Select the name of the form you will add frmSalaryCalculator.aspx. Make sure "Place code in separate file" is checked and "Select master page" is unchecked.
You will create a Web-based salary calculator on this new page.
Click the Design view.
Add the Tools Window using View-> Toolbox.3. You can choose to adjust the ToolBox to tab with Solution Explorer to look like the following screen.
You will create a Web-based salary calculator on this new page.
To do this, open the aspx page in Design view and, from the Toolbox, drag a label into the form, click after the label and add about 5 spaces, then drag a textbox control after the label.
Press Enter after the textbox to put the cursor on the next line.
Add another label and textbox below the first set and press Enter.
Then add a button control. Finally, on the last line, add another label. Your form should look like the screen displayed below.4. If necessary, add the Property Window as shown in the screen below, using View->Properties Window.
5. Now we will modify the page to add proper labels and give the textboxes names.
• Change the text displayed in each label so that the first label displays Annual Hours; the second label should display Rate; and the third label should display $.
• To change the text displayed, click on the label control. This causes the property window to show all properties of the label, then change the Text property of the control in the Properties window.
• Set the ID property of the top textbox to txtAnnualHours.
• Set the ID property of the second textbox to txtPayRate. Set the ID of the bottom label (the one we set the text property to "$") to lblAnnualSalary. (Note: We set these IDs as we will be accessing the control values from the C# code. You can set the button ID and the other two labels' ID properties as well, but we won't be accessing them from our code.)
• Change the button text to display Calculate Salary. (Hint: To change the text displayed as the button label, change the Text property of the button.) The ID of the button should be btnCalculateSalary.Your form should now look like the screen displayed below.This code will be called each time the user presses the button. It is important to remember that code in the code behind page executes on the server, not on the user's browser. This means that when the button is pressed, the page is submitted back to the Web server and is processed by the ASP.Net application server on the Web server. It is this code (between the { and } in this method) that will execute on the server. Once it is done executing, the page will be sent back to the browser. Any changes we make to the page or controls on the page will be shown to the user in the updated page.
Learn More
• In this method, add code that will get the text in the txtAnnualHours text box, convert it to a Double, and store it in a double variable.
• Add code that will get the text from the txtPayRate text box, convert it to a Double, and store it in another variable.
• Create a third variable of type Double and set its value to the annual hours variable value multiplied by the rate double variable value.
• Take this resulting value and convert it to a string (text), and update the lblAnnualSalary Text property with this new string.
Let's look at a similar example. After reviewing this example, write the code needed to calculate the annual salary.
CostOfRoom Calculator is the alternate example, which demonstrates the skills you need to complete this assignment. See video at the top of this lab document and screenshots below.
What follows is an example of code-behind the Calculate button for the CostOfRoom Calculator:
Code-behind the calculate button
A control's property can be accessed by simply using the control ID followed by a . followed by the name of the property. For example, the value stored in the Text property of the txtAnnualHours control can be accessed by using this: txtAnnualHours.Text. Text properties on controls are of type string.
The output of the CostOfRoom calculator is shown in the screen below with Length, Width, Cost Per Square Unit labels and input boxes, and the Calculations button.
Use small values for length and width.
Use large values for length and width and see the formatting of the output.
To convert a string to a Double you can use the Convert class. If we had a string variable called str1 and a double variable called myNumber, the C# code to convert this would be as follows:
When converting from one type to another, we are assuming that the value stored in the type being converted is compatible with the type with which we are converting. In the example above, if the value stored in str1 was not a type compatible with a Double (for example, tiger), an error would be raised.
All of the base types in C# (double, int etc) have a ToString() method that you can call. If you had a double variable that you wanted to convert to a string and set that string to my label's text, you would do the following:
This would take whatever value was stored in the myNumber Double and convert it to a string.
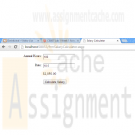
Set your new form as the start page by clicking once on the form name in the Solution Explorer and then right-clicking on the form name and selecting Set as Start Page. You can now test your application and make sure it works correctly as you did with the Hello World form above. You can switch back and forth between which form runs when you run your application by setting the different forms as the start page. The final result should look something like the screen below with the Annual Hours, Pay Rate, Calculate Salary button, and result.
Once you have verified that your project works, save your project, zip all files, and submit it.
NOTE: Please download and review the Files section files Web Lab and Citrix.zip, which contain information on how to FTP to the DeVry University website and how to use Citrix for the assignments. -
New Perspectives on HTML, CSS, and Dynamic HTML 5th edition Tutorial 10 Case 3 MidWest Student Union
Regular Price: $15.00
Special Price $12.00
New Perspectives on HTML, CSS, and Dynamic HTML 5th edition Tutorial 10 Case 3 MidWest Student Union
MidWest Student Union Sean Lee manages the Web site for the student union at MidWest University in Salina, Kansas. The student union provides daily activities for the students on campus. As Web site manager, part of Sean's job is to keep the Web site up to date on the latest activities sponsored by the union. At the beginning of each week, she revises a set of seven Web pages detailing the events for each day in the upcoming week.
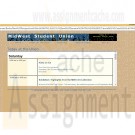
Sean would like the Web site to display the current day's schedule in an inline frame within the Web page titled Today at the Union. To do this, her Web page must be able to determine the day of the week and then load the appropriate file into the frame. She would also like the Today at the Union page to display the current day and date. Figure 10-39 shows a preview of the page she wants you to create.Sean has created the layout of the page, and she needs you to write the scripts to insert the current date and the calendar of events for the current day. To assist you, she has located two functions:
• The showDate() function returns a text string containing the current date in the format Weekday, Month Day, Year. The function has no parameter values.
• The weekDay() function returns a text string containing the name of the current weekday, from Sunday through Saturday. This function also has no parameter values.
The two functions are stored in an external JavaScript file named functions.js. The daily schedules have been stored in files named sunday.htm through saturday.htm.Complete the following:
Learn More
1. Use your text editor to open the todaytxt.htm file from the tutorial.10\case3 folder included with your Data Files. Enter your name and the date in the comment section of the file and save it as today.htm.
2. In the head section just above the closing </head> tag, insert a script element accessing the functions.js file.
3. Scroll down the file and locate the div element with the id dateBox. Within this element insert a script element. The script should run the following two commands:
a. Write the following HTML code to the Web page:
Today is<br/>
b. Write the text string returned by the showDate() function to the Web document.
4. Scroll down the file and locate the h1 heading with the text Today at the Union. Within the empty paragraph that follows this heading, insert another script element. Within the script element, do the following:
a. Insert the following multiline comment:
Display the daily schedule in an inline frame.
Daily schedules are stored in the files sunday.
htm through saturday.htm.
b. Insert a command to write the HTML code
<iframe src='weekday.htm'></iframe>
to the Web page, where weekday is the text string returned by the weekDay() function.
5. Save your changes to the document.
6. Open today.htm in your Web browser. Verify that it shows the current date and that the daily schedule matches the current weekday.
7. If you have the ability to change your computer's date and time, change the date to different days of the week and reload (not simply refresh) the Web page. Verify that the date and the daily schedule change to match the new date you selected. Debug your code as necessary.
8. Submit your completed files to your instructor. -
New Perspectives on HTML and CSS Edition 6 Tutorial 9 Case Problem 3 Math High
Regular Price: $20.00
Special Price $15.00
New Perspectives on HTML and CSS Edition 6 Tutorial 9 Case Problem 3 Math High
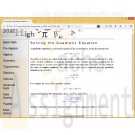
Math High Professor Laureen Cole of Coastal University, owner of the Web site Math High, has been studying the XML vocabulary MathML and how it can be used to display mathematical equations and information. She's asked you to create an XHTML document that contains elements from both XHTML and MathML. A preview of the page that you'll create is shown in Fig 9-31.
Complete the following:
Learn More
1. Use your text editor to open the quadtxt.xhtml file from the tutorial.09\case3 folder included with your Data Files. Enter your name and the date in the comment section of the file. Save the file as quad.xhtml in the same folder.
2. Add an XML prolog at the top of the document.
3. Within the html element, insert two namespace declarations: one for the XHTML namespace and the other for the MathML namespace (http://www.w3.org/1998/Math/MathML). Make XHTML the default namespace for the document and make MathML a local with the prefix m.
4. Scroll down the document to the paragraph element with the id eq1. Within this paragraph, copy and paste the MathML element from the mathml.txt file for the first equation.
5. Repeat Step 4 for the paragraphs with ids from eq2 through eq4.
6. For each MathML element, and the MathML namespace prefix m to indicate that these elements are part of the MathML vocabulary.
7. Close the file, saving your changes.
8. Open the quad.xhtml file in a browser that provide built-in support for MathML. At the time of this writing, that includes the FireFox and Opera browsers. Verify that your page resembles that shown in Figure 9-31.
9. Submit your completed files to your instructor, in either printed or electronic form, as requested. -
CMIS 141 Project 1 Grade Comments
Regular Price: $15.00
Special Price $12.00
CMIS 141 Project 1 Grade Comments
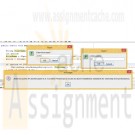
Design and implement a Java program that will read the name and number of points of the students and displays the comments accordingly.
In the following table there are the relation between Grades, Points and CommentsGrade Points Comments
A+ 100 The grade is A+: Outstanding it is a perfect score. Well done.
A 90-99 The grade is A : Excellent Performance excels far above established standards for university-level performance.
B 80-89 The grade is B : Superior-Performance above established standards
C 70-79 The grade is C : Good- Performance meets established standards
D 60-69 The grade is D : Substandard- Performance is below established standards
F 0-59 The grade is F : Failure- Performance does not meet minimum requirementsProgram Statement
Learn More
The program ask you to introduce:
First name:
Points:
The output is:
Name of the student, Points, Grade, Comments regarding the grade (like in the table)
1. Use JOptionPane.showInputDialog() methods for your user to input their data
2. Use JOptionPane.showMessageDialog() methods to display your messages.
3. Include a comprehensive set of application test data that you used to test your program. Your test data can be shown in a table that includes input data, expected output, actual output and pass/fail results from the test. Your test data can be presented in the form of a table as follows:
Example application test data:
Input Expected Output Actual Output Did Test Pass?
First name : John Points: 97 John has points 97 and the grade is A : Excellent Performance excels far above established standards for university-level performance. John has points 97 and the grade is A : Excellent Performance excels far above established standards for university-level performance. Y
Additional data test have to be added -
BMIS 212 Week 1 Programming Assignment
Regular Price: $15.00
Special Price $12.00
BMIS 212 Week 1 Programming Assignment
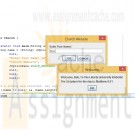
In this new age of Technology (Website, social media, etc., we have been given the opportunity to minister and serve others in many ways. Using the techniques you have learned in this chapter, write a program which displays at least 5 different sentences that explain how technology has been used to win souls to Christ.
Instructions: Write a portion of a program for a church's website. The program will be used for a chatting feature, which should include an Input Box that requests the user's name. The message box should include the user's name and the Scripture of the Day (chapter and verse only).
The program should be similar to the text below:
Welcome, Bob, To The Liberty University Website!
The Scripture for the day is: Matthew 6:11The assignment must have the following statements and components as demonstrated in the text:
1 Java file and 1 Class file
Variable
Input StatementProgram should follow Java Programming Conventions as shown in the Grading Rubric.
Exercise 2.14 Write an application that displays the numbers 1 to 4 on the same line, with each pair of adjacent numbers separated by 1 space. Use the following techniques:
Use 1 System.out.println statement
Use 4 System.out.print statements
Use 1 System.out.printf statementExercise 2.15 (Arithmetic) Write an application that ask the user to enter 2 integers, obtains them from the user and prints their sum, product, difference and quotient (division). Use the techniques shown in Figure 2.7
Exercise 2.26 (Comparing Integers) Write an application that reads 2 integers, determines whether the first is a multiple of the second and prints the result. [Hint: Use the remainder operator.]
Learn More -
CS371 Database Design Executive Summary
$25.00CS371 Database Design Executive Summary
Write a proposal for the new database design to include:
An executive summary for the database projectDevelop main project details
Explain the issues that exist with maintaining the data in its current form.
Explain the process of migrating the data in its current form to a well formed data model by highlighting the following in detail:
Identify required attributes that need to be tracked
Identify functional dependencies
Show the redesign in 1NF, 2NF, and 3NF (similar to figures 7.29, 7.31, 7.33)Explain the project benefits of the data in its new form.
Create the E-R diagram of your relational tables using MySQL Workbench and include in proposal.
Propose some additional data items, which you believe may be beneficial to the University if tracked in your database (i.e. Descriptions, more info about the instructors and students, departments, etc). Describe the steps required to implement these additions.
Identify project risks
In addition to the proposal, in a separate file submit:
Learn More
Provide the SQL statement required to create at least one of your tables.
Provide the SQL statement required to delete at least one of your tables.
Provide the SQL statement required to create a view which includes Course #, Course Name, Time, and Days only.
Identify at least one index, which you believe would improve performance. Explain your choice.
If you add a course description attribute to your course table, there may be some performance impacts imposed by the addition of this "text" field. -

CIS 273 Week 8 Assignment Single Page Website
$15.00CIS 273 Week 8 Assignment Single Page Website
Deliverables: One (1) Web page and one (1) Cascading Style Sheet (.css), including the image file.
Imagine that you have just started your own freelancing business. You have been hired to create a Web page for a company of your choice that announces the item of the week, month, or year. (e.g., Car of the Year, Pet of the Month, Sandwich of the Week, etc.)
1. Create a Cascading Style Sheet (.css) that applies a minimum of background color and font.
2. Create one (1) Web page and a heading tag that overrides the Cascading Style Sheet (.css) font settings and makes the font of the heading different from the rest of the page.
3. The page must also include:
a. An image depicting the item of the week, month, or year.
b. At least three (3) hyperlinks to Websites of associated interest to the item and a brief description of what they are about.
Example: Click here to visit Strayer University
This link will take you to the University’s main page where you can find further information.
4. At the bottom of the page, create a link that would allow the user to email you with questions using the mailto: tag and your email address.
Note: When the email opens the subject line should automatically say, "More Information Please".
5. Create a footer displaying the Copyright symbol (using the character entity reference), the year, and your name.
Example: © 2012 Mary Smith
6. Include a piece of JavaScript in the page.The specific course learning outcomes associated with this assignment are:
Learn More
Describe the structure of the World Wide Web as interconnected hypertext documents.
Create and validate HTML documents.
Create presentations using Cascading Style Sheets and DHTML.
Summarize Web standards in terms of specifications, guidelines, software, and tools.
Write clearly and concisely about Web design and development using proper writing mechanics and technical style conventions. -
CIS 273 Lab Assignment 2 Three Web Pages with Hyperlinks
$12.00CIS 273 Lab Assignment 2 Three Web Pages with Hyperlinks
Learn More
Follow the directions below to complete Lab Assignment 2:
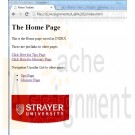
1. Create three (3) Web pages: index.htm, tips.htm, and glossary.htm. Open and close all tags appropriately using the correct tags.
2. Display your name in the title bar of the browser, declare the DOCTYPE for HTML5, and create a comment listing the lab number, the author, and the date.
3. Create links on each page that link to the other two (2) pages.
4. Create navigation links on each page that link to the other two (2) pages.
5. On the home page, create an image linked to http://strayer.edu.
6. Create alternate text for the image link that says "Strayer University."
7. On the glossary.htm page, create a definition list of at least five (5) terms and their definitions.
8. In the definition list, create bold tags for the terms only (not the definition).
9. Display the special characters "<" and ">" somewhere in the term definitions.
10. On the glossary.htm page, create at least two (2) links to areas on the same page. -
CIS407 Lab 1 Week 1 Annual Salary Calculator ASP.NET Web Application
$10.00This course has expired to download the latest version of CIS407A Labs click here
CIS 407 iLab 1 of 7: "Annual Salary Calculator" ASP.NET Web Application
iLAB OVERVIEW
Scenario/Summary
In this iLab, you will create an Annual Salary Calculator ASP.NET web application using Visual Studio.NET 2008.
For the iLabs, you will use the Microsoft Visual Studio 2008 software application. You have two options for using this application:
• You may use a copy of Visual Studio 2008 that is installed on your local PC. If you do not already have this software, there is a link in the Syllabus (in the Textbook and Required Materials section) that you can follow to obtain a copy at low or no cost through the DeVry Student Software Fulfillment Center.
or
• You may run Visual Studio 2008 over the Web from the DeVry iLab (Citrix) server. Instructions for using the iLab (Citrix) server are on the iLab page under Course Home.
Throughout this course, you will be creating a web application for a fictitious company called CoolBiz Productions, Inc. To get familiar with the development environment, follow the Lab Steps to create a simpleAnnual Salary Calculator ASP.NET web application. You will be adding to this application each week.
Instructions for Week 1 iLab: "Hello World, and more" ASP.NET Web Application
Click on the link above to view the tutorial.
Please watch this tutorial before beginning the iLab.
The tutorial has audio.Overview of Fictitious Company
CoolBiz Productions, Inc.
We are a mid-size indie (independent) film studio that is in need of a payroll system. We have outgrown our current system, a simple spreadsheet, to the extent that it takes three people over one week to pay everyone on a timely basis.
Overview of Our Company
We have over 2,000 full-time and part-time employees. We produce comedy, fiction, and science fiction films with budgets of $250K–$20 million. We have produced over 50 films since we first began 20 years ago.
We are very profitable and have strong links to many of the industry's most powerful people.
Current Payroll System
Our current system consists of mostly manual processing using an MS Excel spreadsheet to control who gets paid.
The system consists of the three payroll staff members reviewing each of the full-time staff members' wages, calculating how many hours they worked based on their hourly rate, and paying them by issuing a check.
The check needs to be entered in another worksheet for each of the people who were paid so that we can tell when it went out, how much it was for, and if it was cashed or not. If a [Date_Cashed] is entered, we deduct that amount from our working payroll capital account to track how much money we have for payroll.
This process is then repeated for all part-time staff and independent contractors.
Our Needs
We need a more automated way to pay our staff. We need to use the same logical flow as a basis, yet improve on it by having a way to
1. easily calculate the projected annual salary based on rate and number of hours;
2. search, enter, update, and delete staff and independent employee information in one place;
3. search, enter, update, and delete payroll automation information for the employee to set up recurring payments or one-time payments;
4. produce reports to show the following: (a) summary of who got paid per week, (b) summary of all payments per week, (c) details of any employee to-date (allow entry of a specific employee ID);
5. allow transactions to be rolled back in case we pay someone too much;
6. make use of transaction processing in case the system unexpectedly shuts down;
7. ensure the system is secure (logins required);
8. allow only authorized payroll personnel to control all aspects of the system;
9. allow only authorized payroll personnel to view transactions and user activity;
10. allow only authorized payroll personnel to e-mail reports to users using the e-mail on file; and
11. incorporate error handling into all processes in the system and e-mail any errors to the technical support people.Deliverables
All files are located in the subdirectory of the website. The website should function as follows: You should have a page that, when run, displays a page showing the text "Hello, World." You should also have a second page that is the annual salary calculator that properly calculates the annual salary, given an hourly rate and the number of hours projected to be worked in a year. Once you have verified both pages work, save your website, zip up all files, and submit in the Dropbox.iLAB STEPS
STEPS 1 through 3: Create Website and Home Page (10 points)
In this ilab, we will learn how to create a simple ASP.NET web application using Microsoft Visual Studio.NET 2008. The application will display the text "Hello, World" on the home page.
1. Open Microsoft Visual Studio 2008.
2. Create a new ASP.NET website called "PayrollSystem." To do this, select "File, New Website."
When the "New Website" dialog opens, select "ASP.NET Website" as the Template, select "File System" as the Location, and select "Visual C#" as the Language. Click Browse and navigate to the folder where you want to save your website. Add "PayrollSystem" at the end of the file path. Click OK if you are prompted to create a new folder. Click OK in the New Website dialog to finish creating the website.
3. Edit the Default.aspx file (the home page for your site) to add the message "Hello, World." To do this, if necessary, click the Design button below the editing window to switch to Design view, then click in the editing window and type "Hello, World" (without the quotes).
Click the Save button on the toolbar to save the changes to Default.aspx.
STEPS 4 through 5: Start Debugging (10 points); NOTE: Citrix users have different steps!
4. To ensure that everything is working properly, click the Start Debugging button on the toolbar, or press the F5 key on the keyboard, or pull down the Debug menu and select "Start Debugging."
5. If the "Debugging Not Enabled" dialog box appears, select the option to add or modify the Web.config file to enable debugging and click OK. You should only have to do this the first time you debug the site.
NOTE: To execute the application, you have these options:
A. If you are using Citrix, press CTRL + F5 to Start Without Debugging. You will not be deducted points for this part.
B. If you are using a standalone version, press F5 to Start with Debugging, or you can press CTRL + F5 to Start Without DebuggingSTEP 6 through 7 : Display the "Hello, World" web page (10 points)
Learn More
6. The Internet Explorer web browser will open and display your Default.aspx page containing the "Hello, World" message.
7. Click here for text description of this image.
8. Stop debugging and return to the design mode by closing the browser.
9. Add a new form to your web application called frmSalaryCalculator.aspx. Make sure "Place Code in separate file" is checked when you add the form. To add a new form, click (single-click, not double-click) on the project node in the solution explorer.
With the project node highlighted, right-click on the project node and select "Add New Item" from the popup menu. The following dialog will be displayed:
Select the name of the form you will add frmSalaryCalculator.aspx. Make sure "Place code in separate file" is checked and "Select master page" is unchecked.
10. You will create a web-based salary calculator on this new page. To do this, open the aspx page in Design view and, from the Toolbox, add three labels, two text box controls, and a button control. You can add controls by dragging the control from the Toolbox – Standard section onto your form. Your form should look like this:
11. Change the text displayed in each label so that the first label displays "Annual Hours"; the second label should display "Rate" and the third label should display "$". (Hint: To change the text displayed, change the Text property of each control.)
12. Change the button text to display "Calculate Salary." (Hint: To change the text displayed as the button label, change the Text property of the button.) Your form should now look like this:
13. Set the ID property of the top text box to txtAnnualHours. Set the ID property of the second textbox to txtRate. Set the ID of the bottom label (the one we set the text property to "$") to lblSalary. (Note: We set these IDs as we will be accessing the control values from the C# code. You can set the button ID and the other two labels' ID properties as well, but we won't be accessing them from our code.)
14. In Design view, add a C# event handler for the button-click event by double-clicking on the Calculate Salary button. This will place you in the page code behind file the editor. (Remember that ASP.Net pages have a file containing the HTML markup with an extension of .aspx and a C# 'code behind' file with an extension of .aspx.cs.) This is the code that should be displayed: (If you changed the ID of the button, it will be a different method name.)
This code will be called each time the user presses the button. It is important to remember that code in the code behind page executes on the server – not on the user's browser. This means that when the button is pressed, the page is submitted back to the web server and is processed by the ASP.Net application server on the web server. It is this code (between the { and } in this method) that will execute on the server. Once it is done executing the page will be sent back to the browser. Any changes we make to the page or controls on the page will be shown to the user in the updated page.
15. In this method, add code that will get the text in the txtAnnualHours text box, convert it to a Double, and store it in a double variable. Add code that will get the text from the txtRate text box, convert it to a Double, and store it in another variable. Create a third variable of type Double and set its value to the annual hours variable value multiplied by the rate double variable value. Take this resulting value and convert it to a string (text), and update the lblSalary Text property with this new string.
Hints: A control's property can be accessed by simply using the control ID followed by a . followed by the name of the property. For example, the value stored in the Text property of the txtAnnualHours control can be accessed by using this: txtAnnualHours.Text. Text properties on controls are of type string.
To convert a string to a Double you can use the Convert class. If we had a string variable called str1 and a double variable called myNumber, the C# code to convert this would be as follows:
When converting from one type to another, we are assuming that the value stored in the type being converted is compatible with the type we are converting to. In the example above, if the value stored in str1 was not type compatible with a Double (for example "tiger") an error would be raised.
To set the value of a control on a web form, you can access the control and set the property directly. If I had a label control called lblCar and I wanted to update the text that was displayed in the label, I could do something like this:
Note that following code would be incorrect and cause an error:
lblCar is a Label – it isn't a string so we can't assign a string directly to it, but we can assign a string directly to the Text property of the label.
All of the base types in C# (double, int etc) have a ToString() method you can call. If you had a double variable that you wanted to convert to a string and set that string to my label's text, you would do the following:
This would take whatever value was stored in the myNumber Double and convert it to a string.
To add a $ to output you can use string concatenation in C# like this:
16. Set your new form as the start page by clicking once on the form name in the Solution Explorer and then right-clicking on the form name and selecting "Set as Start Page." You can now test your application and make sure it works correctly as you did with the Hello World form above. You can switch back and forth between which form runs when you run your application by setting the different forms as the start page.
Once you have verified that your project works, save your project, zip all files, and submit in the Dropbox.
NOTE: Please download and review the Doc Sharing files Web Lab and Citrix.zip, which contain information on how to FTP to the DeVry University website and how to use Citrix for the assignments.


