Search results for 'College'
-
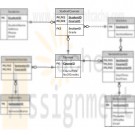
CTS2437 South Community College ERD and SQL script
$15.00South Community College (SCC) is structured like a typical community college. They have 3 semesters and a multitude of courses. Each course may have any number of sections in a given semester. For example, CTS2437 (SQL Server) may have one or more sections being taught in any given semester. SCC has 3 semesters (fall, spring, summer) which they refer to as A, B, and C. They refer to semesters by the year and the semester code. For example, fall 2011 would be referred to as 2011A. They need to keep track of students, courses, schedules, instructors, and grades earned in each course taken. They need a database to maintain these information. The student information would include the student name, address, phone#, and email. Students may have taken or are taking any number of courses. The grade earned for each course must also be maintained. The course information would include the course title and number of credits. Keep in mind that a given course may have many sections in any particular semester. SCC needs to maintain the instructor for each section in addition to the students and the grade they earned. The instructor information would include the instructor name, phone#, office#, and email address. South needs to maintain all courses that the instructor has taught or is currently teaching. Some of the requirements that SCC has requested in the database system include: • Student cannot register for the same section more than once. • A roaster of students can be produced for any given section. • GPA (Grade Point Average) can be generated for a student for any given semester, year, or entire school career. • GPA is calculated by adding up all of the grades earned (A=4, B=3, C=2, D=1, F=0) and dividing by the number of credits associated with the courses taken. • A transcript can be produced for a given student showing all courses taken and grades earned. Learn More -

CS362 Structured Query Language for Data Management Week 2 IP
$20.00CS362 Structured Query Language for Data Management Week 2 IP
Learn More
After creating the database schema, use Insert, Update, and Delete commands to populate the tables with the following information.
1. Insert the following classes' records:
Code Name Description
ACCT306 Accounting 1 This course introduces accounting concepts and explores the accounting environment. It covers the basic structure of accounting, how to maintain accounts, use account balances to prepare financial statements, and complete the accounting cycle. It also introduces the concept of internal control and how to account for assets.
CS362 Structured Query Language for Data Management This course gives complete coverage of SQL, with an emphasis on storage, retrieval, and manipulation of data.
ENG115 English Composition In this course, students focus on developing writing skills through practice and revision. Students will examine expository, critical, and persuasive essay techniques.
FIN322 Investments This course focuses on investments and investment strategies. Various investment vehicles such as stocks, bonds, and commodities are examined. Students will explore the principles of security analysis and valuation.
2. Insert the following advisors' records:
Name Email
Fred Stone fred@college.edu
Bob Gordon bob@college.edu
Jack Simpson jack@college.edu
3. Insert the following students' records:
Name Birthdate Gender StartDate GPA IsActive AdvisorID
Craig Franklin 1970-03-15 Male 2010-05-30 3.10 Yes 3
Harriet Smith 1982-04-15 Female 2010-05-30 3.22 Yes 1
George David 1984-11-05 Male 2010-10-01 0.00 Yes 3
Ben Jefferson 1976-09-25 Male 2009-02-21 1.80 No, the student has gone on temporary leave to pursue other opportunities but plans on returning in 1 year. 3
4. Delete the course named Investments from the system.
5. Change Harriet Smith’s birthdate to April 25, 1982 and her GPA to 3.25.
Copy and paste the work into your Key Assignment document and include screen shots of each step, describe what you did for each step and paste in the actual SQL text used to perform each step. Provide an introduction explaining the important of these commands in relation to your overall Key Assignment. -
COM 330 Chapter 6 Assignment
$20.00COM 330 Chapter 6 Assignment
Learn More
1. Using the STUDENT table structure shown in Table P6.4, do the following.
Table P6.4 Sample STUDENT Records
Attribute Name Sample Value Sample Value Sample Value Sample Value Sample Value
STU_NUM 211343 200128 199876 199876 223456
STU_LNAME Stephanos Smith Jones Ortiz McKulski
STU_MAJOR Accounting Accounting Marketing Marketing Statistics
DEPT_CODE ACCT ACCT MKTG MKTG MATH
DEPT_NAME Accounting Accounting Marketing Marketing Mathematics
DEPT_PHONE 4356 4356 4378 4378 3420
COLLEGE_NAME Business Admin Business Admin Business Admin Business Admin Arts & Sciences
ADVISOR_LNAME Grastrand Grastrand Gentry Tillery Chen
ADVISOR_OFFICE T201 T201 T228 T356 J331
ADVISOR_BLDG Torre Building Torre Building Torre Building Torre Building Jones Building
ADVISOR_PHONE 2115 2115 2123 2159 3209
STU_GPA 3.87 2.78 2.31 3.45 3.58
STU_HOURS 75 45 117 113 87
STU_CLASS Junior Sophomore Senior Senior Junior
c. Write the relational schema and draw the dependency diagram to meet the 3NF requirements to the greatest extent possible. If you believe that practical considerations dictate using a 2NF structure, explain why your decision to retain 2NF is appropriate. If necessary, add or modify attributes to create appropriate determinants and to adhere to the naming conventions.
d. Draw the Crow’s Foot ERD.
Load the data from table P6.4 into an Access database. Add 5 additional students (make up your data) following the table structure.
Create a query in Access that list the students who have a Statistics major.
List the students who have a GPA of 3.45 or higher in a report.
Report the students who have the same advisor.
Submit c and d as an attachment, attach your Access database. -

COM 330 College Access database
$20.00Create a database using MS ACCESS or SQL (your choice). Your database will be a college database, such as Tiny College that tracks students, the classes they are enrolled in, the location of the class and the instructor of the class. You will also show reports and queries to your database. Such as all students who have made an A in History 101, or all the classes that Professor Smith teaches and what buildings/room that he teaches in. How many students are Math majors? Etc….. These are just some examples; use your knowledge of system life cycle, prototyping, Implementation support, organizational issues, standards, etc…
Minimum of 25 students, 10 professors and 10 buildings/rooms, and 15 classes.
Learn More -

Microsoft Access 2010 Chapter 7 Make It Right Correcting Errors in the Query Design
$20.00Microsoft Access 2010 Chapter 7 Make It Right Correcting Errors in the Query Design
Learn More
Analyze a database, correct all errors, and/or improve the design.
Instructions: Start Access. Open the College Pet Sitters database. See the inside back cover of this book for instructions for downloading the Data Files for Students, or see your instructor for information on accessing the files required in this book.
College Pet Sitters is a database maintained by a small pet-sitting business owned by college students. The queries shown in Figure 7 – 37 contain a number of errors that need to be corrected before the queries run properly. The query shown in Figure 7 – 37a displays the Enter Parameter Value dialog box, but this is not a parameter query. Also, the owners wanted to assign the name, Total Amount, to the Balance + Paid calculation. Save the query with your changes.
When you view the results for the query shown in Figure 7 – 37b, you get 30 records. You know this is wrong. Also, the query did not sort correctly. The query results should be sorted first by sitter number and then by descending balance. Correct the errors and save the query with your changes.
Change the database properties, as specified by your instructor. Submit the revised database in the format specified by your instructor. -

Student Database Oracle DDL and Queries
$40.00Student Database Oracle DDL and Queries
Create the following tables.
STUDENT
Student Number (PK)
Student Last Name
Student Major
Department ID (FK)
Student GPA
Student Hours
Student Class
Advisor ID (FK)ADVISOR
Advisor ID (PK)
Advisor Last Name
Advisor Office
Advisor Building
Advisor PhoneDEPARTMENT
Department ID (PK)
Department Code
Department Name
Department Phone*NOTE* You will have to decide on how to handle the Department and Advisor ID foreign keys in terms of a numbering system as well as appropriate field widths and types for the fields.
The business rules which govern this database are: A student may have one advisor while an advisor may advise multiple students. A student belongs to only one department but each department can have many students.
Populate the table with data from Table P6.4 (p. 217).
There is an error in the book! Change Ortiz’s student number to be 200888. In addition, add these three students to your database.
STU_NUM 123984 995133 367181
STU_LNAME Freeman Wilder Green
STU_MAJOR CIT CIT BIS
DEPT_CODE CS CS IS
DEPT_NAME Computer Science Computer Science Business Informatics
DEPT_PHONE 5234 3951 3951
COLLEGE_NAME Informatics Informatics Informatics
ADVISOR_LNAME Strand Zhang Goh
ADVISOR_BLDG Griffin Griffin Griffin
ADVISOR_OFFICE 5132 3451 5612
ADVISOR_PHONE 1603 3512 7922
STU_GPA 2.5 3.9 2.3
STU_HOURS 97 58 63
STU_CLASS Senior Junior JuniorPart 1
Provide all DDL-related code. This includes table definition and creation, fk/pk creation, and populating the tables with data. Please include the output from Oracle that shows that everything was created correctly.Part 2
Learn More
Queries – For each query provide 1) What the output, specifically, should be based upon eyeballing the data 2) the SQL code used to generate the query, and 3) the output from Oracle. Please include any relevant fields you think the user of the query would need to interpret the output.
1. Advisors need the capability to generate a query that returns *all* student information based upon a student number. This will help them in the advisement process. Create a query that returns all information for student Freeman from each table.
2. Each year, college administrators need to know how many students are in each major. Create a query that counts the number of students in each major while displaying the major name.
3. Kroger has approached NKU with an internship opportunity! The business department chair needs to generate a mailing list to inform great students about a job opportunity. Create a query that shows all the student numbers, last names, majors, department names, and advisor’s last name for students in Business Admin. Students should have a minimum GPA of 2.5 or greater to be on this mailing list. List in ascending order of GPA.
4. To get an idea of the adequacy of admission standards, NKU needs to have an idea of the breakdown of students. By each college, show the number of students in each classification (freshmen, sophomore, junior, senior).
5. Due to a fire, Griffin Hall has burnt down. Write a SQL statement that updates all faculty who had offices in Griffin Hall to now be housed in the University Center.
6. New funding may be able to pay for an advising center. The dean would like to get an idea of how many students each faculty member currently advises. Create a query that shows the names and majors of students for each advisor along with the advisor’s name.
7. (Extra credit) Create a query that counts the number of students who are eligible for the Dean’s list (GPA >= 3.5) in each department. -

Microsoft Word 2010 Chapter 2 Lab 2 Preparing a Research Report with a Footnote
Regular Price: $15.00
Special Price $12.00
Microsoft Word 2010 Chapter 2 Lab 2 Preparing a Research Report with a Footnote
Problem: You are a college student enrolled in an introductory English class. Your assignment is to prepare a short research paper in any area of interest to you. The requirements are that the paper be presented according to the MLA documentation style, contain at least one note positioned as a footnote, and have three references. One of the three references must be from the Internet. You prepare a paper about trends in agriculture (Figure 2–84).
Instructions: Perform the following tasks:
Learn More
1. Start Word. Modify the Normal style to 12-point Times New Roman font. Adjust line spacing to double and remove space below (after) paragraphs. Update the Normal style to include the adjusted line and paragraph spacing. Create a header to number pages. Type the name and course information at the left margin. Center and type the title. Set a fi rst-line indent for paragraphs in the body of the research paper.
2. Type the research paper as shown in Figures 2–84a and 2–84b. Insert the footnote as shown in Figure 2–84a. Change the Footnote Text style to the format specified in the MLA documentation style. Change the bibliography style to MLA. As you insert citations, use the source information listed below and on page WD 134:
a. Type of Source: Article in a Periodical
Author: Barton, Blake
Title: Computers in Agriculture
Periodical Title: Agriculture Today and Tomorrow
Year: 2012
Month: Feb.
Pages 53–86
Publication Medium: Print
b. Type of Source: Book
Author: Newman, Albert D., and Carmen W. Ruiz
Title: The Agricultural Industry Today
Year: 2012
City: New York
Publisher: Alabama Press
Publication Medium: Print
c. Type of Source: Web site
Author: Brewster, Letty
Name of Web page: Agriculture: Expanding and Growing
Year: 2012
Month: Jan.
Day: 3
Publication Medium: Web
Year Accessed: 2012
Month Accessed: Feb.
Day Accessed: 9
3. At the end of the research paper text, press the enter key once and insert a manual page break so that the Works Cited page begins on a new page. Enter and format the works cited title. Use Word to insert the bibliographical list. Convert the bibliography field to text. Change the underline format on the titles of the works to the italic format, and insert the correct publication medium for each work.
4. Check the spelling and grammar of the paper.
5. Save the document using Lab 2-2 Agriculture Paper as the fi le name.
6. Print the research paper. Handwrite the number of words, including the footnotes, in the research paper above the title of your printed research paper. -
Advanced Visual Basic 2010 Chapter 7 Programming Challenge 5 Students and Course Lists
Regular Price: $20.00
Special Price $15.00
Advanced Visual Basic 2010 Chapter 7 Programming Challenge 5 Students and Course Lists
In this programming challenge, you will use LINQ statements to display college courses taken by selected students. You will use a CourseRegistration database, which contains tables named Students and Courses.
• The Students table contains the following columns: Id (smallint, primary key), LastName (varchar(30)), Status (smallint), and Major (varchar(5)).
• The Courses table contains the following columns: Id (varchar(10)), Student_Id(smallint), Credits (smallint), and Grade (float). The primary key of the Courses table consists of two combined columns: Id and Student_Id.
Figure 7-21 shows a one-to-many relationship between the Students and Courses tables. You can find the CourseRegistration.mdf database file in the chapter examples folder.Use a LINQ query to fill a DataGridView with a list of Student objects. When the user selects a student in the grid, display all courses taken by the student in a separate grid. Use another LINQ query to fill the second grid. A sample is shown in Figure 7-22, in which Student 1001 (Charles) was selected by clicking the left side of his row. The grid on the right fills with the list of courses taken by the selected student. Notice that the rightmost column in the Student grid displays a count of the number of courses the student has taken. This column was not in the database, but it is calculated by the LINQ query. We showed how to do such a calculation in Section 7.1.
The two DataGridView controls should be inserted into panels belonging to a Split-Container control. At runtime, the user will drag the divider between the two panels to adjust their size. To format the Grade column in the right-hand grid, set its Default-CellStyle.Format property like this:
Learn More
dgvCourses.Columns(2).DefaultCellStyle.Format = "n" -
New Perspectives on HTML, XHTML, and Dynamic HTML Chapter 6 Case Problem 2 Civil War Studies
Regular Price: $15.00
Special Price $12.00
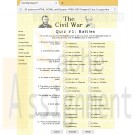
New Perspectives on HTML, XHTML, and Dynamic HTML Chapter 6 Case Problem 2 Civil War Studies
Civil War Studies Adanya Lynne, a professor of military history at Ridgeview State College in Bartlett, Tennessee, has been preparing a series of online quizzes for her students. She has created the basicWeb page design and layout, but has come to you for help in designing the quiz form. She envisions a series of multiple choice questions displayed in a collection of option buttons. Students will be able to click answers on the form and then submit their answers to a CGI script running on theWeb server for their scores. Figure 6-61 shows a preview of the page you’ll create for Professor Lynne.
Complete the following:
Learn More
1. Use your text editor to open the cwquiztxt.htm and qformtxt.css files from the tutorial.06\case2 folder included with your Data Files. Enter your name and the date in the comment section of each file. Save the files as cwquiz.htm and qform.css, respectively.
2. Go to the cwquiz.htm file in your text editor and insert a link to the qform.css style sheet.
3. Scroll down the file to the rightColumn div element. Professor Lynne has inserted the 10 questions for the online quiz. Enclose the questions in a form element with the id quizForm. Call the CGI script at http://www.ridgeviewcollmil.edu/quiz using the post method.
4. Go to the first question and enclose the text of the question in a div element with the class name question.
5. Enclose the set of answers for the first question within a field set.
6. Place a label element around each possible answer for the first question. Put the first answer in the class answerA, the second answer in the class answerB, the third answer in the class answerC, and the fourth answer in the class answerD.
7. Within each of the four labels for the answers to the first question, insert an option button directly before the text of the answer. Assign the ids ans1a, ans1b, ans1c, and ans1d to the four option buttons. Assign the field name question1 to each of the four option buttons. Finally, set the values for the four option buttons to a, b, c, and d.
8. Associate each of the four labels with a different id. Associate the first label with the ans1a field, the second with ans1b, the third with ans1c, and the fourth with ans1d.
9. Repeat Steps 4 through 8 for the remaining nine questions in the quiz, with the following changes:
- Change the ids for the four option buttons to the question number. For example, the ids for the second question are: ans2a, ans2b, ans2c, and ans2d.
- Change the field name of the four option buttons to the number of the question. For example, the field name for the second question is question2, for the third question is question3, and so forth.
10. After the last question, insert a div element with the id buttons. Within the element, insert a submit button with the value Submit, a command button with the value Answers, and a reset button with the value Reset.
11. Save your changes to the file.
12. Go to the qform.css file in your text editor and add the following styles to the style sheet:
- Float all elements of the question class on the left margin. Set their widths to 200 pixels and right-align the text. Set the clear style to left so that the element is only displayed when the left margin is clear.
- Display all field sets as block-level elements floated on the left margin. Set the size of the field sets to 400 pixels wide by 50 pixels high. Add a 20-pixel left margin and a 5-pixel bottom margin. Set the position property to relative. Finally, display the tan.jpg file as the background image for the field sets.
- Use absolute positioning to place all elements of the answerA class at the coordinates (0, 0), place answerB class elements at the coordinates (200, 0), place answerC class elements at (0, 25), and place answerD class elements at (200, 25).
- Center the contents of the div element with the buttons id. Set the width to 600 pixels and the top/bottom padding to 10 pixels. Set the left/right padding to 0 pixels.
- For input elements within the buttons div element, set the width to 100 pixels, set the top/bottom margin to 0 pixels, and set the left/right margin to 10 pixels.
13. Save your changes to the file and open cwquiz.htm in your Web browser. Verify that the layout and design resemble that shown in Figure 6-61.
14. Submit your completed files to your instructor. -

CIS363A Week 3 iLab 3 Create a Web Page Using CSS in Dreamweaver
Regular Price: $12.00
Special Price $10.00
CIS363A Week 3 iLab 3 Create a Web Page Using CSS in Dreamweaver
iLAB OVERVIEW
Scenario and Summary
Create an index.html file and create an external CSS file based on the specifications given in the assignment.
You will need to create an internal and external CSS.
You will also need to attach an external CSS file to the original page.Deliverables
index.html with attached external CSS sheet
style.css fileiLAB STEPS
Lab Preparation
Download the lab3Content.docx document found in Doc Sharing.Part A: Create HTML and CSS Files (3 Points)
Step 1: Create a New HTML File (1 point)
Open Dreamweaver and create a new HTML page.
Enter index.html as the web page name.Step 2: Copy Content From the Word Document (1 point)
Open the lab3Content document found in Doc Sharing.
Paste the content into the index.html page.Step 3: Create a CSS File (1 point)
Create a new CSS page.
Save the file and name it styles.css.
Note: If your styles.css file does not show when needed in the remaining steps, then click on the attach stylesheet icon, select browse, locate the styles.css file, and then click OK. (The styles.css will automatically be linked to the index.html file in the head section of the code.)Part B: Internal CSS (22 Points)
Step 1: Create an Internal CSS (10 points)
Go to the index.html file and create an internal CSS for the following properties. Use the Page Properties option in the Properties Panel.
Background color for the body A light tan: #FC6
Font color for all text in the body A dark blue: #039
Font for all text in the body Comic Sans MS
Font size for all the text in the body Body: 14 points
Link color for all links Dark red: #CC0000
Visited link color for all links Dark red: #CC0000
Rollover link color for all links Dark green: #060
Active link color for all links Dark red: #CC0000
No link should be underlined for all links Never underlineStep 2: Apply Internal CSS (12 points)
Your index.html page should reflect the styles from above.
Go back to Page Properties if the page did not update with your internal CSS.Part C: Tag CSS (22 Points)
Step 1: Create Tag CSS (10 Points)
For all of the following tags, create the CSS rule from the descriptions below.
Hint: To create a CSS, you need to click on the New CSS Rule in the CSS panel on the right-hand side. Watch Adobe TV on best practices for creating a style sheet. You will need to enter Style Sheets or CSS in the Adobe TV searchbox (http://help.adobe.com/en_US/dreamweaver/cs/using/WScbb6b82af5544594822510a94ae8d65-7e32a.html).
H2 Text color: #333, bold
H3 Background color: #39f
Border on the bottom with the following rules
Width: thin
Style: solid
Color: #003
Centered text
Margin on all sides: 35 pixels
p Font: Georgia
Text color: #030
Padding of 15 pixels on all sides
li Font family: Arial
Background color: gray
Text color:black, bold
Text size: 18 pointsStep 2: Apply Tag CSS (12 points)
Apply the new tag CSS to the content on the page.Part D: Class CSS (23 Points)
Step 1: Create a Class CSS (10 points)
Create a new CSS rule using a class CSS. You will need to select the option to include the class CSS to the styles.css file.Navtable: This class will be applied to a navigation table. Font family: Times Roman
Background color: #0ff
Text color: bold, centerexample1:This class will be applied to Example 1.
Background color: #699
Text color: #033, bold
Text size: 10 points
Margin on all sides: 25 pixels
Padding on all sides: 25 pixelsexample2:This class will be applied to Example 2.
Background color: #66c
Border on all sides with the following rules
Width: 10px
Style: solid
Color: #06c
Text size: 10 pixels
Text color: #cccheader:This class will be applied to the heading "IEBGENER STUDY GUIDE."
Font family: Arial
Background color: #6ff
Text color: 030
Text size: 36 points
Margin on all sides: 50 pixels
Padding on all sides: 50 pixelsStep 2: Apply the Class CSS (12 points)
Apply the class CSS as done in the class CSS steps above.Step 3: Upload Zipped File (1 point)
Learn More
Your index.html page should have all inline, tags, and class CSS applied.
Create a folder called CIS363A_YourLastName_Lab3.
Put copies of each required deliverable into the new folder.
Right-click on the folder and select Send To -> Compressed (zipped) Folder. You can also use other tools to compress the files into a single zip folder (e.g., 7-zip).
Upload the zip file to the weekly iLab Dropbox in eCollege.

You have no items in your shopping cart.
