Search results for 'shipping'
5 Item(s)
Grid List
-
CIS 170 Week 2 iLab 2 of 7 Decisions
$15.00CIS 170 Week 2 iLab 2 of 7 Decisions
Scenario/Summary
You will code, build, execute, debug, and test two programs using decision structures. The first program will calculate the shipping charge based on a given purchase amount. The second program translates a given TV channel to its call sign.
Part A: Calculate Shipping Charge
Requirements
Your mission: Write a program that gets the amount of a purchase from the user and then calculates the shipping charge, based on the following table:
$0.00 - $250.00: $5.00
$250.01 - $500.00: $8.00
$500.01 - $1,000.00: $10.00
$1,000.01 - $5,000.00: $15.00
over $5,000.00: $20.00
Sample output from program:
Enter a purchase amount to find out your shipping charges.
Please enter the amount of your purchase: 234.65
The shipping charge on a purchase of $234.65 is $5.00.
Press any key to continue . . .
Tips
Best practice: Put yourself in the place of the program. What questions would you ask a customer in order to get the best input? How would you determine the correct shipping charges if you had to make the decisions yourself? Write out the questions you would ask yourself on paper as pseudocode and/or in Visual Studio as C# comments, and then implement them one by one, testing as you go. Remember to not write too much at one time. Always add and test functionality incrementally!
You can use the pseudocode below as a guide:
Prompt the user for the sale amount
Is sale amount greater than $5,000.00?
If so, shipping is $20.00
If not, is sale amount greater than $1,000.00?
If so, shipping is $15.00
If not, is sale amount greater than $500.00?
If so, shipping is $10.00
If not, is sale amount greater than $250.00?
If so, shipping is $8.00
If not, is sale amount greater than $0.00
shipping is $5.00
If not
shipping is $0.00
If shipping is $0.00
Display "Error incorrect input"
If not
Display sale amount and shipping charge
Learn More
Part B: TV Channel to Call Sign
Requirements
Your mission: Write a program that translates a TV channel (1 through 10) in your area to its respective call sign. For example, in the New York metropolitan area, channel 2 translates to WCBS. If a channel is unused in your area, tell the user that this is the case.
Sample output from program:
Translate TV Channel Number to Call Sign
Enter channel number: 1
Channel 1 is undesignated in your area
Enter channel number: 2
Call sign for channel 2 is WCBS
Enter channel number: 6
Call sign for channel 6 is WRNNDT
Tips
Best practice: Put yourself in the place of the program. What steps would you personally need to perform in order to process a channel translation yourself? Write out those steps on paper as pseudocode and/or in Visual Studio as C# comments, and then implement them one by one, testing as you go. Remember to not write too much at one time. Always add and test functionality incrementally!
Pseudocode: Although there are several valid ways to write the program, the following is an outline of one way to design the overall logic.
Declare variables for channel and call sign
Get channel number from user
Use appropriate decision structure to translate number to call sign
If number is valid in area
Print out translation
If not
Tell user this is the case -

Midterm Exam Track Order and Video Bonanza Project
$15.00Midterm Exam Track Order and Video Bonanza Project
Question One:
Modify your work from midterm project to keep track of each order item in an array. You will then include all the ordered items in the summary. Remove the module level summary variables from the form and loop through the array when totaling the order.Create an array of a structure, which holds the description, quantity, sales price, and extended price (the quantity times the sales price). As each purchase item is added to the order, store the information in the structure array then update the summary text box to reflect the newly ordered item.
Test Data Output
Jane Smith
123 Someplace
Anywhere, CA 99999Quantity - Description @ Price = Extended Price
2 - Deluxe Cooler @ 68.00 = $136.00
1 - Axe @ 5.00 = $5.00Subtotal: $141.00
Shipping: 10.95
Total: $151.95Question Two:
Create a project for Video Bonanza to view a list of Movies. Use a dropdown list box for the movie categories. When a category is selected, display a list of released movie titles in a second list box titled Movie List. Using either buttons or a menu allow the user to display a count of the number of movie titles for the selected category.The category list will have these categories: All, Comedy, Drama, Action, Sci-Fi, Horror, and New Releases. Do not sort the category list. When the program begins, the All movies category will be selected and the Movie List listbox (which is sorted) will display all the movies. When a category is selected, clear the movie titles list box and fill it with only the movies for that category (hint: use the SelectedIndexChanged event).
Use a two dimensional array to store the movies by category. The movies by category are:
Comedy:
Mrs. Housefire
Twister Act
Home by YourselfDrama:
Dancing With FoolsAction:
A Dependent's Pay
Home and AroundSci-Fi:
Jura's ParkHorror:
Ghost ManNew Releases:
Women in White
An American ResidentFor the report display all the movie titles by category and output it in the Print Preview dialog box
Learn More -
Programming In VB Web Applications Exercise 9.2 Rough Riders Rodeo
$20.00Programming In VB Web Applications Exercise 9.2 Rough Riders Rodeo
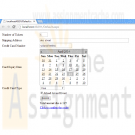
Rough Riders Rodeo wants to sell tickets online. Allow the user to enter the number of tickets needed. The data entry screen should also include the shipping address for the tickets, a credit card number, expiration date, and a drop-down box allowing the user to select the type of credit card. Also include a check box for attending the Awards Event. Include a hyperlink for confirming the order. Make the link invisible to begin with, but display it after the Submit button has been clicked.
Learn More
The confirmation page should say "Thank you for your order".
'The tickets are Sl5 for just the rodeo. $25 if they want to attend the awards event. Note that all members of the party must select the same type of tickets.
When the user selects the Submit button. display the amount due and display a link to confirm the order (make the existing link visible). Use an UpdatePanel to improve performance. -
Programming in Visual Basic 2010 Chapter 4 Novelty Solution
Regular Price: $15.00
Special Price $12.00
Programming in Visual Basic 2010 Chapter 4 Novelty Solution
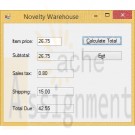
Create a Visual Basic Windows application. Use the following names for the solution, project, and form file, respectively: Novelty Solution, Novelty Project, and Main Form.vb. Save the application in the VB2010\Chap04 folder. Create the interface shown in the figure 4-65. When the user clicks the Calculate Total button, the button's Click event procedure should add the item price to the total of the prices already entered; this amount represents the subtotal owed by the customer. The procedure should display the subtotal on the form. It also should display a 3% sales tax, the shipping charge, and the grand total owed by the customer. The grand total is calculated by adding together the subtotal, the 3% sales tax, and a $15 shipping charge. For example, if the user enters 26.75 as the item price and then clicks the Calculate Total button, the button's Click event procedure should display 26.75 as the subtotal, 0.80 as the sales tax, 15.00 as the shipping charge, and 42.55 as the grand total. If the user subsequently enters 30 as the price and then clicks the Calculate Total button, the button's Click event procedure should display 56.75 as the subtotal, 1.70 as the sales tax, 15.00 as the shipping charge, and 73.45 as the grand total. However, when the subtotal is at least $100, the shipping charge is 0.00. Code the application. Save the solution and then start and test the application. Close the code editor window and then close the solution.
Learn More -
WEB460 Lab 1 of 7: Basic ASP Page and Cross-Page Posting
Regular Price: $12.00
Special Price $10.00
WEB460 Lab 1 of 7: Basic ASP Page and Cross-Page Posting
Scenario/Summary
In this week's lab assignment, we'll be developing credit card information checkout pages of an online book store. Such pages are necessary in any developed e-commerce application. In these pages, users are required to enter information related to their payment and shipping options.
We will develop two pages. On the first page, the user provides personal, payment, and shipping information for the order submitted. The second page summarizes the user's input and requires the user to confirm.Learning Objectives
Create an ASP.NET web project in Visual Studio 2010 or Visual Studio 2012.
Create and design ASP.Net web forms.
Cross-page posting in ASP.NET
How to use ASP.NET web server controls (DropDownList, TextBox, RadioButtonList, Label, and Button)
Exception handlingDeliverables
A zip archive of the ASP.NET Application implementing cross-page posting consisting of the following files:
– pgCheckOut.aspx web form with all server controls defined in requirements
– pgCheckOut.aspx.cs with code for cross-page posting
– pgConfirm.aspx web form with all server controls defined in requirements
– pgConfirm.aspx.cs with code for cross-page posting and exception handlingLab Steps
STEP A: Create a New Web Site Project
1. Go to the File menu and select New. From the New sub-menu, select Web Site to create a new Web Site project.
2. In the New Web Site dialog box, select the language you want to use in developing your web application; for our applications choose Visual C#.
3. Select ASP.NET Empty Web Site to create a project with only a web.config file.
4. Then specify the location of your project or website. Note that in ASP.NET, you have the option of creating your website in different locations, whether in any folder on your local file system, on the local IIS server you have on your computer, or on a remote HTTP or FTP server. ASP.NET has an integrated IIS server with the Visual Studio .Net IDE.
I recommend using the default Web Sites folder in the Visual Studio project folder. This allows the development of web applications without the hassle of setting up an IIS server on your computer. If you don't have IIS server installed on your computer, this is the best option to select for your lab.STEP B: Create and Design a New Web Form, pgCheckOut.aspx
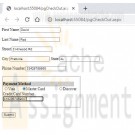
1. Add the first web form to the web application by right-clicking on the project name and selecting Add New Item. Name the web form pgCheckOut.aspx.
2. Add the controls in the table below to the form. If desired, you can visually layout the form using HTML and CSS after adding the controls.
The first column in the table shows the data the control represents or their label, the second column is the type of control, and the last column is the ID or name of the actual control. If the Visual Studio web form Toolbox Pane is not displayed, you can show it by going to the View menu and selecting Toolbox. All of these controls can be found in the Toolbox Pane.
Data or Label Control Type Control ID or Name
First Name TextBox txtFirstName
Last Name TextBox txtLastName
Street TextBox txtStreet
City TextBox txtCity
State TextBox txtState
Payment Method RadioButtonList rblCCType
Credit Card Number TextBox txtCCNumber
Submit Button btnSubmit
Phone Number TextBox txtPhone3. When the user clicks on the submit button, pgConfirm.aspx should be displayed. This is done with cross-page posting. To implement this, set the PostBackUrl property of the Submit button to ~/pgConfirm.aspx. This will cause the pgCheckOut.aspx to post user requests to the web page pgConfirm.aspx, which we will create shortly.
STEP C: Add Code to the pgCheckOut.aspx Form (to Read User Input and Implement Cross-page Posting)
Implement public methods in the pgCheckOut.aspx.cs code file to expose the form's control values to other pages. The code below is an example of how to retrieve the value of the txtFirstName and txtLastName.
Sample Method to Get Control Values
public TextBox FirstName
{ get { return txtFirstName; } }
public TextBox LastName
{ get { return txtLastName; } }STEP D: Create and Design Another Web Form, pgConfirm.aspx
1. Add the second web form to your web application. Name the form pgConfirm.aspx.
2. Add label controls to display the user input values for the name, address, credit card type, and credit card number.
This allows the user to review and confirm order information before final submission. Add the controls in the table below to the form. The application will fill in the text displayed by the labels, so you don't need to. You should provide additional labels that describe these values for the user.
Control Type Control ID or Name Control Purpose
Label lblName Holds the concatenation string of first name and last name entered in pgChekout.aspx
Label lblAddress Holds the concatenation of all address-related fields user input in pgCheckOut.aspx
Label lblCCType Displays the credit card type the user selected in pgCheckOut.aspx
Label lblCCNumber Displays the credit card number the user entered in pgCheckOut.aspx
Label lblStatus Displays the message of any run time exception that might happen during run time
Button btnSubmit When the user clicks on the submit order button, this displays a note to the user that his or her order was submitted successfully. You should use the status label to display the message.STEP E: Add Code to the pgConfirm.aspx Form (to Allow User to Verify Order Input and Submit for Final Processing)
1. In the pgConfirm.aspx page, add the following code to the PreviousPageType directive to the pgConfirm.aspx file, and set it to the pgCheckOut.aspx.
<%@ Page Language="C#" AutoEventWireup=“true" CodeFile="pgConfirm.aspx.cs" Inherits="pgConfirm" %>
<%@ PreviousPageType VirtualPath="~/pgCheckOut.aspx" %>
2. Next, in the Page_Load() event of the pgConfirm.aspx.cs code page, check whether there is any cross-page posting by checking whether there is a cross-page postback, and set the values of the label controls with the corresponding user input values from the previous page as shown below. Be sure to implement for all controls on the form.
3. Enclose your code in a try/catch block to handle any run time exception thrown by the application for any reason, as shown below.
4. Add code to have lblStatus display the message of any thrown exception. Don't forget to add comments explaining what each line of code does.
pgConfirm Page_Load method
protected void Page_Load(object sender, EventArgs e)
{
try
{
if (PreviousPage.IsCrossPagePostBack)
{
lblName.Text = PreviousPage.FirstName.Text + " " + PreviousPage.LastName.Text;
// Your code to set other form labels goes here
}
}
catch (Exception error )
{
lblStatus.Text = error.Message;
}
}STEP F: Compile, Test, Save, and Submit Your Project
Learn More
1. Save your work!
2. Test it! Make changes as appropriate until it works.
3. Remember to add comments for each step being performed.
4. Please zip and submit the entire web project folder.
5 Item(s)
Grid List

You have no items in your shopping cart.
