Search results for 'olympics database'
-
Programming with Microsoft VB 2017 Diane Zak Chapter 11 Utilities Solution
Regular Price: $7.00
Special Price $5.00
Programming with Microsoft VB 2017 Diane Zak Chapter 11 Utilities Solution
Open the Utilities Solution.sln file contained in the VB2017\Chap11\Utilities Solution-DataGrid folder.
Learn More
a. Create a SQL Server database named Utilities.mdf.
b. Add the Bills table definition shown in Figure 11-64 to the database. The Month field's (Is Identity), Identity Increment, and Identity Seed properties are set to True, 1, and 1, respectively. (Recall that you need to expand the Identity Specification property to access these properties.)
c. After defining the table, click the Update button and then click the Update Database button.
d. Open the Data Sources window and start the Data Source Configuration Wizard. Connect the Utilities.mdf file to the application. Include the entire Bills table in the dataset.
e. Set the Utilities.mdf file's Copy to Output Directory property to "Copy if newer".
f. Drag the Bills table to the form. Set the DataGridView control's AutoSizeColumnsMode property to Fill.
g. Open the DataGridView control's task list and click Dock in Parent Container. Click Edit Columns. Change the Month column's AutoSizeMode property to ColumnHeader.
h. Click Electricity in the Edit Columns dialog box, click DefaultCellStyle, click the ... (ellipsis) button, click Format, click the ... (ellipsis) button, click Numeric, and then click the OK button. The Format box now shows N2. Change the Alignment property to MiddleRight and then click the OK button to close the CellStyle Builder dialog box.
i. Now, format the Water and Gas columns using the Numeric setting with two decimal places. Also, align the values in both columns using the MiddleRight setting. When you are finished setting the properties, close the Edit Columns dialog box.
j. Change the form's Size property to 330, 200.
k. Open the Code Editor window and enter an appropriate Try...Catch statement.
l. Save the solution and then start the application. Enter the three records shown in Figure 11-64. (Recall that the Month field is an auto-numbered field. The numbers 1, 2, and 3 will appear when you click the Save Data button.)
m. Stop the application and then start it again to verify that the three records were saved. -

Programming with Microsoft VB 2017 Diane Zak Chapter 11 Total Cookie Sales Solution
Regular Price: $7.00
Special Price $5.00
Programming with Microsoft VB 2017 Diane Zak Chapter 11 Total Cookie Sales Solution
Open the Total Cookie Sales Solution.sln file contained in the VB2017\Chap11\Total Cookie Sales Solution folder
a. Figure 11-63 shows the Sales table contained in the CookieSales.mdf file. The table contains the numbers of boxes of cookies sold in each of six weeks. The database is already connected to the application and the CookieSalesDataSet has already been created.b. Open the Data Sources window and then drag the Sales table to the DataGridView control. Change the control's AutoSizeColumnsMode to Fill. Use the control's task list to disable adding, editing, and deleting records. Also, right-align the numbers in the cookie sales columns.
c. Lock the controls on the form. Start the application to verify that the six records appear in the DataGridView control. Stop the application.
d. The Calculate button should display the total sales for each cookie type. Code the btnCalc_Click procedure. (The database does not allow NULLs in any of the fields, so you do not need to check if a field contains the NULL value.)
e. Save the solution and then start and test the application.
Learn More -
CIS407 Lab 5 of 7: Transaction Processing PayrollSystem ASP.NET Application
Regular Price: $12.00
Special Price $10.00
CIS407 Lab 5 of 7: Transaction Processing PayrollSystem ASP.NET Application
Lab Overview
Scenario/Summary
This week, we will use the .NET OleDbTransaction functions to either commit a set of changes to the database, if all of them were done correctly, or to roll back all of the changes if there was an error in any one of them. We will first modify the code that we created last week so that it will save personnel data in the database in two steps; first by inserting a personnel record for a new employee, and then by updating that record to fill in the start and end dates.
This two-step approach is not really needed in this simple case, but we will use it to simulate a more complex database transaction that would have to be done in multiple steps, such as one involving more than one table or even more than one database. We will then see what happens when there is an error in the second operation (the update), allowing a record to be created containing incomplete information: not a good result! We will fix the problem by wrapping both operations (the insert and the update) into a single transaction that will be committed (made permanent) only if both operations succeed or will be rolled back (undone) if either operation fails. We will also add client-side validation using the ASP.Net validation controls, and we will allow the user an easy way to edit all employees.
Please watch the tutorial before beginning the Lab.Lab Steps
Deliverables
All files are located in the subdirectory of the project. The project should function as specified:
When you press the Submit button in frmPersonnel, a record should be saved in the tblPersonnel table containing the FirstName, LastName, PayRate, StartDate, and EndDate that you entered. Test that the transaction will roll back by entering invalid information in one or more items, such as Hello for a StartDate. Check that client-side validation works: The ability to edit employees in a grid is working. Once you have verified that it works, save your website, zip up all files, and submit them.STEP 1: Modify the clsDataLayer to Use a Two-Step Process
Learn More
1. Open Microsoft Visual Studio.NET.
2. Click the ASP.NET project called PayrollSystem to open it.
3. Open the clsDataLayer class.
4. Modify the SavePersonnel() function so that instead of just doing a single SQL INSERT operation with all of the personnel data, it does an INSERT with only the FirstName and LastName, followed by an UPDATE to save the PayRate, StartDate, and EndDate into the new record. (This two-step approach is not really necessary here because we are dealing with only one table, tblPersonnel, but we are doing it to simulate a case with more complex processing requirements, in which we would need to insert or update data in more than one table or maybe even more than one database.) Find the following existing code in the SavePersonnel() function:
// Add your comments here
strSQL = "Insert into tblPersonnel " +
"(FirstName, LastName, PayRate, StartDate, EndDate) values ('" +
FirstName + "', '" + LastName + "', " + PayRate + ", '" + StartDate +
"', '" + EndDate + "')";
// Add your comments here
command.CommandType = CommandType.Text;
command.CommandText = strSQL;
// Add your comments here
command.ExecuteNonQuery();
Modify it so that it reads as follows:
// Add your comments here
strSQL = "Insert into tblPersonnel " +
"(FirstName, LastName) values ('" +
FirstName + "', '" + LastName + "')";
// Add your comments here
command.CommandType = CommandType.Text;
command.CommandText = strSQL;
// Add your comments here
command.ExecuteNonQuery();
// Add your comments here
strSQL = "Update tblPersonnel " +
"Set PayRate=" + PayRate + ", " +
"StartDate='" + StartDate + "', " +
"EndDate='" + EndDate + "' " +
"Where ID=(Select Max(ID) From tblPersonnel)";
// Add your comments here
command.CommandType = CommandType.Text;
command.CommandText = strSQL;
// Add your comments here
command.ExecuteNonQuery();
5. Set frmMain as the startup form and run the PayrollSystem Web application to test the changes. When valid data values are entered for a new employee, things should work exactly as they did previously. To test it, enter valid data for a new employee in frmPersonnel and click Submit. The frmPersonnelVerified form should be displayed with the entered data values and a message that the record was saved successfully. Click the View Personnel button and check that the new personnel record was indeed saved to the database and that all entered data values, including the PayRate, StartDate, and EndDate, were stored correctly. Close the browser window.
Now run the PayrollSystem Web application again, but this time, enter some invalid data (a nonnumeric value) in the PayRate field to cause an error, like this:
6. Now, when you click Submit, the frmPersonnelVerified form should display a message indicating that the record was not saved:
However, when you click on the View Personnel button to display the personnel records, you should see that an incomplete personnel record was in fact created, with missing values for the PayRate, StartDate, and EndDate fields.
This occurred because the Insert statement succeeded but the following Update statement did not. We do not want to allow this to happen because we end up with incomplete or incorrect data in the database. If the Update statement fails, we want the Insert statement to be rolled back, or undone, so that we end up with no record at all. We will fix this by adding transaction code in the next step.
STEP 2: Add Transaction Code
7. In the clsDataLayer.cls class file, add code to the SavePersonnel() function to create a transaction object. Begin the transaction, commit the transaction if all database operations are successful, and roll back the transaction if any database operation fails. The following listing shows the complete SavePersonnel() function; the lines you will need to add are marked with ** NEW ** in the preceding comment and are shown in bold and underlined.
// This function saves the personnel data
public static bool SavePersonnel(string Database, string FirstName, string LastName,
string PayRate, string StartDate, string EndDate)
{
bool recordSaved;
// ** NEW ** Add your comments here
OleDbTransaction myTransaction = null;
try
{
// Add your comments here
OleDbConnection conn = new OleDbConnection("PROVIDER=Microsoft.ACE.OLEDB.12.0;" +
"Data Source=" + Database);
conn.Open();
OleDbCommand command = conn.CreateCommand();
string strSQL;
// ** NEW ** Add your comments here
myTransaction = conn.BeginTransaction();
command.Transaction = myTransaction;
// Add your comments here
strSQL = "Insert into tblPersonnel " +
"(FirstName, LastName) values ('" +
FirstName + "', '" + LastName + "')";
// Add your comments here
command.CommandType = CommandType.Text;
command.CommandText = strSQL;
// Add your comments here
command.ExecuteNonQuery();
// Add your comments here
strSQL = "Update tblPersonnel " +
"Set PayRate=" + PayRate + ", " +
"StartDate='" + StartDate + "', " +
"EndDate='" + EndDate + "' " +
"Where ID=(Select Max(ID) From tblPersonnel)";
// Add your comments here
command.CommandType = CommandType.Text;
command.CommandText = strSQL;
// Add your comments here
command.ExecuteNonQuery();
// ** NEW ** Add your comments here
myTransaction.Commit();
// Add your comments here
conn.Close();
recordSaved = true;
}
catch (Exception ex)
{
// ** NEW ** Add your comments here
myTransaction.Rollback();
recordSaved = false;
}
return recordSaved;
}
8. Run your Web application. First, enter valid data in all fields of frmPersonnel. When you press the Submit button in frmPersonnel, a record should be saved in the tblPersonnel table containing the FirstName, LastName, PayRate, StartDate, and EndDate. With valid data entered in all items, the successfully saved message should appear, indicating that the transaction was committed.
Click the View Personnel button and verify that the new record was in fact added to the database table correctly.
9. Now, close the browser, run the Web application again, and this time, test that the transaction will roll back after entering incorrect information. On the frmPersonnel form, enter invalid data for PayRate and click Submit. The not saved message should appear, which indicates that the transaction was rolled back.
Click the View Personnel button and verify that this time, as desired, an incomplete record was not added to the database table.
10. You have seen how we used the try/catch block to catch an unexpected error. You may have noticed that if you enter bad data for the dates, an exception is thrown. Go back to the validation code that you added in the frmPersonnel code and add a try/catch with logic to prevent an invalid date from causing a server error.
11. In the Week 3 Lab, you learned how to validate code once the page was posted back to the server. There is some validation that must be done on the server because it requires server resources such as the database. Some validation can also be done on the client. If you can do validation on the client, it saves a round trip to the server, which will improve performance. In this approach, we will check values before the page is submitted to the server for processing. Normally, there is a combination of server and client validation used in a Web application. ASP.Net includes validation controls which will use JavaScript on the client to perform validation. You will find these controls in the Validation group in the toolbox.
12. Add validation controls to the frmPersonnel form as follows: For the first, last name, and pay rate, make sure each field has data in it. Use the RequiredFieldValidator for this task. Add the control to the right of the text box that you are validating. The location of the validator control is where the error message (if there is one) will appear for the control to which you link the validator. You will be adding one validator control for each text box that you want to validate. Remember to set the ControlToValidate and ErrorMessage properties on the validator control. Making this change eliminates the need for the server-side check you were doing previously. Use a regular expression validator to check that the start and end date are in the correct format.
In order to keep the validation controls from causing wrapping, you may want to increase the Panel width.
A regular expression for mm/dd/yyyy is this:
^(0[1-9]|1[012])[- /.](0[1-9]|[12][0-9]|3[01])[- /.](19|20)\d\d$
13. Remove the View Personnel and Cancel buttons from the frmPersonnel form, because they will cause a Postback and invoke the client-side editing that you just added. The user is able to get to the View Personnel from the main form and from the personnel verification screen, so there is no need for these buttons now.
14. Because you have entered data in this lab that is invalid and those partial records are in the database, you will need to add the ability to remove or update data. Open up frmMain and add a new main form option called Edit Employees. Add the link and image for it. This option will take the user to a new form called frmEditPersonnel.
15. Add the new form frmEditPersonnel. On frmEditPersonnel, add the ACIT logo at the top of the form. Add a label that says Edit Employees. Add a GridView control with an ID of grdEditPersonnel.
16. You will now add a SQLDataSource to the page. You will be using a databound grid for this form unlike the previous grids, in which you added as unbound (in the designer).
17. Add a new SQLDataSource control to the frmEditPersonnel in the Design View. This is not a visible control; that is, it will only appear in Design View, but the user will never see it. Note: If you change the folder name or location of your database, you will need to reconfigure the data source (right-click on the data source control and select the Configure Data Source option).
18. There is a small > indicator in the Design View of the SQL Data Source control that you added. If the configuration menu is collapsed (press it to open the menu), or there is a < with the menu displayed, from the data source menu, select Configure Data Source.
19. Press the New Connection button and browse for the database.
20. Press the Next button.
21. When asked if you want to save the connection in the application configuration file, check the Yes check box and press Next.
22. Select the tblPersonnel table.
23. Select all columns (you can use the * for this).
24. Press the Advanced button and check the Generate Insert, Update, and Delete option and press the OK button.
25. Press the Next button.
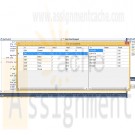
26. Press the Test Query button and make sure that you see all records in the database like the image below. If it does not, repeat the above steps to make sure that you did everything properly (and selected the correct database - if you are not sure, open the database in Windows Explorer to be sure that it is the one with data in tblPersonnel). Press the Finish button.
27. Click on the grid that you added in the Design View and expand the Properties menu (the little > in the upper right of the control). Choose the data source you just added. On the GridView tasks menu, select Edit columns. Add an Edit, Update, and Cancel Command field. Add a Delete Command field. Press OK. You can now test the grid, which is a fully functioning Update and Delete grid. Try it out!
STEP 3: Test and Submit
28. Once you have verified that everything works as it is supposed to work, save your project, zip up all files, and submit it.
NOTE: Make sure you include comments in the code provided where specified (where the " // Your comments here" is mentioned) and for any code you write, or else a 5-point deduction per item (form, class, function) will be made. -
CIS407 Lab 4 of 7: Web Forms with Database Interaction PayrollSystem ASP.NET Application
Regular Price: $12.00
Special Price $10.00
CIS407 Lab 4 of 7: Web Forms with Database Interaction PayrollSystem ASP.NET Application
Lab Overview
Scenario/Summary
In this lab, we will start with the form that we created in Week 2 (frmPersonnel) and add functionality to INSERT records into a database table and SELECT records for display to the user. We will create a typed dataset, a Data Layer class, several functions to access the data, and a connection to a database. We also will add a search form to allow the user to search records in the database and display the results of that search. Please watch the tutorial before beginning the Lab.Lab Steps
Deliverables
All files are located in the subdirectory of the project. The project should function as specified:
When you press the Submit button in frmPersonnel, a record should be saved in the tblPersonnel table having the FirstName, LastName, PayRate, StartDate, and EndDate that you entered on the form. Add a search feature to the project. Update your main navigation page with the new options. Once you have verified that it works, save your website, zip up all files, and submit it.STEP 1: Data Layer
1. Open Microsoft Visual Studio.NET.
2. Click the ASP.NET project called PayrollSystem to open it.
3. Open the clsDataLayer class and add the following function:
// This function saves the personnel data
public static bool SavePersonnel(string Database, string FirstName, string LastName,
string PayRate, string StartDate, string EndDate)
{
bool recordSaved;
try {
// Add your comments here
OleDbConnection conn = new OleDbConnection("PROVIDER=Microsoft.ACE.OLEDB.12.0;" +
"Data Source=" + Database);
conn.Open();
OleDbCommand command = conn.CreateCommand();
string strSQL;
// Add your comments here
strSQL = "Insert into tblPersonnel " +
"(FirstName, LastName, PayRate, StartDate, EndDate) values ('" +
FirstName + "', '" + LastName + "', " + PayRate + ", '" + StartDate +
"', '" + EndDate + "')";
// Add your comments here
command.CommandType = CommandType.Text;
command.CommandText = strSQL;
// Add your comments here
command.ExecuteNonQuery();
// Add your comments here
conn.Close();
recordSaved = true;
} catch (Exception ex) {
recordSaved = false;
}
return recordSaved;
}4. In the frmPersonnelVerified form, go to the Page_Load() event and add the following code after the existing code (but still in the Page_Load event handler):
// Add your comments here
if (clsDataLayer.SavePersonnel(Server.MapPath("PayrollSystem_DB.accdb"),
Session["txtFirstName"].ToString(),
Session ["txtLastName"].ToString(),
Session ["txtPayRate"].ToString(),
Session ["txtStartDate"].ToString(),
Session ["txtEndDate"].ToString()))
{ txtVerifiedInfo.Text = txtVerifiedInfo.Text + "\nThe information was successfully saved!"; }
else
{ txtVerifiedInfo.Text = txtVerifiedInfo.Text + "\nThe information was NOT saved."; }
5. Add comments for all code containing // Add your comments here.
6. Test your work to make sure that no errors occur! (Make sure to put in valid date values for the date data entry fields).
STEP 2: Data Display and Search
7. Using the skills that you learned in Week 3, create a new DataSet for the tblPersonnel table (call the DataSet dsPersonnel).8. Using the skills that you learned in Week 3, create a new function called GetPersonnel in the clsDataLayer class. This function should retrieve all data from the tblPersonnel table and return it in the form of a dsPersonnel DataSet. Use the GetUserActivity function as an example.
9. Create a new Web form called frmViewPersonnel.
10. Using the skills that you learned in Week 3, add a GridView control (called grdViewPersonnel) to the form. This GridView control will be used to display data from the tblPersonnel table. Add the ACIT logo at the top of the page and make sure it links back to frmMain.
11. Add the following code to the Page_Load() function in frmViewPersonnel.
if (!Page.IsPostBack)
{
//Declare the Dataset
dsPersonnel myDataSet = new dsPersonnel();
//Fill the dataset with shat is returned from the method.
myDataSet = clsDataLayer.GetPersonnel(Server.MapPath("PayrollSystem_DB.accdb"));
//Set the DataGrid to the DataSource based on the table
grdViewPersonnel.DataSource = myDataSet.Tables["tblPersonnel"];
//Bind the DataGrid
grdViewPersonnel.DataBind();
}12. Return to the frmPersonnel Web form and add a button ((ID) = btnViewPersonnel, Text = View Personnel) which, when clicked, will display form frmViewPersonnel.
13. Open the frmPersonnelVerified form and add a button ((ID) = btnViewPersonnel, Text = View Personnel) which, when clicked, will display form frmViewPersonnel. NOTE: This is the same button with the same functionality that you added to form frmPersonnel in the previous step. Also, add a new link and linked image to frmMain called View Personnel that will go to the new frmViewPersonnel page you created.
Let's test the View Personnel page. Start your program in Internet Explorer. Click on Add New Employee and add yourself to the database and press Submit. Once you are on the personnel verified form, click the View Personnel button. You should see the data that you just entered.
14. You will now add a Search feature to allow the user to find and display data. The user will enter a last name and the Web application will display the grid of employees with all employees that match that last name.15. Create a new Web form called frmSearchPersonnel. Add the hyperlinked ACIT logo to this page. Also, add a new item on frmMain (with a Link button and Image button) called Search Personnel.
16. On the frmSearchPersonnel form, add a label that displays "Search for employee by last name:". Next to the label, add a text box with an ID of txtSearch. Add a button with an ID of btnSearch and set the text of the button to "Search".
17. When the frmSearchPersonnel Search button is pressed, the frmViewPersonnel is displayed. At this point, no searching is actually happening, but you have the forms that you need and the navigation is working. Now you can focus on the coding that you will need to do to have the grid only display matching employees.
18. Before calling the GetPersonnel method that you added previously in the lab, you will need to get the value that is in the Request["txtSearch"] item. When the form posts the search page results to the frmViewPersonnel, the name value pair for the search value is passed as part of the Request object. This value will need to be assigned to a string variable. To do this task, add the following line of code in the code block below to the Page_Load function in frmViewPersonnel after the line: dsPersonnel myDataSet = new dsPersonnel();
string strSearch = Request["txtSearch"];
Then, modify the call of the GetPersonnel function one line below to add the strSearch as one of the arguments:
myDataSet = clsDataLayer.GetPersonnel(Server.MapPath("PayrollSystem_DB.accdb"), strSearch);19. Modify the GetPersonnel method that you added in the clsDataLayer.cs class to include a new parameter called strSearch of type string. Add string strSearch as an argument to the function as below:
public static dsPersonnel GetPersonnel(string Database, string strSearch)
Then modify the sqlDA select statement within the GetPersonnel function to test if a value is entered for a search parameter.
if (strSearch == null || strSearch.Trim()=="")
{ sqlDA = new OleDbDataAdapter("select * from tblPersonnel", sqlConn); }
else
{ sqlDA = new OleDbDataAdapter("select * from tblPersonnel where LastName = '" + strSearch + "'", sqlConn); }
20. Test the search so that when you enter a last name, employees with that last name are returned. Make sure that when you access frmViewPersonnel and you are not searching, all employees are returned.
STEP 3: Test and Submit
Run your project and test it as follows:
The frmMain form should be displayed first.
Click on the Add New Employee hyperlink to go to the frmPersonnel data entry form. Click the View Personnel button on this form. The frmViewPersonnel form should be displayed in the browser, but at this point, there should not be very many personnel listed.
Use the Back button in your Web browser to return to the frmPersonnel form and enter some personnel data for a few employees, similar to the following:
Now, click the Submit button. The frmPersonnelVerified form should be displayed, showing the data you entered, and you should get a message saying that the data were successfully saved, like this example.
You should be able to view the employee records by clicking the View Personnel link on the home page.
Test the Search feature and make sure that entering no search string returns all of the data and that typing in a last name will return all employees with the same last name.NOTE: Make sure that you include comments in the code provided where specified (where the " // Your comments here" line appears) and for any code that you write, or else a 5-point deduction per item (form, class, function) will be made.
Learn More -
CIS407 Lab 3 PayrollSystem ASP.NET Application
Regular Price: $12.00
Special Price $10.00
CIS407 Lab 3 PayrollSystem ASP.NET Application
STEP 1: Step Title
1. Open Microsoft Visual Studio.NET.
2. Open the PayrollSystem website by clicking on it in the Recent Projects list, or by pulling down the File menu, selecting Open Website, navigating to the folder where you previously saved the PayrollSystem, and clicking Open.
3. Download the PayrollSystem_DB.accdb file from the Files section and save it on your local computer. (Note: your operating system may lock or block the file. Once you have copied it locally, right click on the file and select Properties and then Unblock if available). Then add it to the PayrollSystem website as follows: In Visual Studio, in the Solution Explorer click Website, Add Existing Item, then navigate to the PayrollSystem_DB.accdb file you downloaded, and click the Add button.
Make sure you select file types, which include *.accdb, *.accdb, etc. Otherwise, you will not be able to see the database file to select.
4. Now we need to create a new connection to the PayrollSystem_DB.accdb. To begin, click View Server Explorer.
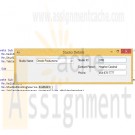
5. When the Server Explorer toolbox appears, click the Connect to Database button.
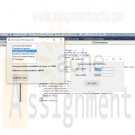
6. When the Add Connection dialog appears, click the Change button. In the Change Data Source dialog, select MS Access Database File; Uncheck Always use this Selection; then click OK.
Press Continue to get the following screen.
7. Click the Browse button to navigate to the PayrollSystem_DB.accdb file in your website folder, then click Open. (NOTE: Be sure you select the PayrollSystem_DB.accdb file in your PayrollSystem website folder, not the one you originally downloaded from the Files section). Click Test Connection. You should receive a message that the test connection succeeded. Click OK to acknowledge the message, then click OK again to close the Add Connection dialog.
8. The PayrollSystemDB.accdb should be added to the Server Explorer. Expand the database, then expand the Tables entry under the database until you see tblUserActivity. Leave the Server Explorer window open for now as you will be returning to it in a moment.
9. Create a new dataset by selecting Website-> Add New Item. Under Templates, select the Dataset item. Enter dsUserActivity.xsd for the name. Click Add.
10. If the following message appears, select Yes. You want to make this dataset available to your entire website.
11. If the TableAdapter Configuration Wizard dialog appears, click Cancel. (We will be configuring a Data Adapter for this dataset later in C# code, so we do not need to run this wizard.)
12. Drag-and-drop the tblUserActivity table from the Server Explorer window into the dsUserActivity dataset in the editor window.
NOTE: If you see a message that says your connection uses a local data file that is not in the current project, that indicates you did not select the correct PayrollSystem_DB.accdb file when you created your data connection. To fix this problem, click No, then right-click on PayrollSystemDB.accdb in the Server Explorer window and choose Modify Connection. Click the Browse button, navigate to the PayrollSystemDB.accdb file that is in your PayrollSystem website folder, and click Open. Test the connection, then click OK.
Click the Save icon on the toolbar to save the dsUserActivity.xsd dataset.
(You can now close the Server Explorer window if you wish.)
13. Create a new class to contain the C# code that will access this dataset. To do so, click Website, Add New Item. In the Add New Item dialog, select the Class template, and enter clsDataLayer for the name. Make sure the Language is set to Visual C#. Click Add.
14. If the following message appears, select Yes. You want to make this class available to everything in your solution.
15. Add the following to the top of your class, below any other using statements created for you by Visual Studio.
Add to top of class
// Add your comments here
using System.Data.OleDb;
using System.Net;
using System.Data;
16. Add the following three functions inside the squiggly braces for the public class clsDataLayer class, above the beginning of the public clsDataLayer() constructor and save the class.
Class
// This function gets the user activity from the tblUserActivity
public static dsUserActivity GetUserActivity(string Database)
{
// Add your comments here
dsUserActivity DS;
OleDbConnection sqlConn;
OleDbDataAdapter sqlDA;
// Add your comments here
sqlConn = new OleDbConnection("PROVIDER=Microsoft.ACE.OLEDB.12.0;" + "Data Source=" + Database);
// Add your comments here
sqlDA = new OleDbDataAdapter("select * from tblUserActivity", sqlConn);
// Add your comments here
DS = new dsUserActivity();
// Add your comments here
sqlDA.Fill(DS.tblUserActivity);
// Add your comments here
return DS;
}
// This function saves the user activity
public static void SaveUserActivity(string Database, string FormAccessed)
{
// Add your comments here
OleDbConnection conn = new OleDbConnection("PROVIDER=Microsoft.ACE.OLEDB.12.0;" +
"Data Source=" + Database);
conn.Open();
OleDbCommand command = conn.CreateCommand();
string strSQL;
strSQL = "Insert into tblUserActivity (UserIP, FormAccessed) values ('" +
GetIP4Address() + "', '" + FormAccessed + "')";
command.CommandType = CommandType.Text;
command.CommandText = strSQL;
command.ExecuteNonQuery();
conn.Close();
}
// This function gets the IP Address
public static string GetIP4Address()
{
string IP4Address = string.Empty ;
foreach (IPAddress IPA in
Dns.GetHostAddresses(HttpContext.Current.Request.UserHostAddress)) {
if (IPA.AddressFamily.ToString() == "InterNetwork") {
IP4Address = IPA.ToString();
break;
}
}
if (IP4Address != string.Empty) {
return IP4Address;
}
foreach (IPAddress IPA in Dns.GetHostAddresses(Dns.GetHostName())) {
if (IPA.AddressFamily.ToString() == "InterNetwork") {
IP4Address = IPA.ToString();
break;
}
}
return IP4Address;
}
STEP 2: frmUserActivity, frmPersonnel, frmMain
17. Create a new web form called frmUserActivity. Switch to Design Mode and add the ACIT logo to the page as an ImageButton and link it back to frmMain. Below the image button add a panel. To the panel, add a Label and GridView (found under the Toolbox, Data tab) having the following properties.
Property Value
Label – Text User Activity
GridView – (ID) grdUserActivity
18. Go to the Page_Load method by double clicking an empty space on the page and add the following code.
Page_Load method for frmUserActivity.aspx
if (!Page.IsPostBack) {
// Declares the DataSet
dsUserActivity myDataSet = new dsUserActivity();
// Fill the dataset with what is returned from the function
myDataSet = clsDataLayer.GetUserActivity(Server.MapPath("PayrollSystem_DB.accdb"));
// Sets the DataGrid to the DataSource based on the table
grdUserActivity.DataSource = myDataSet.Tables["tblUserActivity"];
// Binds the DataGrid
grdUserActivity.DataBind();
}
19. Open the frmMain form, add a new link button and image button to point to the new frmUserActivity. Find an image to use for the image button and add the new option as View User Activity.
20. Go to the frmMain Page_Load and add the following code.
frmMain.aspx Page_Load code
// Add your comments here
clsDataLayer.SaveUserActivity(Server.MapPath("PayrollSystem_DB.accdb"), "frmPersonnel");
21. In the Solution Explorer, right click on the frmMain.aspx form and select Set As Start Page. Run your project. When you open the project, a record should be saved in the tblUserActivity table with the IP address, form name accessed (frmPersonnel), and the date accessed. When you click the View Activity button, you should see at least one record with this information.
23. You will now add server side validation code to the frmPersonnel page. Currently, when the Submit button is pressed, the frmPersonnelVerified page is displayed. This is because the frmPersonnelVerified page is set as the Submit button's PostBackUrl property. Instead of having the page go directly to the frmPersonnelVerified page when the Submit button is pressed, we want to do some server side validation. If any of the validation rules fail, we will redisplay the frmPersonnel page with the fields in question highlighted in yellow with an error message displayed.
First, it is important to understand what is currently happening when the submit button is pressed. This is causing a postback of the form to the frmPersonnelVerified form. When this postback happens, all of the data in the fields on the frmPersonnel form are sent to the frmPersonnelVerified form as name value pairs. In the Page_Load code of frmPersonnelVerified these values are picked up from the Request object and displayed. Each name value pair will be in the Request object as the ID of the control containing the value and the value itself. We can pass data between pages by using Session state instead. In order to do validation on the values but still have the values visible on the frmPersonnelVerified page, we will need to change not only the PostBack URL of the frmPersonnel page but also how the frmPersonnelVerified form is getting the data—it will need to get it from Session state rather than from the Request object.
In order to do this, we will make the following changes.
1. Clear the Submit button PostBackURL Property on the frmPersonnel form. Remove the value in the PostBackUrl that is highlighted.
2. In the btnSubmit_Click event handler get each value from the data entry fields and set Session state items for each. (instructions below)
3. Change the frmPersonnelVerified code behind to get the values from the Session state items you created in the previous step. (instructions below)
When you are done with these steps, you should be able to enter data on the frmPersonnel data entry form and then click the Submit button. The frmPersonnelVerified page should then be displayed with the values that were in the data entry fields on frmPersonnel.
23. Add a label to the frmPersonnel form with an ID of lblError. Do not place the label to the right or left of any of the controls on the form. Add it below the controls or above the controls. The text property of this label should be set to an empty string.
24. Add code to perform server side validation in response to the submit button being clicked. Here are the business rules we want to enforce (remember this will be server C# code in the frmPersonnel code behind): Fields may not be empty or filled with spaces. If any field is empty, turn that field background color to yellow and add to/create an error message to be shown in the error label. The end date must be greater than the start date. If the end date is less than the start date, turn both date fields yellow and add to/create an error message to be shown in the error label. If all fields validate properly then the session state items should be set properly and the user should see the frmPersonnelVerified form with all the values displayed.
frmPersonnel.aspx Lab Hints
1. The server side validation should be in the Submit button's event handler. There is a Trim method on the string object that will automatically remove spaces from the beginning and end of a string. To test if txtFirstName is empty or filled with spaces, use the following code.
if (Request["txtFirstName"].ToString().Trim() == "")
2. To set the background color of the txtFirstName field, use the following code.
txtFirstName.BackColor = System.Drawing.Color.Yellow;
3. To set a value in session state and redirect the response to the frmPersonnelVerified.aspx do the following. txtFirstName is the key and txtFirstName.Text is the value.
Session["txtFirstName"] = txtFirstName.Text;
//Need to set session variables for all text boxes
Response.Redirect("frmPersonnelVerified.aspx");
4. You may want to create variables to work with for validation rather than using the Request item objects directly.
To turn a string into a DateTime object you can use the DateTime method Parse. If you had a date value stored in a string called strDate, you could turn it into a DateTime object like this.
DateTime myDateTimeObject = DateTime.Parse(strDate);
You can compare two DateTime objects by using the DateTime.Compare method. If you had two DateTime objects called dt1 and dt2 you can check to see if dt1 is greater than dt2 by doing this.
if (DateTime.Compare(dt1,dt2) > 0)
DateTime.Compare will return a 0 if the two dates are equal, a 1 if dt1 is greater than dt2, and a -1 if dt1 is less than dt2.
If you put in an invalid date for either of the date fields, you will get an exception/server error when trying to parse the values. We will address this in a later lab—for now make sure you enter valid dates (valid meaning a date in the form of mm/dd/yyyy).
5. An example of the code you might want to use to test if the end date is after the start date follows.
DateTime startDate = DateTime.Parse(Request["txtStartDate"]);
DateTime endDate = DateTime.Parse(Request["txtEndDate"]);
if (DateTime.Compare(startDate, endDate) > 0)
{
txtStartDate.BackColor = System.Drawing.Color.Yellow;
txtEndDate.BackColor = System.Drawing.Color.Yellow;
Msg = Msg + "The end date must be a later date than the start date.";
//The Msg text will be displayed in lblError.Text after all the error messages are concatenated
validatedState= false;
//Boolean value - test each textbox to see if the data entered is valid, if not set validState=false.
//If after testing each validation rule, the validatedState value is true, then submit to frmPersonnelVerified.aspx, if not, then display error message
}
else
{
txtStartDate.BackColor = System.Drawing.Color.White;
txtEndDate.BackColor = System.Drawing.Color.White;
}
Remember to clear the PostBackURL property of the Submit button!
frmPersonnelVerified.aspx Lab Hints
When using the Session state in frmPersonnel.aspx for txtFirstName, you used the following code: Session["txtFirstName"] = txtFirstName.Text;
To get this same value back from the session we use the key and the Session object in the Page_Load of frmPersonnellVerified.aspx (instead of using Request, use Session) as follows.
Session["txtLastName"].ToString()
STEP 3: Verify and Submit
23. View the video above on what functions your lab should have so far.
24. Run your project. When you open the project and go to the main menu form a record should be saved in the tblUserActivity table with the IP address, form name accessed (frmPersonnel), and the date accessed. When you click the View Activity button you should see at least one record with this information. The validation and error display should work for entering data. All navigation and hyperlinks should work.
Once you have verified that it works, save your project, zip up all files, and submit it.NOTE: Make sure you include comments in the code provided where specified (where the " //Your comments here" is mentioned) and for any code you write, or else a five-point deduction per item (form, class, function) will be made. You basically put two forward slashes, which start the comment; anything after the // on that line is disregarded by the compiler. Then type a brief statement describing what is happening in the following code. Comments show professionalism and are a must in systems. As a professional developer, comments will set you apart from others and make your life much easier if maintenance and debugging are needed.
Learn More -
Microsoft Visual Basic 2015 Chapter 8 Case 9 Job Growth in The Information Technology Field
Regular Price: $15.00
Special Price $12.00
Microsoft Visual Basic 2015 Chapter 8 Case 9 Job Growth in The Information Technology Field
Job Growth in The Information Technology Field
Create a requirement document and a Use Case definition document and then design a Windows application based on the case project shown in Figure 8-120. Before writing the code, create an event planning document for each event in the program:The US department of Labor has projected that the Information Technology job sector is growing. Enter the information from the following table into Notepad and save the text file.
Job Title Jobs in 2015 Jobs Projected for 2020
Computer Developers 875000 1181000
Computer Support 862000 1016000
System Analyst 504000 650000
Database Administrators 119000 154000
Network Administrators 262000 402000
IT Managers 205000 307000Calculate the changes in job numbers for each position and display the values. Compute the average number of positions that will be available in these fields each year during the period shown. Fill a ListBox object with the job titles so that the user can select a position and see the number of available jobs for the year 2015 and 2020 on the second form.
Learn More -
Programming in VB 2010 Video Bonanza Chapter 10 Case Study
Regular Price: $25.00
Special Price $20.00
Programming in VB 2010 Video Bonanza Chapter 10 Case Study
1. Create a Windows application to display the information from the Studio table in the VBVideo.mdf database file from the StudentData folder on the text Web site. Allow the user to select the studio name from a sorted drop-down list and display the rest of the fields in labels.
2. Create a Windows or Web application to display the Studio table in a grid. Hint: For a Web application, use a DataList control for the grid.
The Studio table contains these fields:
Learn More
StudioID
StudioName
ContactPerson
Phone -
Handy Calculators and Converters C# Program
Regular Price: $50.00
Special Price $40.00
Handy Calculators and Converters C# Program
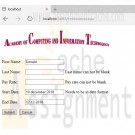
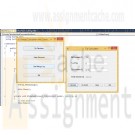
Design, implement, test, and debug a Visual C# program to create a GUI application that is a suite of handy calculators and converters. The first part of the project is to design the GUI interface for your Handy Dandy Pocket Wizard. The interface will be the portal through which we select and use the various applications in your Pocket Wizard. The various calculator and converter GUIs will also be developed in this step.
The interface must have a way to select which application to run, it must then change from the portal window or dialog to the chosen application's dialog or window to apply the application and then be able to return to the portal GUI. The second part of the project is to write the code behind the GUI windows.
Application suite calculators and converters are:
Tip calculating
• Enter Bill total and select the tip % from three standards or an enterable % to get the total amount to be paid
• Enter Bill total and an amount for the tip, the calculator displays the % of the Bill the entered tip represents and the total amount to be paid
• A "Go Dutch" option opens a new dialog window and displays the Total to be paid and allows the user to enter the number of shares that will split the Total.
• The "Dutch" share each person should pay is displayed.
• The Dutch window should be closed and return to the Tip CalculatorSales discounts
• Enter Name of an item, its price and a discount % to see a sale price.
• Store the item Name, price and sale price using an array(s). Enter at least three items and various discounts.
• Display The item Name, original price, discount price and amount saved in columns
• Display Totals for the original prices, discount prices, amount saved and calculate the average discount and the total amount paid.
• As a bonus feature, if a sale price is entered instead of a discount % then the discount % will be calculated and be displayed.Gas mileage log
Learn More
• Enter starting mileage, mileage at fill-up, number of gallons purchased, and price per gallon.
• Calculate miles driven from start to fill-up, miles per gallon.
• Accumulate miles and fuel cost monthly, keep a running Monthly total that updates with each fill-up.
• Every 5000 miles recommend an oil change.
• Use a database to record all the information and generate a report by writing to and reading from a text file. -
Advanced Visual Basic 2010 Chapter 7 Programming Challenge 5 Students and Course Lists
Regular Price: $20.00
Special Price $15.00
Advanced Visual Basic 2010 Chapter 7 Programming Challenge 5 Students and Course Lists
In this programming challenge, you will use LINQ statements to display college courses taken by selected students. You will use a CourseRegistration database, which contains tables named Students and Courses.
• The Students table contains the following columns: Id (smallint, primary key), LastName (varchar(30)), Status (smallint), and Major (varchar(5)).
• The Courses table contains the following columns: Id (varchar(10)), Student_Id(smallint), Credits (smallint), and Grade (float). The primary key of the Courses table consists of two combined columns: Id and Student_Id.
Figure 7-21 shows a one-to-many relationship between the Students and Courses tables. You can find the CourseRegistration.mdf database file in the chapter examples folder.Use a LINQ query to fill a DataGridView with a list of Student objects. When the user selects a student in the grid, display all courses taken by the student in a separate grid. Use another LINQ query to fill the second grid. A sample is shown in Figure 7-22, in which Student 1001 (Charles) was selected by clicking the left side of his row. The grid on the right fills with the list of courses taken by the selected student. Notice that the rightmost column in the Student grid displays a count of the number of courses the student has taken. This column was not in the database, but it is calculated by the LINQ query. We showed how to do such a calculation in Section 7.1.
The two DataGridView controls should be inserted into panels belonging to a Split-Container control. At runtime, the user will drag the divider between the two panels to adjust their size. To format the Grade column in the right-hand grid, set its Default-CellStyle.Format property like this:
Learn More
dgvCourses.Columns(2).DefaultCellStyle.Format = "n" -
BMIS 208 Programming Assignment 9 Microland Computer
Regular Price: $15.00
Special Price $12.00
BMIS 208 Programming Assignment 9 Microland Computer
Learn More
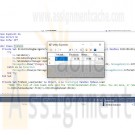
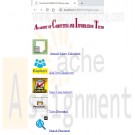
The database Microland.accdb is maintained by the Microland Computer Warehouse, a mail-order computer-supply company. The illustrations below show data in the Customers table in the database. The table identifies each customer by an ID number and gives, in addition to the name and address, the total amount of purchases during the current year.
Write a Visual Basic program that will:
a. On the form_load event, display in a listbox the customers’ names that are listed in the Customers table.
b. When the user selects a customer from the listbox and clicks the button to “Show Customer Information”, the customer’s name, street, city, and purchases should be displayed in the textboxes to the right of the buttons as illustrated below.
c. A Clear button should be included to clear all of the textboxes. [Note that it should not clear the listbox containing the customers’ names.]
d. A Close button should be included to exit the application.
As in all of your assignments, make sure that you have used appropriate programming techniques (i.e. naming of controls and variables, form has a title, tab order of controls is appropriate, textboxes used for display purposes are not writeable, internal documentation/comments are clear, formatting of any currency fields, etc.)
Design your form based on the diagram below.
The database that contains the table for this assignment is contained within your Instructions folder and should be placed in your project’s bin\debug folder.
Below are the data that are contained in the table in the database.
(Note: You do not have to display this table in your Visual Basic program. You should only create the screen shown above using the data in this table.)

You have no items in your shopping cart.
