Search results for 'ITS 320'
-
Visual C# 2010 How to Program Deitel Spam Scanner and Generic Linear Search Method Solution
$12.00Visual C# 2010 How to Program Deitel Spam Scanner and Generic Linear Search Method Solution
(Spam Scanner) Spam (or junk e.mail) cost U.S. organization billions of dollars a year in spam-prevention software, equipment, network resources, bandwidth, and lost productivity. Research online some of the most common spam e.mail messages and words, and check your own junk e.mail folder. Create a list of 30 words and phrases commonly found in spam messages. Write an application in which the user enters an e.mail message. Then, scan the message for each of the 30 keywords or phrases. For each occurrence of one of these within the message, add a pint to the message’s “spam score.” Next, rate the likelihood that the message is spam, based on the number of points received.
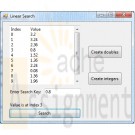
22.7 (Generic Linear Search Method) Write a generic method, Search, that implements the linear-search algorithm. Method Search should compare the search key with each element in the array until the search key is found or until the end of the array is reached. If the search key is found, return its location in the array; otherwise, return -1. Write a test application that inputs and searches an int array and a double array. Provide buttons that the user can click to randomly generate int and double values. Display the generated values in a TextBox, so the user knows what values they can search for [Hint: Use (T : IComparable<T>) in the where clause for method Search so that you can use method CompareTo to compare the search key to the elements in the array.}
Learn More -
Visual C# 2010 How to Program 4E Deitel Chapter 24 Cash Register Microwave and Phone book Applications
$15.00Visual C# 2010 How to Program 4E Deitel Chapter 24 Cash Register Microwave and Phone book Applications
24.9 Create a cash-register application modeled after the one presented in Fig. 24.37. It should alow users to enter a series of prices, then obtain the total. The Delete button should clear the current entry, and the Clear button should reset the application.
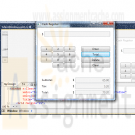
24.11 Using WPF, create a GUI that represents a simple microwave, as shown below (you do not have to provide functionality) To create the Start, Clear and numerical Buttons, you’ll need to make use of control templates. To apply a control template automatically for a control type, you can create a style (with a TargetType) that sets the Template property.
Learn More
24.12 WPF allows two-way data bindings. In a normal data binding, if the data source is updated, the binding’s target will update, but not vice versa. In a two-way binding, if the value is changed in either the binding’s source or its target, the other will automatically updated. To create a two-way binding, set the Mode property to TwoWay at the binding declaration. Create a phone book application modeled after the one shown below. When the user selects a contact from the contacts list, its information should display in a Grid of TextBoxes. As the information is modified, the contacts list should display each change. -

Visual C# 2010 How to Program Deitel Chapter 25 Reflection Enlarge Picture
$20.00Visual C# 2010 How to Program Deitel Chapter 25 Exercise 25.6 Reflection Enlarge Picture
Create an application that has the same GUI as shown in the enclosed. The cover images are included in the folder with chapter examples. When the mouse hovers over any of the covers, that cover and its reflection should animate to a larger size.
Learn More -
CIS 365 Movie Database Project PostgreSQL C# Project
$25.00CIS 365 Movie Database Project PostgreSQL C# Project
Project Requirements
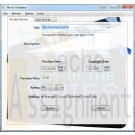
The project for this course is designed to reinforce the material we have covered in the course as well as expose you to new technologies you are likely to encounter when working out in industry.To complete your project, you will be required to connect to a database and display/modify its data. You will be using ADO.Net to work with the database.
The database you will be working with is a PostGres database I have distributed to the class. To access the database, you will need to download and install the PostGres software. It can be found here http://wwwmaster.postgresql.org/download/mirrors-ftp?file=%2Fbinary%2Fv8.2.6%2Fwin32%2Fpostgresql-8.2.6-2.zip, or you can download it from the project folder on Blackboard. To view the database schema and table contents directly, you will need to run the pgAdmin III administrator’s tool installed with the PostGres database (Start->All Programs->PostgreSQLx.x->pgAdmin III).
I would recommend browsing the database and familiarizing yourself with the media table and its associated columns/data.
The following are the project requirements:
1) The user interface must be GUI based and written using Windows Presentation Foundation (WPF).
2) The user must be able to do the following: View the database records, Insert new database records, Modify database records and Delete database records.
3) Error trapping must be performed by the application.
4) Combo boxes must be used to provide user input options (i.e. rating, ranking fields) and to avoid input validation.
5) The application must have a menu bar. I would suggest duplicating any actions such as insert/delete which are performed via command buttons within the menu bar.
6) You should use the following controls in your project: ComboBox, TextBox, Label, Command Buttons, at least one image and radio button/check boxes. ListView and GridView controls are encouraged.Valid choices for rating are G, PG, PG-13 and R. Valid choices for ranking are Poor, Fair, Average, Good, Excellent.
You will also find a project evaluation sheet in the project folder on Blackboard. I would suggest using it as a checklist when working on your project.
I have also placed an example project in Blackboard to demonstrate connecting to the database and pulling records from it.
I have left the actual design of the GUI and user-interaction open to your interpretation. I look forward to seeing your projects.
Learn More -
CIS 170 Week 1 iLab 1 of 7 Getting Started Your First C# Programs
$15.00CIS 170 iLab 1 of 7 Getting Started Your First C# Programs
Week 1 Your First Program Data Types and Expressions
Scenario/Summary
Welcome to Programming with C#. The purpose of this three-part lab is to walk you through the following tutorial to become familiar with the actions of compiling and executing a C# program.iLab Steps
Part A: Getting Started
Step 1: Start the Application
Locate the Visual Studio 2010 icon and double click to open. Under Applications, click on the Microsoft Visual Studio.NET 2010 icon to open the C# software.
Step 2: Create a C# Console Project
Choose File->New Project, and click Console Application. In the project name box, enter LAB1A. Your screen should look like the screen below. If so, press the OK button.
Step 3: Delete All Code in Program.cs
Your screen should now look like what you see below. Now, highlight all of the code that you see [Ctrl + A] and press the Delete key. You will not need this code because you will now be getting experience writing every line of a new program.
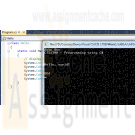
Step 4: Type in Program
Now enter the following C# program exactly as you see it. Use the tab where appropriate. (Note: C# is case sensitive.) Instead of John Doe, type your name.
class Hello
{
static void Main()
{
// display output
System.Console.WriteLine("John Doe");
System.Console.WriteLine("CIS170B – Programming using C#");
System.Console.WriteLine("\n\n\nHello, world!\n\n");
System.Console.WriteLine("EOJ");
System.Console.ReadLine();
}
}
Step 5: Save Program
Save your program by clicking File on the menu bar and then clicking Save Program.cs, or by clicking the Savebutton on the toolbar or Ctrl + S.
Step 6: Build Solution
To compile the program, click Debug on the menu bar and then click the Build Solution or Build LabAoption. You should receive no error messages in the Error List window below the program. If you see some error messages, check the code above to make sure you didn't key in something wrong. You can double click on each error message to better navigate to the area where the problem might be. Once you make your corrections to the code, go ahead and build the solution again.
Step 7: Execute the Program
Once you have no compile errors, to execute or run your program, either:
click Debug on the menu bar, and then Start Debugging;
click the right arrow icon on the menu bar; or press the F5 key.
Step 8: Capture the Output
Print a picture of your screen output. (Do a print screen and paste this into your MS Word document.)
Step 9: Print the Source Code
Copy your source code and paste it into your Word document.
End of Part APart B: Calculate Total Tickets
Step 1: Create New Project
Make sure you close your previous program by clicking File >> Close Solution. Now, create a new project and name it LAB1B.
Step 2: Type in Program
Like before, delete the code that is automatically created and enter the following program. Type in your name for Developer and current date for Date Written.
// ---------------------------------------------------------------
// Programming Assignment: LAB1B
// Developer: ______________________
// Date Written: ______________________
// Purpose: Ticket Calculation Program
// ---------------------------------------------------------------
using System;
class FirstOutputWithUsing
{
static void Main()
{
// create variables and load values
int childTkts, adultTkts, totalTkts;
childTkts = 3;
adultTkts = 2;
// process (calculation)
totalTkts = childTkts + adultTkts;
// display output
Console.WriteLine(totalTkts);
// pause
Console.Write("\nPress Enter to continue...");
Console.ReadLine();
}
}
Step 3: Save Program
Save your program by clicking File on the menu bar and then clicking Save Program.cs, or by clicking the Savebutton on the toolbar or Ctrl + S.
Step 4: Build Solution
To compile the program, click Build on the menu bar and then click the Build Solution or Build LabB option. You should receive no error messages. If you see some error messages, check the code above to make sure you didn't key in something wrong. Once you make your corrections to the code, go ahead and click Build >> Build Solution again.
Step 5: Execute the Program
Once you have no syntax errors, to execute or run your program, click Debug on the menu bar and then clickStart Debugging.
Step 6: Comment the Program
Go back to the editor and insert meaningful comments that show that you understand what each line of code does.
Step 7: Capture the Output
1. Run the program again.
2. Capture a screen print of your output. (Do a PRINT SCREEN and paste into your MS Word document.)
3. Copy your commented code and paste it into your document
End of Part BPart C: Payroll Program
Step 1: Create a New Project
1. Make sure you close your previous program by clicking File >> Close Solution.
2. Create a new project and name it LAB1C.
3. This time, do not delete the code that gets automatically created. Instead, insert your code right between the curly braces, as illustrated below.
static void Main(string [] Args)
{
// your code goes here!
}
Include a comment box like what you coded in Part B at the very top of your program.
Step 1a: Write Your Own Program
Write a program that calculates and displays the take-home pay for a commissioned sales employee after deductions are taken. The employee receives 7% of his or her total sales as his or her gross pay. His or her federal tax rate is 18%. He or she contributes 10% to his or her retirement program and 6% to Social Security. Use the Processing Logic provided in Step 2 below as a guide. The program's output should look something like this:
Enter weekly sales: 28,000
Total sales: $28,000.00
Gross pay (7%): $1,960.00
Federal tax paid: $352.80
Social security paid: $117.60
Retirement contribution: $196.00
Total deductions: $666.40
Take home pay: $1,293.60
Press any key to continue.Step 2: Processing Logic
Basic Logic and Flowchart
Input: Prompt the user for the weekly sales.
Process: Perform the calculations. The employee receives 7% of his or her total sales as his or her gross pay. His or her federal tax rate is 18%. He or she contributes 10% to his or her retirement program and 6% to Social Security.
Output: Display the results.
Pseudocode:
1. Declare variables
2. Accept Input – weeklySales
3. Calculate Gross Pay = Weekly Sales * .07
4. Calculate Federal Tax = Gross Pay * .18
5. Calculate Social Security = Gross Pay * .06
6. Calculate Retirement = Gross Pay * .10
7. Calculate Total Deductions = Federal Tax + Social Security + Retirement
8. Calculate Total Take Home Pay = Gross Pay – Total Deductions
9. Display the following on separate lines and format variables with $ and decimal
1. Total Sales Amount: value of weekly sales
2. Gross Pay (.07): value of gross pay
3. Federal Tax paid (.18): value of federal tax
4. Social Security paid (.06): value of social security
5. Retirement contribution (.10): value of retirement
6. Total Deductions: value of total deductions
7. Take Home Pay: value of take home payStep 3: Save Program
Save your program by clicking File on the menu bar and then clicking Save Program.cs, or by clicking the Savebutton on the toolbar or Ctrl + S.Step 4: Build Solution
To compile the program, click Debug on the menu bar and then click the Build Solution or Build LabCoption. You should receive no error messages. If you see some error messages, check the code above to make sure you didn't key in something wrong. Double-click on an error to navigate to its location in the code. Once you make your corrections to the code, go ahead and click Debug >> Build Solution again.Step 5: Execute the Program
Once you have no syntax errors, to execute or run your program, click Debug on the menu bar and then clickStart Debugging, or press the right arrow icon or the F5 key.Step 6: Capture the Output
1. Capture a screen print of your output. (Do a PRINT SCREEN and paste into your MS Word document.)
2. Copy your commented code and paste it into the Word document.
End of Part C
END OF LABAfter you have completed your lab, complete the following for each part of the lab (if there are multiple parts).
Learn More
1. Capture a screen print of your output. (Do a PRINT SCREEN and paste into an MS Word document.)
2. Copy your code and paste it into the same MS Word document that contains the screen print of your output.
3. Save the Word document as CIS170B_Lab01_B_LastName_FirstInitial.docx.
4. Upload all three projects folder and save the compressed file as CIS170B_Lab01_B_LastName_FirstInitial.Zip.
5. Submit both the compressed project file and the Word document to the weekly Dropbox for this lab.
Zipping and Submitting Your Project Files
When you submit your project files, you will want to send the entire project folder that is created by MS Visual Studio when you create the project, along with your MS Word file. Use your favorite compression tool to zip the full contents of both projects, zip the single zip file, and submit the zip file to your Dropbox. -
CIS 170 Week 2 iLab 2 of 7 Decisions
$15.00CIS 170 Week 2 iLab 2 of 7 Decisions
Scenario/Summary
You will code, build, execute, debug, and test two programs using decision structures. The first program will calculate the shipping charge based on a given purchase amount. The second program translates a given TV channel to its call sign.
Part A: Calculate Shipping Charge
Requirements
Your mission: Write a program that gets the amount of a purchase from the user and then calculates the shipping charge, based on the following table:
$0.00 - $250.00: $5.00
$250.01 - $500.00: $8.00
$500.01 - $1,000.00: $10.00
$1,000.01 - $5,000.00: $15.00
over $5,000.00: $20.00
Sample output from program:
Enter a purchase amount to find out your shipping charges.
Please enter the amount of your purchase: 234.65
The shipping charge on a purchase of $234.65 is $5.00.
Press any key to continue . . .
Tips
Best practice: Put yourself in the place of the program. What questions would you ask a customer in order to get the best input? How would you determine the correct shipping charges if you had to make the decisions yourself? Write out the questions you would ask yourself on paper as pseudocode and/or in Visual Studio as C# comments, and then implement them one by one, testing as you go. Remember to not write too much at one time. Always add and test functionality incrementally!
You can use the pseudocode below as a guide:
Prompt the user for the sale amount
Is sale amount greater than $5,000.00?
If so, shipping is $20.00
If not, is sale amount greater than $1,000.00?
If so, shipping is $15.00
If not, is sale amount greater than $500.00?
If so, shipping is $10.00
If not, is sale amount greater than $250.00?
If so, shipping is $8.00
If not, is sale amount greater than $0.00
shipping is $5.00
If not
shipping is $0.00
If shipping is $0.00
Display "Error incorrect input"
If not
Display sale amount and shipping charge
Learn More
Part B: TV Channel to Call Sign
Requirements
Your mission: Write a program that translates a TV channel (1 through 10) in your area to its respective call sign. For example, in the New York metropolitan area, channel 2 translates to WCBS. If a channel is unused in your area, tell the user that this is the case.
Sample output from program:
Translate TV Channel Number to Call Sign
Enter channel number: 1
Channel 1 is undesignated in your area
Enter channel number: 2
Call sign for channel 2 is WCBS
Enter channel number: 6
Call sign for channel 6 is WRNNDT
Tips
Best practice: Put yourself in the place of the program. What steps would you personally need to perform in order to process a channel translation yourself? Write out those steps on paper as pseudocode and/or in Visual Studio as C# comments, and then implement them one by one, testing as you go. Remember to not write too much at one time. Always add and test functionality incrementally!
Pseudocode: Although there are several valid ways to write the program, the following is an outline of one way to design the overall logic.
Declare variables for channel and call sign
Get channel number from user
Use appropriate decision structure to translate number to call sign
If number is valid in area
Print out translation
If not
Tell user this is the case -
CIS 170 Week 3 iLab 3 of 7 Looping DIVE Scoring Program
$15.00CIS 170 Week 3 iLab 3 of 7 Looping DIVE Scoring Program
DIVE Scoring Program
Your mission: The state diving commission wants to computerize the scoring at its diving competitions. You've been hired to write a program to automate the scoring of dives. Following are the requirements for the program.
After each dive, the user will be prompted to enter the:
diver's name
diver's city
degree of difficulty (ranges from 1.00 to 1.67); and scores from five judges (scores can range from 0 to 10).
If an invalid score is entered, an error message will be displayed. The user will be prompted for the score repeatedly until a valid score is entered.
The program will then display the following information:
Diver's name
Diver's city
Dive final score: This is calculated by dropping the highest and lowest of the five judges' scores. The remaining three scores are added together, and the result is divided by 3 and then multiplied by the degree of difficulty.
The program will then prompt the user if she/he wants to process another dive. The user can type "Y" or "y" to continue, and "N" or "n" to quit.
Sample output:
Diver's name: Sue Jones
Diver's city: Dallas
Dive degree of difficulty: 1.9
Invalid degree of difficulty - Please reenter (Valid Range: 1 - 1.67)
Dive degree of difficulty: 2
Invalid degree of difficulty - Please reenter (Valid Range: 1 - 1.67)
Dive degree of difficulty: 1.2
Judge #1 score: 45
Invalid score - Please reenter (Valid Range: 0 - 10)
Judge #1 score: 3
Judge #2 score: 4.5
Judge #3 score 6.7
Judge #4 score 89
Invalid score - Please reenter (Valid Range: 0 - 10)
Judge #4 score 8
Judge #5 score: 9.2
Diver: Sue Jones
City: Dallas
Dive score: 7.68
Do you want to process another dive (Y/N)? y
Diver's name: Dave Smith
Diver's city: Houston
Dive degree of difficulty: 1.1
Judge #1 score: 5.7
Judge #2 score: 6.8
Judge #3 score:: 7.6
Judge #4 score: 8.7
Judge #5 score: 6.7
Diver: Dave Smith
City: Houston
Dive score: 7.74
Do you want to process another diver (Y/N)? NTips
Learn More
Best practice: Note that a good way to implement the code is to write a first version for only a single dive without validating input. Put yourself in the place of the program. What steps would you personally need to perform in order to process a single dive yourself? Write out those steps on paper as pseudocode and/or in Visual Studio as C# comments, and then implement them one by one, testing as you go. After you have a single dive process working, implement one of the input validations, or the outer loop that repeats the whole process. Whichever you choose, remember to not write too much at one time. Always add and test functionality incrementally!
Pseudocode: Although there are several valid ways to write the program, the following is an outline of one way to design the overall logic.
Declare and initialize variables: name, city, judge score, highest score, lowest score, total score
Loop while there are dives to process
Get diver's name and city
Get degree of difficulty
Loop to validate input
End Loop
Loop five times to get judges' scores
Loop to Validate input
End Loop
Update highest and lowest scores if need be
Add score to total score
End Loop Calculate the final score (subtract highest and lowest scores from total score, divide by 3, multiply by degree of difficulty) Display the diver's information and final dive score Prompt the user if he or she wants to process another dive
End-Loop -

CIS 170 Week 4 iLab 4 of 7 Methods Phone Dialing Program
$15.00CIS 170 Week 4 iLab 4 of 7 Methods Phone Dialing Program
Scenario/Summary
You will code, build, and execute a program that simulates the dialing of a phone using methods.Phone Dialing Program
Your mission: A prepaid phone service needs a program that converts alphanumeric keyboard input into a phone number. The user will input eight characters and the program will output either an error message or the translated seven-digit phone number. The input may contain digits, letters, or both. Letters can be uppercase or lowercase.
The program will perform the conversion per a standard telephone keypad layout.
0
1
2
A B C
3
D E F
4
G H I
5
J K L
6
M N O
7
P Q R S
8
T U V
9
W X Y ZThe program implements the following methods.
Main(): Declares seven character variables and passes these to the following methods by reference:
ProcessInput(): gets user input and performs the conversion
ShowResults(): displays the results
GetInput(): Gets seven characters from the user and stores them into the seven variables Main() has passed by reference.
ProcessInput(): Calls ToDigit() for each, passing each character variable by reference, and returns one of these codes to Main() by value:
0 if there were no input errors
-1 if there were input errorsInput errors include the following:
The first character is 0 (seven-digit phone numbers can't start with 0).
The first three characters are "555" (no phone numbers start with 555).
Any character is not a digit or an uppercase or lowercase letter.
ToDigit(): Converts a character (passed by reference) to its corresponding digit per the table above, and returns one of these codes to ProcessInput() by value:
0 if the character is valid (a digit or uppercase or lowercase letter)
-1 if the character is not valid
ShowResults(): Writes converted telephone number to the screen, inserting a dash (-) between the third and fourth digits, and accepts the seven character variables from Main() by reference.Sample Output:
Enter a 7 character phone number: 2132121
The converted phone number is: 213-2121
Enter a 7 character phone number: 2scdfER
The converted phone number is: 272-3337
Enter a 7 character phone number: 555resw
Invalid input, please try again.
Enter a 7 character phone number: 0988765
Invalid input, please try again.
Enter a 7 character phone number: 12345678
Invalid input, please try again.
Enter a 7 character phone number: @34*uy
Invalid input, please try again.Tips
Best practice: Don't try to write too much at a time! First, write an outline in comments based on the requirements and the pseudocode. Then, implement declaring seven char variables. Make sure to fix any compiler errors before implementing more. Then, write and call an empty GetInput() method that accepts parameters, but does nothing but return a dummy value. Make sure you can pass the seven character variables by reference without compiler errors before implementing any of the GetInput() logic. Keep working incrementally like this, testing as you go. Set breakpoints and use the debugger at each phase to make sure your logic is working correctly. Then, use the same approach to implement the other methods. Test each phase with valid input before handling any invalid conditions.Pseudocode
ProcessInput( ) Method
Get 7 characters from the user and store them in the 7 variables that Main() has passed by reference
Call ToDigit() for each of the 7 characters
If toDigit returns an error code (-1), return an error code (-1)
If the first character is 0, return an error code (-1) to Main()
If the first three characters are 555, return an error code (-1)
If there are no errors, return 0
ToDigit ( ) Method
Convert the characters (passed from ProcessInput() by reference) to upper case
Use a switch statement to translate characters into their corresponding digits.
Write a case statement for each digit and for each valid uppercase letter
Write a default case that returns an error code (-1) for invalid letters
If there are no invalid letters, return 0
ShowResults ( ) Method
Display the Phone Number using the character variables Main() has passed by reference
Main() Method
Declare 7 char variables
Get user input by calling the GetInput() method, passing it the 7 variables by reference
Perform the conversion by calling the ProcessInput( ) method, passing it the 7 variables by reference
Display an error message or call ShowResults(), depending on the code ProcessInput() returnsEND OF LAB
Learn More -
Clearly Visual Basic 2010 Chapter 10 Exercise 8 WKRK Solution
$15.00Clearly Visual Basic 2010 Chapter 10 Exercise 8 WKRK Solution
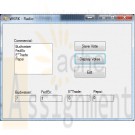
Each year, WKRK-Radio polls its audience to determine the best Super Bowl commercial. Th e choices are as follows: Budweiser, FedEx, E*Trade, and Pepsi. The station manager wants an application that allows him to enter a caller’s choice. The choice should be saved in a sequential access file. The application also should display the number of votes for each commercial. Create a Visual Basic Windows application. Use the following names for the solution, project, and form file, respectively: WKRK Solution, WKRK Project, and Main Form.vb. Create the interface shown in Figure 10-45, and then code the application. Save the solution and then start and test the application. Close the Code Editor window and then close the solution.
Learn More -
BMIS 208 Programming Assignment 9 Microland Computer Warehouse
$20.00BMIS 208 Programming Assignment 9 Microland Computer Warehouse
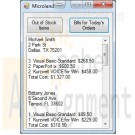
The database Microland.accdb is maintained by the Microland Computer Warehouse, a mail-order computer-supply company. The tables below show data in the three tables in the database. The table Customers identifies each customer by an ID number and gives, in addition to the name and address, the total amount of purchases during the current year prior to today. The table Inventory identifies each product in stock by an ID number and gives, in addition to its description and price (per unit), the quantity in stock at the beginning of the day. The table Orders gives the orders received today. Assume that it is now the end of the day. Write a Visual Basic program that uses the three tables to do the following two tasks:
1. Display in a listbox the items that are out of stock and those that must be reordered to satisfy today’s orders.
2. Display in a listbox bills for all customers who ordered during the day. Each bill should show the customer’s name, address, items ordered (with costs), and total cost of the order.Design your form based on the diagram below.
The database that contains the tables for this assignment is contained within your Instructions folder and should be placed in your project’s bin\debug folder.
Below are the data that are contained in the tables in the database.
(Note: you do not have to reproduce these tables in your Visual Basic program. You should only create the screens shown above.)This assignment is due by 11:59 p.m. (ET) on Monday of Module/Week 6.
Adapted from Schneider, D. I. (2010). Introduction to Programming Using Visual Basic 2010 (8th ed.).Hints – the hints below are for the “Out of Stock” button function and will hopefully give you some clues as to how you can accomplish the other button’s work.
Learn More
1. Create a query1 from the order table to get the itemIDs ordered. You will want to order your query by itemID and use Distinct to eliminate duplicate itemIDs.
2. Use a for-each loop to go through query1 once per itemID. For each loop you want to do the following:
a. Create a query2 using the order table Where the itemID in the order table equals the itemID from query1. The purpose of this query is to get the quantities ordered for each itemID.
b. Use a for-each loop and a variable (let’s call it intTotalOrdered) to iterate through query2 and sum up the quantities ordered for each itemID.
c. Create a query3 using the inventory table and select those records Where the intTotalOrdered is equal to or greater than the quantity on hand – these are the records that will need to be reordered. Use a Let statement with quantity on hand and intTotalOrdered to determine the reorder quantity. Select the itemID, reorder quantity, and item description.
d. Print out itemID, reorder quantity, and item description to your list box. Use Math.Abs() on your reorder quantity to convert negative numbers to positive ones.

You have no items in your shopping cart.
