Search results for 'DBM 460'
2 Item(s)
Grid List
-
WEB460 Lab 1 of 7: Basic ASP Page and Cross-Page Posting
Regular Price: $12.00
Special Price $10.00
WEB460 Lab 1 of 7: Basic ASP Page and Cross-Page Posting
Scenario/Summary
In this week's lab assignment, we'll be developing credit card information checkout pages of an online book store. Such pages are necessary in any developed e-commerce application. In these pages, users are required to enter information related to their payment and shipping options.
We will develop two pages. On the first page, the user provides personal, payment, and shipping information for the order submitted. The second page summarizes the user's input and requires the user to confirm.Learning Objectives
Create an ASP.NET web project in Visual Studio 2010 or Visual Studio 2012.
Create and design ASP.Net web forms.
Cross-page posting in ASP.NET
How to use ASP.NET web server controls (DropDownList, TextBox, RadioButtonList, Label, and Button)
Exception handlingDeliverables
A zip archive of the ASP.NET Application implementing cross-page posting consisting of the following files:
– pgCheckOut.aspx web form with all server controls defined in requirements
– pgCheckOut.aspx.cs with code for cross-page posting
– pgConfirm.aspx web form with all server controls defined in requirements
– pgConfirm.aspx.cs with code for cross-page posting and exception handlingLab Steps
STEP A: Create a New Web Site Project
1. Go to the File menu and select New. From the New sub-menu, select Web Site to create a new Web Site project.
2. In the New Web Site dialog box, select the language you want to use in developing your web application; for our applications choose Visual C#.
3. Select ASP.NET Empty Web Site to create a project with only a web.config file.
4. Then specify the location of your project or website. Note that in ASP.NET, you have the option of creating your website in different locations, whether in any folder on your local file system, on the local IIS server you have on your computer, or on a remote HTTP or FTP server. ASP.NET has an integrated IIS server with the Visual Studio .Net IDE.
I recommend using the default Web Sites folder in the Visual Studio project folder. This allows the development of web applications without the hassle of setting up an IIS server on your computer. If you don't have IIS server installed on your computer, this is the best option to select for your lab.STEP B: Create and Design a New Web Form, pgCheckOut.aspx
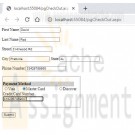
1. Add the first web form to the web application by right-clicking on the project name and selecting Add New Item. Name the web form pgCheckOut.aspx.
2. Add the controls in the table below to the form. If desired, you can visually layout the form using HTML and CSS after adding the controls.
The first column in the table shows the data the control represents or their label, the second column is the type of control, and the last column is the ID or name of the actual control. If the Visual Studio web form Toolbox Pane is not displayed, you can show it by going to the View menu and selecting Toolbox. All of these controls can be found in the Toolbox Pane.
Data or Label Control Type Control ID or Name
First Name TextBox txtFirstName
Last Name TextBox txtLastName
Street TextBox txtStreet
City TextBox txtCity
State TextBox txtState
Payment Method RadioButtonList rblCCType
Credit Card Number TextBox txtCCNumber
Submit Button btnSubmit
Phone Number TextBox txtPhone3. When the user clicks on the submit button, pgConfirm.aspx should be displayed. This is done with cross-page posting. To implement this, set the PostBackUrl property of the Submit button to ~/pgConfirm.aspx. This will cause the pgCheckOut.aspx to post user requests to the web page pgConfirm.aspx, which we will create shortly.
STEP C: Add Code to the pgCheckOut.aspx Form (to Read User Input and Implement Cross-page Posting)
Implement public methods in the pgCheckOut.aspx.cs code file to expose the form's control values to other pages. The code below is an example of how to retrieve the value of the txtFirstName and txtLastName.
Sample Method to Get Control Values
public TextBox FirstName
{ get { return txtFirstName; } }
public TextBox LastName
{ get { return txtLastName; } }STEP D: Create and Design Another Web Form, pgConfirm.aspx
1. Add the second web form to your web application. Name the form pgConfirm.aspx.
2. Add label controls to display the user input values for the name, address, credit card type, and credit card number.
This allows the user to review and confirm order information before final submission. Add the controls in the table below to the form. The application will fill in the text displayed by the labels, so you don't need to. You should provide additional labels that describe these values for the user.
Control Type Control ID or Name Control Purpose
Label lblName Holds the concatenation string of first name and last name entered in pgChekout.aspx
Label lblAddress Holds the concatenation of all address-related fields user input in pgCheckOut.aspx
Label lblCCType Displays the credit card type the user selected in pgCheckOut.aspx
Label lblCCNumber Displays the credit card number the user entered in pgCheckOut.aspx
Label lblStatus Displays the message of any run time exception that might happen during run time
Button btnSubmit When the user clicks on the submit order button, this displays a note to the user that his or her order was submitted successfully. You should use the status label to display the message.STEP E: Add Code to the pgConfirm.aspx Form (to Allow User to Verify Order Input and Submit for Final Processing)
1. In the pgConfirm.aspx page, add the following code to the PreviousPageType directive to the pgConfirm.aspx file, and set it to the pgCheckOut.aspx.
<%@ Page Language="C#" AutoEventWireup=“true" CodeFile="pgConfirm.aspx.cs" Inherits="pgConfirm" %>
<%@ PreviousPageType VirtualPath="~/pgCheckOut.aspx" %>
2. Next, in the Page_Load() event of the pgConfirm.aspx.cs code page, check whether there is any cross-page posting by checking whether there is a cross-page postback, and set the values of the label controls with the corresponding user input values from the previous page as shown below. Be sure to implement for all controls on the form.
3. Enclose your code in a try/catch block to handle any run time exception thrown by the application for any reason, as shown below.
4. Add code to have lblStatus display the message of any thrown exception. Don't forget to add comments explaining what each line of code does.
pgConfirm Page_Load method
protected void Page_Load(object sender, EventArgs e)
{
try
{
if (PreviousPage.IsCrossPagePostBack)
{
lblName.Text = PreviousPage.FirstName.Text + " " + PreviousPage.LastName.Text;
// Your code to set other form labels goes here
}
}
catch (Exception error )
{
lblStatus.Text = error.Message;
}
}STEP F: Compile, Test, Save, and Submit Your Project
Learn More
1. Save your work!
2. Test it! Make changes as appropriate until it works.
3. Remember to add comments for each step being performed.
4. Please zip and submit the entire web project folder. -
WEB460 Lab 2 of 7: Creating and Using Master Pages
Regular Price: $12.00
Special Price $10.00
WEB460 Lab 2 of 7: Creating and Using Master Pages
Scenario/Summary
In this Lab, you create a master page for our bookstore website and then modify the checkout and order confirm pages from last week's lab to use the master page.Deliverables
The deliverables for this week's lab are the following:
pgCheckOut.aspx
pgCheckOut.aspx.cs
pgConfirm.aspx
pgConfirm.aspx.cs
Web460Store.master
Web460Store.master.cs
web.config
Please zip and submit the entire web project folder.Lab Steps
STEP A: Create a New Web Site Project
In this step, we set up a new project and copy the files from the Week 1 Lab into it. This allows us to begin our lab this week where we left off last week and to add common elements to both pages.
1. To start this week's project, create a new Empty Web Application project.
2. Copy the four files from last week's Lab into the folder for this new project. Be careful not to move the files. We want to work on a copy of last week's lab and leave the original untouched. The website folder should have the following files:
pgCheckOut.aspx
pgCheckOut.aspx.cs
pgConfirm.aspx
pgConfirm.aspx.cs
web.config
web.Debug.config ( optional: it depends on the version of Visual Studio you are using)
3. Set pgCheckOut.aspx as the start page and test your application. It should perform just as it did last week.STEP B: Create a Master Page
In this step, we add a master page to our project.
1. Right-click on the name of your project and select Add => Add New Item ...
2. Select Master Page as the type of item to add. Be sure that Place code in separate file. is checked.
3. Name the master page Web460Store.master and click OK to create the maser page for our site.STEP C: Design Your Master Page
Our master page contains elements that we want common to all pages on our website, such as the header, the footer, and two side-by-side content areas. We mark areas that content pages can fill with the ContentPlaceHolder tag.
We also want a Label control that our content pages can modify to display messages directed to the user. Making the Label accessible to content pages requires editing the C# code for the master page, which we do in the next step.
1. View the source for Web460Store.master. We first set the title and a content area in the head of the master page. Make any changes necessary to the <head> tag so that it matches the code below:
<head runat="server">
<title>WEB460 Book Store</title>
<asp:ContentPlaceHolder id="HeadPlaceHolder" runat="server">
</asp:ContentPlaceHolder>
</head>
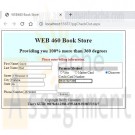
2. Next we create the page template in the <body> of the master page. We use a table to assist with the layout. The first row of the table is the header for our page, displaying the company name and motto. It also contains the Label we will use to send messages to the user. The second table row has two content areas side by side for the website pages to place content and additional controls. The last row of the table is the page footer.
Edit the <body> of your master page so that it looks like the following block of code:
<body>
<form id="form1" runat="server">
<table style="padding: 10px; border: 1px solid black;">
<tr style="background-color:lightcyan; text-align: center;">
<td colspan="2">
<!-- page header -->
<h1>WEB 460 Book Store</h1>
<h2>Providing you 100% more than 360 degrees</h2>
<!-- Label for content pages to display user message -->
<strong><span style="color:red;">
<asp:Label ID="lblUserFeedBack" Runat="server">Welcome Traveler!</asp:Label>
</span></strong>
</td>
</tr>
<tr style="vertical-align: top;">
<td>
<!-- Left content area -->
<asp:ContentPlaceHolder ID="ContentPlaceHolder1" Runat="server">
</asp:ContentPlaceHolder>
</td>
<td>
<!-- right content area -->
<asp:ContentPlaceHolder ID="ContentPlaceHolder2" Runat="server">
</asp:ContentPlaceHolder>
</td>
</tr>
<tr style="background-color:lightgrey; text-align: center;">
<td colspan="2">
<!-- page footer -->
Copyright DeVry University<br />
<strong>User's GUID:
<asp:Label ID="lblGUID" Runat="server" /></strong>
</td>
</tr>
</table>
</form>
</body>STEP D: Expose the Label Control to Content Pages
In this step, we modify the C# code file for our master page, Web460Store.master.cs, to modify text displayed on the Label controls.
1. We need to establish set properties for the Label lblUserFeedback so that our content pages can change the message displayed to the user. Add the following method to the class Web460Store:
public Label UserFeedBack
{
get { return lblUserFeedBack; }
set { lblUserFeedBack = value; }
}
2. To provide a tool we can use for security in the future, we want to display the user GUID (globally unique identifier) for this page call. We only want to generate the GUID the first time the page is loaded (not on postback). We can accomplish this by adding the following code to the master page's Page_Load method:
if (!Page.IsPostBack)
{
lblGUID.Text = System.Guid.NewGuid().ToString();
}STEP E: Modify pgCheckOut to Use Our Master Page
In this step, we modify pgCheckOut.aspx to use the master page we created earlier. Since the master page contains <head>, <body>, and <form> tags, we do not need those in our content page, so we will be removing them as part of this step. We also must map the content on this page to the ContentPlaceHolder controls on the master page.
1. We begin by adding MasterPageFile="~/Web460Store.master" to the page directive to indicate that this page references our master page:
<%@ Page Language="C#" AutoEventWireup="true" MasterPageFile="~/Web460Store.master" CodeFile="pgCheckOut.aspx.cs" Inherits="pgCheckOut" %>
2. So we have access controls the master page has exposed to us, such as the Label for user feedback. We need to add the following directive next:
<%@ MasterType VirtualPath ="~/Web460Store.master" %>
3. We can then remove the <!DOCTYPE>, <html>, and <head> tags because we will be using the ones defined in the master page. Also remove the <body> and <form> tags, but leave the content.
4. Next we map the body content to the two ContentPlaceHolder controls on the master page. The customer name, address, and phone number should be in the left content area (ContentPlaceHolder1) and the credit card information in the right content area ( ContentPlaceholder2 ). We bracket the content for each with an ASP.NET Content control.
5. Before the Label control for the customer's first name, place the line:
<asp:Content ID="ContentArea1" ContentPlaceHolderID="ContentPlaceHolder1" Runat="Server">
6. Just after the line for the phone number TextBox control, close the first content area with the line:
</asp:Content>
7. On the next line, we begin the second content area the same way as the first begins:
<asp:Content ID="ContentArea2" ContentPlaceHolderID="ContentPlaceHolder2" Runat="Server">
8. We close the second content area at the end of the file, after the submit button:
</asp:Content>
At this point, the pgCheckOut.aspx design view should look similar to the following:STEP F: Update the Master Page User Feedback Label
On pgCheckOut.aspx we want the user to enter billing information. We can modify the master page Label lblUserFeedback by updating the master page's UserFeedBack property we setup earlier. So this happens when the page is loaded, making the Page_Load method in pgCheckOut.aspx.cs look like this:
protected void Page_Load(object sender, EventArgs e)
{
Master.UserFeedBack.Text = "Please enter billing information.";
}STEP G: Modify pgConfirm to Use the Site Master Page
In this step, we transform the confirmation page pgConfirm to use the website master page in a similar way to how we modified pgCheckOut.
First, modify pgConfirm.aspx:
1. Remove unneeded HTML tags and modify the page directives as necessary.
2. The left content area should contain the customer's name and address.
3. The right content area should contain the customer credit card information and the Submit Order button.
4. Remove the status label lblStatus because we will use the master page's user feedback Label.
Then, because we removed lblStatus, we need to modify pgConfirm.aspx.cs:
5. When the page first loads, it should display the user feedback message:
Please confirm your billing information.
6. After the user presses the Submit Order button, the user feedback should be:
Your order has been submitted for processing.
7. If there is an exception thrown by PreviousPage.IsCrossPagePostBack, it should display the message:
Sorry, there was an error processing your request.
When the application is rTuonpning, pgConfirm should appear similar to the following:STEP H: Finalize Your Lab
Learn More
1. Save your work!
2. Test it!
3. Make changes as appropriate until it works.
4. Remember to add comments for each step being performed.
2 Item(s)
Grid List

You have no items in your shopping cart.
