Search results for 'Chapter 5: In the Lab: Lab 1 ECO Clothesline database /**/fRoM Chapter 4.'
Maximum words count is 10. In your search query was cut next part: /**/fRoM 4..
-
Programming with Microsoft VB 2017 Diane Zak Chapter 12 Adalene Solution
Regular Price: $7.00
Special Price $5.00
Programming with Microsoft VB 2017 Diane Zak Chapter 12 Adalene Solution
Open the Adalene Solution.sln file contained in the VB2017\Chap12\Adalene Solution folder. The application is already connected to the Adalene.mdf file, and the AdaleneDataSet has already been created. Start the application to view the records in the dataset and then stop the application. The Adalene Fashions application should allow the user to display all of the information in the dataset, only the information for company-owned stores, or only the information for franchisees. Create the appropriate queries and then use them to code the btnDisplay_Click procedure. Save the solution and then start and test the application.
Learn More -
Programming with Microsoft VB 2017 Diane Zak Chapter 11 Utilities Solution
Regular Price: $7.00
Special Price $5.00
Programming with Microsoft VB 2017 Diane Zak Chapter 11 Utilities Solution
Open the Utilities Solution.sln file contained in the VB2017\Chap11\Utilities Solution-DataGrid folder.
Learn More
a. Create a SQL Server database named Utilities.mdf.
b. Add the Bills table definition shown in Figure 11-64 to the database. The Month field's (Is Identity), Identity Increment, and Identity Seed properties are set to True, 1, and 1, respectively. (Recall that you need to expand the Identity Specification property to access these properties.)
c. After defining the table, click the Update button and then click the Update Database button.
d. Open the Data Sources window and start the Data Source Configuration Wizard. Connect the Utilities.mdf file to the application. Include the entire Bills table in the dataset.
e. Set the Utilities.mdf file's Copy to Output Directory property to "Copy if newer".
f. Drag the Bills table to the form. Set the DataGridView control's AutoSizeColumnsMode property to Fill.
g. Open the DataGridView control's task list and click Dock in Parent Container. Click Edit Columns. Change the Month column's AutoSizeMode property to ColumnHeader.
h. Click Electricity in the Edit Columns dialog box, click DefaultCellStyle, click the ... (ellipsis) button, click Format, click the ... (ellipsis) button, click Numeric, and then click the OK button. The Format box now shows N2. Change the Alignment property to MiddleRight and then click the OK button to close the CellStyle Builder dialog box.
i. Now, format the Water and Gas columns using the Numeric setting with two decimal places. Also, align the values in both columns using the MiddleRight setting. When you are finished setting the properties, close the Edit Columns dialog box.
j. Change the form's Size property to 330, 200.
k. Open the Code Editor window and enter an appropriate Try...Catch statement.
l. Save the solution and then start the application. Enter the three records shown in Figure 11-64. (Recall that the Month field is an auto-numbered field. The numbers 1, 2, and 3 will appear when you click the Save Data button.)
m. Stop the application and then start it again to verify that the three records were saved. -

Programming with Microsoft VB 2017 Diane Zak Chapter 11 Total Cookie Sales Solution
Regular Price: $7.00
Special Price $5.00
Programming with Microsoft VB 2017 Diane Zak Chapter 11 Total Cookie Sales Solution
Open the Total Cookie Sales Solution.sln file contained in the VB2017\Chap11\Total Cookie Sales Solution folder
a. Figure 11-63 shows the Sales table contained in the CookieSales.mdf file. The table contains the numbers of boxes of cookies sold in each of six weeks. The database is already connected to the application and the CookieSalesDataSet has already been created.b. Open the Data Sources window and then drag the Sales table to the DataGridView control. Change the control's AutoSizeColumnsMode to Fill. Use the control's task list to disable adding, editing, and deleting records. Also, right-align the numbers in the cookie sales columns.
c. Lock the controls on the form. Start the application to verify that the six records appear in the DataGridView control. Stop the application.
d. The Calculate button should display the total sales for each cookie type. Code the btnCalc_Click procedure. (The database does not allow NULLs in any of the fields, so you do not need to check if a field contains the NULL value.)
e. Save the solution and then start and test the application.
Learn More -
Programming with Microsoft VB 2017 Diane Zak Chapter 12 FixIt Solution
Regular Price: $7.00
Special Price $5.00
Programming with Microsoft VB 2017 Diane Zak Chapter 12 FixIt Solution
Open the VB2017\Chap12\FixIt Solution\FixIt Solution.sln file. Start the application.
Learn More
Click the Grade radio button, type the letter a in the Grade box, and then click the Display button. The application should display three records in the DataGridView control. It should also display the number 3 in the lblCount control. Notice that the application is not working properly. Fix the application. -
Programming with Microsoft VB 2017 Diane Zak Chapter 10 Fence Solution
Regular Price: $7.00
Special Price $5.00
Programming with Microsoft VB 2017 Diane Zak Chapter 10 Fence Solution
In this exercise, you create an application that can be used to calculate the cost of installing a fence around a rectangular area. Create a Windows Forms application. Use the following names for the project and solution, respectively: Fence Project and Fence Solution. Save the application in the VB2017\Chap10 folder:
a. Use Windows to copy the Rectangular.vb file from the VB2017\Chap10 folder to the Fence Project folder. Then, use the Project menu to add the file to the project.
b. Modify the Rectangular class to use the Double (rather than Integer) variables.
c. Add a method named GetPerimeter to the Rectangle class. The method should calculate and return the perimeter of a rectangle. To calculate the perimeter, the method will need to add together the length and width measurements and then multiply the sum by 2.
d. Create the interface shown in Figure 10-41 and then code the application. Save the solution and then start and test the application.
Learn More -
WEB460 Lab 2 of 7: Creating and Using Master Pages
Regular Price: $12.00
Special Price $10.00
WEB460 Lab 2 of 7: Creating and Using Master Pages
Scenario/Summary
In this Lab, you create a master page for our bookstore website and then modify the checkout and order confirm pages from last week's lab to use the master page.Deliverables
The deliverables for this week's lab are the following:
pgCheckOut.aspx
pgCheckOut.aspx.cs
pgConfirm.aspx
pgConfirm.aspx.cs
Web460Store.master
Web460Store.master.cs
web.config
Please zip and submit the entire web project folder.Lab Steps
STEP A: Create a New Web Site Project
In this step, we set up a new project and copy the files from the Week 1 Lab into it. This allows us to begin our lab this week where we left off last week and to add common elements to both pages.
1. To start this week's project, create a new Empty Web Application project.
2. Copy the four files from last week's Lab into the folder for this new project. Be careful not to move the files. We want to work on a copy of last week's lab and leave the original untouched. The website folder should have the following files:
pgCheckOut.aspx
pgCheckOut.aspx.cs
pgConfirm.aspx
pgConfirm.aspx.cs
web.config
web.Debug.config ( optional: it depends on the version of Visual Studio you are using)
3. Set pgCheckOut.aspx as the start page and test your application. It should perform just as it did last week.STEP B: Create a Master Page
In this step, we add a master page to our project.
1. Right-click on the name of your project and select Add => Add New Item ...
2. Select Master Page as the type of item to add. Be sure that Place code in separate file. is checked.
3. Name the master page Web460Store.master and click OK to create the maser page for our site.STEP C: Design Your Master Page
Our master page contains elements that we want common to all pages on our website, such as the header, the footer, and two side-by-side content areas. We mark areas that content pages can fill with the ContentPlaceHolder tag.
We also want a Label control that our content pages can modify to display messages directed to the user. Making the Label accessible to content pages requires editing the C# code for the master page, which we do in the next step.
1. View the source for Web460Store.master. We first set the title and a content area in the head of the master page. Make any changes necessary to the <head> tag so that it matches the code below:
<head runat="server">
<title>WEB460 Book Store</title>
<asp:ContentPlaceHolder id="HeadPlaceHolder" runat="server">
</asp:ContentPlaceHolder>
</head>
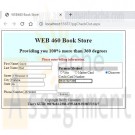
2. Next we create the page template in the <body> of the master page. We use a table to assist with the layout. The first row of the table is the header for our page, displaying the company name and motto. It also contains the Label we will use to send messages to the user. The second table row has two content areas side by side for the website pages to place content and additional controls. The last row of the table is the page footer.
Edit the <body> of your master page so that it looks like the following block of code:
<body>
<form id="form1" runat="server">
<table style="padding: 10px; border: 1px solid black;">
<tr style="background-color:lightcyan; text-align: center;">
<td colspan="2">
<!-- page header -->
<h1>WEB 460 Book Store</h1>
<h2>Providing you 100% more than 360 degrees</h2>
<!-- Label for content pages to display user message -->
<strong><span style="color:red;">
<asp:Label ID="lblUserFeedBack" Runat="server">Welcome Traveler!</asp:Label>
</span></strong>
</td>
</tr>
<tr style="vertical-align: top;">
<td>
<!-- Left content area -->
<asp:ContentPlaceHolder ID="ContentPlaceHolder1" Runat="server">
</asp:ContentPlaceHolder>
</td>
<td>
<!-- right content area -->
<asp:ContentPlaceHolder ID="ContentPlaceHolder2" Runat="server">
</asp:ContentPlaceHolder>
</td>
</tr>
<tr style="background-color:lightgrey; text-align: center;">
<td colspan="2">
<!-- page footer -->
Copyright DeVry University<br />
<strong>User's GUID:
<asp:Label ID="lblGUID" Runat="server" /></strong>
</td>
</tr>
</table>
</form>
</body>STEP D: Expose the Label Control to Content Pages
In this step, we modify the C# code file for our master page, Web460Store.master.cs, to modify text displayed on the Label controls.
1. We need to establish set properties for the Label lblUserFeedback so that our content pages can change the message displayed to the user. Add the following method to the class Web460Store:
public Label UserFeedBack
{
get { return lblUserFeedBack; }
set { lblUserFeedBack = value; }
}
2. To provide a tool we can use for security in the future, we want to display the user GUID (globally unique identifier) for this page call. We only want to generate the GUID the first time the page is loaded (not on postback). We can accomplish this by adding the following code to the master page's Page_Load method:
if (!Page.IsPostBack)
{
lblGUID.Text = System.Guid.NewGuid().ToString();
}STEP E: Modify pgCheckOut to Use Our Master Page
In this step, we modify pgCheckOut.aspx to use the master page we created earlier. Since the master page contains <head>, <body>, and <form> tags, we do not need those in our content page, so we will be removing them as part of this step. We also must map the content on this page to the ContentPlaceHolder controls on the master page.
1. We begin by adding MasterPageFile="~/Web460Store.master" to the page directive to indicate that this page references our master page:
<%@ Page Language="C#" AutoEventWireup="true" MasterPageFile="~/Web460Store.master" CodeFile="pgCheckOut.aspx.cs" Inherits="pgCheckOut" %>
2. So we have access controls the master page has exposed to us, such as the Label for user feedback. We need to add the following directive next:
<%@ MasterType VirtualPath ="~/Web460Store.master" %>
3. We can then remove the <!DOCTYPE>, <html>, and <head> tags because we will be using the ones defined in the master page. Also remove the <body> and <form> tags, but leave the content.
4. Next we map the body content to the two ContentPlaceHolder controls on the master page. The customer name, address, and phone number should be in the left content area (ContentPlaceHolder1) and the credit card information in the right content area ( ContentPlaceholder2 ). We bracket the content for each with an ASP.NET Content control.
5. Before the Label control for the customer's first name, place the line:
<asp:Content ID="ContentArea1" ContentPlaceHolderID="ContentPlaceHolder1" Runat="Server">
6. Just after the line for the phone number TextBox control, close the first content area with the line:
</asp:Content>
7. On the next line, we begin the second content area the same way as the first begins:
<asp:Content ID="ContentArea2" ContentPlaceHolderID="ContentPlaceHolder2" Runat="Server">
8. We close the second content area at the end of the file, after the submit button:
</asp:Content>
At this point, the pgCheckOut.aspx design view should look similar to the following:STEP F: Update the Master Page User Feedback Label
On pgCheckOut.aspx we want the user to enter billing information. We can modify the master page Label lblUserFeedback by updating the master page's UserFeedBack property we setup earlier. So this happens when the page is loaded, making the Page_Load method in pgCheckOut.aspx.cs look like this:
protected void Page_Load(object sender, EventArgs e)
{
Master.UserFeedBack.Text = "Please enter billing information.";
}STEP G: Modify pgConfirm to Use the Site Master Page
In this step, we transform the confirmation page pgConfirm to use the website master page in a similar way to how we modified pgCheckOut.
First, modify pgConfirm.aspx:
1. Remove unneeded HTML tags and modify the page directives as necessary.
2. The left content area should contain the customer's name and address.
3. The right content area should contain the customer credit card information and the Submit Order button.
4. Remove the status label lblStatus because we will use the master page's user feedback Label.
Then, because we removed lblStatus, we need to modify pgConfirm.aspx.cs:
5. When the page first loads, it should display the user feedback message:
Please confirm your billing information.
6. After the user presses the Submit Order button, the user feedback should be:
Your order has been submitted for processing.
7. If there is an exception thrown by PreviousPage.IsCrossPagePostBack, it should display the message:
Sorry, there was an error processing your request.
When the application is rTuonpning, pgConfirm should appear similar to the following:STEP H: Finalize Your Lab
Learn More
1. Save your work!
2. Test it!
3. Make changes as appropriate until it works.
4. Remember to add comments for each step being performed. -
WEB460 Lab 1 of 7: Basic ASP Page and Cross-Page Posting
Regular Price: $12.00
Special Price $10.00
WEB460 Lab 1 of 7: Basic ASP Page and Cross-Page Posting
Scenario/Summary
In this week's lab assignment, we'll be developing credit card information checkout pages of an online book store. Such pages are necessary in any developed e-commerce application. In these pages, users are required to enter information related to their payment and shipping options.
We will develop two pages. On the first page, the user provides personal, payment, and shipping information for the order submitted. The second page summarizes the user's input and requires the user to confirm.Learning Objectives
Create an ASP.NET web project in Visual Studio 2010 or Visual Studio 2012.
Create and design ASP.Net web forms.
Cross-page posting in ASP.NET
How to use ASP.NET web server controls (DropDownList, TextBox, RadioButtonList, Label, and Button)
Exception handlingDeliverables
A zip archive of the ASP.NET Application implementing cross-page posting consisting of the following files:
– pgCheckOut.aspx web form with all server controls defined in requirements
– pgCheckOut.aspx.cs with code for cross-page posting
– pgConfirm.aspx web form with all server controls defined in requirements
– pgConfirm.aspx.cs with code for cross-page posting and exception handlingLab Steps
STEP A: Create a New Web Site Project
1. Go to the File menu and select New. From the New sub-menu, select Web Site to create a new Web Site project.
2. In the New Web Site dialog box, select the language you want to use in developing your web application; for our applications choose Visual C#.
3. Select ASP.NET Empty Web Site to create a project with only a web.config file.
4. Then specify the location of your project or website. Note that in ASP.NET, you have the option of creating your website in different locations, whether in any folder on your local file system, on the local IIS server you have on your computer, or on a remote HTTP or FTP server. ASP.NET has an integrated IIS server with the Visual Studio .Net IDE.
I recommend using the default Web Sites folder in the Visual Studio project folder. This allows the development of web applications without the hassle of setting up an IIS server on your computer. If you don't have IIS server installed on your computer, this is the best option to select for your lab.STEP B: Create and Design a New Web Form, pgCheckOut.aspx
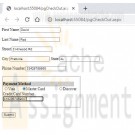
1. Add the first web form to the web application by right-clicking on the project name and selecting Add New Item. Name the web form pgCheckOut.aspx.
2. Add the controls in the table below to the form. If desired, you can visually layout the form using HTML and CSS after adding the controls.
The first column in the table shows the data the control represents or their label, the second column is the type of control, and the last column is the ID or name of the actual control. If the Visual Studio web form Toolbox Pane is not displayed, you can show it by going to the View menu and selecting Toolbox. All of these controls can be found in the Toolbox Pane.
Data or Label Control Type Control ID or Name
First Name TextBox txtFirstName
Last Name TextBox txtLastName
Street TextBox txtStreet
City TextBox txtCity
State TextBox txtState
Payment Method RadioButtonList rblCCType
Credit Card Number TextBox txtCCNumber
Submit Button btnSubmit
Phone Number TextBox txtPhone3. When the user clicks on the submit button, pgConfirm.aspx should be displayed. This is done with cross-page posting. To implement this, set the PostBackUrl property of the Submit button to ~/pgConfirm.aspx. This will cause the pgCheckOut.aspx to post user requests to the web page pgConfirm.aspx, which we will create shortly.
STEP C: Add Code to the pgCheckOut.aspx Form (to Read User Input and Implement Cross-page Posting)
Implement public methods in the pgCheckOut.aspx.cs code file to expose the form's control values to other pages. The code below is an example of how to retrieve the value of the txtFirstName and txtLastName.
Sample Method to Get Control Values
public TextBox FirstName
{ get { return txtFirstName; } }
public TextBox LastName
{ get { return txtLastName; } }STEP D: Create and Design Another Web Form, pgConfirm.aspx
1. Add the second web form to your web application. Name the form pgConfirm.aspx.
2. Add label controls to display the user input values for the name, address, credit card type, and credit card number.
This allows the user to review and confirm order information before final submission. Add the controls in the table below to the form. The application will fill in the text displayed by the labels, so you don't need to. You should provide additional labels that describe these values for the user.
Control Type Control ID or Name Control Purpose
Label lblName Holds the concatenation string of first name and last name entered in pgChekout.aspx
Label lblAddress Holds the concatenation of all address-related fields user input in pgCheckOut.aspx
Label lblCCType Displays the credit card type the user selected in pgCheckOut.aspx
Label lblCCNumber Displays the credit card number the user entered in pgCheckOut.aspx
Label lblStatus Displays the message of any run time exception that might happen during run time
Button btnSubmit When the user clicks on the submit order button, this displays a note to the user that his or her order was submitted successfully. You should use the status label to display the message.STEP E: Add Code to the pgConfirm.aspx Form (to Allow User to Verify Order Input and Submit for Final Processing)
1. In the pgConfirm.aspx page, add the following code to the PreviousPageType directive to the pgConfirm.aspx file, and set it to the pgCheckOut.aspx.
<%@ Page Language="C#" AutoEventWireup=“true" CodeFile="pgConfirm.aspx.cs" Inherits="pgConfirm" %>
<%@ PreviousPageType VirtualPath="~/pgCheckOut.aspx" %>
2. Next, in the Page_Load() event of the pgConfirm.aspx.cs code page, check whether there is any cross-page posting by checking whether there is a cross-page postback, and set the values of the label controls with the corresponding user input values from the previous page as shown below. Be sure to implement for all controls on the form.
3. Enclose your code in a try/catch block to handle any run time exception thrown by the application for any reason, as shown below.
4. Add code to have lblStatus display the message of any thrown exception. Don't forget to add comments explaining what each line of code does.
pgConfirm Page_Load method
protected void Page_Load(object sender, EventArgs e)
{
try
{
if (PreviousPage.IsCrossPagePostBack)
{
lblName.Text = PreviousPage.FirstName.Text + " " + PreviousPage.LastName.Text;
// Your code to set other form labels goes here
}
}
catch (Exception error )
{
lblStatus.Text = error.Message;
}
}STEP F: Compile, Test, Save, and Submit Your Project
Learn More
1. Save your work!
2. Test it! Make changes as appropriate until it works.
3. Remember to add comments for each step being performed.
4. Please zip and submit the entire web project folder. -
Microsoft Visual Basic 2012 Shelly Cashman Chapter 6 Case Problem 8 Galaxy Hotel
Regular Price: $20.00
Special Price $15.00
Microsoft Visual Basic 2012 Shelly Cashman Chapter 6 Case Problem 8 Galaxy Hotel
Create a requirements document and a Use Case Definition document, and design a Windows application based on the case project shown in Figure 6-135:
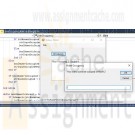
The Galaxy Hotel ask you to write a Windows application that computes the occupancy rate of the hotel. Occupancy rate is a percentage that is equal to the number of rooms sold divided by the total number of room available. The hotel has seven floors. The user should use an InputBox function to respond to two questions about each floor. How many rooms are occupied on that floor? How many rooms on floor are vacant? Display which floor you are asking about in each question. Display how many rooms are occupied and vacant on each floor in a ListBox object. After the user has entered all the information, display the following results: the total number of rooms at hotel, the number of occupied rooms, the number of vacant rooms. Also display the occupancy rate as a percentage, such as 61%. Nonnumeric values should not be accepted. Do not accept negative numbers. Publish the application after testing it.
Learn More -
Microsoft Visual Basic 2012 Shelly Cashman Chapter 6 Case Problem 5 Distance Traveled Calculator
Regular Price: $20.00
Special Price $15.00
Microsoft Visual Basic 2012 Shelly Cashman Chapter 6 Case Problem 5 Distance Traveled Calculator
Design a Windows application and write the code that will execute according to the program requirements shown in Figure 6-132. Before writing the code, create an event planning document for each event in the program. Create a Use Case Definition document for the application.
REQUIREMENTS DOCUMENT
Date submitted: December 5, 2014
Application title: Vacation Distance Calculator Windows ApplicationPurpose: This application computes the number of miles traveled given the speed limit and the number of days traveled while driving cross country.
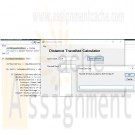
Program Procedures: In a Windows application, enter the speed limit and the number of days you plan to travel across the country. You will enter the number of hours you would like to drive for each of the days, based on places you plan to visit as you drive and other factors. For example, the first day you plan to drive only 4 hours because you are driving after work. The application displays the distance that you are able to travel for the entire trip based on the speed limit and the hours driven.
Algorithms, Processing, Conditions:
1. The application opens displaying a title. The user enters the speed limit and the and number of days you plan to drive.
2. The user clicks the Distance button to request the number of hours you plan to drive each day. The result of the total number of miles you plan to drive over the entire trip will be displayed.
3. A File menu contains a Clear and an Exit option. The Clear menu item clears the result and the entered number of miles per hour and time traveled. The Exit menu item closes the application.Notes and Restrictions:
1. Nonnumeric values should not be accepted.
2. The number of hours for one day of travel should not exceed 20 hours.Comments:
Learn More
1. The application allows decimal entries. -
CSIS 209 Programming Assignment 2 Salesperson Total Sales Application
Regular Price: $15.00
Special Price $12.00
CSIS 209 Programming Assignment 2 Salesperson Total Sales Application
Adapted from: Deitel & Deitel (2017). Visual C# 2015 How to Program (6th ed.). Pearson Education, Inc.
A large company pays its salespeople on a commission basis. The salespeople receive $200 per week plus 9% of their gross sales for that week. For example, a salesperson who sells $5,000 worth of merchandise in a week receives $200 plus 9% of $5,000, or a total of $650. You’ve been supplied with a list of the items sold by each salesperson. The values of these items are as follows:
Item Value
1 239.99
2 129.75
3 99.95
4 350.89Develop a C# application that inputs one salesperson's items sold for the last week, then calculates and displays that salesperson's total sales. There's no limit to the number of items that can be sold by a salesperson. You do not have to implement this with classes and objects.
Technical Requirements:
Prompt the user to enter the salesperson's name, and store this name in a variable.
Prompt the user to enter an item number and a quantity sold of that item. Store these two entries in two separate variables called "intItem" and "intQuantity".
Using a DO-WHILE control structure, loop until the user enters -1 for the item number.
Calculate the amount of sales for an item and store the result in a variable called dblItemSales.
After the user enters an item number and a quantity, print to the screen: the salesperson's name "has sold " [intQuantity] "of item # [intItem].
Accumulate the total sales in a variable called dblTotalSales by using a SWITCH statement to select the correct value to be multiplied by the quantity sold and adding this result to a running total, which is stored in the variable dblTotalSales.
If the user enters a number other than 1, 2, 3, or 4, display the message "Invalid Entry" and re-prompt the user to enter an Item Number. Make sure you do not perform any calculations or prompt the user to enter a quantity if the item number is incorrect.
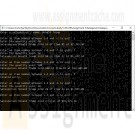
After accumulating the total sales for an employee (that is, after the user has entered a -1 to quit), print to the screen Salesperson [Salesperson’s name] sold a total of [total sales].See below for examples of the required output.
Learn More


