Search results for 'dbm 502 learning team'
8 Item(s)
Grid List
-
New Perspectives on HTML and XHTML Tutorial 4 Case Problem 3 Solution
$12.00New Perspectives on HTML and XHTML Tutorial 4 Case Problem 3 Solution
Data Files needed for this Case Problem: image0.jpg – image9.jpg, longstxt.htm, and lpmap.jpg
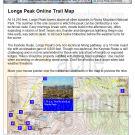
Longs Peak Interactive Map Longs Peak is one of the most popular attractions of Rocky Mountain National Park (RMNP). Each year during the months of July, August, and September, thousands of people climb Longs Peak by the Keyhole Route to reach the 14,255-foot summit. Ron Bartlett, the head of the RMNP Web site team, has asked for your help in creating an interactive map of the Keyhole Route. The map will be installed at electronic kiosks in the park’s visitor center. Ron envisions a map with 10 numbered waypoints along the Keyhole Route, displaying photos and text descriptions of each waypoint when a mouse pointer hovers over its corresponding numbered point. Figure 4-59 shows a preview of the online map with the first waypoint highlighted by the user.Ron also wants to create a print version of the waypoint descriptions. Users can print the map elsewhere on the park’s Web site, so he wants the print style sheet to display just the list of waypoints in a bulleted list.
Complete the following:
Learn More
1. Use your text editor to open the longstxt.htm file from the tutorial.04\case3 folder included with your Data Files. Enter your name and the date in the comment section at the top of the file. Save the file as longs.htm in the same folder. Take some time to study the contents of the file. Notice that the waypoint descriptions are nested within the online_map div container. Each waypoint description has been placed in a separate div container with the class name notes and id names ranging from point0 to point9.
2. To create a rollover effect for the nine waypoints, you need to mark the waypoint contents as hyperlinks.Within each of the nine div containers, enclose the img element and paragraph element within a single <a> tag. Point each link to the longs.htm file so that if a user clicks the link, it will simply refresh the currentWeb page.
3. Add a style to the embedded style sheet at the top of the file to remove underlining from all hypertext links.
4. Currently the online_map div container does not display the Longs Peak map. Add the following style to the embedded style sheet to display the map:
• Set the width of the container to 600 pixels wide by 294 pixels high.
• Add a 1-pixel-wide solid black border to the container.
• Apply the lpmap.jpg graphic file as the background image.
• Use relative positioning to place the container on the page. Set the top and left coordinates to 0 pixels.
5. In the embedded style sheet, add the following styles for all of the div containers belonging to the notes class:
• For paragraphs nested within each note, set the font size to 8 points and the margin to 5 pixels.
• Set the font color to yellow for each span element nested within a note.
6. For each link nested within a notes class element, apply the following styles:
• Set the width and height of the link to 20 pixels.
• Hide any content that overflows the boundary of the link.
• Set the background color to blue and the font color to white.
• Set the z-index value to 1.
7. When the mouse hovers over a link within a notes class element, have the browser apply the following style:
• Change the width to 150 pixels and the height to 170 pixels.
• Change the overflow property to visible.
• Set the z-index value to 2.
8. Use absolute positioning to place the link nested within the #point0 selector at the coordinates (560, 60).
9. Repeat Step 8 for the nine remaining waypoints:
• #point1 at (277, 90)
• #point2 at (175, 0)
• #point3 at (110, 115)
• #point4 at (55, 165)
• #point5 at (5, 180)
• #point6 at (15, 222)
• #point7 at (50, 245)
• #point8 at (100, 245)
• #point9 at (90, 220)
10. Go to the top of the file and add a media attribute to the embedded style sheet indicating that the sheet is designed for screen and tv media.
11. Save your changes to the file and then open longs.htm in your Web browser. Verify that the placement of the waypoints follows the locations shown in Figure 4-59. Confirm that when you hover your mouse over each of the nine waypoints, a description of the waypoint appears on the top of the trail map.
12. Return to the longs.htm file in your text editor. Create a new embedded style sheet designed for print media.
13. Scroll down to the “Longs Peak Online Trail Map” h2 heading and enclose the text “Online Trail Map” within a span element.
14. Add the following styles to the embedded print style sheet:
• Set the font family for the page body to sans-serif.
• Remove underlining from all hypertext links.
• Do not display the #instructions selector, the span element nested within the h2 element, or the img element nested within elements belonging to the notes class.
• Display the notes class of elements as list items with a disc marker. Set the margin to 20 pixels.
• Change the display property of paragraphs nested within the notes class of elements to inline.
• Display span elements nested within the notes class of elements in a bold font.
15. Add a style that inserts the text string “Trail Itinerary” after the h2 heading.
16. Save your changes to the file.
17. Refresh the longs.htm file in your Web browser. By either printing the page or viewing the page within the Print Preview window, confirm that the printed page only shows a bulleted list of the waypoint descriptions. If you are running Firefox, Opera, or Safari, confirm that the heading at the top of the page reads “Longs Peak Trail Itinerary.” (If you are using Internet Explorer, the title will simply read “Longs Peak.”)
18. Submit your completed files to your instructor. -
New Perspectives on HTML and XHTML Tutorial 9 Case Problem 2 Solution
$12.00New Perspectives on HTML and XHTML Tutorial 9 Case Problem 2 Solution
Data Files needed for this Case Problem: cassini.jpg, dtd_list.txt, gargtxt.htm, gbar.jpg, glogo.jpg, maa.jpg, and oneil.jpg
Middle Age Arts Nicole Swanson is the head of the Web site team at Middle Age Arts, a company that creates and sells replicas of historical European works of art for home and garden use. She has recently started a project to update the old HTML code in the site’s many pages. She’s asked you to update the page describing the company’s collection of decorative gargoyles. She wants the page to comply with XHTML 1.0 strict standards. Figure 9-30 shows a preview of the completed Web page.
Complete the following:
Learn More
1. Use your text editor to open gargtxt.htm from the tutorial.09\case2 folder included with your Data Files. Enter your name and the date in the comment section and save the file as gargoyle.htm in the same file.
2. Insert an XML prolog at the top of the file. Use the standard attribute defaults for an XHTML file.
3. After the XML prolog, insert a DOCTYPE declaration for the XHTML 1.0 strict DTD.
4. Set the default namespace of the document to the XHTML namespace.
5. Test the file on the validator. Fix the errors as follows:
• Convert the attributes for the body element into styles in an embedded style sheet.
(Hint: The link, alink, and vlink attributes are used to set the colors of hyperlinks, active links, and visited links in the Web page.)
• Use proper syntax for any empty elements.
• Set the color and text alignment of an h4 element using an inline style.
• Ensure that all two-sided tags are properly closed.
• Use the float style to align all inline images.
• Use an inline style to set a table cell’s width and background color.
• Remove all deprecated elements and attributes.
6. Save your final version of the file once it passes the validation test for XHTML 1.0 strict, and then test it in your browser to ensure that it looks like Figure 9-30.
7. Submit your completed files to your instructor. -

WEB 240 Learning Team Assignment Website Evaluation Paper and Prototype for Redesign
$15.00WEB 240 Learning Team Assignment Website Evaluation Paper and Prototype for Redesign
Week 4: Website Evaluation Paper and Prototype for Redesign
Create a redesigned homepage prototype as well as a redesigned secondary page prototype due in Week Five. For the prototype, Adobe® Dreamweaver® is recommended.
Finalize your Website Evaluation Paper due in Week Five, which must include the following:
· The virtual organization being evaluated, their purpose, and intended audience
· The list of design criteria created by the team, including a description of why each was considered to be important
· The results of the comparative review of sites
· A detailed analysis of the selected Virtual Organization site based on the chosen design criteria
· Recommendations for improvements to the site based on the design analysis and the inclusion of metadata to promote the website
A description of proposed changesWeek 5: Website Evaluation Paper and Prototype for Redesign
Submit the Website Evaluation Paper.
Learn More
Submit the redesigned homepage prototype as well as a redesigned secondary page prototype. -

Penn foster Graded Project 402081 Common Web Page Technologies
$15.00Penn foster Graded Project 402081 Common Web Page Technologies
PROJECT SCENARIO
After learning that one of their diehard fans can develop web pages, your favorite music band wants you to create their fan club website! After talking with the band manager, you realize you need the following web pages:
• index.html—Contains the band name, current lineup, and a brief history of the band.
• music.html—Contains their music catalog and upcoming tour dates.
• fanclub.html—Contains a form to sign-up for the band’s fanclub.
If the website grows in popularity, then you hope you’ll be able to create even more web pages for your favorite band!INSTRUCTIONS
In this graded project, you’ll need to use a preferred text or HTML editor. For these simple web pages, TextPad or Notepad should be fine, but you’re welcome to try more complex WYSIWYG (What You See Is What You Get) editors such as Amaya (http://www.w3.org/Amaya/User/BinDist.html) or WebPlus (http://www.serif.com/web-design-software/).The text content of these pages is largely up to you and your sense of fun and good taste. You can choose an existing music band you like, which will make it easier to come up with content, or you can create a fictional music band, if you’re feeling particularly creative. You’ll be graded on whether you provide the required sections and pages, not on the actual content.
1. Create a folder for your website named band_fan. You’ll probably need at least a band logo as an image, so create an images folder in the band_fan. If you’re making up a fictional band, then you can use the logo generator at cooltext.com. Otherwise, you can download the logo from your actual band’s website. In most cases, you can just perform a Google image search (http://images.google.com) and download the image.
2. Create the index.html file and save it in the band_fan folder. This file must include the band logo, list of the current lineup, and brief history of the band. Use the following HTML as a template, replacing BANDNAME and NAME# with your band information:
<!DOCTYPE html>
<html>
<head>
<title>About the Band</title>
</head>
<body>
<img src="images/logo.gif" /><br />
<a href="music.html">Music</a> | <a href="fanclub.html">Fans</a>
<h1>About BANDNAME</h1>
<h2>Current Lineup</h2>
<ul>
<li><strong>Vocalist</strong> -NAME#</li>
<li><strong>Guitarist</strong> - NAME#</li>
<li><strong>Bassist</strong> - NAME#</li>
<li><strong>Drummer</strong> - NAME#</li>
</ul>
<h2>Brief History</h2>
<p>
<!—Describe how BANDNAME got together, mentioning how each NAME# met, etc.—>
</p>
</body>
</html>
3. Create the music.html file and save it in the band_fan folder. This file must include a list of current albums or singles and upcoming tour dates. Use the following HTML as a template, replacing BANDNAME, ALBUM#, YEAR#, DATE#, VENUE# and NAME# with your band information:
<!DOCTYPE html>
<html>
<head>
<title>About the Music</title>
</head>
<body>
<h1>BANDNAME Music</h1>
<h2>Albums/Singles</h2>
<ul>
<li>ALBUM#(YEAR#)</li>
<li>ALBUM#(YEAR#)</li>
</ul>
<h2>Upcoming Tour Dates</h2>
<ul>
<li>DATE# - VENUE#</li>
<li>DATE# - VENUE#</li>
<li>DATE# - VENUE#</li>
</ul>
<a href="index.html">Go home</a>
</body>
</html>
4. Create the fanclub.html file and save it in the band_fan folder. This file should be a form that requires fans to provide their name, e-mail address and any comments.
Use the following HTML as a template, replacing the BANDNAME with your band information:
<!DOCTYPE html>
<html>
<head>
<title>Join the Fan Club</title>
</head>
<body>
<h1>Join with BANDNAME!</h1>
<form>
<fieldset>
<legend>Contact Info</legend>
<label for="name">Name:</label><input type="text" name="name" />
<label for="e-mail">E-mail:</label><input type="text" name="e-mail" />
</fieldset>
<fieldset>
<legend>Comments</legend>
<textarea cols="50" name="comments"> Let us know what you think!</textarea>
</fieldset>
<input type="submit" value="Join" />
<input type="reset" value= "Start over" />
</form>
<a href="index.html">Go home</a>
</body>
</html>PROJECT SUBMISSION
Learn More
GUIDELINES
To submit your project, you must provide the entire contents of the band_fan folder. The band_fan folder should include the images folder and the files index.html, music.html, and fanclub.html. To prepare the band_fan folder for submission, you should right-click the band_fan folder and choose the
Send to > Compressed (zipped) folder option in the context menu (Figure 4).
The resulting file should be band_fan.zip. Submit this file for grading.
GRADING CRITERIA
Your project will be graded using the following rubric:
• The band_fan folder includes all required content 40 points
• The images folder contains a band logo image 15 points
• The index.html file correctly uses the HTML template 15 points
• The music.html file correctly uses the HTML template 15 points
• The fanclub.html file correctly uses the HTML template 15 points
TOTAL 100 points -

CIS 273 Week 8 Assignment Single Page Website
$15.00CIS 273 Week 8 Assignment Single Page Website
Deliverables: One (1) Web page and one (1) Cascading Style Sheet (.css), including the image file.
Imagine that you have just started your own freelancing business. You have been hired to create a Web page for a company of your choice that announces the item of the week, month, or year. (e.g., Car of the Year, Pet of the Month, Sandwich of the Week, etc.)
1. Create a Cascading Style Sheet (.css) that applies a minimum of background color and font.
2. Create one (1) Web page and a heading tag that overrides the Cascading Style Sheet (.css) font settings and makes the font of the heading different from the rest of the page.
3. The page must also include:
a. An image depicting the item of the week, month, or year.
b. At least three (3) hyperlinks to Websites of associated interest to the item and a brief description of what they are about.
Example: Click here to visit Strayer University
This link will take you to the University’s main page where you can find further information.
4. At the bottom of the page, create a link that would allow the user to email you with questions using the mailto: tag and your email address.
Note: When the email opens the subject line should automatically say, "More Information Please".
5. Create a footer displaying the Copyright symbol (using the character entity reference), the year, and your name.
Example: © 2012 Mary Smith
6. Include a piece of JavaScript in the page.The specific course learning outcomes associated with this assignment are:
Learn More
Describe the structure of the World Wide Web as interconnected hypertext documents.
Create and validate HTML documents.
Create presentations using Cascading Style Sheets and DHTML.
Summarize Web standards in terms of specifications, guidelines, software, and tools.
Write clearly and concisely about Web design and development using proper writing mechanics and technical style conventions. -

New Perspectives on HTML and CSS Edition 6 Tutorial 6 Case Problem 2 Creating a Web Form
Regular Price: $20.00
Special Price $15.00
New Perspectives on HTML and CSS Edition 6 Tutorial 6 Case Problem 2 Creating a Web Form
Learn More
Data Files needed for this Case Problem: diners.png, discover.png, formsubmit.js, go.png, master.png, modernizr-1.5.js, paytxt.css, regex.txt, sb.css, sbback.png, sblogo.png, spicetxt.htm, state.txt, stop.png, visa.png
The Spice Bowl Rita Sato is the manager of the Web development team for The Spice Bowl, a new online grocery store specializing in gourmet spices. She's asked you to work on the Web forms for the site. The first form you'll create is a payment form in which customers enter their billing address and credit card data. She wants you to include validation tests for customers postal codes, phone numbers, e-mail addresses, and credit card numbers. A preview of the form you'll create is shown in Figure 6-79.
Complete the following:
1. In your text editor, open the spicetxt.htm and paytxt.css files from the tutorial.06\case2 folder included with your Data Files. Enter your name and the date in the comment section of each file. Save the files as spice.htm and payment.css respectively.
2. Go to the spice.htm file in your text editor and review the contents and structure of the document. Link the file to the payment.css style sheet.
3. Scroll down to the h1 heading Payment Form, and below it insert a form element with the action http://www.thespicebowlcorp.com/cgi-bin/payment using the post method.
4. Within the form, create three field sets with the ids billing, creditcard, and info, and with the legend text Billing Information (required), Credit Card (required), and Additional Information, respectively.
5. Within the billing field set, create input boxes for the customer's first name, last name, street address, second line of the street address, and city with the field names fNane, lNane, street, street2, and city, respectively. Add field labels for these input boxes as shown in Figure 6-79.
6. Create a selection list for the state field containing two-letter abbreviations of the state names. You can find a list of state abbreviations in the state.txt file. Add the label text State.
7. Create an input box for the zip field along with the label text ZIP/Postal Code. The pattern of the field value should match the regular expression for postal codes. You can use the regular expression patterns listed in the regex.txt data file.
8. Create an input box for the country field along with the label text Country. Make the default value of the field equal to the text string United States.
9. Create an input box for the phone field along with the label text Phone. The pattern of the field value should match the regular expression for phone numbers.
10. All of the fields within the billing field set should be marked as required fields with the exception of the street2 field.
11. Within the creditcard field set, create a field set belonging to the class optionGroup. Within this field set, create four label elements. Within each label, create an option button belonging to the card field followed by an inline image belonging to one of four credit card companies. The field values associated with the four option buttons are diners, discover, master, and visa, and the inline images are diners.png, discover.png, master.png, and visa.png, respectively.
12. Directly below the optionGroup field set, create an input box for the ccardnumber field along with the label text Credit Card Number. The text of the field value should match the regular expression for credit card numbers found in the regex.txt file.
13. Add a label containing the text Expiration Date followed by a selection list for the ccardmonthfield field that contains the first entry --Month-- followed by the text for each individual month in chronological order from January (01) through December (12). Also add a selection list for the ccardyear field with the first entry --Year-- followed by year values for 2014 through 2018.
14. Add a label containing the text CSC followed by an input box for the csc field. The csc field should be limited to three characters, follow the regular expression pattern \d{3 }$ and display the placeholder text nnn.
15. Make all of the fields within the creditCard field set required fields.
16. Within the info field set, create a label containing the text Contact Email followed by an input box for the email field that uses the email data type.
17. Add a label containing the text Special Notes followed by a text area box for the notes field.
18. At the bottom or the form, directly above the closing </form> tag, insert a submit button with the button text Submit Order.
19. Save your changes to the file, and then go to the payment.css file and add styles rules for the different form elements as described in the following steps.
20. Display all field sets without borders and with a 5-pixel margin. Display all field set legends with a background color of (239, 198, 145) and a text color of black. Set the top and bottom margins to 10 pixels and indent the legend text 20 pixels. Set the width of the legend to 1O0% of the width of the field set. Finally, add rounded borders to the legend, 1 0 pixels in radius.
21. Display all labels as blocks, floated on the left margin once the left margin is clear. Set the font size to 0.8em and align the label text to the right. Set the top and bottom margins to 2 pixels, and set the left and right margins to 5 pixels. Set the width of the labels to 25%.
22. Display all input elements as blocks, floated on the left with a font size of 0.9cm and a width of 60%. Set the top and bottom margins to 2 pixels, and set the left and right margins to O pixels.
23. Display all select elements as blocks floated on the left with a font size of 0.9 em and a margin of 2 pixels.
24. Display all textarea elements as blocks floated on the left with a font size of 0.9 em, a height of 75 pixels, and a width of 60%.
25. Set the left margin of the field set belonging to the optionGroup class to 25%. For label elements nested within the optionGroup field set: a) display the labels inline; b) do not float the labels; and c) set the label width to 100 pixels.
26. Display option buttons inline with no floating. Set the margin of the option buttons to 0 pixels and the width to 20 pixels.
27. Set the width of the input box for the csc field to 50 pixels.
28. For the submit button, add the following styles: a) set the background color to the value (239, 198, 145); b) do not float the input box; c) set the dimensions of the button to 150 pixels wide by 30 pixels high; d) set the top and bottom margins to 10 pixels. and set the left and right margins to auto; and e) add a rounded border with a 15-pixel radius.
29. When input, select, and textarea elements receive the focus, change the background color to the value (255, 218, 165).
30. When an input element receives the focus and is invalid, change the background color to the value (255, 245, 215) and display the stop.png background image file in the bottom-right corner of the input box with no tiling.
31. When an input element receives the focus and is valid, change the background color to the value (215, 255, 215) and display the go.png image in the bottom-right corner of the input box with no tiling.
32. Save your changes to the style sheet.
33. Open the spice.htm file in your Web browser. Verify that you cannot submit the form without all required fields filled out, and without phone number, e-mail address, and CSC values entered in the proper format.
34. Verify the validation checks for the credit card number by confirming that the form rejects the following credit card numbers (which are not valid card numbers):
• 31012345678901
• 6012123456789019
• 5912345678901235
• 8123456789012349
35. Further verify the validation checks for the credit card number by confirming that the form accepts the following credit card numbers which are valid card numbers:
• 30312345678901
• 6011123456789019
• 5112345678901235
• 4123456789012349
36. Submit your completed files to your instructor, in either printed or electronic form, as requested. -

CIS 273 Techincal Project Business Website
Regular Price: $25.00
Special Price $20.00
CIS 273 Lab Assignment 10 Business Website
This assignment consists of three (3) sections: a narrative, a storyboard, and a business Website. You must submit all three (3) sections for the completion of this assignment. The assignment is to be submitted in a single compressed folder (zip file) to the online course shell. Section 3 must contain all .htm files, along with any other files that may be necessary for your project to run (ex: text files, images, etc.). When saving the compressed folder (zip file), it should be saved as Techincal Project_Last name_First initial.zip. For example, if your name is Mary Smith, the file for submission should be saved as Techincal Project_Smith_M.htm
Select a business that you are interested in. (e.g., pet store, travel site, fishing gear, appliances, automobiles, housewares, furniture, etc.). Imagine that you have just been hired to create a four (4) page hierarchical Website for the business you selected.Section 1: Narrative
Write a half (1/2) page paper in which you:
1. Create a narrative that describes the site to your prospective client.Section 2: Storyboard
Imagine that your narrative has been approved. Use Word, Visio, or Dia to:
2. Create a storyboard diagram depicting the layout of your Website.Section 3: Business Website
In order to receive full credit for this section, you will need to submit:
1) One (1) screen shot of your emailed data from the guestbook.
2) One (1) CSS style sheet.
3) Four (4) Web pages.3. Create your Website based on the following requirements:
a. Create a Cascading Style Sheet (.css) for all pages, which:
i. Applies a background color.
ii. Applies style to font.
iii. Changes the ordered list markers to anything other than the default.
iv. Changes the unordered list markers to anything other than the default.
v. Applies style to a copyright footer.b. Include:
i. A graphic or logo on the home page.
ii. A navigation bar with links to every other page on the home page.
iii. A guestbook registry on the home page using the mailto: tag with an entry field for:
a. A person’s name.
b. An email address.
iv. A piece of JavaScript on the home page.c. Create a submit button for the guestbook registry that will email the information to your email address. Note: Test the function and take a screen shot of the emailed information you receive. You must submit the screen shot in your zipped file of deliverables as proof.
d. Create three (3) sub pages that include:
i. The same graphic / logo.
ii. A navigation bar with links to every other page.
iii. An ordered list of at least two (2) items, and then at least two (2) unordered list entries under each ordered list item where one (1) of the items must be a hyperlinked to a Website (the hyperlink should not show the address printed on the page).
Note: Each of the three pages should have unique lists.
Example:
A. Food
? Dry food
? Wet food
? Canned food
B. Toys
? Indoor
? OutdoorThe specific course learning outcomes associated with this assignment are:
Learn More
1) Describe the structure of the World Wide Web as interconnected hypertext documents.
2) Create and validate HTML documents.
3) Create presentations using Cascading Style Sheets and DHTML.
4) Write clearly and concisely about Web design and development using proper writing mechanics and technical style conventions. -

New Perspectives on HTML, CSS, and Dynamic HTML 5th edition Tutorial 12 Case 2 The VoterWeb
Regular Price: $15.00
Special Price $12.00
New Perspectives on HTML, CSS, and Dynamic HTML 5th edition Tutorial 12 Case 2 The VoterWeb
VoterWeb is an online source for election news and results from national. state, and local races. Faye Summerall is one manager of the Web site development team. Faye wants to add horizontal bar charts to Web pages displaying election results. The length of each bar should correspond to the percentage of votes that a candidate receives in a given race. She has asked you to develop a JavaScript program that automatically writes the bar chat. Figure 12-37 shows a preview of the Web page for a series of Congressional races.
The horizontal bar charts will be created within table rows. The length of each bar will be determined by the number of blank table cells it contains. For example, to display a horizontal bar representing 45% of the vote, you'll write 45 blank table cells. The color of each bar is determined by the background color of its table cells. To apply the background color, you'll add class attributes to the blank table cells. A style rule in the results. css style sheet will determine the background color for each class of table cells.
The data for each election has been stored in arrays in an external file named votes.js. The file includes data from five elections for different Congressional seats. The names of the races have been stored in an array named race. The name1 array contains the candidate names for the first race, thename2 array contains the candidate names for the second race, and so on through the name5array. The party affiliations for the candidates in the first race have been stored in theparty1 array, for the second race in the party2 array, and so forth. The votes1 through votes5 arrays store the votes for each candidate in each of the five races.Complete the following:
1. Using your text editor, open electtxt.htm and bartxt.js from the tutorial.12\case2 folder, enter your name and the datein the head section, and then save the files as election.htm and barchart.js, respectively.2. Open the votes.js ile from the tutorial.12\case2 folder in your text editor, study the file to become familiar with the different arrays and their contents, and then close the file. Return to theelection.htmfile in your text editor, and then add two script elements to the head section of the file pointing to thebarchart.js and votes.jsfiles. Save your changes to the document.
3. Go to the barchart.jsfile in your text editor. Insert a function namedtotalvotes(). The purpose of this function is to calculate the sum of all the values within an array. The function has a single parameter, votes, representing one of the five vote arrays (vote1 through vote5). Add the following commands to the function:
a. Declare a variable named total, setting its initial value to 0.
b. Create a for loop that loops through each of the items in the votes array, adding that item's value to the total variable.
c. After the for loop is completed, return the value of the total variable from the function.
4. Insert another function named calcPercent(). The purpose of this function is to calculate a percentage, rounded to the nearest integer. The function has two parameters: item and sum. Have the function return the value of the item parameter divided by sum, multiplied by 100, and then rounded to the nearest integer. (Hint: Use the Math.round() method to round the calculated percentage.)5. Insert a function named createbar(). The purpose of this function is to write the blank table cells that make up each horizontal bar in the election results. The function has two parameters: partytype and percent. The partyType parameter will be used to store the party affiliation of the candidate (D, R, I, G, or L). The percent parameter will be used to store the percentage the candidate received in the election, rounded to the nearest integer. Add the following commands to the function:
a. Create a switch statement that tests the value of the partyType parameter. If partyType equals D, store the following text string in a variable named bartext: <td class='dem'> </td> If partyType equals R, barText should equal the following: <td class='rep'> </td> If partyType equals I, barText should equal the following: <td class='ind'> </td>
If partyType equals G, barText should equal the following: <td class='green'> </td> Finally, if partyType equals L, barText should equal the following: <td class='lib'> </td> Be sure to add a break statement after each case statement so browsers do not attempt to test additional cases after finding a match.
b. Create a for loop in which the counter variable goes from 1 up through the value of the percent parameter in increments of 1. At each iteration, write the value of the barText variable to the Web document.6. Insert a function named showresults(). The purpose of this function is to show the results of a particular race. The function has four parameters: race, name, party, and votes. The race parameter will contain the name of the race. The name parameter will contain the array of candidate names. The party parameter will contain the array of party affiliations. Finally, thevotes parameter will contain the array of votes for each candidate in the race. Add the following commands to the function:
a. Declare a variable named totalv equal to the value returned by the totalVotes() function using votes as the parameter value.
b. Write the HTML code <h2>race</h2> <table> <tr> <th>Candidate</th> <th class='num'>Votes</th> <th class='num'>%</th> </tr> to the document, where race is the value of the race parameter.7. Next, within the showResults() function, add a for loop in which the counter variable starts at 0 and, while the counter is less than the length of the name array, increase the counter in increments of 1. At each iteration of the for loop, run the commands outlined in the following five steps:
a. Write the HTML code <tr> <td>name (party)</td> <td class='num'>votes</td> where name, party, and votes are the entries in the name, party, and votes arrays, respectively, for the index indicated by the counter variable.
b. Create a variable named percent equal to the value returned by the calcPercent() function. Use the current value from the votes array for the value of the item parameter, and use the value from totalV for the value of the sum parameter.
c. Write the HTML code <td class='num'>(percent%)</td> where percent is the value of the percent variable.
d. Call the createBar() function using the current value of the party array and percent as the parameter values.
e. Write a closing </tr> tag to the document.8. After the for loop has completed within the showResults() function, write a closing </table> tag to the document.
9. Write comments throughout your code to document your work.
10. Save your changes to the file, and then return to theelection.htmfile in your text editor. Scroll down the document. After the Congressional Races h1 heading, insert a script element containing the following commands:
a. Call the showresults() function using race[0], name1, party1, and votes1 as the parameter values.
b. Repeat the previous command for the remaining four races, using race[1] through race[4] as the parameter values for the race parameter, party2 through party5 for the party parameter, name2 through name5 for the name parameter, and votes2 through votes5 for the votes parameter.11. Save your changes to the file, and then openelection.htm in your Web browser. Verify that the correct percentage appears for each candidate, and that a horizontal bar chart representing the percent value is displayed next to each candidate.
12. Submit your completed Web site to your instructor, in either printed or electronic form, as requested.
Learn More
8 Item(s)
Grid List

You have no items in your shopping cart.
