Search results for 'SELECT'
-

PRINCIPLES OF WEB DESIGN Sklar Chapter 4 Hands-On Projects CIT-150
$15.00PRINCIPLES OF WEB DESIGN Sklar Chapter 4 Hands-On Projects CIT-150
Learn More
3. In this project, you will have a chance to test a few simple style rules on a standard HTML document and view the results in your browser.
a. Using your HTML editor, create a simple HTML file (or open an existing file) that contains <body>, <h1>, and <p> elements. Save the file as csstest1.htm in the Chapter04 folder in your work folder.
b. Add a <style> element to the <head> section, as shown in the following code.
<head>
<title>CSS Test Document</title>
<style type="text/css">
</style>
</head>
c. Add a style rule that uses body as a selector and sets the color property to green, as shown in the following code:
<style type="text/css">
body {color: green;}
</style>
d. Save csstest1.htm and view it in the browser. All of the document text should now be green.
e. Now add a style rule that sets <h1> elements to be displayed in black:
<style type="text/css">
body {color: green;}
h1 {color: black;}
</style>
f. Save csstest1.htm and view the results in the browser.
g. Finally, add a style rule that sets a margin for <p> elements to 30 pixels:
<style type="text/css">
body {color: green;}
h1 {color: black;}
p {margin: 30px;}
</style>
h. Save csstest1.htm and view the results in the browser.
4. In this project, you will have a chance to test a few basic selection techniques on a standard HTML document and view the results in your browser. Save the file and view it in your browser after completing each step.
a. Using your HTML editor, create a simple HTML file (or open an existing file) that contains <body>, <h1>, <p> elements, and so on. Save the file in the Chapter04 folder in your work folder as csstest2.htm.
b. Add a <style> element to the <head> section, as shown in the following code:
<head>
<title>CSS Test Document</title>
<style type="text/css">
</style>
</head>
c. Write a style rule that uses body as a selector and sets the color property to the color of your choice.
d. Find two elements on the page, such as <h1> and <h2>, which can share the same characteristics. Write a single style rule that applies to both elements. Set the color property to red and the margin property to 20px.
e. Find one element that contains another, such as a <b> or <q> element within a <p> element. Write a descendant selector rule that affects the contained element and sets the color property to green.
5. In this project, you will have a chance to test a few advanced selection techniques on a standard HTML document and view the results in your browser. Save the file and view it in your browser after completing each step.
a. Using your HTML editor, create a simple HTML file (or open an existing file) that contains the elements: <body>, <h1>, <p>, and so on. Save the file in the
Chapter04 folder in your work folder as csstest3.htm.
b. Add a <style> element to the <head> section, as shown in Exercise 4.
c. Write a rule for a class selector named heading. Set the color property to red and the font-size property to 200%. Apply the heading class to an <h1> or <h2>
element in the document.
d. Write a rule for a class selector named emphasis. Set the color property to blue and the background-color property to yellow. In the document, add a <span>
element to a span of words that you want to highlight. Apply the emphasis class to the <span> element. -

Principles of Web Design Sklar Chapter 5 Hands-On Projects CIT-150
$15.00Principles of Web Design Sklar Chapter 5 Hands-On Projects CIT-150
1. In the following set of steps, you will learn how to style listitem elements with the list-style properties. As you work through the exercise, refer to Figure 5-27 to see the results you will achieve. Save your file and test your work in the browser as you complete each step.
To apply the list-style properties:
a. Open the file lists.html in your HTML editor, and save it in your work folder as lists1.html.
b. Copy the image file diamond.gif into your work folder.
c. In your browser, open the file lists1.html. When you open the file, it looks like Figure 5-26. Notice that the file contains three lists. You will apply a different liststyle to each list.
d. The first list on the page is a bulleted list that currently displays the default disc (bullet) style. Write a style rule that uses a class selector circle to uniquely select the list. Set the list-style-type property to change the bullet style to circle.
ul.circle {list-style-type: circle;}
e. Now apply the style to the first list by adding the class attribute to the <ul> element.
<!-- Bulleted List -->
<ul class="circle">
<li>Bread</li>
<li>Milk</li>
<li>Cheese</li>
<li>Eggs</li>
</ul>
f. The second list on the page is an ordered list that currently displays the default decimal style. Write a style rule that uses a class selector alpha to uniquely select the list. Set the list-style-type property to change the style to upper-alpha.
ol.alpha {list-style-type: upper-alpha;}
g. Now apply the style to the first list by adding the class attribute to the <ol> element.
<!-- Alphabetical List -->
<ol class="alpha">
<li>Spring</li>
<li>Summer</li>
<li>Fall</li>
<li>Winter</li>
</ol>
h. The third list on the page is an unordered list that currently displays the default bullet style. Write a style rule that uses a class selector image to uniquely select the list. Set the list-style-image property to a URL value, using the image file diamond.gif.
ul.image {list-style-image: url(diamond.gif);}
i. Now apply the style to the first list by adding the class attribute to the <ol> element. Figure 5-27 shows the finished document.
<!-- List Image -->
<ul class="image">
<li>Spruce</li>
<li>Pine</li>
<li>Elm</li>
<li>Birch</li>
</ul>2. Modify an existing HTML document to use Cascading Style Sheets.
Learn More
a. Build styles using the existing standard HTML elements in the file.
b. Test the work in multiple browsers to verify that all styles are portable.
c. Remove the files and place them in an external style sheet.
d. Link the HTML file to the style sheet. Test to make sure the file is displayed properly. -

New Perspectives on HTML and XHTML Tutorial 4 Case Problem 4
$12.00New Perspectives on HTML and XHTML Tutorial 4 Case Problem 4
Data Files needed for this Case Problem: bizet.jpg, bizetbio.txt, bizetlist.txt, mozart.jpg, mozartbio.txt, mozartlist.txt, puccini.jpg, puccinibio.txt, puccinilist.txt, verdi.jpg, verdibio.txt, verdilist.txt, wagner.jpg, wagnerbio.txt, and wagnerlist.txt
Gresham Children’s Choir Faye Dawson is an instructor for Gresham Children’s Choir in Gresham, Oregon. The choir is a chance for talented youth to perform and to learn about music history. Faye is working on a Web site describing the history of opera. She’s asked for your help in creating a design. Faye has provided you with information on five different composers: Bizet, Mozart, Puccini, Verdi, and Wagner. For each composer, she’s given you an image file containing the composer’s picture, a text file listing the composer’s works, and a text file containing a biographical sketch. Use this information to design your Web site. You may supplement these files with any other material you think will enhance your site’s design.
Complete the following:
Learn More
1. Use your text editor to create four HTML files named bizet.htm, mozart.htm, puccini.htm, verdi.htm, and wagner.htm, placing them in the tutorial.04\case4 folder included with your Data Files. Enter your name and the date in a comment section of each file. Include any other comments you think will aptly document the page’s purpose and history.
2. Use the provided text files and image files to create a Web page describing each composer’s life and accomplishments. Include hypertext links between the five composer Web pages.
3. Create an external style sheet named gresham.css for your Web site. Insert a comment section in the style sheet file that includes your name and the date as well as other comments that describe the style sheet.
4. The content of the gresham.css style sheet is up to you, but it must include the following features:
• Styles that use contextual selectors
• A style that uses a pseudo-element and a pseudo-class
• Styles that use positioning styles (either absolute or relative)
• A style that creates or modifies an ordered or unordered list
• A style to create a rollover effect
5. Create another style sheet named printer.css containing styles for a printed version of the pages in your Web site. Add appropriate comments to the different parts of your style sheet.
6. Test your Web site on a variety of browsers to ensure your design works under different conditions.
7. Submit your completed files to your instructor. -
New Perspectives on HTML and XHTML Tutorial 4 Case Problem 3 Solution
$12.00New Perspectives on HTML and XHTML Tutorial 4 Case Problem 3 Solution
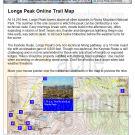
Data Files needed for this Case Problem: image0.jpg – image9.jpg, longstxt.htm, and lpmap.jpg
Longs Peak Interactive Map Longs Peak is one of the most popular attractions of Rocky Mountain National Park (RMNP). Each year during the months of July, August, and September, thousands of people climb Longs Peak by the Keyhole Route to reach the 14,255-foot summit. Ron Bartlett, the head of the RMNP Web site team, has asked for your help in creating an interactive map of the Keyhole Route. The map will be installed at electronic kiosks in the park’s visitor center. Ron envisions a map with 10 numbered waypoints along the Keyhole Route, displaying photos and text descriptions of each waypoint when a mouse pointer hovers over its corresponding numbered point. Figure 4-59 shows a preview of the online map with the first waypoint highlighted by the user.Ron also wants to create a print version of the waypoint descriptions. Users can print the map elsewhere on the park’s Web site, so he wants the print style sheet to display just the list of waypoints in a bulleted list.
Complete the following:
Learn More
1. Use your text editor to open the longstxt.htm file from the tutorial.04\case3 folder included with your Data Files. Enter your name and the date in the comment section at the top of the file. Save the file as longs.htm in the same folder. Take some time to study the contents of the file. Notice that the waypoint descriptions are nested within the online_map div container. Each waypoint description has been placed in a separate div container with the class name notes and id names ranging from point0 to point9.
2. To create a rollover effect for the nine waypoints, you need to mark the waypoint contents as hyperlinks.Within each of the nine div containers, enclose the img element and paragraph element within a single <a> tag. Point each link to the longs.htm file so that if a user clicks the link, it will simply refresh the currentWeb page.
3. Add a style to the embedded style sheet at the top of the file to remove underlining from all hypertext links.
4. Currently the online_map div container does not display the Longs Peak map. Add the following style to the embedded style sheet to display the map:
• Set the width of the container to 600 pixels wide by 294 pixels high.
• Add a 1-pixel-wide solid black border to the container.
• Apply the lpmap.jpg graphic file as the background image.
• Use relative positioning to place the container on the page. Set the top and left coordinates to 0 pixels.
5. In the embedded style sheet, add the following styles for all of the div containers belonging to the notes class:
• For paragraphs nested within each note, set the font size to 8 points and the margin to 5 pixels.
• Set the font color to yellow for each span element nested within a note.
6. For each link nested within a notes class element, apply the following styles:
• Set the width and height of the link to 20 pixels.
• Hide any content that overflows the boundary of the link.
• Set the background color to blue and the font color to white.
• Set the z-index value to 1.
7. When the mouse hovers over a link within a notes class element, have the browser apply the following style:
• Change the width to 150 pixels and the height to 170 pixels.
• Change the overflow property to visible.
• Set the z-index value to 2.
8. Use absolute positioning to place the link nested within the #point0 selector at the coordinates (560, 60).
9. Repeat Step 8 for the nine remaining waypoints:
• #point1 at (277, 90)
• #point2 at (175, 0)
• #point3 at (110, 115)
• #point4 at (55, 165)
• #point5 at (5, 180)
• #point6 at (15, 222)
• #point7 at (50, 245)
• #point8 at (100, 245)
• #point9 at (90, 220)
10. Go to the top of the file and add a media attribute to the embedded style sheet indicating that the sheet is designed for screen and tv media.
11. Save your changes to the file and then open longs.htm in your Web browser. Verify that the placement of the waypoints follows the locations shown in Figure 4-59. Confirm that when you hover your mouse over each of the nine waypoints, a description of the waypoint appears on the top of the trail map.
12. Return to the longs.htm file in your text editor. Create a new embedded style sheet designed for print media.
13. Scroll down to the “Longs Peak Online Trail Map” h2 heading and enclose the text “Online Trail Map” within a span element.
14. Add the following styles to the embedded print style sheet:
• Set the font family for the page body to sans-serif.
• Remove underlining from all hypertext links.
• Do not display the #instructions selector, the span element nested within the h2 element, or the img element nested within elements belonging to the notes class.
• Display the notes class of elements as list items with a disc marker. Set the margin to 20 pixels.
• Change the display property of paragraphs nested within the notes class of elements to inline.
• Display span elements nested within the notes class of elements in a bold font.
15. Add a style that inserts the text string “Trail Itinerary” after the h2 heading.
16. Save your changes to the file.
17. Refresh the longs.htm file in your Web browser. By either printing the page or viewing the page within the Print Preview window, confirm that the printed page only shows a bulleted list of the waypoint descriptions. If you are running Firefox, Opera, or Safari, confirm that the heading at the top of the page reads “Longs Peak Trail Itinerary.” (If you are using Internet Explorer, the title will simply read “Longs Peak.”)
18. Submit your completed files to your instructor. -
New Perspectives on HTML and XHTML Tutorial 6 Case Problem 1 Solution
$12.00New Perspectives on HTML and XHTML Tutorial 6 Case Problem 1 Solution
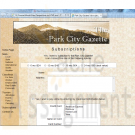
Data Files needed for this Case Problem: parch.jpg, pcg.css, pcglogo.jpg, sformtxt.css, and subtxt.htm
The Park City Gazette Kevin Webber, the editor of the Park City Gazette of Estes Park, Colorado, has asked for your help in developing a subscription page for the newspaper’s Web site. The page includes a form where customers can enter the length of the subscription they want to purchase, their mailing address, and their credit card information. Kevin has already created much of the layout and text of the Web page. Your job is to add the fields and control elements for the subscription form. A preview of the Web page you’ll create for Kevin is shown in Figure 6-60.The form contains several labels and control elements placed side-by-side in two columns. To create this two-column layout, you’ll float the labels and control elements on the left margin. You’ll identify the labels that are floated by putting them into the float-Label class. The floated control elements will belong to the floatCtrl class.
Complete the following:
Learn More
1. Use your text editor to open the sformtxt.css and subtxt.htm files from the tutorial.06\case1 folder included with your Data Files. Enter your name and the date in the comment section of each file. Save the files as sform.css and subscription.htm, respectively, in the same folder.
2. Go to the subscription.htm file in your text editor and insert a link to the sform.css style sheet.
3. Scroll down the file and insert a form element with the id subForm, directly below the paragraph in the rightColumn div container.
4. At the top of the form, Kevin wants an option list showing the four different payment plans. Insert a field set with the id subPlans. Within the field set do the following:
• Insert four option buttons belonging to the subplan field.
• Give the option buttons the ids plan1 through plan4 and the values 1 through 4.
• After each option button, insert a label element associated with the preceding option button. The text of the four labels is "6 mo./$24", "12 mo./$45", "18
mo./$64", and "24 mo./$80 (best value)".
5. After the subPlans field set, insert a label containing the text "Name". Associate the label with the cName field and put it in the class floatLabel.
6. After the label, insert an input box for the cName field. Place the input box in the floatCtrl field and set the size of the input box to 50 characters.
7. Insert another label containing the text "Address" associated with the address field and belonging to the floatLabel class. After the label, insert a text area box for the address field. Set the size of the box to six rows by 50 columns and place the text area box in the floatCtrl field.
8. Insert a label with the id agreeLabel associated with the agree field. Place the label in the floatLabel class. Within the label element, insert a check box for the agree field. After the check box, but within the label element, insert the text "Yes, I wish to pay online by entering my credit card information below."
9. Insert a field set with the id payment. At the top of the field set, insert a label belonging to the floatLabel class, containing the text "Credit Card" and associated with the cardType field.
10. Insert a selection list for the cardType field. Do the following for the selection list:
• Place the selection list in the floatCtrl class.
• Set the selection list to display four items.
• Add the following options to the selection list: American Express, Discover, MasterCard, and Visa.
• Set the values of the four options to: Amex, Disc, MC, and Visa.
11. Below the selection list, insert two labels. The first label should contain the text "Name on Card" and should be associated with the cardName field. The second label should contain the text “Card Number” and should be associated with the cardNumber field. Put both labels in the floatLabel class.
12. Directly after each label, insert an input box. The first input box should be for the cardName field; the second input box is for the cardNumber field. For both input boxes, set the width to 30 characters and place the input box into the floatCtrl class.
13. Insert a label belonging to the floatLabel class and containing the text "Expiration Date". After the label, insert two selection lists for the expMonth and expYear field. Do the following for the selection lists:
• Place both selection lists in the floatCtrl class.
• Add 12 options to the expMonth selection list containing the text "01" through "12". The values of the options should range from 1 to 12.
• Add five options to the expYear selection list containing the text "2011" through "2015". Set the values of each option to match the option text.
14. Insert a field set with the id buttons. Within the field set, insert a submit and reset button. Give the submit button the value Subscribe. Give the reset button the value Cancel.
15. Use the CGI script at http://www.theparkcitygazette.com/subscribe with the post method.
16. Save your changes to the file.
17. Go to the sform.css file in your text editor and add the following styles to the style sheet:
• Set the background color of the subPlans field set to white. Set the padding to 5 pixels and the bottom margin to 20 pixels. Center the contents of the field set.
• For label elements within the subPlans fieldset element, set the right margin to 15 pixels.
• Display objects belonging to the floatLabel class as block-level elements, floated on the left margin but only when the left margin is clear. (Hint: Use the clear style.) Set the width to 150 pixels and the bottom margin to 10 pixels. Right-align the label text.
• Display objects belonging to the floatCtrl class as block-level elements, floated on the left margin. Set the left margin to 20 pixels and the bottom margin to 10 pixels.
• Set the width of the agreeLabel label to 600 pixels with top/bottom margins of 20 pixels and left/right margins of 0 pixels. Center the label text.
• Display the payment field set only when the left margin is clear. Set the background color to white. Set the width of the field set to 400 pixels with a left margin of 100 pixels and 5 pixels of padding.
• Center the contents of the buttons field set with top/bottom margins of 10 pixels and left/right margins of 0 pixels. Set the border style to none.
18. Save your changes to the sform.css file and open subscription.htm in your Web browser. Verify that the layout and content of the Web form resemble that shown in Figure 6-60.
19. Submit your completed files to your instructor. -

WEB 240 Learning Team Assignment Website Evaluation Paper and Prototype for Redesign
$15.00WEB 240 Learning Team Assignment Website Evaluation Paper and Prototype for Redesign
Week 4: Website Evaluation Paper and Prototype for Redesign
Create a redesigned homepage prototype as well as a redesigned secondary page prototype due in Week Five. For the prototype, Adobe® Dreamweaver® is recommended.
Finalize your Website Evaluation Paper due in Week Five, which must include the following:
· The virtual organization being evaluated, their purpose, and intended audience
· The list of design criteria created by the team, including a description of why each was considered to be important
· The results of the comparative review of sites
· A detailed analysis of the selected Virtual Organization site based on the chosen design criteria
· Recommendations for improvements to the site based on the design analysis and the inclusion of metadata to promote the website
A description of proposed changesWeek 5: Website Evaluation Paper and Prototype for Redesign
Submit the Website Evaluation Paper.
Learn More
Submit the redesigned homepage prototype as well as a redesigned secondary page prototype. -
ITCO381 Unit 2 IP assignment
$15.00ITCO381 Unit 2 IP assignment
The deliverable for the Unit 2 IP assignment is a Visual Studio Web site consisting of the downloaded ITCO381_Unit_2 Web site with a Unit2.css added.
When submitting the assignment for grading, please zip the Web site folder containing all of the Web site files and submit the zipped file. By default the required Web site folder to submit is created in the WebSites folder of the Visual Studio 2010 folder. Do not zip the folder created in the Projects folder of the Visual Studio 2010 folder as it only contains the .sln file.
The Unit2.css file must be linked to the Unit2.htm file in the ITCO381_Unit_2 Web site.
Add style rules to Unit2.css as instructed:
• Ensure that the semantic elements format in older browsers.
• Eliminate the default spacing around all elements (HINT: reset selector).
• Body
• Use the Verdana font or any available sans-serif font for the text.
• Set the font size for the body to 80% of the browser’s default font size.
• Set the width of the window to display the document to 700.
• Header
• Center the text in the header.
• Provide spacing at the top of the level-one heading in the header to the equivalent of one capital M without affecting the spacing of the image.
• Set the font size for the level-one heading in the header to three times the browser’s default font size.
• Display the image in the header to the right of the text.
• Section
• Ensure the text of the section does not flow around the image in the header.
• Display the image in the first paragraph to the left of the text.
• Set the font size for the level-one heading in the section to two times the browser’s default font size.
• Center the text in the level-one heading in the section
• Provide spacing at the bottom of the level-one heading in the section to the equivalent of one capital M.
• Set the font size for the level-two headings in the section to one and one-half times the browser’s default font size.
• Center the text in the level-two headings in the section.
• Navigation
• Center the text in the navigation.
• Provide spacing at the bottom of the navigation to the equivalent of two capital Ms.
• Anchor
• Bold the text of a hyperlink when the user hovers over the hyperlink or a hyperlink gets the focus.
• Set the text of a hyperlink to red when the user hovers over the hyperlink or a hyperlink gets the focus.
• Footer
• Display the footer on the right side of the page.
• Set the font size of the text in the footer to 75% of the browser’s default font size.The finished CSS must be validated.
Learn More -
ITCO381 Unit 3 IP assignment
$15.00ITCO381 Unit 3 IP assignment
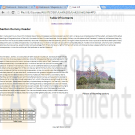
Continue to build on the skills of providing Web page content and structure with HTML and Web page style and layout using CSS. Design and develop an intermediate-level Web page consisting of valid HTML content that includes semantic elements, images, and tables.
Learn More
• Use Visual Studio to create a New Web Site. Select the ASP.NET Empty Web Site template to create the Web site. Use the File System Web location to create the Web site at the selected location and give the Web site an appropriate name.
• Create a static Web page that includes the basic structure of a valid HTML (not XHTML) document.
o Make sure to include
the language attribute of the html element and
the character set attribute of the metadata element.
o Name the Web page Unit3.htm
• Link to the Unit3.css file used to style and layout the Web page.
• Assign “Unit 3 IP” to the title.
• Structure the Web page using the HTML semantic elements
o header
o section
o footer
• Within the structure of the Web page add other HTML elements including at least:
o one level-one heading for the page in the header
o navigation in the header that includes a
one level-two heading for a table of contents in the header
list of at least three placeholders that
navigate to the paragraphs in the section
implement accessibility guidelines
o one level-one heading for the section
o three paragraphs in the section
beginning of each paragraph is a placeholder
additional text to lengthen the document
o three paragraphs in the section
a return placeholder that navigates back to the table of contents
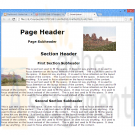
o one figure element in the section to display
Image that implements accessibility guidelines
Copy the image file to the Web site folder.
Submit the image file along with the document.
figure caption
o figure element in the section to display
figure caption
table with
table header
table body
at least three table rows
at least three table data
table footer that spans three columns
• Use of any inline elements should follow current standards
• No style should be applied
• Validate the HTML in the Web page.
Develop an external CSS to provide style, presentation, and layout to the HTML document.
• Select Website > Add New Item from the menu and select Style Sheet from Add New Item dialog box. Name the style sheet Unit3.css.
• Add style rules to Unit3.css to accomplish the following:
o Ensure that the semantic elements format in older browsers.
o Eliminate the default spacing around all elements.
o In the following order, use the Calibri font, Arial font, or any available sans-serif font for the text.
o Set the font size for the body to 85% of the browser’s default font size.
o Set the width of the window to display the document to 950.
o Center the text in the header.
o Set the font size for the level-one heading in the header to two and one-half times the browser’s default font size.
o Set the font size for the level-two heading in the header and the level-one heading in the section to one and three-quarter times the browser’s default font size.
o Set the text to undecorated and one and one-quarter times the browser’s default font size when the user hovers over or focuses on the links in the table of contents.
o Set the width of figures to 300.
o Display figures on the right with the paragraph text flowing to the left of the figures.
o Set the margin for figures to the equivalent of one capital M on all sides.
o Set the padding for figures to the equivalent of one capital M on all sides.
o Display a one pixel black border to the left of figures.
o Bold the text of figure captions.
o Set the size of the font of figure captions to one and one-quarter times the browser’s default font size.
o Center the text of figure captions.
o Set the padding of all paragraphs to the equivalent of one capital M on the top and bottom and zero on the left and right.
o Clear the float of the figures in the paragraphs that return the user to the table of contents.
o Center the text of the paragraphs that return the user to the table of contents.
o Display the footer in the center of the page.
o Set the padding of table data and table headers to zero on the top and bottom and to the equivalent of one-half a capital M on the left and right;
o Display a one pixel black border around all table data and table headers.
o Center the text in the table footer.
o Bold the text in the table footer.
• Validate the CSS style rules.
• Zip (compress) the Visual Studio Web site folder into a .zip file to submit. -
Penn Foster Graded Project 40267000 Tutorial 16 Case 1 French 101
$20.00Penn Foster Graded Project 40267000 Tutorial 16 Case 1 French 101
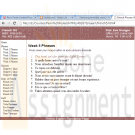
In this graded project, you’re going to add dynamic content and styles using JavaScript, as you learned in this lesson. You’re going to create external script elements, event handlers, and functions for a Web site containing French phrases. Upon clicking on a phrase, an English translation will appear. Upon releasing the mouse, the French phrase should be visible once again.
Turn to page 956 and locate Case Problem 1. Follow the steps in this case to add the appropriate code to the project.Grading
Your project will be graded on the following elements:
French5.htm
When viewed in browser, clicking on a phrase from 1 to 10 shows the English translation 15 points _______
When viewed in browser, releasing the mouse button on a phrase from 1 to 10 shows the French French phrase 15 points _______
English phrases are in red font, non-Italic 10 points _______
French phrases are in black font, Italic 10 points _______
When viewing code, two external script elements link to french5.js and engfr.js files 10 points _______
When viewing code, an event handler in body element runs function setUpTranlation() when page loads 10 points _______Engfr.js
JavaScript file contains a function setUpTranslation() 10 points _______
JavaScript file contains a function swapFE() 10 points _______
JavaScript file contains a function swapEF() 10 points _______New Perspectives on HTML, XHTML, and Dynamic HTML Tutorial 16 Case 1 French 101
Learn More
Complete the following:
1. Use your text editor to open the french5txt.htm and engfrtxt.js files from the tutorial.16/case1 folder, enter your name and the date in the comment section of each file, and then save the files as french5.htm and engfr.js, respectively.
2. Go to the french5.htm file in your text editor and review the contents and structure of the file. Add two script elements that attach the french5.htm file to the french5.js and engfr.js script files. Close the french5.htm file, saving your changes.
3. Go to the engfr.js file in your text editor. Add a command to have the browser run the setUp() function when the page is loaded.
4. Create the setUp() function. The purpose of this function is to insert an ordered list of French phrases taken from the french array in the french5.js file and to add event handlers to switch these phrases to their English counterparts. Add the following commands to the setUp() function:
a. Declare a variable named transDoc that references the element with the ID doc. It is within this element that you’ll place the list of French phrases.
b. Create an element node named olElem containing the ol element.
c. Loop through all of the items in the french array. For each item in the array, create an element node named newLI containing a list item element. Set the text contained within newLI to the text of the current item in the french array. Set the ID of the newLI element to iphrase, where i is the value of the index number in the array. Set the cursor style of the list item to pointer. Have the browser run the swapFE() function when the user presses the mouse button down on the list item, and run the swapEF() function when the mouse button is released. Finally, append the newLI element as a child of the olElem object.
d. After the loop has finished, append the olElem object to the transDoc object.
5. Create the swapFE() function. The purpose of this function is to display the English phrase in place of the French phrase selected by the user. Add the following commands to the function:
a. The swapFE() function is only run in response to the mousedown event. Store the object in which the mousedown event occurred in a variable named phrase.
b. If the node name of the phrase object indicates that the phrase object is a text node, point the phrase object to the parent of that text node. This is done to ensure that the object being examined is the list item element containing the phrase, and not simply the text of the phrase itself.
c. Declare a variable named phraseNum that returns the index number of the phrase being selected. You can extract the index number by applying the parseInt() method to contents of the ID attribute of the phrase object.
d. Change the inner HTML of the phrase object to the item in the english array with an index equal to the phraseNum variable.
e. Change the font style of the phrase object to italic and the font color to the color value (155, 102, 102).
6. Create the swapEF() function. The purpose of this function is to display the French translation of the phrase selected by the user. The code of the function should be identical to that used in the swapFE() function, except that it should use the french array rather than the english array and the phrase text should be displayed in a normal black font.
7. Close the file, saving your changes.
8. Open french5.htm in your Web browser. Verify that a list of 10 French phrases appears on the Web page. Also, verify that as you press the mouse button on each
phrase, the English translation appears. When you release the mouse button, the French phrase should reappear.
9. Submit the completed project to your instructor. -
New Perspectives on HTML XHTML and Dynamic HTML Chapter 14 Case Problem 1 The Monroe Public Library
$20.00New Perspectives on HTML, XHTML, and Dynamic HTML Chapter 14 Case Problem 1 The Monroe Public Library
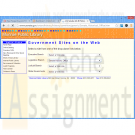
The Monroe Public Library At the Monroe Public Library, Denise Kruschev works on the library’s Web site. One of her responsibilities is to add content to the site that will be of interest to the library’s patrons. Denise’s latest assignment is to create a Web page containing links to hundreds of government Web sites. She knows that a long list of links will fill the page, making the page difficult to use. Instead, Denise wants to use “select and go navigation,” in which the links are placed within a selection list. When a user selects a link from the list, the linked page should open automatically. Denise already set up the selection lists, but she asks you to help write the JavaScript program. Figure 14-67 shows a preview of the Web page.
Complete the following:
Learn More
1. Use your text editor to open the mpltxt.htm and linkstxt.js files from the tutorial.14/case1 folder, enter your name and the date in the comment section of
each file, and then save the files as mpl.htm and links.js, respectively.
2. Go to the mpl.htm file in your text editor and create a link to the links.js file.
3. Scroll through the mpl.htm file, studying the code. Each option in the selection list contains a value referencing the URL of a government Web site. Close the file, saving your changes.
4. Go to the links.js file in your text editor and insert an event handler to run the init() function when the page is loaded.
5. Create the init() function. Within this function do the following:
a. Create a variable named allSelect that references all of the selection elements in the document.
b. For each item within the allSelect object collection, add an onchange event handler that runs the loadLink() function when the selection list changes.
6. Create the loadLink() function. The purpose of this function is to cause the brows er to load a URL from a selection list. Add the following commands to the function:
a. Create a variable named sIndex that points to the index of the selected option in the current selection list. (Hint: Use the this keyword to reference the current selection list.)
b. Web pages can be loaded using the command location.href = url; where url is the URL of theWeb page. Enter this command into the function using the value of the selected option from the selection list as the value of url. (Hint: Use the sIndex variable to point to the selected option from the current selection list.)
7. Save your changes to the file.
8. Open mpl.htm in your Web browser. Verify that by clicking the links from the selection lists on the page you can bring up the corresponding government Web sites.
9. Submit your completed files to your instructor.

You have no items in your shopping cart.
