Search results for 'My Guitar Shop'
8 Item(s)
Grid List
-
New Perspectives on HTML and XHTML Tutorial 6 Case Problem 1 Solution
$12.00New Perspectives on HTML and XHTML Tutorial 6 Case Problem 1 Solution
Data Files needed for this Case Problem: parch.jpg, pcg.css, pcglogo.jpg, sformtxt.css, and subtxt.htm
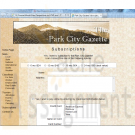
The Park City Gazette Kevin Webber, the editor of the Park City Gazette of Estes Park, Colorado, has asked for your help in developing a subscription page for the newspaper’s Web site. The page includes a form where customers can enter the length of the subscription they want to purchase, their mailing address, and their credit card information. Kevin has already created much of the layout and text of the Web page. Your job is to add the fields and control elements for the subscription form. A preview of the Web page you’ll create for Kevin is shown in Figure 6-60.The form contains several labels and control elements placed side-by-side in two columns. To create this two-column layout, you’ll float the labels and control elements on the left margin. You’ll identify the labels that are floated by putting them into the float-Label class. The floated control elements will belong to the floatCtrl class.
Complete the following:
Learn More
1. Use your text editor to open the sformtxt.css and subtxt.htm files from the tutorial.06\case1 folder included with your Data Files. Enter your name and the date in the comment section of each file. Save the files as sform.css and subscription.htm, respectively, in the same folder.
2. Go to the subscription.htm file in your text editor and insert a link to the sform.css style sheet.
3. Scroll down the file and insert a form element with the id subForm, directly below the paragraph in the rightColumn div container.
4. At the top of the form, Kevin wants an option list showing the four different payment plans. Insert a field set with the id subPlans. Within the field set do the following:
• Insert four option buttons belonging to the subplan field.
• Give the option buttons the ids plan1 through plan4 and the values 1 through 4.
• After each option button, insert a label element associated with the preceding option button. The text of the four labels is "6 mo./$24", "12 mo./$45", "18
mo./$64", and "24 mo./$80 (best value)".
5. After the subPlans field set, insert a label containing the text "Name". Associate the label with the cName field and put it in the class floatLabel.
6. After the label, insert an input box for the cName field. Place the input box in the floatCtrl field and set the size of the input box to 50 characters.
7. Insert another label containing the text "Address" associated with the address field and belonging to the floatLabel class. After the label, insert a text area box for the address field. Set the size of the box to six rows by 50 columns and place the text area box in the floatCtrl field.
8. Insert a label with the id agreeLabel associated with the agree field. Place the label in the floatLabel class. Within the label element, insert a check box for the agree field. After the check box, but within the label element, insert the text "Yes, I wish to pay online by entering my credit card information below."
9. Insert a field set with the id payment. At the top of the field set, insert a label belonging to the floatLabel class, containing the text "Credit Card" and associated with the cardType field.
10. Insert a selection list for the cardType field. Do the following for the selection list:
• Place the selection list in the floatCtrl class.
• Set the selection list to display four items.
• Add the following options to the selection list: American Express, Discover, MasterCard, and Visa.
• Set the values of the four options to: Amex, Disc, MC, and Visa.
11. Below the selection list, insert two labels. The first label should contain the text "Name on Card" and should be associated with the cardName field. The second label should contain the text “Card Number” and should be associated with the cardNumber field. Put both labels in the floatLabel class.
12. Directly after each label, insert an input box. The first input box should be for the cardName field; the second input box is for the cardNumber field. For both input boxes, set the width to 30 characters and place the input box into the floatCtrl class.
13. Insert a label belonging to the floatLabel class and containing the text "Expiration Date". After the label, insert two selection lists for the expMonth and expYear field. Do the following for the selection lists:
• Place both selection lists in the floatCtrl class.
• Add 12 options to the expMonth selection list containing the text "01" through "12". The values of the options should range from 1 to 12.
• Add five options to the expYear selection list containing the text "2011" through "2015". Set the values of each option to match the option text.
14. Insert a field set with the id buttons. Within the field set, insert a submit and reset button. Give the submit button the value Subscribe. Give the reset button the value Cancel.
15. Use the CGI script at http://www.theparkcitygazette.com/subscribe with the post method.
16. Save your changes to the file.
17. Go to the sform.css file in your text editor and add the following styles to the style sheet:
• Set the background color of the subPlans field set to white. Set the padding to 5 pixels and the bottom margin to 20 pixels. Center the contents of the field set.
• For label elements within the subPlans fieldset element, set the right margin to 15 pixels.
• Display objects belonging to the floatLabel class as block-level elements, floated on the left margin but only when the left margin is clear. (Hint: Use the clear style.) Set the width to 150 pixels and the bottom margin to 10 pixels. Right-align the label text.
• Display objects belonging to the floatCtrl class as block-level elements, floated on the left margin. Set the left margin to 20 pixels and the bottom margin to 10 pixels.
• Set the width of the agreeLabel label to 600 pixels with top/bottom margins of 20 pixels and left/right margins of 0 pixels. Center the label text.
• Display the payment field set only when the left margin is clear. Set the background color to white. Set the width of the field set to 400 pixels with a left margin of 100 pixels and 5 pixels of padding.
• Center the contents of the buttons field set with top/bottom margins of 10 pixels and left/right margins of 0 pixels. Set the border style to none.
18. Save your changes to the sform.css file and open subscription.htm in your Web browser. Verify that the layout and content of the Web form resemble that shown in Figure 6-60.
19. Submit your completed files to your instructor. -
Penn foster Graded Project 402081 Common Web Page Technologies
$15.00Penn foster Graded Project 402081 Common Web Page Technologies
PROJECT SCENARIO
After learning that one of their diehard fans can develop web pages, your favorite music band wants you to create their fan club website! After talking with the band manager, you realize you need the following web pages:
• index.html—Contains the band name, current lineup, and a brief history of the band.
• music.html—Contains their music catalog and upcoming tour dates.
• fanclub.html—Contains a form to sign-up for the band’s fanclub.
If the website grows in popularity, then you hope you’ll be able to create even more web pages for your favorite band!INSTRUCTIONS
In this graded project, you’ll need to use a preferred text or HTML editor. For these simple web pages, TextPad or Notepad should be fine, but you’re welcome to try more complex WYSIWYG (What You See Is What You Get) editors such as Amaya (http://www.w3.org/Amaya/User/BinDist.html) or WebPlus (http://www.serif.com/web-design-software/).The text content of these pages is largely up to you and your sense of fun and good taste. You can choose an existing music band you like, which will make it easier to come up with content, or you can create a fictional music band, if you’re feeling particularly creative. You’ll be graded on whether you provide the required sections and pages, not on the actual content.
1. Create a folder for your website named band_fan. You’ll probably need at least a band logo as an image, so create an images folder in the band_fan. If you’re making up a fictional band, then you can use the logo generator at cooltext.com. Otherwise, you can download the logo from your actual band’s website. In most cases, you can just perform a Google image search (http://images.google.com) and download the image.
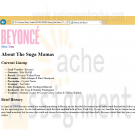
2. Create the index.html file and save it in the band_fan folder. This file must include the band logo, list of the current lineup, and brief history of the band. Use the following HTML as a template, replacing BANDNAME and NAME# with your band information:
<!DOCTYPE html>
<html>
<head>
<title>About the Band</title>
</head>
<body>
<img src="images/logo.gif" /><br />
<a href="music.html">Music</a> | <a href="fanclub.html">Fans</a>
<h1>About BANDNAME</h1>
<h2>Current Lineup</h2>
<ul>
<li><strong>Vocalist</strong> -NAME#</li>
<li><strong>Guitarist</strong> - NAME#</li>
<li><strong>Bassist</strong> - NAME#</li>
<li><strong>Drummer</strong> - NAME#</li>
</ul>
<h2>Brief History</h2>
<p>
<!—Describe how BANDNAME got together, mentioning how each NAME# met, etc.—>
</p>
</body>
</html>
3. Create the music.html file and save it in the band_fan folder. This file must include a list of current albums or singles and upcoming tour dates. Use the following HTML as a template, replacing BANDNAME, ALBUM#, YEAR#, DATE#, VENUE# and NAME# with your band information:
<!DOCTYPE html>
<html>
<head>
<title>About the Music</title>
</head>
<body>
<h1>BANDNAME Music</h1>
<h2>Albums/Singles</h2>
<ul>
<li>ALBUM#(YEAR#)</li>
<li>ALBUM#(YEAR#)</li>
</ul>
<h2>Upcoming Tour Dates</h2>
<ul>
<li>DATE# - VENUE#</li>
<li>DATE# - VENUE#</li>
<li>DATE# - VENUE#</li>
</ul>
<a href="index.html">Go home</a>
</body>
</html>
4. Create the fanclub.html file and save it in the band_fan folder. This file should be a form that requires fans to provide their name, e-mail address and any comments.
Use the following HTML as a template, replacing the BANDNAME with your band information:
<!DOCTYPE html>
<html>
<head>
<title>Join the Fan Club</title>
</head>
<body>
<h1>Join with BANDNAME!</h1>
<form>
<fieldset>
<legend>Contact Info</legend>
<label for="name">Name:</label><input type="text" name="name" />
<label for="e-mail">E-mail:</label><input type="text" name="e-mail" />
</fieldset>
<fieldset>
<legend>Comments</legend>
<textarea cols="50" name="comments"> Let us know what you think!</textarea>
</fieldset>
<input type="submit" value="Join" />
<input type="reset" value= "Start over" />
</form>
<a href="index.html">Go home</a>
</body>
</html>PROJECT SUBMISSION
Learn More
GUIDELINES
To submit your project, you must provide the entire contents of the band_fan folder. The band_fan folder should include the images folder and the files index.html, music.html, and fanclub.html. To prepare the band_fan folder for submission, you should right-click the band_fan folder and choose the
Send to > Compressed (zipped) folder option in the context menu (Figure 4).
The resulting file should be band_fan.zip. Submit this file for grading.
GRADING CRITERIA
Your project will be graded using the following rubric:
• The band_fan folder includes all required content 40 points
• The images folder contains a band logo image 15 points
• The index.html file correctly uses the HTML template 15 points
• The music.html file correctly uses the HTML template 15 points
• The fanclub.html file correctly uses the HTML template 15 points
TOTAL 100 points -

Penn foster Graded Project 402082 Unix-Based Environments and Apache HTTP Server
$15.00Penn foster Graded Project 402082 Unix-Based Environments and Apache HTTP Server
OVERVIEW
After installing Apache HTTP Server, you’re now ready to configure it for your website! Throughout this and future graded projects, you’ll be creating a fictional website, configuring it in various web server environments and then uploading it to the Penn Foster web server. There’s no better way to apply your knowledge than by completing a common real-world task!PROJECT SCENARIO
You’re now asked to test the fan club website on a local Apache HTTP Server. You should have completed the previous graded assignment and have the following files:
• index.html—Contains the band name, current lineup, and a brief history of the band.
• music.html—Contains their music catalog and upcoming tour dates.
• fanclub.html—Contains a form to sign-up for the band’s fanclub.
If not, go back to the previous graded project and create the required files and folders. In addition to these pages, you’ll add the following Perl script in this graded project:
• signup.pl—This script will accept the form data from fanclub.html and display that data on a welcome page.INSTRUCTIONS
In this graded project, you’ll need to have installed ActivePerl from the previous study unit and installed Apache HTTP Server as directed in the current study unit. In the first section, you’ll configure Apache for your website. In the second section, you’ll add a Perl script, modify the fanclub.html file and then test to see if the website works. To make configuration simpler, you may want to move the band_fan folder with all of its content to the C:\ drive to shorten its path. The location will now be C:\band_fan.CONFIGURATION
1. Determine the location of the band_fan folder. You can do this through the GUI by right-clicking the folder and choosing the Properties option from the context menu (Figure 7). The folder in which it’s located is the value for the Location field. You can either copy-and-paste the location or write it down. Click the OK button to dismiss the dialog.Open the Apache configuration file. This can be accessed from the Start menu. Start > All Programs > Apache HTTP Server 2.2 > Configure Apache Server > Edit the Apache httpd.conf Configuration (Figure 8).
2. A dialog may appear indicating that Windows can’t open the file. If so, select the Select a program from a list of installed programs radio button and click
the OK button. You can choose any text editor you prefer.
3. Find the DocumentRoot directive in the httpd.conf file. You can use the CTRL-F shortcut to search for the word without scrolling through the whole file.
# DocumentRoot: The directory out of which you’ll serve your
# documents. By default, all requests are taken from this directory, but
# symbolic links and aliases may be used to point to other locations.
#
DocumentRoot "C:/Apache/htdocs"
4. Modify the DocumentRoot directive for the band_fan folder. Warning: You’ll need to change every backslash (\) in the path to a forward-slash (/). C:\foster\band_fan should now be C:/foster/band_fan.
DocumentRoot "C:/band_fan"
5. Find the second Directory tag in the httpd.conf file. You can use the CTRL-F shortcut to search for the phrase <Directory "C:/Apache/htdocs"> without scrolling through the whole file.
# This should be changed to whatever you set DocumentRoot to.
#
<Directory "C:/Apache/htdocs">
6. Modify the Directory tag for the band_fan folder. Warning: You’ll need to change every backslash (\) in the path to a forward-slash (/).
<Directory "C:/band_fan">
7. Find the Options directive immediately below the Directory tag.
# The Options directive is both complicated and important. Please see
# http://httpd.apache.org/docs/2.2/mod/core.html#options
# for more information.
Options Indexes FollowSymLinks
8. Modify the Options directive to support CGI scripts by adding the option ExecCGI.
Options Indexes FollowSymLinks ExecCGI
9. Find the ScriptAlias directive in the httpd.conf file. You can use the CTRL-F shortcut to search for the word without scrolling through the whole file.
# ScriptAlias: This controls which directories contain server scripts.
# ScriptAliases are essentially the same as Aliases, except that
# documents in the target directory are treated as applications and
# run by the server when requested rather than as documents sent to the
# client. The same rules about trailing "/" apply to ScriptAlias
# directives as to Alias.
ScriptAlias /cgi-bin/ "C:/Apache/cgi-bin/"
10. Modify the ScriptAlias directive for the band_fan folder, including the cgi-bin directory.
ScriptAlias /cgi-bin/"C:/band_fan/cgi-bin/"
11. Find the next Directory tag in the httpd.conf file. You can use the CTRL-F shortcut to search for the phrase <Directory "C:/Apache/cgi-bin"> without scrolling through the whole file.
# "C:/Apache/cgi-bin" should be changed to whatever your ScriptAliased
# CGI directory exists, if you have that configured.
<Directory "C:/Apache/cgi-bin">
12. Modify the Directory tag for the band_fan folder, including the cgi-bin directory.
<Directory "C:/band_fan/cgi-bin">
13. Save and close the configuration file.
14. If Apache is running, close the command-line window in which you ran httpd.exe. Otherwise, the configuration file changes won’t affect the web service.
CGI Scripting and Testing
15. Open a text editor of your choice and type the following
Perl script:
#/perl/bin/perl
use strict;
use warnings;
use CGI;
my $cgi = CGI->new();
print
$cgi->header('text/html'),
$cgi->start_html('Fanclub Signup'),
$cgi->h1('You are now signed up.'),
$cgi->p('Thank you for signing up,' ,
$cgi->strong($cgi->param('name')), '.'),
$cgi->p('The following comment has been submitted:'),
$cgi->blockquote($cgi->param('comments')),
$cgi->end_html;
16. Create a new folder named cgi_bin in the band_fan folder and save the script with the filename signup.pl.
17. Open the fanclub.html file in text or HTML editor and modify the opening form tag as follows:
<form method='post' action='cgi-bin/signup.pl'>
18. Start the Apache web service. Launch the Windows command line and type the following at the commandline prompt:
C:\Apache\bin\httpd.exe
19. Type the URL http://localhost:8080 in your browser. You should see the homepage index.html for the band fan club. Click on the links for the other two pages and verify they work.
20. Test the fanclub.html page by typing in values for the HTML form controls and then clicking the Join button.
21. You should get a resulting page that displays as follows:PROJECT SUBMISSION
Learn More
GUIDELINES
To submit your project, you must provide the signup.pl file and modified fanclub.html and httpd.conf files. You should copy the fanclub.html file from the band_fan folder and the signup.pl file from the cgi-bin folder in the band_fan folder. The httpd.conf file should be copied (do not move) from the default location C:\Apache\conf. Move all files to your desktop or another common folder and then select them together by holding down the CTRL key while clicking them. To combine them into a single file for submission, you should right-click on one of the selected files and choose the Send to > Compressed (zipped) folder option in the context menu.
The resulting file should be named apache.zip. Submit this file for grading. -
Penn foster Graded Project 41885100 WEB PAGES LISTS AND TABLES
Regular Price: $20.00
Special Price $15.00
Penn foster Graded Project 41885100 WEB PAGES LISTS AND TABLES
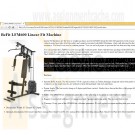
Body Systems is one of the leading manufacturers of home gyms. The company recently hired you to assist in developing their web site. Your first task is to create a Web page for the LSM400, a popular weight machine sold by the company.
Learn More
You'll download three files from your My Courses page:
1. smith.txt, describing the features of the LSM400
2. image file, logo.jpg, displaying the company logo
3. smith.jpg, an image of the LSM400
You can supplement these files with any other resources available to you. You're responsible for the page's content and appearance.
To complete this task:
1. Create an XHTML file named smith.htm.
2. In the head element, include an appropriate page title, along with a comment describing the purpose of the page, your name, and the date.
3. Include at least one example of each of the following in the document:
a. Heading
b. Paragraph
c. Ordered or unordered list
d. Character formatting element
e. Inline image
f. Horizontal line
g. Special character
h. Block-level element that is not a heading, paragraph, list, or horizontal line
4. Demonstrate your understanding of inline styles by including at least two different examples of an inline style.
5. Use proper XHTML syntax at all times. Close all two sided tags. Properly nest all tags. Use lowercase element and attribute names. Enclose attribute values in quotes. Include alternate text for non-graphical browsers with inline images.
6. Write your code so that it will be easy to read and understand. (You may download two image files from the Internet and use those, citing where you downloaded the files, and create a list of 3 to 5 features at your discretion.)
7. Save your XHTML file, and then view the resulting Web page in a browser.
8. Submit your completed project. -

New Perspectives on HTML, CSS, and Dynamic HTML 5th edition Tutorial 8 Case 1 dessertWeb
Regular Price: $15.00
Special Price $12.00
New Perspectives on HTML, CSS, and Dynamic HTML 5th edition Tutorial 8 Case 1 dessertWeb
dessertWeb Amy Wu has asked for your help in redesigning her Web site, dessertWeb, taking advantage of some of the new CSS3 styles. The dessertWeb Web site is a cooking site for people who want to share dessert recipes and learn about cooking in general. In addition to redesigning the site’s appearance, she wants you to create a print style sheet so that users can easily print out recipes and ingredient lists without having to print the headers, footers, and navigation lists that appear on each Web page. Figure 8-64 shows a preview of the screen version of the page.
Complete the following:
Learn More
1. In your text editor, open the recipetxt.htm and dweffectstxt.css files from the tutorial.08\case1 folder included with your Data Files. Enter your name and the date in the comment section of each file. Save the files as recipe.htm and dweffects.css, respectively.
2. Go to the dweffects.css file in your text editor. Create a style rule for the body element to add two box shadows. One shadow should be placed on the right edge of the page body with the color value (211, 211, 211) and an opacity of 0.5. Set the horizontal offset to 10 pixels, the vertical offset to 0 pixels, and the blur to 15 pixels. Create the same drop shadow on the left edge of the page body as well.
3. Apply the following style rules to each list item in the horizontal navigation list of the page header: a) set the background color to the value (224, 238, 238); b) add rounded corners 10 pixels in radius; and c) create two inset box shadows: one white shadow located in the upper-left corner offset 3 pixels in the horizontal and vertical direction with a blur of 2 pixels, and the other, a shadow in the lower-right corner with a color value of (147, 207, 207) offset 5 pixels in the horizontal and vertical direction with a blur of 5 pixels.
4. Add box shadows to the article element with the following properties: a) create an inset box shadow in the lower-right corner with a color value of (171, 171, 171), offset 15 pixels in the horizontal and vertical direction, and with a blur of 75 pixels; and b) create an external shadow located in the lower-right corner with a color value of (101, 101, 101), offset 5 pixels in the vertical and horizontal direction with a blur of 5 pixels.
5. Add a horizontal background gradient to the blockquote element with the following properties: a) set the gradient to go from the left to the right starting with the color value (166, 230, 230), having a color stop at the 5% point with a value (231, 231, 231), and ending with the color value (255, 255, 255) 15% of the way across the block quote; b) create the same color gradient using the WebKit gradient() function with a color stop for the middle color occurring at the 33% point; and c) using the Internet Explorer Gradient filter, create a horizontal gradient that starts with the hexadecimal color value DEF4F4 and ends with the value FFFFFF.
6. Save your changes to the file, and then return to the recipe.htm file in your text editor. Add a link to the dweffects.css style sheet file. Specify that the dwlayout.css and dweffects.css style sheets should be used with screen devices.
7. Save your changes to the document, and then view the page in your Web browser. Verify that the appearance of the page resembles that shown in Figure 8-64. (Note: If you are using Internet Explorer version 8 or earlier, your page will show only the gradient effect around the block quotes, and the gradient will go from light teal to white.)
8. Figure 8-65 shows a preview of the printed version of the recipe page, displaying the recipe description and ingredients on the first page and the directions on the second page. In your text editor, open the dwprinttxt.css file from the tutorial.08/case1 folder. Enter your name and the date in the comment section of the file, and then save it as dwprint.css.
9. Set the page size of the printout to 8.5 3 11 inches in portrait orientation with a margin of 0.5 inch.
10. Hide the following page elements on the printout: page header, left section, right section, all navigation lists, the aside element, the page footer, the h2 element nested within a heading group, and the last paragraph in the article element.
11. Set the font size of all h1 headings to 200% with a bottom margin of 0.2 inches. Set the font size of all h2 elements to 150% with a top margin of 0.5 inches.
12. Set the line height of all list items to 1.5 em.
13. Set the left margin of all ordered lists to 0.5 inches, displaying a decimal value.
14. Set a page break to always occur before the last h2 element in the page.
15. Save your changes to the file, and then return to the recipe.htm file in your text editor. Add a link to the dwprint.css style sheet file, setting the style sheet to be used with a print device.
16. Save your changes to the document, and then view the printed version of the file or preview the printed version in your Web browser. Verify that the contents and layout resemble that shown in Figure 8-65.
17. Submit your completed files to your instructor. -

New Perspectives HTML5 and CSS3 7th Edition Tutorial 5 Case 3 Cauli-Wood Gallery
Regular Price: $20.00
Special Price $15.00
New Perspectives HTML5 and CSS3 7th Edition Tutorial 5 Case 3 Cauli-Wood Gallery
Cauli-Wood Gallery Sofia Fonte is the manager of the Cauli-Wood Gallery, an art gallery and coffee shop located in Sedona, Arizona. She has approached you for help in redesigning the gallery's website to include support for mobile devices and tablets. Your first project will be to redesign the site's home page following the principles of responsive design. A preview of the mobile and desktop versions of the website's home page is shown in Figure 5-61.
Sofia has already written much of the HTML code and some of the styles to be used in this project. Your job will be to finish the redesign and present her with the final version of the page.
Complete the following:
1. Using your editor, open the cw_home_txt.html and cw_styles_txt.css files from the html05 case3 folder. Enter your name and the date in the comment section of each file, and save them as cw_home.html and cw_styles.css respectively.2. Go to the cw_home.html file in your editor. Within the document head, insert a meta element that sets the browser viewport for use with mobile devices. Also, create links to cw_reset.css and cw_styles.css style sheets. Take some time to study the contents and structure of the document and then close the file saving your changes.
3. Return to the cw_styles.css file in your editor. At the top of the file, use the @import rule to import the contents of the cw_designs.css file, which contains several style rules that format the appearance of different page elements.
Explore 4. At the bottom of the home page is a navigation list with the id bottom containing several ul elements. Sofia wants these ul elements laid out side-by-side. Create a style rule for the bottom navigation list displaying it as a flexbox row with no wrapping. Set the justify-content property so that the flex items are centered along the main axis. Be sure to include the WebKit browser extension in all of your flex styles.
5. Define flex values for ul elements within the bottom navigation list so that the width of those elements never exceeds 150 pixels but can shrink below that value.
6. Sofia wants more highly contrasting colors when the page is displayed in a mobile device. Create a media query for mobile screen devices with maximum widths of 480 pixels. Within that media query, insert a style rule that sets the font color of all body text to rgb(211,211,211) and sets the body background color to rgb(51, 51, 51).
7. Sofia also wants to reduce the clutter in the mobile version of the home page. Hide the following elements for mobile users: the aside element, any img element within the article element, and the spotlight section element.
8. At the top of the web page is a navigation list with the ID top. For mobile devices, display the ul element within this navigation list as a flexbox row with wrapping. For each list item within this ul element, set the font size to 2.2em. Size the list items by setting their flex values to 1 for the growth and shrink rates and 130 pixels for the basis value.
9. Under the mobile layout, the six list items in the top navigation list should appear as square blocks with different background images. Using the selector nav#top ul li:nth-of-type( 1 ) for the first list item, create a style rule that changes the background to the background image cw_image01.png. Center the background image with no tiling and size it so that the entire image is contained within the background.
10. Repeat the previous step for the next five list items using the same general format. Use the cw_image02.png file for background of the second list item, the cw_image03.png file for the third list item background, and so forth.
Explore 11. Sofia has placed hypertext links for the gallery's phone number and e-mail address in a paragraph with the id links. For mobile users, she wants these two hypertext links spaced evenly within the paragraph that is displayed below the top navigation list. To format these links, create a style rule that displays the links paragraph as a flexbox row with no wrapping, then add a style that sets the value of the justify-content property of the paragraph to space-around.
12. She wants the telephone and e-mail links to be prominently displayed on mobile devices. For each a element within the links paragraph, apply the following style rule that: a) displays the link text in white on the background color rgb(220, 27, 27), b) sets the border radius around each hypertext to 20 pixels with 10 pixels of padding, and c) removes any underlining from the hypertext links.
13. Next, you'll define the layout for tablet and desktop devices. Create a media query for screen devices whose width is 481 pixels or greater. Within this media query, display the page body as a flexbox in row orientation with wrapping.
14. The page body has four children: the header, the footer, the article element, and the aside element. The article and aside elements will share a row with more space given to the article element. Set the growth, shrink, and basis values of the article element to 2, 1, and 400 pixels. Set those same values for the aside element to 1,2, and 200 pixels.
Explore 15. For tablet and desktop devices, the top navigation list should be displayed as a horizontal row with no wrapping. Enter a style rule to display the top navigation list ul as a flexbox with a background color of rgb(51, 51, 51) and a height of 50 pixels. Use the justify-content and align-items property to center the flex items both horizontally and vertically.
16. Define the flex size of each list item in the top navigation list to have a maximum width of 80 pixels but to shrink at the same rate as the width if the navigation list is reduced.
17. Sofia doesn't want the links paragraph displayed for tablet and desktop devices. Complete the media query for tablet and desktop devices by hiding this paragraph.
18. Save your changes to the style sheet and then open the cw_home.html file in your browser or device emulator. Verify that the layout and contents of the page switch between the mobile version and the tablet/desktop version shown in Figure 5-61 as the screen width is increased and decreased.
Learn More -
New Perspectives HTML5 and CSS3 7th Edition Tutorial 10 Case 1 Trophy Case Sports
Regular Price: $20.00
Special Price $15.00
New Perspectives HTML5 and CSS3 7th Edition Tutorial 10 Case 1 Trophy Case Sports
Trophy Case Sports Sarah Nordheim manages the website for Trophy Case Sports, a sports memorabilia store located in Beavercreek, Ohio. She has asked you to work on creating a script for a shopping cart page. The script should take information on the items that the customer has purchased and present in it table form, calculating the total cost of the order. A preview of the page you will create is shown in Figure 10-35.
Sarah has already designed the page layout. Your job will be to use JavaScript to enter the order information (this task will later be handled by a script running on website) and to write a script that generates the HTML code for the shopping cart table.
Complete the following:
1. Use your editor to open the tc_cart_txt.html, tc_cart_txt.js and tc_order_txt.js files from the htm10 case 1 folder. Enter your name and the date in the comment section of each file, and save them as tc_cart.html, tc_cart.js and tc_order.js respectively.2. Go to the tc_cart.html file in your editor. Directly above the closing </head> tag, insert script elements to link the page to the tc_order.js and tc_cart.js files in that order. Defer the loading and running of both script files until after the page has loaded.
3. Scroll down the file and directly below the h1 heading titled "Shopping Cart" insert a div element with the ID cart.
4. Save your changes to the file and go to the tc_ordet.js file in your editor.
5. Within the tc_order.js file, you will create arrays containing information on a sample customer order. Create an array named item that will contain the ID numbers of the items purchased by the customer. Add the following four item numbers to the array: 10582, 23015, 41807, and 10041.
6. Create an array named itemDescription containing the following item descriptions:
• 1975 Green Bay Packers Football (signed), Item 10582
• Tom Land, 1955 Football Card (unsigned), Item 23015
• 1916 Army-Navy Game, Framed Photo (signed), Item 41807
• Protective Card Sheets, Rem 100417. Create an array named itemPrice containing the following item prices: 149.93, 89.98, 334.93, and 22.67.
8. Create an array named itemQty containing the following quantities that the customer ordered of each item: 1, 1, 1, and 4.
9. Save your changes to the file, and then open the tc_cart.js file in your editor.
10. In your script, you will calculate a running total of the cost of the order. Declare a variable named orderTotal and set its initial value to 0.
11. Declare a variable named cartHTML that will contain the HTML code for the contents of the shopping cart, which will be displayed as a table. Set its initial value to the text string:
<table>
<tr>
<th>Item</th><th>Description</th><th>Price</th><th>Qty</th><th>Total</th>
</tr>12. Create a for loop that loops through the entries in the item array. Each time through the loop, execute the commands described in Steps a through e.
a. Add the following HTML code to the value of the cartHTML variable
<tr> <td><img src='tc_item.png' alt='item' /> </td>
where item is the current value from the item array.
b. Add the following HTML code to the cartHTML variable to display the description, price, and quantity ordered of the item
<td> description</td> <td>price</td> <td>quantity</td>
where description is the current value from the itemDescription array, price is the current value from the itemPrice array preceded by a $ symbol, and quantity is from the itemQty array.
c. Declare a variable named itemCost equal to the price value multiplied by the quantity value for the current item.
d. Add the following HTML code to the cartHTML variable to display the cost for the item(s) ordered, completing the table row
<td>$cost</td></tr>
where cost is the value of the itemCost variable, preceded by a $ symbol.
e. Add the value of the itemCost variable to the order Total variable to keep a running total of the total cost of the customer order.13. After the tor loop has completed, add the following HTML code to the value of the cartHTML variable, completing the shopping cart table
<tr>
<td colspan= '4'>Subtotal</td>
<td>Total</td>
</tr>
</table>
where total is the value of the orderTotal variable, preceded by a $ symbol.14. Apply the cartHTML value to the inner HTML of the div element with the ID cart.
15. Document your script file with appropriate comments, and then save your work.
16. Open the tc_cart.html file in your browser and verify that the page now shows the shopping cart data for the sample customer order.
Learn More -
New Perspectives on HTML, CSS, and Dynamic HTML 5th edition Tutorial 13 Case 3 The 221B Blog
Regular Price: $15.00
Special Price $12.00
New Perspectives on HTML, CSS, and Dynamic HTML 5th edition Tutorial 13 Case 3 The 221B Blog
The 221B Blog Kyle Harris is a fan of mystery stories. His favorites are the Sherlock Holmes stories by Sir Arthur Conan Doyle. Kyle decided to create a Web site for other fans of the fictional detective; the site is called The 221B Blog, named after the street number of Holmes’ fictional Baker Street address.
On his Web site, Kyle has added a discussion forum, links to other mystery Web sites, and a place for members to post artwork, essays, and fan fiction. Kyle also has created links to online text versions of all of the 56 short stories and four novels in the Sherlock Holmes canon. Kyle is concerned that having so many links on the home page will make it difficult for users to navigate the site. He’s seen sites in which lists of links are stored in popup or pull-down menus, remaining out of sight until needed by a user. Kyle wants to add a similar feature to his Web site and has asked you to help him write the code.
Each pull-down menu will have a heading that identifies the contents of the menu. Kyle envisions the HTML structure shown in Figure 13-41 in which the pull-down menus are nested within another list that acts as a menu bar. Each pull-down menu is identified with the class name submenu, and the h1 element containing each heading is identified with the class name submenuHead.Kyle already has created the style sheet for the menus and the HTML code for the Web page. Your job will be to write the JavaScript code to control the operation of the pull-down menus on the page.
Complete the following:
Learn More
1. Using your text editor, open the holmestxt.htm, pulltxt.css, and pulltxt.js files from the tutorial.13\case3 folder, enter your name and the date in the comment section of each file, and then save the files as holmes.htm, pullmenu.css, and pullmenu.js, respectively.
2. Take some time to view the contents of the holmes.htm file in your text editor, noting the structure of the two navigation lists and the submenus within each of those lists.
3. Open the holmes.htm file in your Web browser, and then study the placement of the six pull-down menus for the stories and novels of Sherlock Holmes. The page also contains four pull-down menus in the vertical navigation bar containing links to Web sites for User Submissions, Holmes on the Web, Arthur Conan Doyle, and Other Fictional Detectives, but these are obscured by the horizontal pull-down menus at the moment.
4. Go to the pullmenu.css file in your text editor. At the bottom of the file, insert the following two style rules: i) hide the ul elements nested within the li elements belonging to the submenu class by setting their display property to none; and ii) display a pointer cursor for h1 elements belonging to the submenuHead class.
5. Save your changes to the file and then return to the holmes.htm file in your text editor.
6. Add a script element linking the file to the pullmenu.js file and then close the file, saving your changes.
7. Go to the pullmenu.js file in your text editor. Insert a command to run the init() function when the page is loaded by the browser.
8. Create the init() function. The purpose of this function is to add a dynamic id attribute
to each pull-menu heading, and to create an onclick event handler for each submenu heading. Add the following commands to the function:
a. Create the submenuHeads variable containing the object collection for all elements in the document belonging to the submenuHead class.
b. Loop through the submenuHeads object collection, and for each item in the collection do the following: i) add the id attribute isubmenu_heading to the element, where i is the index number of the item in the object collection; and ii) run the showMenu() function when the item is clicked.
9. Create the hideAllMenuLists() function. The purpose of this function is to hide all pull-down menus on the page. Add the following commands to the function:
a. Create the allMenuLists variable referencing all of the ul elements in the document that are nested within the li elements belonging to the submenu class. (Hint: Use the querySelectorAll() method.)
b. Loop through the allMenuLists object collection. For each item in the collection, set the display style property value to none.
10. Create the showMenu() function. The purpose of this function is to display the pulldown menu corresponding to the menu heading that was clicked by the user. Add the following commands to the function:
a. Create the subIndex variable containing the index number found within the id property of the heading that was clicked by the user. (Hint: Use the parseInt() function to extract the index number.)
b. Create the allMenus variable containing the object collection of all elements belonging to the submenu class.
c. Create the currentMenu variable containing the element from the allMenus object collection with the index number indicated by the subIndex variable.
d. Create the currentMenuList containing the first ul element nested within the currentMenu object. This will be the pull-down menu that you will either hide or display on the page.
e. If the display property of currentMenuList is equal to block, change the display property to none to hide it; otherwise, because currentMenuList must be hidden, run the hideAllMenuLists() function to hide all other pull-down menus on the page and change the display style property of currentMenuList to block.
11. Document your code with informative comments throughout the JavaScript file.
12. Save your changes to the file, and then reload holmes.htm in your Web browser. Verify that when you click the pull-down menu headings located on the menu bar or on the vertical navigation list, the corresponding menu is displayed. Further verify that only one pull-down menu can be displayed at a time. Finally, verify that you can hide any pull-down menu by clicking the menu heading a second time.
13. Submit your completed files to your instructor, in either printed or electronic form, as requested.
8 Item(s)
Grid List

You have no items in your shopping cart.
