Search results for 'ITS 320'
-
New Perspectives on HTML and XHTML Tutorial 4 Case Problem 3 Solution
$12.00New Perspectives on HTML and XHTML Tutorial 4 Case Problem 3 Solution
Data Files needed for this Case Problem: image0.jpg – image9.jpg, longstxt.htm, and lpmap.jpg
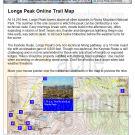
Longs Peak Interactive Map Longs Peak is one of the most popular attractions of Rocky Mountain National Park (RMNP). Each year during the months of July, August, and September, thousands of people climb Longs Peak by the Keyhole Route to reach the 14,255-foot summit. Ron Bartlett, the head of the RMNP Web site team, has asked for your help in creating an interactive map of the Keyhole Route. The map will be installed at electronic kiosks in the park’s visitor center. Ron envisions a map with 10 numbered waypoints along the Keyhole Route, displaying photos and text descriptions of each waypoint when a mouse pointer hovers over its corresponding numbered point. Figure 4-59 shows a preview of the online map with the first waypoint highlighted by the user.Ron also wants to create a print version of the waypoint descriptions. Users can print the map elsewhere on the park’s Web site, so he wants the print style sheet to display just the list of waypoints in a bulleted list.
Complete the following:
Learn More
1. Use your text editor to open the longstxt.htm file from the tutorial.04\case3 folder included with your Data Files. Enter your name and the date in the comment section at the top of the file. Save the file as longs.htm in the same folder. Take some time to study the contents of the file. Notice that the waypoint descriptions are nested within the online_map div container. Each waypoint description has been placed in a separate div container with the class name notes and id names ranging from point0 to point9.
2. To create a rollover effect for the nine waypoints, you need to mark the waypoint contents as hyperlinks.Within each of the nine div containers, enclose the img element and paragraph element within a single <a> tag. Point each link to the longs.htm file so that if a user clicks the link, it will simply refresh the currentWeb page.
3. Add a style to the embedded style sheet at the top of the file to remove underlining from all hypertext links.
4. Currently the online_map div container does not display the Longs Peak map. Add the following style to the embedded style sheet to display the map:
• Set the width of the container to 600 pixels wide by 294 pixels high.
• Add a 1-pixel-wide solid black border to the container.
• Apply the lpmap.jpg graphic file as the background image.
• Use relative positioning to place the container on the page. Set the top and left coordinates to 0 pixels.
5. In the embedded style sheet, add the following styles for all of the div containers belonging to the notes class:
• For paragraphs nested within each note, set the font size to 8 points and the margin to 5 pixels.
• Set the font color to yellow for each span element nested within a note.
6. For each link nested within a notes class element, apply the following styles:
• Set the width and height of the link to 20 pixels.
• Hide any content that overflows the boundary of the link.
• Set the background color to blue and the font color to white.
• Set the z-index value to 1.
7. When the mouse hovers over a link within a notes class element, have the browser apply the following style:
• Change the width to 150 pixels and the height to 170 pixels.
• Change the overflow property to visible.
• Set the z-index value to 2.
8. Use absolute positioning to place the link nested within the #point0 selector at the coordinates (560, 60).
9. Repeat Step 8 for the nine remaining waypoints:
• #point1 at (277, 90)
• #point2 at (175, 0)
• #point3 at (110, 115)
• #point4 at (55, 165)
• #point5 at (5, 180)
• #point6 at (15, 222)
• #point7 at (50, 245)
• #point8 at (100, 245)
• #point9 at (90, 220)
10. Go to the top of the file and add a media attribute to the embedded style sheet indicating that the sheet is designed for screen and tv media.
11. Save your changes to the file and then open longs.htm in your Web browser. Verify that the placement of the waypoints follows the locations shown in Figure 4-59. Confirm that when you hover your mouse over each of the nine waypoints, a description of the waypoint appears on the top of the trail map.
12. Return to the longs.htm file in your text editor. Create a new embedded style sheet designed for print media.
13. Scroll down to the “Longs Peak Online Trail Map” h2 heading and enclose the text “Online Trail Map” within a span element.
14. Add the following styles to the embedded print style sheet:
• Set the font family for the page body to sans-serif.
• Remove underlining from all hypertext links.
• Do not display the #instructions selector, the span element nested within the h2 element, or the img element nested within elements belonging to the notes class.
• Display the notes class of elements as list items with a disc marker. Set the margin to 20 pixels.
• Change the display property of paragraphs nested within the notes class of elements to inline.
• Display span elements nested within the notes class of elements in a bold font.
15. Add a style that inserts the text string “Trail Itinerary” after the h2 heading.
16. Save your changes to the file.
17. Refresh the longs.htm file in your Web browser. By either printing the page or viewing the page within the Print Preview window, confirm that the printed page only shows a bulleted list of the waypoint descriptions. If you are running Firefox, Opera, or Safari, confirm that the heading at the top of the page reads “Longs Peak Trail Itinerary.” (If you are using Internet Explorer, the title will simply read “Longs Peak.”)
18. Submit your completed files to your instructor. -
Penn Foster Graded Project 40267000 Tutorial 16 Case 1 French 101
$20.00Penn Foster Graded Project 40267000 Tutorial 16 Case 1 French 101
In this graded project, you’re going to add dynamic content and styles using JavaScript, as you learned in this lesson. You’re going to create external script elements, event handlers, and functions for a Web site containing French phrases. Upon clicking on a phrase, an English translation will appear. Upon releasing the mouse, the French phrase should be visible once again.
Turn to page 956 and locate Case Problem 1. Follow the steps in this case to add the appropriate code to the project.Grading
Your project will be graded on the following elements:
French5.htm
When viewed in browser, clicking on a phrase from 1 to 10 shows the English translation 15 points _______
When viewed in browser, releasing the mouse button on a phrase from 1 to 10 shows the French French phrase 15 points _______
English phrases are in red font, non-Italic 10 points _______
French phrases are in black font, Italic 10 points _______
When viewing code, two external script elements link to french5.js and engfr.js files 10 points _______
When viewing code, an event handler in body element runs function setUpTranlation() when page loads 10 points _______Engfr.js
JavaScript file contains a function setUpTranslation() 10 points _______
JavaScript file contains a function swapFE() 10 points _______
JavaScript file contains a function swapEF() 10 points _______New Perspectives on HTML, XHTML, and Dynamic HTML Tutorial 16 Case 1 French 101
Learn More
Complete the following:
1. Use your text editor to open the french5txt.htm and engfrtxt.js files from the tutorial.16/case1 folder, enter your name and the date in the comment section of each file, and then save the files as french5.htm and engfr.js, respectively.
2. Go to the french5.htm file in your text editor and review the contents and structure of the file. Add two script elements that attach the french5.htm file to the french5.js and engfr.js script files. Close the french5.htm file, saving your changes.
3. Go to the engfr.js file in your text editor. Add a command to have the browser run the setUp() function when the page is loaded.
4. Create the setUp() function. The purpose of this function is to insert an ordered list of French phrases taken from the french array in the french5.js file and to add event handlers to switch these phrases to their English counterparts. Add the following commands to the setUp() function:
a. Declare a variable named transDoc that references the element with the ID doc. It is within this element that you’ll place the list of French phrases.
b. Create an element node named olElem containing the ol element.
c. Loop through all of the items in the french array. For each item in the array, create an element node named newLI containing a list item element. Set the text contained within newLI to the text of the current item in the french array. Set the ID of the newLI element to iphrase, where i is the value of the index number in the array. Set the cursor style of the list item to pointer. Have the browser run the swapFE() function when the user presses the mouse button down on the list item, and run the swapEF() function when the mouse button is released. Finally, append the newLI element as a child of the olElem object.
d. After the loop has finished, append the olElem object to the transDoc object.
5. Create the swapFE() function. The purpose of this function is to display the English phrase in place of the French phrase selected by the user. Add the following commands to the function:
a. The swapFE() function is only run in response to the mousedown event. Store the object in which the mousedown event occurred in a variable named phrase.
b. If the node name of the phrase object indicates that the phrase object is a text node, point the phrase object to the parent of that text node. This is done to ensure that the object being examined is the list item element containing the phrase, and not simply the text of the phrase itself.
c. Declare a variable named phraseNum that returns the index number of the phrase being selected. You can extract the index number by applying the parseInt() method to contents of the ID attribute of the phrase object.
d. Change the inner HTML of the phrase object to the item in the english array with an index equal to the phraseNum variable.
e. Change the font style of the phrase object to italic and the font color to the color value (155, 102, 102).
6. Create the swapEF() function. The purpose of this function is to display the French translation of the phrase selected by the user. The code of the function should be identical to that used in the swapFE() function, except that it should use the french array rather than the english array and the phrase text should be displayed in a normal black font.
7. Close the file, saving your changes.
8. Open french5.htm in your Web browser. Verify that a list of 10 French phrases appears on the Web page. Also, verify that as you press the mouse button on each
phrase, the English translation appears. When you release the mouse button, the French phrase should reappear.
9. Submit the completed project to your instructor. -

Penn foster Graded Project 402082 Unix-Based Environments and Apache HTTP Server
$15.00Penn foster Graded Project 402082 Unix-Based Environments and Apache HTTP Server
OVERVIEW
After installing Apache HTTP Server, you’re now ready to configure it for your website! Throughout this and future graded projects, you’ll be creating a fictional website, configuring it in various web server environments and then uploading it to the Penn Foster web server. There’s no better way to apply your knowledge than by completing a common real-world task!PROJECT SCENARIO
You’re now asked to test the fan club website on a local Apache HTTP Server. You should have completed the previous graded assignment and have the following files:
• index.html—Contains the band name, current lineup, and a brief history of the band.
• music.html—Contains their music catalog and upcoming tour dates.
• fanclub.html—Contains a form to sign-up for the band’s fanclub.
If not, go back to the previous graded project and create the required files and folders. In addition to these pages, you’ll add the following Perl script in this graded project:
• signup.pl—This script will accept the form data from fanclub.html and display that data on a welcome page.INSTRUCTIONS
In this graded project, you’ll need to have installed ActivePerl from the previous study unit and installed Apache HTTP Server as directed in the current study unit. In the first section, you’ll configure Apache for your website. In the second section, you’ll add a Perl script, modify the fanclub.html file and then test to see if the website works. To make configuration simpler, you may want to move the band_fan folder with all of its content to the C:\ drive to shorten its path. The location will now be C:\band_fan.CONFIGURATION
1. Determine the location of the band_fan folder. You can do this through the GUI by right-clicking the folder and choosing the Properties option from the context menu (Figure 7). The folder in which it’s located is the value for the Location field. You can either copy-and-paste the location or write it down. Click the OK button to dismiss the dialog.Open the Apache configuration file. This can be accessed from the Start menu. Start > All Programs > Apache HTTP Server 2.2 > Configure Apache Server > Edit the Apache httpd.conf Configuration (Figure 8).
2. A dialog may appear indicating that Windows can’t open the file. If so, select the Select a program from a list of installed programs radio button and click
the OK button. You can choose any text editor you prefer.
3. Find the DocumentRoot directive in the httpd.conf file. You can use the CTRL-F shortcut to search for the word without scrolling through the whole file.
# DocumentRoot: The directory out of which you’ll serve your
# documents. By default, all requests are taken from this directory, but
# symbolic links and aliases may be used to point to other locations.
#
DocumentRoot "C:/Apache/htdocs"
4. Modify the DocumentRoot directive for the band_fan folder. Warning: You’ll need to change every backslash (\) in the path to a forward-slash (/). C:\foster\band_fan should now be C:/foster/band_fan.
DocumentRoot "C:/band_fan"
5. Find the second Directory tag in the httpd.conf file. You can use the CTRL-F shortcut to search for the phrase <Directory "C:/Apache/htdocs"> without scrolling through the whole file.
# This should be changed to whatever you set DocumentRoot to.
#
<Directory "C:/Apache/htdocs">
6. Modify the Directory tag for the band_fan folder. Warning: You’ll need to change every backslash (\) in the path to a forward-slash (/).
<Directory "C:/band_fan">
7. Find the Options directive immediately below the Directory tag.
# The Options directive is both complicated and important. Please see
# http://httpd.apache.org/docs/2.2/mod/core.html#options
# for more information.
Options Indexes FollowSymLinks
8. Modify the Options directive to support CGI scripts by adding the option ExecCGI.
Options Indexes FollowSymLinks ExecCGI
9. Find the ScriptAlias directive in the httpd.conf file. You can use the CTRL-F shortcut to search for the word without scrolling through the whole file.
# ScriptAlias: This controls which directories contain server scripts.
# ScriptAliases are essentially the same as Aliases, except that
# documents in the target directory are treated as applications and
# run by the server when requested rather than as documents sent to the
# client. The same rules about trailing "/" apply to ScriptAlias
# directives as to Alias.
ScriptAlias /cgi-bin/ "C:/Apache/cgi-bin/"
10. Modify the ScriptAlias directive for the band_fan folder, including the cgi-bin directory.
ScriptAlias /cgi-bin/"C:/band_fan/cgi-bin/"
11. Find the next Directory tag in the httpd.conf file. You can use the CTRL-F shortcut to search for the phrase <Directory "C:/Apache/cgi-bin"> without scrolling through the whole file.
# "C:/Apache/cgi-bin" should be changed to whatever your ScriptAliased
# CGI directory exists, if you have that configured.
<Directory "C:/Apache/cgi-bin">
12. Modify the Directory tag for the band_fan folder, including the cgi-bin directory.
<Directory "C:/band_fan/cgi-bin">
13. Save and close the configuration file.
14. If Apache is running, close the command-line window in which you ran httpd.exe. Otherwise, the configuration file changes won’t affect the web service.
CGI Scripting and Testing
15. Open a text editor of your choice and type the following
Perl script:
#/perl/bin/perl
use strict;
use warnings;
use CGI;
my $cgi = CGI->new();
print
$cgi->header('text/html'),
$cgi->start_html('Fanclub Signup'),
$cgi->h1('You are now signed up.'),
$cgi->p('Thank you for signing up,' ,
$cgi->strong($cgi->param('name')), '.'),
$cgi->p('The following comment has been submitted:'),
$cgi->blockquote($cgi->param('comments')),
$cgi->end_html;
16. Create a new folder named cgi_bin in the band_fan folder and save the script with the filename signup.pl.
17. Open the fanclub.html file in text or HTML editor and modify the opening form tag as follows:
<form method='post' action='cgi-bin/signup.pl'>
18. Start the Apache web service. Launch the Windows command line and type the following at the commandline prompt:
C:\Apache\bin\httpd.exe
19. Type the URL http://localhost:8080 in your browser. You should see the homepage index.html for the band fan club. Click on the links for the other two pages and verify they work.
20. Test the fanclub.html page by typing in values for the HTML form controls and then clicking the Join button.
21. You should get a resulting page that displays as follows:PROJECT SUBMISSION
Learn More
GUIDELINES
To submit your project, you must provide the signup.pl file and modified fanclub.html and httpd.conf files. You should copy the fanclub.html file from the band_fan folder and the signup.pl file from the cgi-bin folder in the band_fan folder. The httpd.conf file should be copied (do not move) from the default location C:\Apache\conf. Move all files to your desktop or another common folder and then select them together by holding down the CTRL key while clicking them. To combine them into a single file for submission, you should right-click on one of the selected files and choose the Send to > Compressed (zipped) folder option in the context menu.
The resulting file should be named apache.zip. Submit this file for grading. -

Penn foster Graded Project 402083 Windows Server and Internet Information Services
$15.00Penn foster Graded Project 402083 Windows Server and Internet Information Services
OVERVIEW
After installing IIS, you’re now ready to configure it for your website!
Throughout this and future graded projects, you’ll be creating a fictional website, configuring it in various web server environments and then uploading it to the Penn Foster web server. There’s no better way to apply your knowledge than completing a common real-world task!PROJECT SCENARIO
You’re now asked to test the fan club website on a local installation of IIS. You should have completed the previous graded assignment and have the following files:
• index.html—Contains the band name, current lineup, and a brief history of the band.
• music.html—Contains their music catalog and upcoming tour dates.
• fanclub.html—Contains a form to sign-up for the band’s fan club.
• signup.pl—This script handles the form data from fanclub.html.
If not, go back to the previous graded project and create the required files and folders.INSTRUCTIONS
In this graded project, you’ll need to have installed ActivePerl from the previous study unit and installed IIS as directed in the current study unit.
In the first section, you’ll configure IIS for your website using its administrative console. In the second section, you’ll test to see if the website works. To make configuration simpler, you may want to move the band_fan folder with all of its content to the C:\ drive to shorten its path if you haven’t done so
already.CONFIGURATION
1. Determine the location of the band_fan folder. You can do this through the GUI by right-clicking the folder and choosing the Properties option from the context menu. The folder in which it’s located is the value for the Location field. You can either copy-and-paste the location or write it down. Click the OK button to dismiss the dialog (Figure 7).
2. Open the Internet Information Services (IIS) Manager console. This can be accessed using the command inetmgr. To launch the console, click on the Start Menu, type inetmgr in the Search textbox, and hit the ENTER key.
3. Add a new web application to the default website. In the left pane labeled Connections, expand COMPUTERNAME > Sites, right-click on the Default Web Site node
and choose Add Application in the context menu (Figure 8).
4. In the Add Application dialog, type BandFan in the Alias textbox and the location of the band_fan folder in the Physical path textbox. Click the OK button to
dismiss the dialog (Figure 9)
5. Open IIS handler mappings. With the BandFan node still selected in the left-pane, double-click on Handler Mappings in the center pane.
6. Double-click on the CGI-exe handler mapping in the disabled section of the center pane. In the Edit Module Mapping dialog, set the Request path textbox to *.pl and the Executable (optional) textbox to C:\Perl\bin\perl.exe "%s" %s. The %s switch is a placeholder for the actual Perl script filename (Figure 10).
7. Click the OK button to dismiss the Edit Module Mapping dialog. An information message will appear, asking whether you want to enable the extension. Click
the Yes button to dismiss the message dialog (Figure 11). To complete the CGI configuration, you must restart IIS. To restart IIS, you must be running the command line as an administrator.
8. To launch the Windows command line in administrator mode, click on the Start Menu, type cmd in the Search textbox, right-click cmd.exe, and choose the Run as
administrator option from the context menu (Figure 12)
9. Click Yes to dismiss the User Account Control dialog. FIGURE 10—Setting the Request Path FIGURE 11—Click Yes to allow the ISAPI Extension.
10. To restart IIS, type iisreset and hit the ENTER key.
You should get the following output:
Attempting stop...
Internet services successfully stopped
Attempting start...
Internet services successfully restartedTESTING
1. Type the URL http://localhost/BandFan in your browser. You should see the homepage index.html for the band fan club. Click on the links for the other two
pages and verify that they work. FIGURE 12—Launching the Windows Command Line in Admin Mode
2. Test the fanclub.html page by typing in values for the HTML form controls and then clicking the Join button.
3. You should get a resulting page that displays as follows:PROJECT SUBMISSION
Learn More
GUIDELINES
To submit your project, you must provide the applicationHost.config file. This file contains all of the configuration settings you made in IIS to host the website. The applicationHost.config file should be copied (not moved) from the default location C:\Windows\System32\inetsrv\config. Submit this file for grading. -
New Perspectives on HTML and CSS Edition 6 Tutorial 5 Case Problem 2
Regular Price: $12.00
Special Price $10.00
New Perspectives on HTML and CSS Edition 6 Tutorial 5 Case Problem 2
Learn More
Data Files needed for this Case Problem: bottom.jpg, bottomleft.jpg, bottomright.jpg, caltxt.css, css.css, ccc.jpg, febtxt.htm, left.jpg, modernizr-1.5.js, right.jpg, tab.jpg, tabred.jpg, top.jpg, topleft.jpg, and topright.jpg
The Chamberlain Civic Center Lewis Kern is an events manager at the Chamberlain Civic Center in Chamberlain, South Dakota. The center is in the process of updating its Website, and Lewis has asked you to work on the pages detailing events in the upcoming year. He's asked you to create a calendar page for the month of February. Lewis wants the page design to catch the reader’s eye and so he suggests that you create a Web table with a background showing a spiral binding. The spiral binding graphic must be flexible to accommodate calendars of different sizes, so you’ll build the borders for this image by nesting the February calendar table within eight div elements. The February calendar must list the following events:
- Every Sunday, the Carson Quartet plays at 1:00 pm ($8)
- February 1, 8:00 pm: Taiwan Acrobats ($16/$24/$$36)
- February 5, 8:00 pm: Joey Gallway ($16/$24/$36)
- February 7-8, 7:00 pm: West Side Story ($24/$36/$64)
- February 10, 8:00 pm: Jazz Masters ($18/$24/$32)
- February 13, 8:00 pm: Harlem Choir ($18/$24/$32)
- February 14, 8:00 pm: Chamberlain Symphony ($18/$24/$32)
- February 15, 8:00 pm: Edwin Drood ($24/$36/$44)
- February 19, 7:00 pm: The Yearling ($8/$14/$18)
- February 21, 8:00 pm: An Ellington Tribute ($24/$32/$48)
- February 22, 8:00 pm: Othello ($18/$28/$42)
- February 25, 8:00 pm: Madtown Jugglers ($12/$16/$20)
- February 28, 8:00 pm: Ralph Williams ($32/$48/$64)
- March 1, 8:00 pm: Othello ($18/$28/$42)
Lewis wants the weekend events (Friday and Saturday night) to be displayed with a light red background. A preview of the page you'll create is shown at the end of this write-up.
Complete the following:
1. In your text editor, open the caltxt.css and febtxt.htm files from the tutoril.05\case2 folder. Enter your name and the date in the comment section of each file. Save the files as calendar.css and feb.htm, respectively.
2. Go to the feb.htm file in your text editor. Create links to the calendar.css and ccc.css style sheets.
3. Scroll down to the events section element. Within the element, insert a table with the class name calendar. Add the table caption Events in February at the CCC to the calendar.
4. Create a column group for the calendar consisting of two col elements. The first col element should belong to the weekdays class and span five columns. The second col element should belong to the weekends class and span two columns.
5. Create a table header row group consisting of one row of table headings displaying the three-letter abbreviations for the days of the week, starting with Sun and ending with Sat.
6. Create a table body row group containing the days in the month of February. The row group should contain five rows and seven columns of the table data cells. There are no spanning
cells in any of the rows or columns.
7. Each table data cell should have the following content:
- The day of the month should be marked as an h3 heading (refer to Figure 5-55 for the starting and ending days in the calendar).
- On the days when there is a CCC event, enter the event information as a definition list with the name of the event marked as a dt element, and the time and price of the event each marked with a dd element.
8. Save your changes to the file and then go to the calendar.css file in your text editor. Create a style rule for the calendar table to: a) create separate borders for the different parts of the table with a 5 pixel space between the borders; b) set the font size to 8 pixels; c) set the top margin to 20 pixels, the bottom margin to 5 pixels, and the left and right margins to auto; d) set the padding space to 40 pixels; and e) set the width to 650 pixels.
9. In the style rule you created in the previous step, add a style rule that specifies multiple background images for the calendar table in the following order:
- the topleft.jpg image in the top-left corner of the table with no tiling
- the topright.jpg image in the top-right corner with no tiling
- the bottomleft.jpg image in the bottom-left corner with no tiling
- the bottomright.jpg image in the bottom-right corner with no tiling
- the top.jpg image in the top-left corner, tiled only in the horizontal direction
- the left.jpg image in the top-left corner, tiled only in the vertical direction
- the right.jpg image in the top-right corner, tiled only in the vertical direction
- the bottom.jpg image in the bottom-left corner, tiled only in the horizontal direction.
10. Create a style rule to center the table caption along the top of the calendar table and do the following: a) set the bottom padding to 10 pixels; b) set the font size to 16 pixels; c) set the kerning to 3 pixels; and d) set the width to 650 pixels.
11. Set the width of the table columns to 14% of the width of the table. For columns belonging to the weekends class, change the background color to the value (255, 232, 232).
12. For table heading cells in the table header row group, set the background color to red, the font color to white, and the letter spacing to 5 pixels.
13. Set the height of the table row within the table header row group of the calendar table to 5%. Set the height of the table rows within the table body row group to 19% each.
14. Add a 1-pixel solid gray border to every table data cell within the calendar table. Set the vertical alignment of the cell content to the top of the cell.
15. Set the font size of h3 headings within the data table cells of the calendar table to 8 pixels.
16. The paragraphs in the summary section are enclosed within a div element. Create a style rule for this div element to: a) display the contents in a columnar layout with the column width set to 300 pixels; b) set the column gap to 20 pixels and; c) add a 1-pixel solid black divider rule between columns.
17. Save your changes to the file and then open feb.htm in your Web browser. Verify that the layout and design of page resemble that shown in Figure 5-55. (Note: If you are running Internet Explorer or Opera, you might not see multiple columns in the description of the upcomming Feburary events.)
18. Submit your completed files to your instructor, in either printed or electronic form, as requested. -
New Perspectives on HTML and CSS Edition 6 Tutorial 4 Case Problem 2 Creating Page Layouts with CSS
Regular Price: $20.00
Special Price $15.00
New Perspectives on HTML and CSS Edition 6 Tutorial 4 Case Problem 2 Creating Page Layouts with CSS
Learn More
Data Files needed for this Case Problem: modernizr-1.5.js, notice.png, pizzatxt.c, rblogo.png, redhalltxt.htm, redbar.png, slice.png, toppings.png
Red Ball Pizza Alice Nichols is the owner of Red Ball Pizza, a well-established pizzeria in Ormond Beach, Florida. She's asked for your help in creating a design for the company's Website. After discussing the issue with Alice, you settle on a fixed width layout. Alice has created a sample home page for you to work on. She already created all of the content and the graphics. She needs your help with the design. Figure 4-79 shows a preview of the page you'll create for her.
Complete the following:
1. In your text editor, open the pizzatxt.css and redballtxt.htm files from the tutorial.04\case2 folder. Enter your name and the date in the comment section of each file. Save the files as pizza.css and rcdhall.htm, respectively.
2. Return to the redball.htm file in your text editor. Take some time to review the content and structure of the document, and then link the file to the pizza.css style sheet. Close the file, saving your changes.
3. Go to the pizza.css file in your text editor. Create a style rule to display the header, section, aside, tooter, and nav elements as blocks.
4. Set the default padding and margin size to 0 pixels.
5. Create a style for the body element to: a) set the background color to red; and b) set the font family to Verdana, Geneva, or sans-serif.
6. The entire content of the page has been enclosed in a div container element with the id container. Create a style rule for this container to: a) set the width to 1000 pixels; b) center the container in the browser window by selling the top/bottom margins to 0 pixels and the left/right margins to auto; c) display a 1-pixel solid black border on the left and right edges; and d) set the background color to white and display the redbar.png image file as the background image, placing the image file in the top-left corner of the container and tiling it in the vertical direction only.
7. Change the background color of the header element to white and set its height to 100 pixels.
8. Create a style rule for the horizontal navigation list to: a) set the height to 70 pixels and the width to 100%; and b) set the background color to white.
9. For eath list item within the horizontal navigation list, create a style rule to: a) set the background color to white; b) set the font size to 16 pixels, the height and the line height to 50 pixels, and the width to 180 pixels; c) display the item as a block and float it on the left; d) set the left and right margins to 5 pixels; and e) horizontally center the contents.
10. For each hypertext link within a list item in the horizontal navigation list, create a style rule to: a) display the link as a block; b) set the background color to red and the text color to white; c) create elongated corners with a horizontal radius of 10 pixels and a vertical radius of 25 pixels (use progressive enhancement to support browser extensions); and d) remove the text underlining. If a user hovers a mouse pointer over these links, change the background color to the value (255, 101, 101) and the text color to black.
11. Create a style rule for the vertical navigation list to: a) float it on the left only when the left margin is clear; and b) set the width to 200 pixels.
12. For list items within the vertical navigation list, create a style rule to: a) remove the list item marker; b) indent the text 20 pixels; and c) set the top and bottom margins to 20 pixels.
13. For hypertext links within the vertical navigation list, set the text color to white and remove the text underlining. When a user hovers the mouse pointer over these links, change the text color to black.
14. The main content of the Web page is contained in a section element with the id main. Create a style rule for this element to: a) change the background color to the value (255, 211, 211); b) float the element on the left; and c) set the width to 600 pixels.
15. For paragraphs that are direct children of the main section, set the font size to 20 pixels and the margin to 15 pixels.
16. For inline images within the main section, create a style rule to: a) float the image on the right; b) set the margin to 15 pixels; c) set the width to 350 pixels; and d) set the radius of the bottom-left corner to 350 pixels (use progressive enhancement to support the Mozilla and WebKit browser extensions).
17. Alice has included six coupons in the home page that have been nested within div elements belonging to the coupon class. For each coupon div element: a) add a 5-pixel dashed black border; b) float the coupons on the left; c) set the width to 170 pixels and the height to 150 pixels; and d) set the top and bottom margins to 20 pixels, and the left and right margins to 10 pixels.
18. To the style rule for the coupons, add style properties to create the following two background images: a) place the slice.png image in the center of the coupon without tiling; and b) place the notice.png image in the bottom-right corner of the coupon without tiling. Set the background color of the coupon to white.
19. For h1 headings within the coupons, add a style rule to: a) set the text color to white on a background with the color value (192, 0, 0); b) set the font size to 16 pixels and the kerning to 2 pixels; c) center the text; d) set the height to 25 pixels; and e) display the text in small caps.
20. For paragraphs within the coupons, create a style rule to: a) set the font size to 14 pixels; b) center the text; and c) set the margin to 5 pixels.
21. Alice has placed interesting tidbits about pizza in an aside element. Float the aside element on the left with a width of 200 pixels.
22. For h1 headings within the aside element, create a style rule to: a) set the text color to the value(l92, 0,0); b) set the font size to 20 pixels and the kerning to 2 pixels; c) set the font weight to normal; and d) center the text of the headings.
23. For list items within the aside element, create a style rule to: a) set the background color to the value (255, 135, 1 35); b) add round corners with a 5-pixel radius; c) set the text color to black; d) remove the list style maker; and e) set the margin to 10 pixels and the padding to 5 pixels.
24. Display the footer element when the left margin is clear, and set the size of the left margin to 200 pixels.
25. For the address element within the footer element, create a style rule to: a) add a l-pixel solid red border to the top of the element; b) change the text color to red; c) set the font size to 10 pixels, set the font style to normal, and center the address text; and d) set the top margin to 25 pixels and the bottom padding to 20 pixels.
26. Add style comments throughout your style sheet to document your work and then save your changes.
27. Open the redhall.htm file in your Web browser and verify that the design and layout resemble that shown in Figure 4-79.
28. Submit your completed files to your instructor, in either printed or electronic form, as requested. -
New Perspectives on HTML, CSS, and Dynamic HTML 5th edition Tutorial 12 Case 1 The Lighthouse
Regular Price: $15.00
Special Price $12.00
New Perspectives on HTML, CSS, and Dynamic HTML 5th edition Tutorial 12 Case 1 The Lighthouse
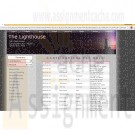
The Lighthouse is a charitable organization located in central Kentucky that matches donors with needy groups. The fundraising coordinator for The Lighthouse is Aaron Kitchen. On an administration Web page available only to Lighthouse staff, Aaron wants to display a list of information on recent donations, including the name and address of the donor, the amount donated, and the date of the donation. A list of donations from the last month has been downloaded from an external database and stored in a collection of arrays named firstName, lastName, street, city, state, zip, amount, and date. Aaron needs your help with displaying the data from those arrays in a Web table. He also wants a summary table that displays the total number of contributors and the total contribution amount. Figure 12-36 shows a preview of the Web page you’ll create.
Complete the following:
Learn More
1. Using your text editor, open clisttxt.htm and tablestxt.js from the tutorial.12\case1 folder. Enter your name and the date in the head section, and then save the files as clist.htm and tables.js, respectively.
2. Go to the clist.htm file in your text editor. The firstName, lastName, street, city, state, zip, amount, and date arrays have been created and populated for you in the april.js file. In the head section of the document, insert a script element that points to this file.
3. Aaron already has created a style sheet for the tables that will display the list of contributors and the summary of their contributions. Add a link to the tables.css style sheet in the Web page.
4. Save your changes to the file, and then go to the tables.js file in your text editor.
5. Add a function named showTable() that will be used to display the table containing the contributor list. The function has no parameters. Add the following commands to the function:
a. Write the following code to the document to create the header row for the table of contributions:
<table id='contributors'>
<thead>
<tr>
<th>Date</th><th>Amount</th>
<th>First Name</th><th>Last Name</th>
<th>Address</th>
</tr>
</thead>
b. Write the <tbody> tag to the document.
c. Next, you’ll create a table row for each person listed in the lastName array. Create a for loop that loops through each entry in the lastName array. Each time through the loop, write the HTML code
<tr>
<td>date</td>
<td class='amt'>amount</td>
<td>firstName</td>
<td>lastName</td>
<td>street <br />
city, state zip
</td>
</tr>
to the document, where date, amount, firstName, lastName, street, city, state, and zip are the items from the date, amount, firstName, lastName, street, city, and zip arrays, respectively, corresponding to the value from the counter variable in the for loop.
d. After the for loop, write the </tbody> tag to close off the table body.
e. Write the </table> tag to close off the Web table.
6. Create a function named showSummary() that will be used to calculate and display the total number of contributors and the total amount of contributions. The function has no parameters. Add the following commands to the function:
a. Declare the total variable, setting its initial value to 0.
b. Loop through each of the entries in the amount array, adding each item's value to the total variable.
c. Write the HTML code
<table id='sumTable'>
<tr>
<th id='sumTitle' colspan='2'>Summary</th>
</tr>
<tr>
<th>Contributors</th>
<td>contributors</td>
</tr>
<tr>
<th>Amount</th>
<td>$total</td>
</tr>
</table>
to the document, where contributors is the length of the lastName array and total is the value of the total variable.
7. Document your code using descriptive comments. Close the file, saving your changes, and then return to the clist.htm file in your text editor.
8. Add a script element to link to the tables.js file you created.
9. Scroll down to the figure box for the contribution totals. Within the figure box, insert a script element that runs the showSummary() function.
10. Scroll down to the figure box for the contributors data list. Within the figure box, insert a script element that runs the showTable() function.
11. Save your changes to the file, and then open clist.htm in your Web browser. Verify that the summary and contributor list tables appear as shown in Figure 12-36.
12. Submit your completed files to your instructor, in either printed or electronic form, as requested. -

New Perspectives on HTML, CSS, and Dynamic HTML 5th edition Tutorial 13 Case 1 Twin Life Magazine
Regular Price: $15.00
Special Price $12.00
New Perspectives on HTML, CSS, and Dynamic HTML 5th edition Tutorial 13 Case 1 Twin Life Magazine
Twin Life Magazine Elise Howard is the editor of Twin Life, a magazine for parents of twins, triplets, and other multiple births. The magazine is upgrading its Web site and Elise has approached you to help with the website design. She would like to give readers the ability to increase or decrease the font size of the articles the magazine publishes to make the text easier to read, or to allow readers to view an entire article on the same screen. Although readers can use their Web browsers to zoom in and zoom out of the Web pages, Elise wants an app that will affect only the article text and accompanying photo, while leaving the rest of page features - the magazine logo and list of links - unaffected.
To create this effect, her sample page has two buttons: one to increase the font size and other to decrease it. All text and page objects that are to be resized have been set using the relative em unit, while the other page text and objects that are to remain fixed in size have been set in pixels. Thus to change the size of all of the resizable objects, your code simply needs to change the default size of the document page body; all of the resizable objects will change proportionally based on the default font size. Figure 13-39 shows a preview of the article and resizing buttons that you'll work on for Twin Life.Complete the following:
Learn More
1. Using your text editor, open twinstxt.htm, tlmtxt.css, and fonttxt.js from the tutorial.13\case1 folder. Enter your name and the date in the head section, and then save the files as twins.htm, tlm.css, and fontsizer.js, respectively.
2. Go to the twins.htm file in your text editor and add a script element linking to the fontsizer.js file.
3. Scroll down the file and locate the fontbuttons div element, which contains two image buttons. Place both image buttons in the fontsizer class. Set the values associated with those buttons to -0.1 for the fontdown.png image and 0.1 for fontup.png.
4. Save your changes to the file, and then go to the tlm.css file in your text editor.
5. At the bottom of the file, insert a style rule to set the width of the inline image within the figure box in the article element to 12em.
6. Add another rule to set the font size of paragraph text within the article element to 1em.
7. Save your changes to the file, and then go to the fontsizer.js file in your text editor.
8. Add a command to run the startup() function when the page is initially loaded by the browser.
9. Create the startup() function. The purpose of this function is to apply onclick event handlers to the two font resize buttons. Create the fontButtons variable containing all of the page elements that belong to the fontsizer class. Loop through that collection and add an event handler to each item in the collection to run the resizeText() function when clicked.
10. Create the resizeText() function. The purpose of this function is to change the default font size of the document body based on the value of the font button being clicked. When that value is changed, all object sizes based on em units automatically will be resized. Add the following commands to the function:
a. Using the parseFloat() function, store the numeric value of the button being clicked in the fontChange variable.
b. Next, you must determine whether an inline style has been used to set the default document body font size. First, test whether the font size of the document body is equal to an empty text string. If it is, set the font size to 1.0em. (Hint: Use the reference document.body to reference the document body.)
c. Use the parseFloat() function to store the numeric value of the document body font size in the currentFontSize variable.
d. Change the document body font size to the text string current font size + font change + "em" where current font size is the value of the currentFontSize variable and font change is the value of the fontChange variable.
11. Document your code with appropriate comments throughout.
12. Save your changes to the file, and then load twins.htm in your Web browser. Verify that when you click the buttons to increase or decrease the font size, the paragraph text and the size of the author’s photo change in response, but no other part of the Web page changes in size.
13. Submit your completed files to your instructor, in either printed or electronic form, as requested. -
New Perspectives on HTML and CSS Edition 6 Tutorial 7 Case Problem 3 Franklin High School
Regular Price: $15.00
Special Price $12.00
New Perspectives on HTML and CSS Edition 6 Tutorial 7 Case Problem 3 Franklin High School
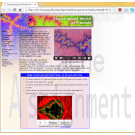
Franklin High School Fractals are geometric objects that closely model the seemingly chaotic world of nature. Doug Hefstadt, a mathematics teacher at Franklin High School in Lake Forest, Illinois, has just begun a unit on fractals for his senior math class. He's used the topic of fractals to construct a Web page to be placed on the school network, and he needs your help to complete the Web page. He has a video clip of a fractal that he wants placed in the Web page, along with a Java applet that allows students to interactively explore the Mandelbrot Set, a type of fractal object. He wants our assistance with putting these two objects in his Web page. A preview of the page you'll create is shown in Figure 7-47.
Complete the following:
Learn More
1. Use your text editor to open the fractaltxt.htm file from the tutorial.07\case3 folder included with your Data Files. Enter your name and the date in the comment section of the file. Save the file as fractal.htm in the same folder.
2. Scroll down to the figure element. Directly above the figure caption, insert a video element. Set the width and height of the video to 320 pixels by 260 pixels. Add attributes to display the zoom.png file as a poster image for the video, and have the video automatically loop back to the beginning when played. Display the mandel.mp4 and mandel.webm Video files in the player. Display the video controls in the player.
3. Within the video element, nest an object element displaying the mandel.swf Flash player. Add an attribute and a parameter to loop the player back to the beginning when played.
4. If the browser does not support flash player, display a message telling the user that he or she must have the Shockwave player. Include a link too the Website where the user can download the player.
5. Scroll down to the article element, Within the paragraph in this element, insert an object element containing the Java applet for the Mandel.class file; set the width of the Java window to 280 pixels and height to 240 pixels.
6. If your browser does not support Java, have it display the text Your browser does not support Java applets in place of the Mandel.class applet.
7. Save your changes to the file.
8. Open the Web page in an HTML5-enabled browser and verify the video plays correctly.
9. Open the Web page in a browser that does not support HTML5 but support Flash, and verify that you can play the Flash video. If the browser does not support HTML5 and Flash, verify that the browser displays a message indicating that the user should install Flash. Re-enable Flash if you disabled it.
10. Test the fractal applet to verify that you can use it to zoom into the Mandelbrot Set at different levels of magnification.
11. Disable Java support and verify that the browser displays a message indicating that you should install Java. Re-enable Java support in the browser.
12. Submit your completed files to your instructor, in either printed or electronic form, as requested. -

CIS363A Week 3 iLab 3 Create a Web Page Using CSS
Regular Price: $20.00
Special Price $15.00
CIS363A Week 3 iLab 3 Create a Web Page Using CSS
A local recruiter wants you to make a Web page for his information technology staffing company. He wants a Web page that has informed recent graduates about careers as Web programmers and Web designers. Create a Web page that will give information about each of the positions mentioned. The page content should be as followed:
Descriptions about each of the positions
Skills and/or education required for these positions
Salaries, benefits associated with these positions
Professional organizations of which people who hold these positions are typical membersThis page must have at least five graphical elements. You must implement the following CSS features:
Box Model
Floating Elements
Borders
Remember that the recruiter wants this page to be well organized, informative, and attractive. Use colors and great graphics to make this Web page interesting so that he can attract more business.Software Citation Requirements
This course uses open-source software which must be cited when used for any student work. Citation requirements are on the Open Source Applications page.
Please review the installation instruction files to complete your assignmentDeliverables
Submit your assignment to the Dropbox, located at the top of this page. For instructions on how to use the Dropbox, read these step-by-step instructions. (See the Syllabus section "Due Dates for Assignments & Exams" for due dates.)
Submit a Week 3 Lab folder, including
The HTML Web page
Associated CSS files
Images and multimedia (if any)Category Points
Use of Box Model, bordering, and floating elements 15
Completed Web page based on project specifications 15
Correct External CSS file that attaches to each page 10
Total 40Required Software
Software Name 1
Access the software at https://lab.devry.edu.
Steps: 1, 2, and 3
Software Name 2
Access the software at https://devrydesktop.rkon.com.
Steps: 4 and 5Lab Steps
STEP 1: Gather Web Content
Create written Web content about each of the positions.
Gather all images that you will use.STEP 2: Create Your Web Page
Create an informal page layout for the Web page.
Create the Web page based on criteria mentioned.STEP 3: Submit Your Assignment
Learn More
Upon completion of this step, upload your site to the Web server and attach a copy of the zipped folder to the Dropbox.
Submit your assignment to the Dropbox, located at the top of this page. For instructions on how to use the Dropbox, read these step-by-step instructions.

You have no items in your shopping cart.
