Search results for 'Chapter'
8 Item(s)
Grid List
-

PRINCIPLES OF WEB DESIGN Sklar Chapter 4 Hands-On Projects CIT-150
$15.00PRINCIPLES OF WEB DESIGN Sklar Chapter 4 Hands-On Projects CIT-150
Learn More
3. In this project, you will have a chance to test a few simple style rules on a standard HTML document and view the results in your browser.
a. Using your HTML editor, create a simple HTML file (or open an existing file) that contains <body>, <h1>, and <p> elements. Save the file as csstest1.htm in the Chapter04 folder in your work folder.
b. Add a <style> element to the <head> section, as shown in the following code.
<head>
<title>CSS Test Document</title>
<style type="text/css">
</style>
</head>
c. Add a style rule that uses body as a selector and sets the color property to green, as shown in the following code:
<style type="text/css">
body {color: green;}
</style>
d. Save csstest1.htm and view it in the browser. All of the document text should now be green.
e. Now add a style rule that sets <h1> elements to be displayed in black:
<style type="text/css">
body {color: green;}
h1 {color: black;}
</style>
f. Save csstest1.htm and view the results in the browser.
g. Finally, add a style rule that sets a margin for <p> elements to 30 pixels:
<style type="text/css">
body {color: green;}
h1 {color: black;}
p {margin: 30px;}
</style>
h. Save csstest1.htm and view the results in the browser.
4. In this project, you will have a chance to test a few basic selection techniques on a standard HTML document and view the results in your browser. Save the file and view it in your browser after completing each step.
a. Using your HTML editor, create a simple HTML file (or open an existing file) that contains <body>, <h1>, <p> elements, and so on. Save the file in the Chapter04 folder in your work folder as csstest2.htm.
b. Add a <style> element to the <head> section, as shown in the following code:
<head>
<title>CSS Test Document</title>
<style type="text/css">
</style>
</head>
c. Write a style rule that uses body as a selector and sets the color property to the color of your choice.
d. Find two elements on the page, such as <h1> and <h2>, which can share the same characteristics. Write a single style rule that applies to both elements. Set the color property to red and the margin property to 20px.
e. Find one element that contains another, such as a <b> or <q> element within a <p> element. Write a descendant selector rule that affects the contained element and sets the color property to green.
5. In this project, you will have a chance to test a few advanced selection techniques on a standard HTML document and view the results in your browser. Save the file and view it in your browser after completing each step.
a. Using your HTML editor, create a simple HTML file (or open an existing file) that contains the elements: <body>, <h1>, <p>, and so on. Save the file in the
Chapter04 folder in your work folder as csstest3.htm.
b. Add a <style> element to the <head> section, as shown in Exercise 4.
c. Write a rule for a class selector named heading. Set the color property to red and the font-size property to 200%. Apply the heading class to an <h1> or <h2>
element in the document.
d. Write a rule for a class selector named emphasis. Set the color property to blue and the background-color property to yellow. In the document, add a <span>
element to a span of words that you want to highlight. Apply the emphasis class to the <span> element. -

Principles of Web Design Sklar Chapter 5 Hands-On Projects CIT-150
$15.00Principles of Web Design Sklar Chapter 5 Hands-On Projects CIT-150
1. In the following set of steps, you will learn how to style listitem elements with the list-style properties. As you work through the exercise, refer to Figure 5-27 to see the results you will achieve. Save your file and test your work in the browser as you complete each step.
To apply the list-style properties:
a. Open the file lists.html in your HTML editor, and save it in your work folder as lists1.html.
b. Copy the image file diamond.gif into your work folder.
c. In your browser, open the file lists1.html. When you open the file, it looks like Figure 5-26. Notice that the file contains three lists. You will apply a different liststyle to each list.
d. The first list on the page is a bulleted list that currently displays the default disc (bullet) style. Write a style rule that uses a class selector circle to uniquely select the list. Set the list-style-type property to change the bullet style to circle.
ul.circle {list-style-type: circle;}
e. Now apply the style to the first list by adding the class attribute to the <ul> element.
<!-- Bulleted List -->
<ul class="circle">
<li>Bread</li>
<li>Milk</li>
<li>Cheese</li>
<li>Eggs</li>
</ul>
f. The second list on the page is an ordered list that currently displays the default decimal style. Write a style rule that uses a class selector alpha to uniquely select the list. Set the list-style-type property to change the style to upper-alpha.
ol.alpha {list-style-type: upper-alpha;}
g. Now apply the style to the first list by adding the class attribute to the <ol> element.
<!-- Alphabetical List -->
<ol class="alpha">
<li>Spring</li>
<li>Summer</li>
<li>Fall</li>
<li>Winter</li>
</ol>
h. The third list on the page is an unordered list that currently displays the default bullet style. Write a style rule that uses a class selector image to uniquely select the list. Set the list-style-image property to a URL value, using the image file diamond.gif.
ul.image {list-style-image: url(diamond.gif);}
i. Now apply the style to the first list by adding the class attribute to the <ol> element. Figure 5-27 shows the finished document.
<!-- List Image -->
<ul class="image">
<li>Spruce</li>
<li>Pine</li>
<li>Elm</li>
<li>Birch</li>
</ul>2. Modify an existing HTML document to use Cascading Style Sheets.
Learn More
a. Build styles using the existing standard HTML elements in the file.
b. Test the work in multiple browsers to verify that all styles are portable.
c. Remove the files and place them in an external style sheet.
d. Link the HTML file to the style sheet. Test to make sure the file is displayed properly. -

Principles of Web Design Sklar Chapter 6 Hands-On Projects 3 4 CIT-150
$15.00Principles of Web Design Sklar Chapter 6 Hands-On Projects 3 4 CIT-150
3. In this project, you will create a floating text box.
a. Copy the floatactivity.html file from the Chapter06 folder provided with your Data Files to the Chapter06 folder in your work folder. (Create the Chapter06
folder, if necessary.)
b. Open the file floatactivity.html in your HTML editor, and save it in your work folder as floatactivity1.html.
c. In your browser, open the file floatactivity1.html. When you open the file, it looks like Figure 6-30.
Figure 6-30 Original HTML file for Project 3
d. Examine the page code. Notice that an existing style rule sets a background-color for a floatbox class, as shown in the following code fragment:
.floatbox {background-color: #ccddee;}
e. This class is applied to the first <p> element in the document, as shown in Figure 6-30. Your goal is to use a variety of box properties to create a finished page that looks like Figure 6-31.
Figure 6-31 Completed HTML file for Project 3
f. Use the following properties to create the finished floating text box:
• width
• height
• float
• padding
• margin-right
• border
• text-align
Experiment with the different properties until you achieve results that look as close to the finished page as possible.4. In this project, you will have a chance to test the border properties. Save and view the file in your browser after completing each step.
Learn More
a. Using your HTML editor, create a simple HTML file (or open an existing file) that contains heading and paragraph elements. Save the file in your Chapter06
folder as borders.html.
b. Add a <style> element to the <head> section as shown in the following code:
<head>
<title>CSS Test Document</title>
<style type="text/css">
</style>
</head>
c. Experiment with the different border styles. Start by applying any of the following style rules to your document’s elements:
h1 {border: solid 1px black;}
h2 {border-top: solid 1px; border-bottom: solid 3px;}
p {border-left: double red; border-right: solid 1px;}
d. Experiment with adding padding properties to your style rules to off set the borders from the text. The following style rules have sample padding properties
to try:
h1 {border: solid 1px black; padding: 20px;}
h2 {border-top: solid 1px; border-bottom: solid 3px;
padding-top: 15px; padding-bottom: 30px;}
p {border-left: double red; border-right: solid 1px;
padding-left: 30px; padding-right: 20px;}
e. Continue to experiment with the border and padding properties. Try adding color and margin properties to see how the elements are displayed. -
New Perspectives on HTML XHTML and Dynamic HTML Chapter 14 Case Problem 1 The Monroe Public Library
$20.00New Perspectives on HTML, XHTML, and Dynamic HTML Chapter 14 Case Problem 1 The Monroe Public Library
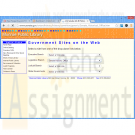
The Monroe Public Library At the Monroe Public Library, Denise Kruschev works on the library’s Web site. One of her responsibilities is to add content to the site that will be of interest to the library’s patrons. Denise’s latest assignment is to create a Web page containing links to hundreds of government Web sites. She knows that a long list of links will fill the page, making the page difficult to use. Instead, Denise wants to use “select and go navigation,” in which the links are placed within a selection list. When a user selects a link from the list, the linked page should open automatically. Denise already set up the selection lists, but she asks you to help write the JavaScript program. Figure 14-67 shows a preview of the Web page.
Complete the following:
Learn More
1. Use your text editor to open the mpltxt.htm and linkstxt.js files from the tutorial.14/case1 folder, enter your name and the date in the comment section of
each file, and then save the files as mpl.htm and links.js, respectively.
2. Go to the mpl.htm file in your text editor and create a link to the links.js file.
3. Scroll through the mpl.htm file, studying the code. Each option in the selection list contains a value referencing the URL of a government Web site. Close the file, saving your changes.
4. Go to the links.js file in your text editor and insert an event handler to run the init() function when the page is loaded.
5. Create the init() function. Within this function do the following:
a. Create a variable named allSelect that references all of the selection elements in the document.
b. For each item within the allSelect object collection, add an onchange event handler that runs the loadLink() function when the selection list changes.
6. Create the loadLink() function. The purpose of this function is to cause the brows er to load a URL from a selection list. Add the following commands to the function:
a. Create a variable named sIndex that points to the index of the selected option in the current selection list. (Hint: Use the this keyword to reference the current selection list.)
b. Web pages can be loaded using the command location.href = url; where url is the URL of theWeb page. Enter this command into the function using the value of the selected option from the selection list as the value of url. (Hint: Use the sIndex variable to point to the selected option from the current selection list.)
7. Save your changes to the file.
8. Open mpl.htm in your Web browser. Verify that by clicking the links from the selection lists on the page you can bring up the corresponding government Web sites.
9. Submit your completed files to your instructor. -
Penn foster Graded Project 41885200 Teenage Mutant Ninja Turtles
Regular Price: $20.00
Special Price $15.00
Penn foster Graded Project 41885200 Teenage Mutant Ninja Turtles
Turn to page 321 of the textbook and use the Practice Creating iFrames exercise to create a page listing the Teenage Mutant Ninja Turtles. You’ll need to modify the music types pages created earlier in your reading of the chapter to reflect the new focus of the pages. Use CSS formatting to change the color of each turtle’s name in the frame to the color of the headband each one wears. After completing the pages, validate the code using the XHTML validator at http://validator.w3.org/.
Learn More -
New Perspectives on HTML, XHTML, and Dynamic HTML Chapter 6 Case Problem 2 Civil War Studies
Regular Price: $15.00
Special Price $12.00
New Perspectives on HTML, XHTML, and Dynamic HTML Chapter 6 Case Problem 2 Civil War Studies
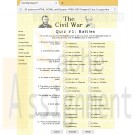
Civil War Studies Adanya Lynne, a professor of military history at Ridgeview State College in Bartlett, Tennessee, has been preparing a series of online quizzes for her students. She has created the basicWeb page design and layout, but has come to you for help in designing the quiz form. She envisions a series of multiple choice questions displayed in a collection of option buttons. Students will be able to click answers on the form and then submit their answers to a CGI script running on theWeb server for their scores. Figure 6-61 shows a preview of the page you’ll create for Professor Lynne.
Complete the following:
Learn More
1. Use your text editor to open the cwquiztxt.htm and qformtxt.css files from the tutorial.06\case2 folder included with your Data Files. Enter your name and the date in the comment section of each file. Save the files as cwquiz.htm and qform.css, respectively.
2. Go to the cwquiz.htm file in your text editor and insert a link to the qform.css style sheet.
3. Scroll down the file to the rightColumn div element. Professor Lynne has inserted the 10 questions for the online quiz. Enclose the questions in a form element with the id quizForm. Call the CGI script at http://www.ridgeviewcollmil.edu/quiz using the post method.
4. Go to the first question and enclose the text of the question in a div element with the class name question.
5. Enclose the set of answers for the first question within a field set.
6. Place a label element around each possible answer for the first question. Put the first answer in the class answerA, the second answer in the class answerB, the third answer in the class answerC, and the fourth answer in the class answerD.
7. Within each of the four labels for the answers to the first question, insert an option button directly before the text of the answer. Assign the ids ans1a, ans1b, ans1c, and ans1d to the four option buttons. Assign the field name question1 to each of the four option buttons. Finally, set the values for the four option buttons to a, b, c, and d.
8. Associate each of the four labels with a different id. Associate the first label with the ans1a field, the second with ans1b, the third with ans1c, and the fourth with ans1d.
9. Repeat Steps 4 through 8 for the remaining nine questions in the quiz, with the following changes:
- Change the ids for the four option buttons to the question number. For example, the ids for the second question are: ans2a, ans2b, ans2c, and ans2d.
- Change the field name of the four option buttons to the number of the question. For example, the field name for the second question is question2, for the third question is question3, and so forth.
10. After the last question, insert a div element with the id buttons. Within the element, insert a submit button with the value Submit, a command button with the value Answers, and a reset button with the value Reset.
11. Save your changes to the file.
12. Go to the qform.css file in your text editor and add the following styles to the style sheet:
- Float all elements of the question class on the left margin. Set their widths to 200 pixels and right-align the text. Set the clear style to left so that the element is only displayed when the left margin is clear.
- Display all field sets as block-level elements floated on the left margin. Set the size of the field sets to 400 pixels wide by 50 pixels high. Add a 20-pixel left margin and a 5-pixel bottom margin. Set the position property to relative. Finally, display the tan.jpg file as the background image for the field sets.
- Use absolute positioning to place all elements of the answerA class at the coordinates (0, 0), place answerB class elements at the coordinates (200, 0), place answerC class elements at (0, 25), and place answerD class elements at (200, 25).
- Center the contents of the div element with the buttons id. Set the width to 600 pixels and the top/bottom padding to 10 pixels. Set the left/right padding to 0 pixels.
- For input elements within the buttons div element, set the width to 100 pixels, set the top/bottom margin to 0 pixels, and set the left/right margin to 10 pixels.
13. Save your changes to the file and open cwquiz.htm in your Web browser. Verify that the layout and design resemble that shown in Figure 6-61.
14. Submit your completed files to your instructor. -

New Perspectives on HTML, CSS, and Dynamic HTML 5th edition Tutorial 14 Case 1 New Accents Photography
Regular Price: $15.00
Special Price $12.00
New Perspectives on HTML, CSS, and Dynamic HTML 5th edition Tutorial 14 Case 1 New Accents Photography
After you have completed all of the tutorials in Chapter 14, turn to page 1001 in your textbook and do Case Problem 1, New Accents Photography. Make sure all files are uploaded to cPanel and submit your URL for the accents.htm file when you are finished.
Use JavaScript to create a dynamic style sheet switcher.
Data files needed for this Case Problem: accentstxt.htm, base.css, elegant.css, elegant.png, elegant_back.png, elegant_small.png, innovative.css, innovative.png, innovative_back.png, innovative_small.png, joyous.css, joyous.png, joyous_back.png, joyous_small.png, modernizr-1.5.js, nalogo.png, romantic.css, romantic.png, romantic_back.png, romantic_small.png, styletxt.js, zany.css, zany.png, zany_back.png, zany_small.png
New Accents Photography Christine Drake is the owner and chief photographer at New Accents Photography, a photography studio in Ashland, Oregon, that specializes in wedding photos. Wedding portraiture is a competitive business. and Christine wants to improve the design of her Web site's opening page to help interest couples in viewing her work. Christine is proud of the many and varied styles of portraiture that New Accents Photography offers, and she would like to create an interactive style sheet switcher that loads different style designs based on her photos.
Christine envisions making several style sheets, and she wants to limit the amount of work she'll have to do when updating the HTML code as she adds new sheets to her site. She would like your help with writing a JavaScript app that examines the list of style sheets in the site's home page and creates a figure box of clickable thumbnail images for each sheet design. A preview of the page you'll create for Christine is shown In figure 14-66.Christine already has written the style sheet code and most of the HTML code. Your job will be to write the JavaScript code to enable her customers to switch from one style design to another.
Complete the following:
1. Using your text editor, open accentstxt.htm and styletxt.js from the tutorial.14\case1 folder. Enter your name and the date in the comment section of each file, and then save the files asaccents.htm and stylebox.js, respectively.2. Go to the accents.htm file in your text editor. Currently, Christine has only one persistent style sheet linked to her document. Create a link to the preferred style sheet romantic.css and give it the title romantic.
3. Create links to the following alternate style sheets: elegant.css, joyous.css, innovative.css, and zany.css. Give the style sheets the titles elegant, joyous, innovative, and zany, respectively. Do not disable any of these style sheets at this time.
4. Create a link to the styleBox.js file. Take some time to study the rest of the HTML code and then close the file, saving your changes.
5. Go to the styleBox.js file in your text editor. Below the comments, declare a global variable named allSheets and set it equal to an empty array. The purpose of the allSheets variable will be to store references to each preferred and alternate style sheet in the document.
6. Add a command to run the loadStyles() function when the page is initially loaded.
7. Create the loadStyles() function. The purpose of this function is to load all of the preferred and alternate style sheets into the allSheets variable. Add the following commands to the function:
a. Declare the links variable referencing all link elements in the document.
b. Loop through the contents of the links object collection. For each item, determine whether it represents a preferred or alternate style sheet with a defined title.
c. Disable each alternate style sheet, but leave the preferred style sheet enabled.
d. Use the push() array method to add each preferred or alternate style sheet to the allSheets array.
e. After the completion of the for loop, call the displayThumbs() function.
8. Create the displayThumbs() function. The purpose of this function is to display thumbnail images of each style sheet design from the allSheets array. Add the following commands to the function:
a. Create an element node for the figure element and store it in the figBox variable.
b. Set the id of the figBox element node to the text string thumbnails.
c. Loop through each item in the allSheets array, and do the following for each item:
i) create an element node for the img element and store it in the sheetImg variable;
ii) set the source of the sheetImginline image to the file title_small.png, where title is the title value of the current style sheet in the loop; iii)set the title attribute of the inline image to match the title attribute of the current style sheet;
iv) add an onclick event handler to the inline image to run the showSheet() function when clicked; and
v) append sheetImg to the figBox node.
d. After the for loop has completed, append the figBox node to the document element with the id main.
9. Create the showSheet() function. The purpose of this function is to change the style sheet used in the document. Add the following commands to the function:
a. Declare the variable sTitle, setting it equal to the title attribute of the inline image that called the showSheet() function. (Hint: Use the this keyword to reference the inline image.)
b. Loop through all of the sheets in the allSheets array. Enable the style sheet whose title attribute equals sTitle and disable all of the others.
10. Document your work with descriptive comments throughout your code.11. Save your changes to the file, and then open accents.htm in your Web browser. Verify that five inline images have been added near the bottom of the Web page. Click each thumbnail image and verify that it loads a different style sheet. (Note: If you are using Safari for Windows or Macintosh Version 5.1.2, this style sheet switcher will not work.)
12. Submit your completed files to your instructor, in either printed or electronic form, as requested.
Learn More -
WBG310 Week 3 Lab Interactive Web Page Scripting with Lab
Regular Price: $15.00
Special Price $12.00
WBG310 Week 3 Lab Interactive Web Page Scripting with Lab
Scenario/Summary
Using the skills acquired in the tutorials from Chapter 5, build a web page of your own design that has jQuery-programmed event handlers. Find errors and omissions in existing files and repair them to function correctly.Deliverables
W3iLab_1.html. Zip the file and submit your assignment.Lab Steps
STEP 1: Open the Template
Open jsTemplate.html from Week 1.
Save the file as w3_Lab3.html.STEP 2: Collect jQuery Library File
Use the link to jQuery at Google as shown here, and as described in the week lesson:
<script src="https://code.jquery.com/jquery-3.5.1.js"></script>
...or, download the current jQuery library file from https://jquery.com/download/ (https://jquery.com/download/) and place the file in the _js folder.
Note: You may need to right-click on the download link an and then select "Save Link as...", or "Download Linked File as . . ." depending on your browser.STEP 3: Set the Source for the Library File
1. If you download your own copy, create a set of script tags above the current script tag set, and set the src to the library file in Step 2.STEP 4: Create jQuery Functions for Events
1. Set an id="p1" for the first paragraph <p>.
2. Create the document ready function for your page as explained in the text in Chapter 4.
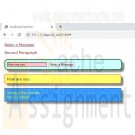
3. Within the document function, create an event handler that will append the contents of the ‘more’ div tag with the message ‘You Clicked!’. Include a line break. The expected results are pictured below.STEP 5: Create jQuery Functions for Events
1. Create a textbox inside the form. Name the new input element with id=“box1”
2. Create a function that changes the background color of the box to light blue when the box gains the focus.
3. Create a function that changes the background color of the box to pink when the box loses the focus. Hint: Blur.STEP 6: Create jQuery Functions for Events
1. Create a button next to the textbox on the form. Make the button read, ‘Relay a Message.’
2. Create a function that appends the contents of the results DIV when clicked. The message should be ‘Here is your message’ or something similar. The expected results are pictured below.STEP 7: Create jQuery Functions for Events
1. When the page loads (onload), hide the form.
2. Change the value of #p1 to ‘Relay a Message’ and make it a hyperlink with the href="#"
3. Reset the function for the paragraph click event.
Include the designation in the identifier for the anchor tag.
Have the form slide down. Use the ‘slow’ modifier.
4. In the button click event, reset the message to come from the textbox. Hint: Use .val() to collect the user input. Include a line break with the message. The expected results are pictured below.STEP 8: Prep for Turn-In
Learn More
1. When your application functions as expected, zip the file submit your assignment.
8 Item(s)
Grid List

You have no items in your shopping cart.
