Search results for 'DBM 460'
-

DBM 405A Lab 3 Database Creation and Table Manipulation
Regular Price: $15.00
Special Price $12.00
DBM 405A Lab 3 Database Creation and Table Manipulation
I. OBJECTIVES
1. Understand and become familiar with Table Manipulation.II. PARTS LIST
1. EDUPE Omnymbus Environment (https://devry.edupe.net:8300); and/or
2. MySQL (dev.mysql.com/downloads).III. PROCEDURE
By now you have set up either the Omnymbus environment or the MySQL Server Community environment, or both. You may do the labs in this class on your own computer equipped with MySQL or you may use the MySQL environment hosted by the vendor Omnymbus. You may even use both.Lab Procedure Continued (common to both environments)
Learn More
1. Add a table named "Season" to your Baseball database, which consists of the following fields:
a. Season (Integer)
b. PlayDate (date)
c. HomeTeam (character 5)
d. HomeTeamScore (Integer)
e. AwayTeam (character 5)
f. AwayTeamScore (Integer)
2. Populate the table with 56 unique games where each plays the other 7 twice (once as the home team and once as the away team). Make the season equal to this year. Leave the scores blank and use any date for the PlayDate.
3. Create another table called "PastSeasons" by copying the structure of the table "Season" and copying all the data from "Season" into the new table.
4. Replace the Season field in the table Season with next year for all records.
5. Unload the Season table data to a comma-delimited file.
6. Load the comma-delimited file to PastSeasons table, appending the data to the data that is already there. -
DBM 405A Lab 2 SQL Review
Regular Price: $15.00
Special Price $12.00
DBM 405A Lab 2 SQL Review
I. OBJECTIVES
1. Get access to a MySQL environment.
2. Familiarize yourself with the environment.II. PARTS LIST
3. EDUPE Omnymbus Environment (https://devry.edupe.net:8300); and/or
4. MySQL (dev.mysql.com/downloads).III. PROCEDURE
You may do the labs in this class on your own computer equipped with MySQL or you may use the MySQL environment hosted by the vendor Omnymbus. You may even use both.Using MySQL on your own computer means downloading a version from dev.mysql.com/downloads and installing the database engine on your computer. This can be done easily and there are a number of resources on the web to help you with this process.
You may also use the MySQL environment hosted by Omnymbus by logging in with your credentials to https://devry.edupe.net:8300.
Using the first approach will give you experience writing programs on a desktop computer and accessing a database. Using the second approach will give you experience writing applications that access a database in a cloud environment.
You are encouraged to use both approaches.
In the previous lab (Week 1), you have established a database environment (either MySQL Community Server or the Omnymbus environment). You may continue to use that environment or you my return to Week 1 to set up the alternate environment.
Lab Procedure Continued (common to both environments)
Learn More
1. Use the database named “Baseball” created in last week’s lab.
2. Use the table named “Teams” which consists of the following fields:
a. TeamCode (character 5)
b. TName (character 20)
c. TAddress (character 30)
d. TCity (character 20)
e. TState (character 2)
f. TZip (character 9)
g. Wins (integer)
h. Losses (integer)
3. You should have a table with 8 teams.
4. Use the table named “Players”, which consists of the following fields:
a. FirstName (character 20)
b. LastName (character 30)
c. MidInit (character 1)
d. PAddress (character 30)
e. PCity (character 20)
f. PState (character 2)
g. PZip (character 9)
h. Phone (character 11)
i. Team (character 5)
5. You should have a table with 80 players (10 on each team). Players are identified by the Team field which matches the TeamCode in the Teams table.
6. Demonstrate the use of the WHERE clause by selecting and displaying only the players from one team.
7. Demonstrate the use of the COUNT function by determining how many players are on each team and displaying the results.
8. For each City, find the number of players who list their home in that city.
9. Demonstrate the ORDER BY clause by listing all the players in alphabetical order by last name within Team. -

DBM 405A Lab 1 SQL Review
Regular Price: $15.00
Special Price $12.00
DBM 405A Lab 1 SQL Review
I. OBJECTIVES
a. Get access to a MySQL environment.
b. Familiarize yourself with the environment.II. PARTS LIST
1. EDUPE Omnymbus Environment (https://devry.edupe.net:8300); and/or
2. MySQL (dev.mysql.com/downloads).III. PROCEDURE
You may do the labs in this class on your own computer equipped with MySQL or you may use the MySQL environment hosted by the vendor Omnymbus. You may even use both.Using MySQL on your own computer means downloading a version from dev.mysql.com/downloads and installing the database engine on your computer. This can be done easily and there are a number of resources on the web to help you with this process.
You may also use the MySQL environment hosted by Omnymbus by logging in with your credentials to https://devry.edupe.net:8300.
Using the first approach will give you experience writing programs on a desktop computer and accessing a database. Using the second approach will give you experience writing applications that access a database in a cloud environment.
You are encouraged to use both approaches.
Desktop MySQL Environment
1. Download the MySQL Community Server from the http://dev.mysql.com/downloads/ website.
2. Install MySQL on your computer.
3. Open the MySQL Environment on your computer.Omnymbus Environment
1. Login to the MySQL Omnymbus Environment by following the instruction located in Doc Sharing (document titled “Login MySQL Omnymbus Environment”).Lab Procedure Continued (common to both environments)
1. Create a database named “Baseball”.2. Create a table named “Teams” and add the following fields:
a. TeamCode (character 5)
b. TName (character 20)
c. TAddress (character 30)
d. TCity (character 20)
e. TState (character 2)
f. TZip (character 9)
g. Wins (integer)
h. Losses (integer)3. Populate the table with 8 teams.
4. Create a table named “Players” and add the following fields:
a. FirstName (character 20)
b. LastName (character 30)
c. MidInit (character 1)
d. PAddress (character 30)
e. PCity (character 20)
f. PState (character 2)
g. PZip (character 9)
h. Phone (character 11)
i. Team (character 5)5. Populate the table with 80 players (10 on each team). For the team, use the TeamCode from the first table to identify the Team the player is on.
Learn More
6. Display or list the data from both table to the screen or printer. -
DBM 502 WEEK 5 Protecting Database
Regular Price: $15.00
Special Price $12.00
DBM 502 WEEK 5 Protecting Database
Learn More
Password protect the database you created for your individual assignment in Week Three.
Create a CRUD matrix to indicate the permissions (read, insert, delete, modify) you would grant to different users of your database.
Create at least two different users and implement their permissions using SQL statements.
Submit the following deliverables to your instructor:
The command(s) to protect your entire SQL Server database
The matrix (categories of users are rows, categories of data are columns, and R, I, D, and/or M in the cells)
The SQL code for creating logins and 2 specific users from your matrix
The SQL code for granting appropriate permissions to your 2 new users -

ITS407 Module 8 Project Ace Software MySQL Database For Mom and Pop Johnson video store
$25.00ITS407 Module 8 Project Ace Software MySQL Database For Mom and Pop Johnson video store
You are a database consultant with Ace Software, Inc., and have been assigned to develop a database for the Mom and Pop Johnson video store in town. Mom and Pop have been keeping their records of videos and DVDs purchased from distributors and rented to customers in stacks of invoices and piles of rental forms for years. They have finally decided to automate their record keeping with a relational database.
You sit down with Mom and Pop to discuss their business, and watch their operation for about a week. You discover quickly that a video and a DVD are both copies of a movie kept in a separate plastic case that is rented out. They have several copies of each movie they rent, therefore there are several videos and DVDs for each movie title. You learn that in their inventory they have several thousand videos and DVDs, which they get wholesale from about a half dozen distributors. The video and DVD prices to them are based on the quantity of their shipment and the past business they have done with each company.
The price of a DVD for a movie might be different than the price of a video for the same movie, even from the same distributor. Each distributor provides different types of movies (e.g., suspense, horror, mystery, comedy, etc.). A single distributor may provide several different types of movies in both video and DVD format. It is possible to obtain the same movie from multiple distributors and at different wholesale prices.
Each video and DVD has a unique identification number that Mom and Pop assign in their inventory, in addition to the distributor's serial number for the item. Each movie also has a unique identification number Mom and Pop assign in addition to the title and any movie IDs the distributors use in their electronic catalogs. Distributors provide electronic catalogs to Mom and Pop, and the information from these catalogs must be included in the database.
Mom and Pop need to record when a video or DVD is rented, when a video or DVD is returned, and all customer charges such as late and damaged fees, failure to rewind fees, and taxes. They need a report of which videos are returned late because there are standard and late charges. On occasion there are discount prices for certain movies or types of movies. Customers want to rent movies based on actors or actresses, running length, type of movie, rating, year released, the director, and the Academy Awards won (by the movie, the actors, the actresses and/or the directors). Customers also want to know how many videos they have rented in the last month, year, and so forth. Mom and Pop need to keep only basic information on customers in their database, such as name, address, telephone numbers, etc.
There must be no limit to the number of video and/or DVD copies of a movie that Mom and Pop can have in their inventory. Video/DVD ID numbers, movie ID numbers, and distributor ID numbers for videos, DVDs, and movies are all different. Also, each movie must be able to have an unlimited number of actors, actresses, directors, and Academy Awards (i.e., Oscars). Other types of awards (e.g., Golden Globe, People's Choice, etc.) are not of interest for this application. The rental of equipment, sale of videos, DVDs, popcorn, etc., is not to be kept in the database.
1) Identify and describe the entities and their attributes.
2) Develop relationship sentence pairs.
3) Draw an ERD with Visio.
4) Develop metadata from the ERD and document in an Excel spreadsheet.
5) Using your selected RDBMS (SQL Server, Oracle, or MySQL), develop and execute an SQL script file of DDL SQL to create the database tables in the metadata document.
6) Using your selected RDBMS, develop and execute an SQL script file of DML SQL INSERT statements to populate the tables using SQL INSERT statements for at least 5 rows of data per table.
7) Using your selected RDBMS develop and execute an SQL script file to:
a) Show the contents of all tables
b) Retrieve all of the customers' names, account numbers, and addresses (street and zip code only), sorted by account number
c) Retrieve all of the DVDs rented in the last 30 days and sort in chronological rental date order
d) Update a customer name to change their maiden names to married names. You can choose which row to update. Make sure that you use the primary key column in your WHERE clause to affect only a specific row.
e) Delete a specific customer from the database. You can choose which row to delete. Make sure that you use the primary key column in your WHERE clause to affect only a specific row.The metadata should be submitted in an Excel spreadsheet. All other outputs for the database design, SQL code, and SQL results should be submitted in a single Word file in order, by step, and clearly labeled.
Learn More -
CMIS 420 Homework Assignment 3 Advanced Relational Database Concepts and Applications
$20.00CMIS 420 Homework Assignment 3 Advanced Relational Database Concepts and Applications
Learn More
Homework Task 1:
Create a PL/SQL block to complete the followings.
Output the cheapest movie information. You can use the view you created in project 1 - task 1
In your block, referential type should be used to receive the cursor return.
Use DBMS_OUTPUT to output your result.
Possible Exception should be handled in exception handling section. You are not required to use user-defined exception. Use Oracle predefined exception. When exception occurs, you need to output error code and error message.
Spool the output to a text file. Don't forget to use "Set serveroutput on"
Submit your code as .sql file and spooled output
Homework Task 2:
Create a stored procedure based on task 1 with an input parameter movie_id. Modify your cursor to use movie_id to select desired movie information. And execute the procedure and spool the execution result.
Spool the output to a text file. Don't forget to use "set serveroutput on"
Submit your code as .sql file and spooled output
Homework Task 3:
Create a statement trigger on orders table. The trigger fires after updating the table. When the trigger fires one record insert into the following temp table using the insert statement shown below:
Note: you need to create temp_table and its sequence using the following code.
PROMPT creating table temp_table ...............
DROP TABLE temp_table;
CREATE TABLE temp_table
( num_col NUMBER(5) not null primary key,
char_col VARCHAR2(30),
date_col VARCHAR2(30));
PROMPT creating SEQUENCE trigger_seq ...............
DROP SEQUENCE trigger_seq;
CREATE SEQUENCE trigger_seq
START WITH 1
INCREMENT BY 1;
INSERT INTO temp_table (num_col, char_col, date_col)
VALUES (trigger_seq.NEXTVAL, 'After Statement trigger', TO_CHAR(sysdate, 'DD-MON-YYY HH24:MI:SS'));
Submit your code as .sql file
Homework Task 4:
Create a row trigger on order_items table to fire after inserting the data into order_items table. When the trigger fires it inserts a record into temp_table using the following insert statement:
INSERT INTO temp_table (num_col, char_col, date_col)VALUES (trigger_seq.NEXTVAL, 'After Row Trigger', TO_CHAR(sysdate, 'DD-MON-YYY HH24:MI:SS'));
Submit your code as .sql file
Homework Task 5:
Test your triggers.
Update orders table to set total payment to 300. fire statement trigger on orders table.
Insert one record into order_items. Fire row trigger on order_items table.
Query temp_table to get the inserted records for trigger firing.
Spool the output to a text file and submit it. -

DBM 405 Lab 7 Study Case Front-End GUI
$20.00DBM 405 Lab 7 Study Case front-end GUI
Learn More
Scenario/Summary
The More Movies company has hired you to redesign a database system for them that can facilitate the process of renting out and returning movies.
They already have an Oracle database that stores information about movies, members who rent the movies, and the rentals. This is the database that you already have become familiar with and the one which includes tables: MM_MOVIE, MM_MOVIE_TYPE, MM_MEMBER, MM_RENTAL, and MM_PAY_TYPE. The machine on which this database is running has both the server and client Oracle9i software installed on it. Every night, a clerk updates data to account for the day's activities, and periodically the reports are run to summarize business, show renting trends, etc. Access to the database is accomplished using a SQL*Plus environment that is very similar to the iSQL*Plus that you know from the previous database course. This business process worked okay for as long as More Movies stayed a very small business.
However, the company has grown substantially, expanding its operations to more movie selection and more members, and consequently, it has moved to a larger location. It occupies a two-story shop now. It became very impractical to record rentals at the end of the day. They also do not want to rely on clerks knowing any SQL programming in order to record updates and run reports.
In short, there is a need for a more convenient database system. The machine on which the database is currently running is powerful enough to host the database server. The database should be accessible from four checkout stations that process renting out and returning movies. This system should have an easy-to-use graphical user interface access.
For the lab, you will be creating several documents to be submitted for the lab. Be sure that you save the documents with your last name and lab7 in the file name. Place all documents into a single ZIP file and submit for grading.
LAB STEP
Step 1:
Describe what software you propose to use to develop the front-end GUI application for the new system. Be sure to justify your choice. Keep in mind portability, ease of use, scalability, and ability to update. What other options have you considered?
Step 2:
In setting up the servers and environment, do you propose to use middleware? If so, what kind, and where would you deploy it?
Step 3:
Provide a system diagram of the proposed system. Be sure to include such things as servers (application and database), user clients, and any other special pieces to the puzzle that you might think of.
Step 4:
Provide a detailed design of the GUI screen that facilitates renting out and returning movies. For every button, or other component that provides reaction to user's events, give detailed pseudocode. Also, clearly indicate where you would use any of the PL/SQL code that you developed for the labs in this course. If the application platform you have selected does not support PL/SQL then describe how you would take the processing developed in the procedures and functions and incorporate it into the system.
This concludes the Lab for Week 7. -
DBM 405 Lab 2 Simple PL/SQL Applications Advanced Database Oracle
$20.00DBM 405 Lab 2 Simple PL/SQL Applications Advanced Database Oracle
Learn More
Scenario/Summary
The purpose of this week's lab is to work with basic PL/SQL syntax to create an anonymous block of code. In the lab, you will be using SQL*Plus to modify one of the tables in the MovieRental schema and then write a simple block of code to update the table with some new data and then execute the code in SQL*Plus. As an additional task in the lab, you will be asked to modify the existing PL/SQL block of code given to you to add exception handling and then execute it in SQL*Plus. Both of these concepts will help enforce the material covered in this second week.
For the lab, you will need to create a script file containing the PL/SQL code that will address the lab steps below. Run the script file in your SQL*Plus session using the SET ECHO ON session command at the beginning to capture both the PL/SQL block code and output from Oracle after the block of code has executed. To successfully test the code in Step 3, you will need to copy/paste your code into SQL*Plus for each movie ID as you change the value for the host variable. Spool your output to a file named with your last name plus lab 2 and give the file a text (.txt) extension. For example, if your last name was Johnson then the file would be named johnson_lab2.txt. Submit both the spooled output AND the script file for grading of the lab.
LAB STEP
Step 1:
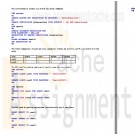
As business is becoming strong and the movie stock is growing for More Movie Rentals, the manager wants to do more inventory evaluations. One item of interest concerns any movie for which the company is holding $75 or more in value. The manager wants to focus on these movies in regards to their revenue generation to ensure the stock level is warranted. To make these stock queries more efficient, the application team decides that a column should be added to the MM_MOVIE table named STK_FLAG that will hold a value '*' if stock is $75 or more. Otherwise, the value should be NULL. Add the new column to the MM_MOVIE table as a CHAR data type.
Execute a DESC MM_MOVIE on the table both before you add the new column and after the column is added.
Note: Since this is code will be in your script file, you will need to comment it out after the first time you have execute the ALTER TABLE statement successfully to avoid getting errors each additional time your script file is run.
Step 2:
Create an anonymous block of PL/SQL code that contains a CURSOR FOR loop to accomplish the task described above in Step 1. Your loop will need to interrogate the value (using an IF statement) found in the movie_qty field of the cursor loop variable to see if it is >= 75. If this is true then you will need to update the new column in the table with an '*' WHERE CURRENT OF the table. If the quantity is not >= 75 (the ELSE side of the IF statement) then update the new column with a NULL.
Execute a SELECT * from MM_MOVIE both before and after you execute the new PL/SQL block of code to show that the process works.
Step 3:
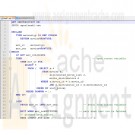
Here is a block that retrieves the movie title and rental count based on a movie ID provided via a host variable.
SET SERVEROUTPUT ON
VARIABLE g_movie_id NUMBER
BEGIN
:g_movie_id := 4;
END;
/
DECLARE
v_count NUMBER;
v_title mm_movie.movie_title%TYPE;
BEGIN
SELECT m.movie_title, COUNT(r.rental_id)
INTO v_title, v_count
FROM mm_movie m, mm_rental r
WHERE m.movie_id = r.movie_id
AND m.movie_id = :g_movie_id
GROUP BY m.movie_title;
DBMS_OUTPUT.PUT_LINE(v_title || ': ' || v_count);
END;
/
Modify the block of code to add exception handlers for errors that you can and cannot anticipate. You will need to execute the entire code listing shown above each time you wish to test it by changing the value of :g_movie_id for each test.
Once finished, test your exception handling by running the modified block for the following values of :g_movie_id. Be sure that you can capture the value in the :g_movie_id host variable.
• 12 - normal output will display title and number of rentals
• 13 - exception - there is no movie ID for 13
• 1 - exception - Movie with ID 1 has never been rented
This concludes the Lab for Week 2. -
DBM 405 Lab 1 SQL Review Advanced Database Oracle
$20.00DBM 405 Lab 1 SQL Review Advanced Database Oracle
Learn More
Scenario/Summary
The purpose of the first week's lab is to review the SQL language, and familiarize you with the database example that we will use in labs through this course. If you have not done it yet, please download the MovieRentals.SQL file to your computer from Doc Sharing. This script file will need to be run once logged into your Oracle user account to create the tables and data that will be used for this lab and subsequent labs in the course.
Setting up your environment:
Before attempting Lab 1, you need to be sure you have read through the SQL*Plus tutorial which can be found in Doc Sharing as well as under the SQL*Plus Tutorial tab in Week 1. This tutorial describes the functionality of the editor and will step you through the process of setting up and using the SQL*Plus in the iLab environment so that it will best serve your needs for the remainder of the labs required for this course. Once you have logged into Oracle through iLab then execute the MovieRental.SQL script and create the tables and data for the lab.
For the lab, you will need to create a script file containing the eight queries that will address the lab steps below. Run the script file in your SQL*Plus session using the SET ECHO ON session command at the beginning to capture both the query and result set. Spool your output to a file named with your last name plus lab 1 and give the file a text (.txt) extension. For example, if your last name was Johnson then the file would be named johnson_lab1.txt. Submit both the spooled output AND the script file for grading of the lab.
LAB STEP
Step 1:
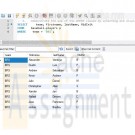
Within SQL*Plus, list names of the tables that you have created whose name starts with MM (Hint: use data dictionary view USER_TABLES).
Step 2:
Use DESCRIBE (in short: DESC) command in SQL*Plus for each of these tables to show columns and their datatypes.
Step 3:
Use SELECT * command to display all data from each of the tables in the MoreMovies schema. Make sure that the LINESIZE and PAGESIZE have large enough values, and that you format columns so that the report looks good. You should end up with five queries and result sets.
Step 4:
Using the mm_movie and mm_movie_type tables, write a query that will list all movie categories together with the count of movies in each category. Give the column with the count in it a meaningful name such as IN STOCK.
Step 5:
Using the mm_movie and mm_rental tables, write a query that will list titles and checkout dates for all movies that were signed out by Wild Coyote (MEMBER_ID=13).
Step 6:
Using the same two tables used in Step 5, write an SQL sub-query that will list all movies (movie ids and titles) of all movies that have never been rented.
Step 7:
Using the mm_member and mm_rental tables, write a query that will list all members (member ID, first name, and last name) and the number of movies they have rented, for all members who have rented at least one movie. Order the result set so that it shows the largest number of movies rented as the first row.
Step 8:
Write a query that will display the largest number of movies rented by one member and that member's name. Give the output column a meaningful name such as MAXIMUM NUMBER.
Step 9:
Using the mm_member and mm_rental tables, write a query that will display member ID, last name, first name, and the number of movies rented for each member. Give the column with the number of movies rented a meaningful name such as NUMBER RENTED.
Step 10:
Using the mm_member, mm_movie and mm_rental tables, write the query that will prepare a report that shows who rented which movie. Use member names (first and last) and movie title rather than the corresponding IDs. Order the report by member names, and for a single member by the movie titles.
This concludes the Lab for Week 1. -

DBM 405 Lab 6 Reading and Writing to External Files
$20.00DBM 405 Lab 6 Reading and Writing to External Files
Learn More
Scenario/Summary
This week, we are going to make a change to the processing in our schema by altering one of the procedures contained in the package previously created. At this point, we have dealt with procedures that required us to pass parameter values each time the procedure was executed. This type of processing greatly limits the ability to process large amounts of data efficiently. The lab this week will introduce you to a couple of the procedures contained in the UTL_FILE package that is part of Oracle's group of built-in packages. By using the GET_LINE and PUT_LINE procedures contained in UTL_FILE, you will be able to process multiple records from a file and create a results report on the events performed by your movie rental procedure with one call to execute the procedure.
For the lab, you will need to create a script file containing the PL/SQL code that will address the lab steps below. Run the script file in your SQL*Plus session using the SET ECHO ON session command at the beginning to capture both the PL/SQL block code and output from Oracle after the block of code has executed. You will only need to recompile both the package specifications and the package body since you will be making a change to the movie_rental_sp procedure in the specifications. You will be running tests to verify that the changes to your procedure are working as they should. Spool your output and name your files with your last name plus lab 6 and give the file a text (txt) extension. For example, if your last name was Johnson then the file would be named johnson_lab6.txt. Submit both the spooled output files AND the script file for grading of the lab.
IMPORTANT: Before beginning the lab, you will want to refresh the tables in your schema by running the movierental.sql script.
LAB STEP
Step 1: Setting Up Your Environment
Before you can effectively use the procedures in UTL_FILE to work with external files for this lab, you will need to set up your environment. The first step of this process will involve creating a directory folder under the R: drive which is the mapped drive for DBM405. The second part of the process will involve creating the Directory Object in Oracle to point to this folder. To accomplish this task, please follow the steps listed here.
1. Create the directory folder (You can refer to the SQL*Plus Tutorial in Week 1 for visuals of this process).
• First, log into the iLab and open up your Oracle folder. Next, open Windows Explorer and expand the R: drive tree.
• Under the R: drive, create your own folder by selecting File/New/Folder from the main menu bar. Name your folder using a unique name such as DBM405_lastname_lab6 or some other unique name. Make sure that there are no other folders under the R: drive with the same name as yours. You are the only person who has access to your folder, but the name must be unique.
2. Create the Directory Object.
• In Windows Explorer (the one in the Oracle folder in the iLab), you want to take note of the path name for the R: drive. It will be DBM405\ followed by the session you are in. For example, if you are in Spring A, the path would be DBM405\SPRINGA, or if Spring B, it would be DBM405\SPRINGB. This is important because this will be used to define the path for the Directory Object. Remember that the R: drive is really mapped to the Oracle server F: drive.
• Start up a session in SQL*Plus and log into your user schema.
• Use the following SQL command to create the Directory Object that you will use for this lab.
Create or Replace Directory DBM405_YOURNAME_DIR As 'F:\DBM405\session\YourFolderName';
IMPORTANT: Replace the word YOURNAME with your actual last name, the word session with the session name found in the path for the R: drive (see first bullet above), and the word YourFolderName with the name of the folder you created in Part 1 above. For example, if your last name were SMITH and you were taking this course is Spring session A and the folder you create was named DBM405_SMITH_lab6, the statement would be:
Create or Replace Directory DBM405_SMITH_DIR As 'F:\DBM405\SPRINGA\DBM405_SMITH_LAB6';
3. Set up the data file.
• Download the file "movierentaldata.txt" from Doc Sharing and place this file in the directory folder you created above in Part 1.
You have now set up Oracle to work with the procedures in UTL_FILE that we will use for this lab.
Step 2: Changing the Package Specifications
We are now ready to start updating the package that we modified in Lab 5 so that it will allow us to read a file and make changes to the database. To do this, we will need to make changes to the parameter list of the MOVIE_RENT_SP procedure to reflect a new process. Since we will be changing the parameter list, we will need to make changes to the Package Specifications as well as to the Package Body.
For the change to the Package Specifications, you will need to define a parameter for the Directory Object, one for the input file, and one for an output file that will be used for a verifications report. Each of these parameters can be defined as VARCHAR2 data types.
Step 3: The DECLARE (IS) Section of the Procedure
Now, we can move on to the Package Body and the MOVIE_RENT_SP procedure itself. The first thing you want to do is make sure that the parameter list in the procedure matches the parameter list that you just changed in the Specifications in Step 2. The two parameter lists must match exactly or you will get errors when trying to compile the Package Body.
When you read in the file, you will need several variables to handle both the record and the various pieces of data in the record. When the record is read in, you will need to substring each piece of data from the record into a variable which then can be used like you were using the parameters before. To keep from having to make numerous changes in the code, you might want to consider using the actual parameter names from your parameter list in the code from Lab 5. For example, if the parameter name for the movie ID was P_MOVIE_ID then you would create a variable named P_MOVIE_ID. Each of the variables for movie ID, member ID, and payment method can be cast to the data type in the MM_RENTAL table. For example:
p_movie_id mm_rental.movie_id%TYPE;
You will also need a variable to hold the record data that will be read in and a variable to hold record data that will be written out. Check the length of the data in the movierentaldata.txt file to determine the length for the input data variable. For the output data variable, you can use your own judgment, but using VARCHAR2(80) would probably be more than adequate.
The last thing you will need to add is a variable to act as the handle for the input record and one for the output record. Remember that the name for these is not important, but they must be based on the FILE_TYPE data type.
Step 4: Opening the Files
Now, we move to the body of the code and the BEGIN section. The first thing that needs to happen is to open both the files. Remember that we are going to set up our processing just like we would any IPO logic, i.e., we need to open the files, read a record, process the data, read the next record, and repeat this process until there is no more data.
To accomplish this first step of opening the files, you will need to initialize the two variables you declare to handle the files. For the input file, you will need to use the FOPEN program. Remember that you have to pass this program three variables: the name of the parameter for the directory object, the name of the parameter for the input file, and the mode the file is to be in. For the input file, the mode needs to be "r", and for the output file, the mode needs to be "w".
An example of what your code might look like can be found in the lecture material for this week.
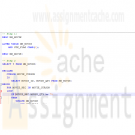
Step 5: Setting Up the LOOP
Since our code in its current format is designed for only one set of input values (remember that in previous labs we were using an EXECUTE command and then passing data to the procedure) and we now want to process multiple records of data, we need to make a change to the overall structure of the code. We need to put all of the processing in the body of the procedure after the files are opened into a basic LOOP using the LOOP/END LOOP commands. Also, we will need a new BEGIN section inside this LOOP that all of the existing code will go into. The basic structure of body of your code should look like the following when you complete this step.
BEGIN
open files
LOOP
BEGIN
file processing
BEGIN
existing process to increment rental_id
EXCEPTION
END
EXCEPTION
END
END LOOP
END
Step 6: Setting Up the File Read and Process
Now, we need to get our data record so that we can process the data brought into the program. To do this, we need to read a record using the GET_LINE program in UTL_FILE. This involves using the UTL_FILE.GET_LINE process while passing the file handle variable and input record variable to the GET_LINE program.
Once the record is in the input variable, we then need to parse out the individual pieces of data (movie ID, customer ID, and payment method) from the record using the SUBSTR function. Remember that the parameters for the SUBSTR function are the record variable name, the value for the first byte of data we want to pull, and the length of the data. For example, to get the movie ID from our record, the code might look like the following.
p_movie_id := SUBSTR(v_rental_record, 1, 2);
This would pull two bytes of data from the data record and put them in the variable p_movie_id. Now we can use the variable in our code that follows to see if that movie ID exists in the mm_rental table. You will need to repeat the process above for the member ID and the payment method. Do all three together between the line of code that reads the file and the first SELECT statement.
Step 7: Setting Up the Output Process
If you have used the same names for your three data variables that you used for the original parameter names in the previous lab then you should not have to make any changes at all to any of the SELECT statements or the INSERT statement in the main body of code. Now, we need to set up the processing that will create the output data that will go into our output validation record. To do this, you will be using the PUT_LINE program within UTL_FILE.
There are going to be six different places you will want to write out a record. The first will be after the insert statement when a new rental record is added to the mm_rental table. To create this output line you can concatenate variables and character strings together to create the data record. For example, to create an output line that would read "Rental record 13 for member 10 has been added" after the new record has been inserted, you would use code similar to the following (keep in mind that your variable names might be different).
v_report_record := 'Rental record '||v_rental_id||' for member '||p_member_id||
' has been added';
UTL_FILE.PUT_LINE(v_report_filehandle, v_report_record);
This same type of process and format will need to be repeated for each exception handler that in the previous lab used the DBMS_OUTPUT.PUT_LINE package and procedure. In these cases, your output line is already formatted and set, you just need to replace the DBMS_OUTPUT.PUT_LINE with the initialization of your output record and then add the UTL_FILE.PUT_LINE code.
Step 8: Getting Out of the LOOP and Closing the Output File
There is one final step that has to be taken care of before you can start testing your code. Since we are reading a record file within a LOOP we need to be able to EXIT out of the loop after the last record has been processed. To do this you will need to add a NO_DATA_FOUND exception to your main exception handling section. This exception handle must be added before the WHEN OTHERS exception handle (remember, that on has to be last). This exception handle will have three pieces to process.
The first will be some form of message stating that all the records have been processed and this is the end of the report, i.e., ALL RECORDS PROCESSED - END OF REPORT. The second piece will be a line that will close the output file using UTL_FILE.FCLOSE. The only parameter you will need to pass is the name of the output file variable. This must be done or your output file will not have any data in it. The third thing will be the word EXIT which will tell the program to exit out of the loop.
You are now ready to compile your package specifications (must be done first) and then the package body. Debug any errors you might have and then run your test.
Step 9: Testing Your New Procedure
For this lab, you only need to test the MOVIE_RENT_SP procedure of the package. To do this, enter an EXECUTE command for the package.procedure and pass the name of your Directory Object, input file name, and output file name to the procedure. IMPORTANT: The Directory Object name MUST BE IN UPPERCASE! This is the way it is stored in the data dictionary in Oracle and if it is not in uppercase, an error will be generated. Your call to the new procedure should look similar to the following.
execute MM_RENTALS_PKG.movie_rent_sp('DBM405_SMITH_DIR','movierentaldata.txt','rentalreport.txt');
The output in your output file should look similar to the following (the wording may be different but the processes recorded should be the same).
There is no movie with id 13. Cannot proceed with rental.
There is no member with id 20. Cannot proceed with rental.
There is no payment method with id 7. Cannot proceed with rental.
Rental record 13 for member 10 has been added.
Movie id 5 is not available at this time. Cannot proceed with rental.
This concludes the Lab for Week 6.
Currently Shopping by:
- Category: Database Remove This Item
Shopping Options
- Category
-
- Oracle (15)
- ERD (8)
- MS Access (12)
- SQL (3)
- SQLServer (3)
- MySQL (1)
- DBM-405A Advanced Database with Lab (10)
- DBM380 Database Concepts (7)
- DBM381 Database Concepts Assignment Help (4)
- DBM502 Database Management Assignment Help (5)
- DBM261 Advanced Desktop Databases Assignment Help (2)

You have no items in your shopping cart.
